使用Java API连接和操作HBase数据库
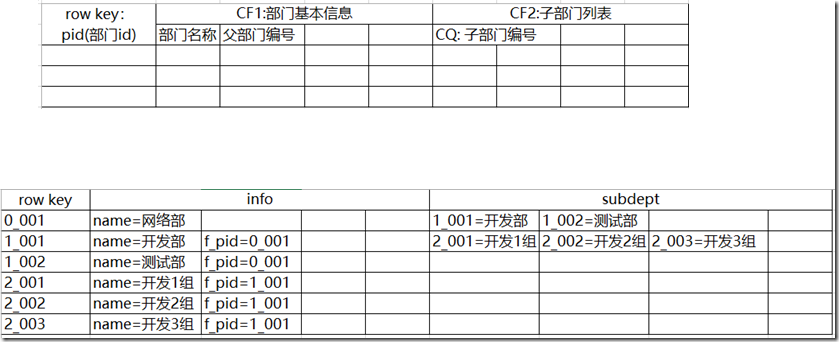
创建的数据库存储如下数据

表结构
java代码
  1

  2 public class HbaseTest {

  3

  4 	/**

  5 	 * 配置ss

  6 	 */

  7 	static Configuration config = null;

  8 	private Connection connection = null;

  9 	private Table table = null;

 10

 11 	@Before

 12 	public void init() throws Exception {

 13 		config = HBaseConfiguration.create();// 配置

 14 		config.set("hbase.zookeeper.quorum", "192.168.33.61");// zookeeper地址

 15 		config.set("hbase.zookeeper.property.clientPort", "2181");// zookeeper端口

 16 		connection = ConnectionFactory.createConnection(config);

 17 		table = connection.getTable(TableName.valueOf("dept"));

 18 	}

 19

 20 	/**

 21 	 * 创建数据库表dept,并增加列族info和subdept

 22 	 *

 23 	 * @throws Exception

 24 	 */

 25 	@Test

 26 	public void createTable() throws Exception {

 27 		// 创建表管理类

 28 		HBaseAdmin admin = new HBaseAdmin(config); // hbase表管理

 29 		// 创建表描述类

 30 		TableName tableName = TableName.valueOf("dept"); // 表名称

 31 		HTableDescriptor desc = new HTableDescriptor(tableName);

 32 		// 创建列族的描述类

 33 		HColumnDescriptor family = new HColumnDescriptor("info"); // 列族

 34 		// 将列族添加到表中

 35 		desc.addFamily(family);

 36 		HColumnDescriptor family2 = new HColumnDescriptor("subdept"); // 列族

 37 		// 将列族添加到表中

 38 		desc.addFamily(family2);

 39 		// 创建表

 40 		admin.createTable(desc); // 创建表

 41 		System.out.println("创建表成功!");

 42 	}

 43

 44 	/**

 45 	 * 向hbase中插入前三行网络部、开发部、测试部的相关数据,

 46 	 * 即加入表中的前三条数据

 47 	 *

 48 	 * @throws Exception

 49 	 */

 50 	@SuppressWarnings({ "deprecation", "resource" })

 51 	@Test

 52 	public void insertData() throws Exception {

 53 		table.setAutoFlushTo(false);

 54 		table.setWriteBufferSize(534534534);

 55 		ArrayList<Put> arrayList = new ArrayList<Put>();

 56

 57 		Put put = new Put(Bytes.toBytes("0_1"));

 58 		put.add(Bytes.toBytes("info"), Bytes.toBytes("name"), Bytes.toBytes("网络部"));

 59 		put.add(Bytes.toBytes("subdept"), Bytes.toBytes("subdept1"), Bytes.toBytes("1_1"));

 60 		put.add(Bytes.toBytes("subdept"), Bytes.toBytes("subdept2"), Bytes.toBytes("1_2"));

 61 		arrayList.add(put);

 62

 63 		Put put1 = new Put(Bytes.toBytes("1_1"));

 64 		put1.add(Bytes.toBytes("info"), Bytes.toBytes("name"), Bytes.toBytes("开发部"));

 65 		put1.add(Bytes.toBytes("info"), Bytes.toBytes("f_pid"), Bytes.toBytes("0_1"));

 66

 67 		Put put2 = new Put(Bytes.toBytes("1_2"));

 68 		put2.add(Bytes.toBytes("info"), Bytes.toBytes("name"), Bytes.toBytes("测试部"));

 69 		put2.add(Bytes.toBytes("info"), Bytes.toBytes("f_pid"), Bytes.toBytes("0_1"));

 70

 71 		for (int i = 1; i <= 100; i++) {

 72

 73 			put1.add(Bytes.toBytes("subdept"), Bytes.toBytes("subdept"+i), Bytes.toBytes("2_"+i));

 74 			put2.add(Bytes.toBytes("subdept"), Bytes.toBytes("subdept"+i), Bytes.toBytes("3_"+i));

 75 		}

 76 		arrayList.add(put1);

 77 		arrayList.add(put2);

 78 		//插入数据

 79 		table.put(arrayList);

 80 		//提交

 81 		table.flushCommits();

 82 		System.out.println("数据插入成功!");

 83 	}

 84

 85 	/**

 86 	 * 向hbase中插入开发部、测试部下的所有子部门数据

 87 	 * @throws Exception

 88 	 */

 89 	@Test

 90 	public void insertOtherData() throws Exception {

 91 		table.setAutoFlushTo(false);

 92 		table.setWriteBufferSize(534534534);

 93 		ArrayList<Put> arrayList = new ArrayList<Put>();

 94 		for (int i = 1; i <= 100; i++) {

 95 			Put put_development = new Put(Bytes.toBytes("2_"+i));

 96 			put_development.add(Bytes.toBytes("info"), Bytes.toBytes("name"), Bytes.toBytes("开发"+i+"组"));

 97 			put_development.add(Bytes.toBytes("info"), Bytes.toBytes("f_pid"), Bytes.toBytes("1_1"));

 98 			arrayList.add(put_development);

 99

100 			Put put_test = new Put(Bytes.toBytes("3_"+i));

101 			put_test.add(Bytes.toBytes("info"), Bytes.toBytes("name"), Bytes.toBytes("测试"+i+"组"));

102 			put_test.add(Bytes.toBytes("info"), Bytes.toBytes("f_pid"), Bytes.toBytes("1_2"));

103 			arrayList.add(put_test);

104 		}

105

106 		//插入数据

107 		table.put(arrayList);

108 		//提交

109 		table.flushCommits();

110 		System.out.println("插入其他数据成功!");

111 	}

112

113 	/**

114 	 * 查询所有一级部门(没有上级部门的部门)

115 	 * @throws Exception

116 	 */

117 	@Test

118 	public void scanDataStep1() throws Exception {

119

120 		// 创建全表扫描的scan

121 		Scan scan = new Scan();

122 		System.out.println("查询到的所有一级部门如下:");

123 		// 打印结果集

124 		ResultScanner scanner = table.getScanner(scan);

125 		for (Result result : scanner) {

126 			if (result.getValue(Bytes.toBytes("info"), Bytes.toBytes("f_pid")) == null) {

127 				for (KeyValue kv : result.raw()) {

128 				     System.out.print(new String(kv.getRow()) + " ");

129 				     System.out.print(new String(kv.getFamily()) + ":");

130 				     System.out.print(new String(kv.getQualifier()) + " = ");

131 				     System.out.print(new String(kv.getValue()));

132 				     System.out.print(" timestamp = " + kv.getTimestamp() + "\n");

133 				}

134 		}

135 		}

136 	}

137

138 	/**

139 	 * 已知rowkey,查询该部门的所有(直接)子部门信息 rowkey=1_1

140 	 * @throws Exception

141 	 */

142 	@Test

143 	public void scanDataStep2() throws Exception {

144 		Get g = new Get("1_1".getBytes());

145 		g.addFamily("subdept".getBytes());

146 		// 打印结果集

147 		Result result = table.get(g);

148 		for (KeyValue kv : result.raw()) {

149 		     Get g1 = new Get(kv.getValue());

150 		     Result result1 = table.get(g1);

151 		     for (KeyValue kv1 : result1.raw()) {

152 			     System.out.print(new String(kv1.getRow()) + " ");

153 			     System.out.print(new String(kv1.getFamily()) + ":");

154 			     System.out.print(new String(kv1.getQualifier()) + " = ");

155 			     System.out.print(new String(kv1.getValue()));

156 			     System.out.print(" timestamp = " + kv1.getTimestamp() + "\n");

157 			}

158 		}

159 	}

160

161 	/**

162 	 * 已知rowkey,向该部门增加一个子部门

163 	 * rowkey:0_1

164 	 * 增加的部门名:我增加的部门

165 	 * @throws Exception

166 	 */

167 	@Test

168 	public void scanDataStep3() throws Exception {

169 		//新增一个部门

170 		Put put = new Put(Bytes.toBytes("4_1"));

171 		put.add(Bytes.toBytes("info"), Bytes.toBytes("name"), Bytes.toBytes("我增加的部门"));

172 		put.add(Bytes.toBytes("info"), Bytes.toBytes("f_pid"), Bytes.toBytes("0_1"));

173 		//插入数据

174 		table.put(put);

175 		//提交

176 		table.flushCommits();

177

178 		//更新网络部

179 		Put put1 = new Put(Bytes.toBytes("0_1"));

180 		put1.add(Bytes.toBytes("subdept"), Bytes.toBytes("subdept3"), Bytes.toBytes("4_1"));

181 		//插入数据

182 		table.put(put1);

183 		//提交

184 		table.flushCommits();

185 	}

186

187 	/**

188 	 * 已知rowkey(且该部门存在子部门),删除该部门信息,该部门所有(直接)子部门被调整到其他部门中

189 	 * @throws Exception

190 	 */

191 	@Test

192 	public void scanDataStep4() throws Exception {

193 		/**

194 		 * 向部门"我增加的部门"添加两个子部门"

195 		 */

196 		table.setAutoFlushTo(false);

197 		table.setWriteBufferSize(534534534);

198 		ArrayList<Put> arrayList = new ArrayList<Put>();

199 		Put put1 = new Put(Bytes.toBytes("5_1"));

200 		put1.add(Bytes.toBytes("info"), Bytes.toBytes("name"), Bytes.toBytes("新增子部门1"));

201 		put1.add(Bytes.toBytes("info"), Bytes.toBytes("f_pid"), Bytes.toBytes("4_1"));

202 		Put put2 = new Put(Bytes.toBytes("5_2"));

203 		put2.add(Bytes.toBytes("info"), Bytes.toBytes("name"), Bytes.toBytes("新增子部门2"));

204 		put2.add(Bytes.toBytes("info"), Bytes.toBytes("f_pid"), Bytes.toBytes("4_1"));

205

206 		arrayList.add(put1);

207 		arrayList.add(put2);

208 		//插入数据

209 		table.put(arrayList);

210 		//提交

211 		table.flushCommits();

212

213 		/**

214 		 * 目的:删除"我增加的部门"的部门信息,该部门所有(直接)子部门被调整到其他部门中

215 		 * 使用策略:更新部门名就可以了,也就是说一个部门可能有多个rowkey

216 		 */

217 		Put put = new Put(Bytes.toBytes("4_1"));

218 		put.add(Bytes.toBytes("info"), Bytes.toBytes("name"), Bytes.toBytes("开发部"));

219 		//插入数据

220 		table.put(put);

221 		//提交

222 		table.flushCommits();

223 	}

224

225 	@After

226 	public void close() throws Exception {

227 		table.close();

228 		connection.close();

229 	}

230

231 }
使用Java API连接和操作HBase数据库的更多相关文章
- 本地eclipse java api连接远程虚拟机HBase
1.本地与远程连通 无论是域名或者ip都可以,另外需保证HBase在虚拟机集群上正常运行. 2.本地要有一个跟远程相同的hadoop环境 当然不相同,只要兼容也可以,现采用hadoop-2.5.0-c ...
- Java java jdbc thin远程连接并操作Oracle数据库
JAVA jdbc thin远程连接并操作Oracle数据库 by:授客 QQ:1033553122 测试环境 数据库:linux 下Oracle_11g_R2 编码工具:Eclipse 编码平台:W ...
- Java连接并操作SQLServer数据库
本人只需在项目中引入sqljdbc4.jar 包即可 ----------------------------------------- 在JAVA中如何连接SQL Server数据库 - hangh ...
- loadrunner 脚本开发-调用java jar文件远程操作Oracle数据库测试
调用java jar文件远程操作Oracle数据库测试 by:授客 QQ:1033553122 测试环境 数据库:linux 下Oracle_11g_R2 Loadrunner:11 备注:想学ora ...
- Python 使用Python远程连接并操作InfluxDB数据库
使用Python远程连接并操作InfluxDB数据库 by:授客 QQ:1033553122 实践环境 Python 3.4.0 CentOS 6 64位(内核版本2.6.32-642.el6.x86 ...
- JAVA API连接HDFS HA集群
使用JAVA API连接HDFS时我们需要使用NameNode的地址,开启HA后,两个NameNode可能会主备切换,如果连接的那台主机NameNode挂掉了,连接就会失败. HDFS提供了names ...
- robot_framewok自动化测试--(9)连接并操作 MySql 数据库
连接并操作 MySql 数据库 1.mysql数据库 1.1安装mysql数据库 请参考我的另一篇文章:MYSQL5.7下载安装图文教程 1.2.准备测试数据 请参考我的另一篇文章:Mysql基础教程 ...
- HBase的Java Api连接失败的问题及解决方法
分布式方式部署的HBase,启动正常,Shell操作正常,使用HBase的Java Api操作时总是连接失败,信息如下: This server is in the failed servers li ...
- java API连接虚拟机上的hbase
今天用本地的eclipse连接虚拟机上的hbase数据库,代码如下: public static void main(String[] args) throws Exception{ Configur ...
随机推荐
- 敏捷测试(4)--基于story的敏捷基础知识
基于story的敏捷基础知识----需求管理(一) 基于story进行需求管理 (1)使用story模式来管理需求,将庞大的MRD划分为一个个合适粒度,且可独立交付的story(通常每个story能在 ...
- Android轶事之View要去大保健?View大小自己决定?
-"爹,我要吃糖" -"好哒儿子" -"爹,我要吃包包" - "好哒儿子" - "爹,我要吃串串" ...
- IE11 开启F12开发人员工具中的 始终从服务器刷新
在进行页面脚本调试时,经常需要清除浏览器缓存来获取最新的脚本文件,IE11之前的浏览器版本我们可以按F12调出开发人员工具,在缓存选项中开启"始终从服务器中刷新"的设置后我们就不需 ...
- python模块:调用系统命令模块subprocess等
http://blog.csdn.net/pipisorry/article/details/46972171 Python经常被称作"胶水语言",因为它能够轻易地操作其他程序,轻 ...
- Java-instanceof总结
纸上得来终觉浅,绝知此事要躬行 --陆游 问渠那得清如许,为有源头活水来 --朱熹 instanceof其实是Java的一个二元操作符,用于判断左边的对象是否是右边这个特定的类或者它的子类的 ...
- android中的回调
1.引子 android中的回调最经典的就是点击事件设置监听(一般通过switch(v.getId()))这里写个最基本的 btn_rigister.setOnClickListener(new Vi ...
- AngularJS进阶(一)深入理解ANGULARUI路由_UI-ROUTER
深入理解ANGULARUI路由_UI-ROUTER 最近在用 ionic写个webapp 看到几个demo中路由有好几种,搞的有点晕,查下资料研究下,做个笔记,其中大部分为摘抄别人的,做个说明免得被人 ...
- Palette状态栏颜色提取,写的不错就分享了
Palette 说Palette之前先说下前面提到的Pager.ViewPager是什么大家应该都是知道的了,一般ViewPager.xxxTabStrip.Fragment三个好基友是一起出现的.这 ...
- 二分算法C实现
#include <stdio.h> #include <stdlib.h> #define NR(x) (sizeof(x)/sizeof(x[0])) int Binary ...
- Struts-ValueStack和OGNL总结
(1)ValueStack是一个借口,在Struts2中使用OGNL表达式实际上是使用实现了ValueStack接口类的OgnlValueStack,它是ValueStack的默认实现类. (2)Va ...