SpringAOP(5)
2019-03-08/14:22:58
演示:登陆核心业务类与日志周边功能实现AOP面向切面思想
jar包:https://share.weiyun.com/5GOFouP
1.AOP
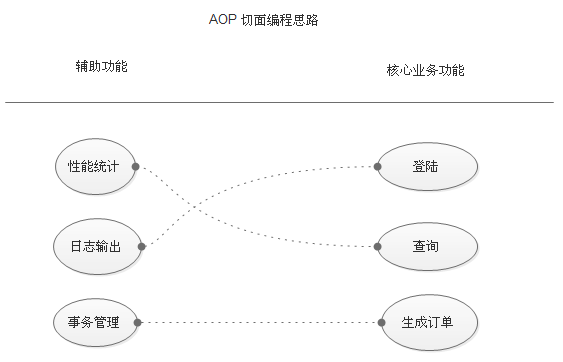
Spring(1)中有讲过什么是AOP,这里就放一个原理图看一下
1. 功能分两大类,辅助功能和核心业务功能
2. 辅助功能和核心业务功能彼此独立进行开发
3. 比如登陆功能,即便是没有性能统计和日志输出,也可以正常运行
4. 如果有需要,就把"日志输出" 功能和 "登陆" 功能 编织在一起,这样登陆的时候,就可以看到日志输出了
5. 辅助功能,又叫做切面,这种能够选择性的,低耦合的把切面和核心业务功能结合在一起的编程思想,就叫做切面编程
2.准备业务类ProductService
 package service;

 public class ProductService {

     public void doSomeService(){

         System.out.println("doSomeService");

     }

 }
ProductService.java
3.引入切面之前调用业务类
 package test;

 import org.springframework.context.ApplicationContext;
 import org.springframework.context.support.ClassPathXmlApplicationContext;

 import com.how2java.service.ProductService;

 public class TestSpring {

     public static void main(String[] args) {
         ApplicationContext context = new ClassPathXmlApplicationContext(new String[] { "applicationContext.xml" });
         ProductService s = (ProductService) context.getBean("s");
         s.doSomeService();
     }
 }
TestSpring.java
运行之前需要在配置文件中加一个扫描
 <?xml version="1.0" encoding="UTF-8"?>
 <beans xmlns="http://www.springframework.org/schema/beans"
     xmlns:xsi="http://www.w3.org/2001/XMLSchema-instance"
     xmlns:aop="http://www.springframework.org/schema/aop"
     xmlns:tx="http://www.springframework.org/schema/tx"
     xmlns:context="http://www.springframework.org/schema/context"
     xsi:schemaLocation="
    http://www.springframework.org/schema/beans
    http://www.springframework.org/schema/beans/spring-beans-3.0.xsd
    http://www.springframework.org/schema/aop
    http://www.springframework.org/schema/aop/spring-aop-3.0.xsd
    http://www.springframework.org/schema/tx
    http://www.springframework.org/schema/tx/spring-tx-3.0.xsd
    http://www.springframework.org/schema/context
    http://www.springframework.org/schema/context/spring-context-3.0.xsd">

     <bean name="s" class="service.ProductService">   //声明业务对象
     </bean>
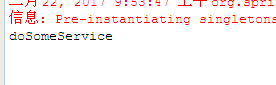
运行结果
4.准备日志切面 LoggerAspect
该日志切面的功能是 在调用核心功能之前和之后分别打印日志,切面就是原理图中讲的那些辅助功能。
下面是切面要执行的函数 log,log函数有一个形参 joinPoint 这个可以理解为断点
第8行代码可以理解为就是将来与某个核心功能编织之后,用于执行核心功能的代码
getSignature 获取切点的签名
proceed() 执行切点本来的业务
 package aspect;
 import org.aspectj.lang.ProceedingJoinPoint;

 public class LoggerAspect {

     public Object log(ProceedingJoinPoint joinPoint) throws Throwable {
         System.out.println("start log:" + joinPoint.getSignature().getName());    //开始
         Object object = joinPoint.proceed();   //监视
         System.out.println("end log:" + joinPoint.getSignature().getName());  //执行切面,结束
         return object;
     }
 }
5.AOP配置文件详解
17-20行:详情见注释
23-25行: 指定右边的核心业务功能 看原理图的实现
这一句是声明切入点,切入点的 id 叫 loggerCutPoint ,用来标记这个切入点,这个expression表示:满足expression中的方法调用之后,就会去进行切面操作,类似于触发了切面
第一个 * 代表返回任意类型 service.ProductService.* 表示包名以 service.ProductService 开头的类的任意方法(第二个*表示任意方法,通配符的意思)(..) 表示方法的参数是任意数量和类型
简单说就是,只要service这个包中的ProductService类的任意一个函数被调用,不管返回值是什么,都会触发开关,我就会去执行切面,也就是辅助功能,但是辅助功能是什么呢,就是下面两句:
27-29行: 指定左边的辅助功能 看原理图的实现
这两句是定义了一个切面,上面说只要触发开关,就会去执行切面,就是指的这里的切面,所谓切面,就是一个类中的方法...
id代表这个切面的名字,ref就是指的方法所在的类,method代表的就是方法的名字,
pointcut-ref="loggerCutpoint" 这个就是表示这个切面是和上面的切点关联起来的(一个切点是可以关联多个切面的,一个切面只能关联一个方法),只要上面的切点被触发,就会到这里来执行一些辅助功能
after表示在切入点触发之后来执行我这个中断,当然也有before,一共有五个before,after,After-returning ,After-throwing,Around。具体的AOP术语单独用一篇博客细讲一下
在 method 参数后面,还可以加上参数列表。
<aop:config/>:把业务对象与辅助功能编织在一起。
 <?xml version="1.0" encoding="UTF-8"?>
 <beans xmlns="http://www.springframework.org/schema/beans"
     xmlns:xsi="http://www.w3.org/2001/XMLSchema-instance"
     xmlns:aop="http://www.springframework.org/schema/aop"
     xmlns:tx="http://www.springframework.org/schema/tx"
     xmlns:context="http://www.springframework.org/schema/context"
     xsi:schemaLocation="
    http://www.springframework.org/schema/beans
    http://www.springframework.org/schema/beans/spring-beans-3.0.xsd
    http://www.springframework.org/schema/aop
    http://www.springframework.org/schema/aop/spring-aop-3.0.xsd
    http://www.springframework.org/schema/tx
    http://www.springframework.org/schema/tx/spring-tx-3.0.xsd
    http://www.springframework.org/schema/context
    http://www.springframework.org/schema/context/spring-context-3.0.xsd">

     <bean name="s" class="service.ProductService">
     </bean>    //声明业务类

     <bean id="loggerAspect" class="aspect.LoggerAspect"/>   //声明日志切面

     <aop:config>
         <aop:pointcut id="loggerCutpoint"
             expression=
             "execution(* service.ProductService.*(..)) "/>

         <aop:aspect id="logAspect" ref="loggerAspect">
             <aop:around pointcut-ref="loggerCutpoint" method="log"/>
         </aop:aspect>
     </aop:config>

 </beans>
6.测试代码
 package test;

 import org.springframework.context.ApplicationContext;
 import org.springframework.context.support.ClassPathXmlApplicationContext;

 import service.ProductService;

 public class TestSpring {

     public static void main(String[] args) {
         ApplicationContext context = new ClassPathXmlApplicationContext(
                 new String[] { "applicationContext.xml" });
         ProductService s = (ProductService) context.getBean("s");
         s.doSomeService();
     }
 }
TestSpring.java
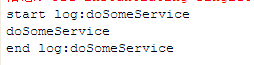
运行测试,可以发现在编织之后,业务方法运行之前和之后分别会打印日志
SpringAOP(5)的更多相关文章
- Spring-AOP实践 - 统计访问时间
公司的项目有的页面超级慢,20s以上,不知道用户会不会疯掉,于是老大说这个页面要性能优化.于是,首先就要搞清楚究竟是哪一步耗时太多. 我采用spring aop来统计各个阶段的用时,其中计时器工具为S ...
- Spring-Aop入门
(一)Aop术语定义 1.通知(advice) 通知定义了切面要做什么工作,即调用的方法,同时定义了什么时候做这些工作,即以下五种类型 (1)前置通知(Before) :在目标方法调用之前执行切面方法 ...
- 转-springAOP基于XML配置文件方式
springAOP基于XML配置文件方式 时间 2014-03-28 20:11:12 CSDN博客 原文 http://blog.csdn.net/yantingmei/article/deta ...
- SpringAOP详解(转载大神的)
AOP(Aspect-Oriented Programming)这个东西,名字与 OOP 仅差一个字母,其实它是对 OOP 编程方式的一种补充,并非是取而代之.翻译过来就是"面向方面编程&q ...
- spring-aop学习
SpringAOP学习 author:luojie 1. AOP中的基本概念 AOP的通用术语,并非spring java所特有.很遗憾AOP的术语不是特别的直观.但如果让Spring java来 ...
- SpringAOP之静态代理
一.SpringAOP: ⒈AOP:Aspect Oriented Programming 面向切面编程, 实现的是核心业务和非核心业务之间的的分离,让核心类只做核心业务,代理类只做非核心业务. ⒉ ...
- springaop实现登陆验证
1.首先配置好springmvc和springaop 2.先写好登陆方法,通过注解写代理方法 通过代理获得登陆方法的参数方法名,然后再aop代理方法内进行登陆验证 贴出代码 package com.h ...
- spring-aop示例
具体案例放在github上,主要是jar包在上面 https://github.com/guoyansi/spring-aop-example knights.xml <?xml version ...
- 使用SpringAop 验证方法参数是否合法
(原文地址:http://blog.csdn.net/is_zhoufeng/article/details/7683194) 1.依赖包 aspectjweaver.jar 其中Maven的配 ...
- 关于SpringAOP的XML方式的配置
AOP(XML)[理解][应用][重点] 1.AOP基础实例 A.导入jar包 核心包(4个) 日志(2个) AOP(4个) Spring进行AOP开发(1个) ...
随机推荐
- github下载和上传项目
git下载和上传项目 下载: git clone +地址 上传: 1.git init 在当前项目的目录中生成本地的git管理(多一个.git文件夹,为隐藏文件) 2.git add .(注意最后面有 ...
- 一文助您成为Java.Net双平台高手
写在前面:本文乃标题党,不是月经贴,侧重于Web开发差异,或细节或概述,若有不对之处,还请各位读者本着友好互助的心态批评指正.由于博客园中.Neter较多(个人感觉),因此本文也可以作为.Neter到 ...
- selinux学习
一.基本概念 1.TE模型的安全上下文 所有的操作系统访问控制都基于主体.客体,以及与他们相关的访问控制属性. 在selinux中,访问控制属性叫做安全上下文.所有对象(文件.进程间通信通道.套接字. ...
- SpringBoot | 第六章:常用注解介绍及简单使用
前言 之前几个章节,大部分都是算介绍springboot的一些外围配置,比如日志配置等.这章节开始,开始总结一些关于springboot的综合开发的知识点.由于SpringBoot本身是基于Sprin ...
- jQuery --- 第四期 (jQuery动效)
学习笔记 1.jQuery动画的淡入淡出 <!doctype html> <html> <head> <meta charset="utf-8&qu ...
- 全球排名第一的开源ERP Odoo v12 最新一键安装体验版正式发布
引言 Odoo 12.0是目前全球Odoo社区最新推出的产品版本代号,该产品具有划时代的意义,增加了如互联网级的知识库网盘功能.工业互联网的IOT设备矩阵管控功能,全新的Python Sass前端引擎 ...
- iOS客户端图片智能裁剪
 概述 所谓智能裁剪其实就是按照指定尺寸裁剪或显示出包含图片核心特征的区域,目前很多智能裁剪都是在服务器端做的,在客户端需要访问时直接裁剪放到Redis或者提前裁剪好以备访问.但是找了一圈直接在iO ...
- MySQL学习(二)索引与锁 --- 2019年1月
1.Order By 是怎么工作的 MySQL做排序是一个成本比较高的操作.MySQL会为每个线程分配一个 sort_buffer 内存用于排序,该内存大小为 sort_buffer_size. 全字 ...
- 《深入理解Java虚拟机》-----第7章 虚拟机类加载机制——Java高级开发必须懂的
代码编译的结果从本地机器码转变为字节码,是存储格式发展的一小步,却是编程语言发展的一大步. 7.1 概述 上一章我们了解了Class文件存储格式的具体细节,在Class文件中描述的各种信息,最终都需要 ...
- 【Android Studio安装部署系列】三十二、Android模拟器Genymotion安装使用教程详解
版权声明:本文为HaiyuKing原创文章,转载请注明出处! 一.注册\登录 打开Genymotion官网,https://www.genymotion.com/ ,首先点击右上角的Sign in进行 ...