SSM整合之基础xml文件以及基础理解
前言
最近在学习SSM框架,就去找了一些视频来看,写一篇整合的文章,文章包括一些整合的依赖,以及创建的xml文件
什么是SSM框架
SSM(Spring+SpringMVC+MyBatis)框架集由Spring、MyBatis两个开源框架整合而成(SpringMVC是Spring中的部分内容),常作为数据源较简单的web项目的框架。
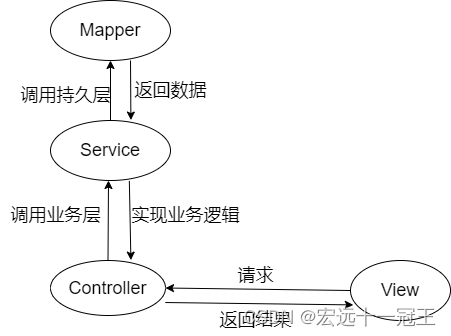
主要分为四层:
- 持久层:dao层(Mapper)层
主要是用来对数据进行持久化的工作,我们一般会在该层设计接口,然后从数据源获取数据,更新数据等,从而进行业务数据的处理
- 业务层:Service层
Service层主要是用来写一些业务逻辑。
一般Service层是调用Mapper层,然后对数据进行处理后返回给Controller控制层
- 控制层:Controller层
控制层一般是对用来对业务模块的控制,控制层一般是为了处理视图层发起的请求,调用Serivice层来完成请求的处理。
- 视图层(View):
视图层主要就是我们最常接触到的层,也是最接近用户的一层,主要负责前台的展示。
各层之间的关系,可以使用这张图来表示,表达的非常简略,主要是为了更加直观的展示各层之间的调用顺序,我们一般编写的顺序是从dao层到Service层,最后才到Controller层。
实例
下面就不对上述框架进行介绍了,直接上一个简单的整合实例以及创建。
首先我们需要创建一个maven项目,请确保你的本地仓库和配置文件都有正确配置。
pom依赖
 <groupId>org.example</groupId>

    <artifactId>ssm_demo</artifactId>

    <version>1.0-SNAPSHOT</version>

    <properties>

        <maven.compiler.source>8</maven.compiler.source>

        <maven.compiler.target>8</maven.compiler.target>

    </properties>

    <dependencies>

        <!-- MyBatis框架 -->

        <dependency>

            <groupId>org.mybatis</groupId>

            <artifactId>mybatis</artifactId>

            <version>3.5.6</version>

        </dependency>

        <!-- MyBatis整合Spring -->

        <dependency>

            <groupId>org.mybatis</groupId>

            <artifactId>mybatis-spring</artifactId>

            <version>2.0.6</version>

        </dependency>

        <!-- 数据库连接 -->

        <dependency>

            <groupId>mysql</groupId>

            <artifactId>mysql-connector-java</artifactId>

            <version>8.0.23</version>

        </dependency>

        <!-- C3P0连接池-->

        <dependency>

            <groupId>com.mchange</groupId>

            <artifactId>c3p0</artifactId>

            <version>0.9.5.2</version>

        </dependency>

        <!-- Spring框架 -->

        <dependency>

            <groupId>org.springframework</groupId>

            <artifactId>spring-webmvc</artifactId>

            <version>5.3.9</version>

        </dependency>

        <!-- AOP -->

        <dependency>

            <groupId>org.aspectj</groupId>

            <artifactId>aspectjweaver</artifactId>

            <version>1.9.7</version>

        </dependency>

        <!-- Spring获取数据源-->

        <dependency>

            <groupId>org.springframework</groupId>

            <artifactId>spring-jdbc</artifactId>

            <version>5.3.9</version>

        </dependency>

        <!--Servlet、JSP、JSTL-->

        <dependency>

            <groupId>javax.servlet</groupId>

            <artifactId>javax.servlet-api</artifactId>

            <version>4.0.1</version>

            <scope>provided</scope>

        </dependency>

        <dependency>

            <groupId>javax.servlet.jsp</groupId>

            <artifactId>javax.servlet.jsp-api</artifactId>

            <version>2.3.3</version>

            <scope>provided</scope>

        </dependency>

        <dependency>

            <groupId>javax.servlet</groupId>

            <artifactId>jstl</artifactId>

            <version>1.2</version>

        </dependency>

        <!-- JUnit -->

        <dependency>

            <groupId>junit</groupId>

            <artifactId>junit</artifactId>

            <version>4.12</version>

            <scope>test</scope>

        </dependency>

<!--        Lombok-->

        <dependency>

            <groupId>org.projectlombok</groupId>

            <artifactId>lombok</artifactId>

            <version>1.18.22</version>

            <scope>provided</scope>

        </dependency>

        <dependency>

            <groupId>com.alibaba</groupId>

            <artifactId>druid</artifactId>

            <version>1.2.6</version>

        </dependency>

        <dependency>

            <groupId>org.aspectj</groupId>

            <artifactId>aspectjweaver</artifactId>

            <version>1.8.13</version>

        </dependency>

    </dependencies>
构建项目的路径设置
<build>

        <resources>

            <resource>

                <directory>src/main/resources</directory>

                <includes>

                    <include>**/*.properties</include>

                    <include>**/*.xml</include>

                </includes>

                <filtering>true</filtering>

            </resource>

            <resource>

                <directory>src/main/java</directory>

                <includes>

                    <include>**/*.properties</include>

                    <include>**/*.xml</include>

                </includes>

                <filtering>true</filtering>

            </resource>

        </resources>

    </build>
Spring 文件配置
我们先配置一个database.properties来配置连接数据源的文件,这里我就只用简单的4个基础配置,最大连接数量这些就不添加在这里了。
jdbc.Driver=com.mysql.cj.jdbc.Driver

jdbc.url=jdbc:mysql://localhost:3306/mybatis?useSSL=true&useUnicode=true&characterEncoding=utf8&serverTimezone=Asia/Shanghai

jdbc.username=root

jdbc.password=123456
数据库文件写好了我们是不是需要配置mybatis的配置文件了,那是不是需要配置一些选项,这里我们用的是Spring来整合项目,数据库的连接池管理就交给Spring 的BeanFactory来管理了
mybatis-config.xml
<?xml version="1.0" encoding="UTF8" ?>

<!DOCTYPE configuration

        PUBLIC "-//mybatis.org//DTD Config 3.0//EN"

        "http://mybatis.org/dtd/mybatis-3-config.dtd">

<configuration>

<!--        配置数据源spring-->

    <settings>

        <setting name="logImpl" value="STDOUT_LOGGING"/>

    </settings>

    <typeAliases>

        <package name="com.DY.entity"/>

    </typeAliases>

    <mappers>

        <mapper resource="mapper/UserInfoMapper.xml"/>

    </mappers>

</configuration>
mappers是用来存放mapper层对应的接口配置文件,比如UserInfoMapper.xml。
配置好mybatis的文件后,我们是不是可以来配置Mapper层的文件了
spring-mapper.xml
我们需要配置连接池,通过context来获取到database.properties配置文件
<?xml version="1.0" encoding="UTF8"?>

<beans xmlns="http://www.springframework.org/schema/beans"

       xmlns:xsi="http://www.w3.org/2001/XMLSchema-instance"

       xmlns:context="http://www.springframework.org/schema/context"

       xsi:schemaLocation="http://www.springframework.org/schema/beans

        http://www.springframework.org/schema/beans/spring-beans.xsd

         http://www.springframework.org/schema/context

         https://www.springframework.org/schema/context/spring-context.xsd">

    <!--    1.关联数据库配置文件-->

    <context:property-placeholder location="classpath:database.properties"/>

    <!--    2. 连接池-->

    <bean id="dataSource" class="com.mchange.v2.c3p0.ComboPooledDataSource">

        <property name="driverClass" value="${jdbc.Driver}"/>

        <property name="jdbcUrl" value="${jdbc.url}"/>

        <property name="user" value="${jdbc.username}"/>

        <property name="password" value="${jdbc.password}"/>

    </bean>

    <!--    3。sqlSessionFactory-->

    <bean id="sqlSessionFactory" class="org.mybatis.spring.SqlSessionFactoryBean">

        <property name="dataSource" ref = "dataSource"/>

        <!--        绑定配置文件-->

        <property name="configLocation" value="classpath:mybatis-config.xml"/>

    </bean>

    <!--    配置mapper接口扫描包,动态实现mapper接口注入Spring容器,-->

    <bean class="org.mybatis.spring.mapper.MapperScannerConfigurer">

        <property name="sqlSessionFactoryBeanName" value="sqlSessionFactory"/>

<!--        扫描dao包-->

        <property name="basePackage" value="com.DY.mapper"/>

    </bean>

</beans>
接着我们创建一个spring-service.xml文件来扫描service的接口文件
spring-service.xml
<?xml version="1.0" encoding="UTF8"?>

<beans xmlns="http://www.springframework.org/schema/beans"

       xmlns:xsi="http://www.w3.org/2001/XMLSchema-instance"

       xmlns:context="http://www.springframework.org/schema/context"

       xmlns:aop="http://www.springframework.org/schema/aop"

       xsi:schemaLocation="http://www.springframework.org/schema/beans

       http://www.springframework.org/schema/beans/spring-beans.xsd

       http://www.springframework.org/schema/context

       https://www.springframework.org/schema/context/spring-context.xsd

       http://www.springframework.org/schema/aop

       http://www.springframework.org/schema/aop/spring-aop.xsd

       ">

<!--    扫描service下的包-->

    <context:component-scan base-package="com.DY.service.impl"/>

<!--    将所有的业务类,注入Spring,-->

    <bean id="UserInfoServiceImpl" class="com.DY.service.impl.UserInfoServiceImpl">

        <property name="userInfoMapper" ref="userInfoMapper"/>

    </bean>

    <bean id="transactionManager" class="org.springframework.jdbc.datasource.DataSourceTransactionManager">

<!--        注入数据源-->

        <property name="dataSource" ref="dataSource"/>

    </bean>

</beans>
我们是不是可以通过所有的业务类都注入Spring的工厂中,ref=“dataSource”,相当于在在这个Bean中注入id=dataSource这个Bean,这个我们在后面applicationContext.xml有定义,这里如果需要还可以定义Spring的AOP的配置。
那上述工作都完成后是不是可以到MVC层了,我们创建spring-mvc文件
spring-mvc.xml
<?xml version="1.0" encoding="UTF8"?>

<beans xmlns="http://www.springframework.org/schema/beans"

       xmlns:xsi="http://www.w3.org/2001/XMLSchema-instance"

       xmlns:context="http://www.springframework.org/schema/context"

       xmlns:mvc="http://www.springframework.org/schema/mvc"

       xsi:schemaLocation="http://www.springframework.org/schema/beans

       http://www.springframework.org/schema/beans/spring-beans-4.2.xsd

    http://www.springframework.org/schema/mvc

    http://www.springframework.org/schema/mvc/spring-mvc-4.2.xsd

    http://www.springframework.org/schema/context

    http://www.springframework.org/schema/context/spring-context-4.2.xsd">

<!--    1.注解驱动-->

    <mvc:annotation-driven/>

<!--    2.静态资源过滤-->

    <mvc:default-servlet-handler/>

<!--    3.扫描包-->

    <context:component-scan base-package="com.DY.controller"/>

<!--    4.视图解析器-->

    <bean class="org.springframework.web.servlet.view.InternalResourceViewResolver">

        <property name="prefix" value="/WEB-INF/jsp/"/>

        <property name="suffix" value=".jsp"/>

    </bean>

</beans>
这个整合的比较老,使用的还是jsp文件,这里和web.xml是配合使用的。
最后是不是可以到applicationContext.xml文件的配置了,如果前面的我们都配置的没有问题,是不是我们直接import这些配置文件进去就完成整个整合了。
<?xml version="1.0" encoding="UTF8"?>

<beans xmlns="http://www.springframework.org/schema/beans"

       xmlns:xsi="http://www.w3.org/2001/XMLSchema-instance"

       xmlns:context="http://www.springframework.org/schema/context"

       xsi:schemaLocation="http://www.springframework.org/schema/beans

       http://www.springframework.org/schema/beans/spring-beans.xsd

       http://www.springframework.org/schema/context

       https://www.springframework.org/schema/context/spring-context.xsd">

    <import resource="classpath:spring-mapper.xml"/>

    <import resource="classpath:spring-service.xml"/>

    <import resource="classpath:spring-mvc.xml"/>

</beans>
最后
这里还是展示一些相关的代码吧,比如我需要新建一个controller包、entity包、mapper包、service包,在resources下面定义一些配置文件
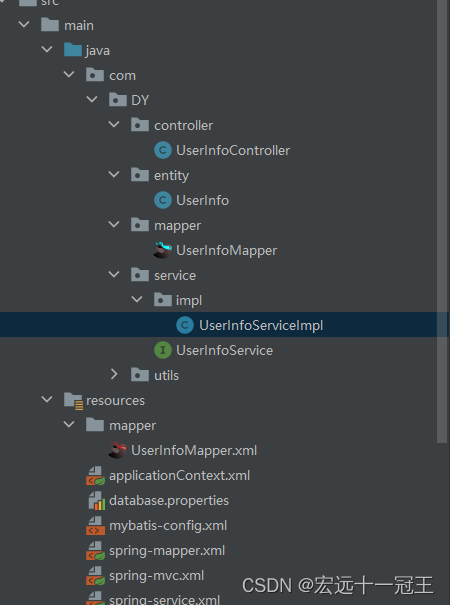
展示代码
controller
@Controller

@RequestMapping("/user")

public class UserInfoController {

    private GetDate getDate;

    @Autowired

    @Qualifier("UserInfoServiceImpl")

    private UserInfoService userInfoService;

    //查询所有用户,并返回到页面

    @RequestMapping("/allUser")

    public String list(Model model){

        List<UserInfo> userInfos = userInfoService.querryAllUsers();

        model.addAttribute("userInfos", userInfos);

        return "allUser";

    }

}
entity,对应着数据库的表的字段名,一般采用驼峰命名法,@Data是lombok插件的注解可以自动帮你写getter和setter方法
import lombok.AllArgsConstructor;

import lombok.Data;

import lombok.NoArgsConstructor;

import java.util.Date;

@Data

@AllArgsConstructor

@NoArgsConstructor

public class UserInfo {

    /**

     * 用户ID

     */

    private Long userId;

    /**

     *

     */

    private String username;

    /**

     *

     */

    private String userPassword;

    /**

     *

     */

    private Date createTime;

    /**

     *

     */

    private Date updateTime;

}
mapper, 展示一个UserInfoMapper
包括一些方法,和一些参数的获取
package com.DY.mapper;

import com.DY.entity.UserInfo;

import org.apache.ibatis.annotations.Param;

import java.util.List;

public interface UserInfoMapper {

    /**

     * 增加用户

     */

//    int addUser(UserInfo userInfo);

    /**

     * 查询用户

     */

    UserInfo querryUserById(@Param("userId") Long userId);

    /**

     * 查询所有用户

     * DY

     * @return

     */

    List<UserInfo> querryAllUsers();

    /**

     * 增加用户

     * @param userInfo

     * @return

     */

    Integer insertUserInfo(UserInfo userInfo);

    /**

     * 更新用户

     */

    Integer updateUserInfo(UserInfo userInfo);

    /**

     * 根据用户姓名查询用户

     * @param userName

     * @return

     */

    List<UserInfo> querryUserByUserName(@Param("userName") String userName);

}
service层
service一般会分成两个部分,一个是接口部分,一个是这个接口的实现Impl包
比如这里我先展示UserInfoService
package com.DY.service;

import com.DY.entity.UserInfo;

import org.apache.ibatis.annotations.Param;

import java.util.List;

public interface UserInfoService {

    UserInfo querryUserById(@Param("userId") Long userId);

    /**

     * 查询所有用户

     * DY

     * @return

     */

    List<UserInfo> querryAllUsers();

    /**

     * 插入一个新用户

     * @return

     */

    Integer insertUserInfo(UserInfo userInfo);

    /**

     * 更新用户信息

     * @param userInfo

     * @return

     */

    Integer updateUserInfo(UserInfo userInfo);

    /**

     * 根据用户姓名查询用户

     */

    List<UserInfo> querryUserByUserName(String userName);

}
这里是不是有一些业务逻辑的接口方法,对应的Impl类
UserInfoServiceImpl.java,需要@Autowired使用自动装载,将mapper层的注入到Service中,方便我们调用Mapper层的方法
package com.DY.service.impl;

import com.DY.entity.UserInfo;

import com.DY.mapper.UserInfoMapper;

import com.DY.service.UserInfoService;

import org.springframework.beans.factory.annotation.Autowired;

import org.springframework.stereotype.Service;

import java.util.List;

@Service

public class UserInfoServiceImpl implements UserInfoService {

    //service层组合mapper,

    @Autowired

    private UserInfoMapper userInfoMapper;

    public void setUserInfoMapper(UserInfoMapper userInfoMapper) {

        System.out.println("设置mapper");

        this.userInfoMapper = userInfoMapper;

    }

    @Override

    public UserInfo querryUserById(Long userId) {

        return this.userInfoMapper.querryUserById(userId);

    }

    @Override

    public List<UserInfo> querryAllUsers() {

        return this.userInfoMapper.querryAllUsers();

    }

    @Override

    public Integer insertUserInfo(UserInfo userInfo) {

        System.out.println(userInfo);

        return this.userInfoMapper.insertUserInfo(userInfo);

    }

    @Override

    public Integer updateUserInfo(UserInfo userInfo) {

        System.out.println(userInfo);

        return this.userInfoMapper.updateUserInfo(userInfo);

    }

    @Override

    public List<UserInfo> querryUserByUserName(String userName) {

        System.out.println(userName);

        return this.userInfoMapper.querryUserByUserName(userName);

    }

}
总结
到这里,基本的整个项目的整合就结束了,可能写的还不是很清楚,只是我的粗略理解,刚学望各位大佬指点。
SSM整合之基础xml文件以及基础理解的更多相关文章
- ssm整合的spring.xml文件配置(applicationContext.xml)
<?xml version="1.0" encoding="UTF-8"?><beans xmlns="http://www.spr ...
- ssm整合之springmvc.xml文件
<?xml version="1.0" encoding="UTF-8"?><beans xmlns="http://www.spr ...
- ssm整合之web.xml文件
<!DOCTYPE web-app PUBLIC "-//Sun Microsystems, Inc.//DTD Web Application 2.3//EN" " ...
- 配置ssm 时, web.xml 文件无 # 自动代码提示
环境:STS 版本:spring-tool-suite-3.8.1.RELEASE-e4.6-win32-x86_64 配置ssm 时, web.xml 文件无 如下图蓝色圈范围内的提示 问题与 链接 ...
- 【报错】spring整合activeMQ,pom.xml文件缺架包,启动报错:Caused by: java.lang.ClassNotFoundException: org.apache.xbean.spring.context.v2.XBeanNamespaceHandler
spring版本:4.3.13 ActiveMq版本:5.15 ======================================================== spring整合act ...
- 关于mybatis-config.xml文件的基础解释
今天是我第一天落户博客园,想一想从mybatis框架开始写起吧.mybatis框架与Hibernate框架相比来说,专注于SQL语句,对SQL语句的要求比较高吧. 我觉得,对于mybatis框架来说, ...
- ssm整合(基于xml配置方式)
本文是基于xml配置的方式来整合SpringMVC.Spring和Mybatis(基于注解的方式会再写一篇文章),步骤如下: (1)首先自然是依赖包的配置文件 pom.xml <project ...
- Spring整合Hibernate的XML文件配置,以及web.xml文件配置
利用Spring整合Hibernate时的XML文件配置 applicationContext.xml <?xml version="1.0" encoding=" ...
- SSM 生成mapper中xml文件:未能解析映射资源:“文件嵌套异常
错误日记我就网上随便找个贴着: 错误一: org.springframework.beans.factory.BeanCreationException: Error creating bean wi ...
- SSM整合的pom.xml依赖
<project xmlns="http://maven.apache.org/POM/4.0.0" xmlns:xsi="http://www.w3.org/20 ...
随机推荐
- VS中多字节字符集和UNICODE字符集的使用说明
两者的核心区别: 1.在制作多国语言软件时,使用Unicode(UTF-16,16bits,两个字节).无特殊要求时,还是使用多字节字符集比较好. 2.如果要兼容C编程,只能使用多字节字符集.这里的兼 ...
- CentOS7带图形界面不能扫描网卡。
CentOS7在带有图形界面,在配置/sysconfig/network-script/ifcfg-ens*后不能识别到网卡,有可能是NetworkManager打开导致,可以使用systemctl ...
- Windows 10 输入法(仅桌面) %100 解决
大家好,今天我遇到了一件非常难受的一件事,那就是 WIndows 自带的输入发问题,无法输入中文!!! 这时我去网上找找解决方案,总结了一下几个: 文件检查 步骤 以管理员身份运行PowerShell ...
- Python学习笔记W1
今天正式开始学习Python语言,学习方式观看教学视频,完成作业.视频共计28周,争取每天2天完成一周教学内容,共计56天,预计完成日期:2019-2-28. Owen写于2018-12-22 ...
- 使用react-vite-antd,修改antd主题,报错 [vite] Internal server error: Inline JavaScript is not enabled. Is it set in your options? It is hacky way to make this function will be compiled preferentially by less
一般报错 在官方文档中,没有关于vite中如何使用自定义主题的相关配置,经过查阅 1.安装less yarn add less (已经安装了就不必再安装) 2.首先将App.css改成App.les ...
- lua的一些封装方法
获取点击屏幕坐标 1 function getTouchPosition() 2 local locationX, locationY 3 4 local listener = cc.EventLis ...
- 文件的上传&预览&下载学习(三)
0.参考博客 https://www.pianshen.com/article/18961690151/ (逻辑流程图讲得很清楚) https://www.cnblogs.com/xiahj/p/vu ...
- PatriotCTF 2022 RE
PatriotCTF 2022 RE String Cheese ida 打开 Shift+F12 即可得到flag PCTF{d0nt_string_m3_410ng_b3_my_v413ntin3 ...
- 63.C++类型转换
类型转换(cast)是将一种数据类型转换成另一种数据类型.例如,如果将一个整型值赋给一个浮点类型的变量,编译器会暗地里将其转换成浮点类型. 转换是非常有用的,但是它也会带来一些问题,比如在转换 ...
- 声网自研传输层协议 AUT 的落地实践丨Dev for Dev 专栏
本文为「Dev for Dev 专栏」系列内容,作者为声网大后端传输协议负责人 夏天. 针对实时互动应用对网络传输带来的新需求和新挑战,声网通过将实时互动中的应用层业务需求与传输策略的分层和解耦,于 ...