SpringBoot——配置及原理
更多内容,前往IT-BLOG
一、Spring Boot全局配置文件
application.properties 与 application.yml 配置文件的作用:可以覆盖 SpringBoot 配置的默认值。
YML(is not a Markup Language:不仅仅是一个标记语言):以前的配置文件,大多是xx.xml文件,而 YAML是以数据为中心,比 json、xml等更适合做配置文件。
 1 #普通配置文件.properties的语法

 2 #server.port=80

 3

 4 #XML的写法

 5 #<server>

 6 #   <port>8080<port/>

 7 #<server/>

 8

 9 #yml 以数据为中心的语法

10 server:

11   port: 8080
YML语法:基本语法:k:(空格)v--->表示一对键值对。(以空格缩进来控制层级关系;只要是左对齐的一列数据,都是同一层级)属性和值也是大小写敏感。
1 server:

2   port: 8080

3   path: /hello

4 spring:

5   profiles: dev
值的写法:【1】字面量:普通的值(数字、字符串、布尔),字符串默认是不用加上单引号或者双引号,但也可以加,但是有区别:双引号,不会转义字符串里面的特殊字符,特殊字符会作为本身想表达的意思。单引号,会转义特殊字符,特殊字符最终只是一个普通的字符串数据。
【2】对象(属性和值)或者Map(键值对)的表达[k: v]形式,对象也是[k: v]的方式。比较抽象,我们举个栗子看看:
1 #yml正常写法

2 friends:

3     lastName: zhangsan

4     age: 20

5

6 #行内写法

7 friends: {lastName: zhangsan,age: 20}
【3】数组(List、Set)用 [- 值]表示数组中的一个元素,也举一个栗子:
1 # yml正常写法 -值 形式

2 pets:

3    - cat

4    - dog

5 #行内写法

6 pets: [cat,dog]
配置文件注入:测试上面数据赋值是否正确。
【1】准备配置文件:application.yml
 1 person:

 2   lastName: zhangsan

 3   age: 20

 4   boss: false

 5   birth: 2018/8/20

 6   map: {k1: v1,k2: v2}

 7   lists: [listi,zhaoliu]

 8   dog:

 9     name: gou

10     age: 2
【2】准备 JavaBean:@ConfigurationProperties(prefix ="person") 表示将配置文件中的 person的每一个属性映射到这个组件中,但只有这个组件是容器中的组件,才能提供功能。需要使用 @Component标注才能成为容器组件。
 1 @Component

 2 @ConfigurationProperties(prefix ="person")

 3 public class Person {

 4     private String lastName;

 5     private Integer age;

 6     private boolean boss;

 7     private Date birth;

 8     private Map<String,String> map;

 9     private List lists;

10     private Dog dog;

11 }
【3】优化:当准备2中的文件,会提示我们 “Spring Boot Configuration Annotation ...” 点击去后会发现如下 starters信息,那么我们将此配置于 pom文件中,作用:当我们在配置文件中,给带有 @ConfigurationProperties的实体类赋值时会有属性提示。
<dependency>

    <groupId>org.springframework.boot</groupId>

    <artifactId>spring-boot-configuration-processor</artifactId>

    <optional>true</optional>

</dependency>
【4】测试: 进入 test目录底下的类目录,直接导入 person输入,查看是否已赋值即可。
 1 //使用Spring的驱动器,不用再使用JUnit的驱动器了

 2 @RunWith(SpringRunner.class)

 3 @SpringBootTest

 4 public class HellowordQuickStartApplicationTests {

 5         //在测试期间可以类似编码一样进行自动注入

 6     @Autowired

 7     Person person;

 8

 9         @Test

10     public void testPersion(){

11         System.out.println(person);

12     }

13 }
【5】properties 中的语句与 yml不同,以下是 properties的配置语句。
 1 #person.lastName=张三 也是可以的

 2 person.last-name=张三

 3 person.age=18

 4 person.birth=2013/04/23

 5 person.boss=false

 6 person.map.key1=v1

 7 person.map.key2=v2

 8 person.lists=a,b,c

 9 person.dog.name=dog

10 person.dog.age=2
【6】测试的时候可能会出现乱码,设置如下。properties 默认的编码时ASK码,我们需要将其设置为UTF-8来解决乱码问题。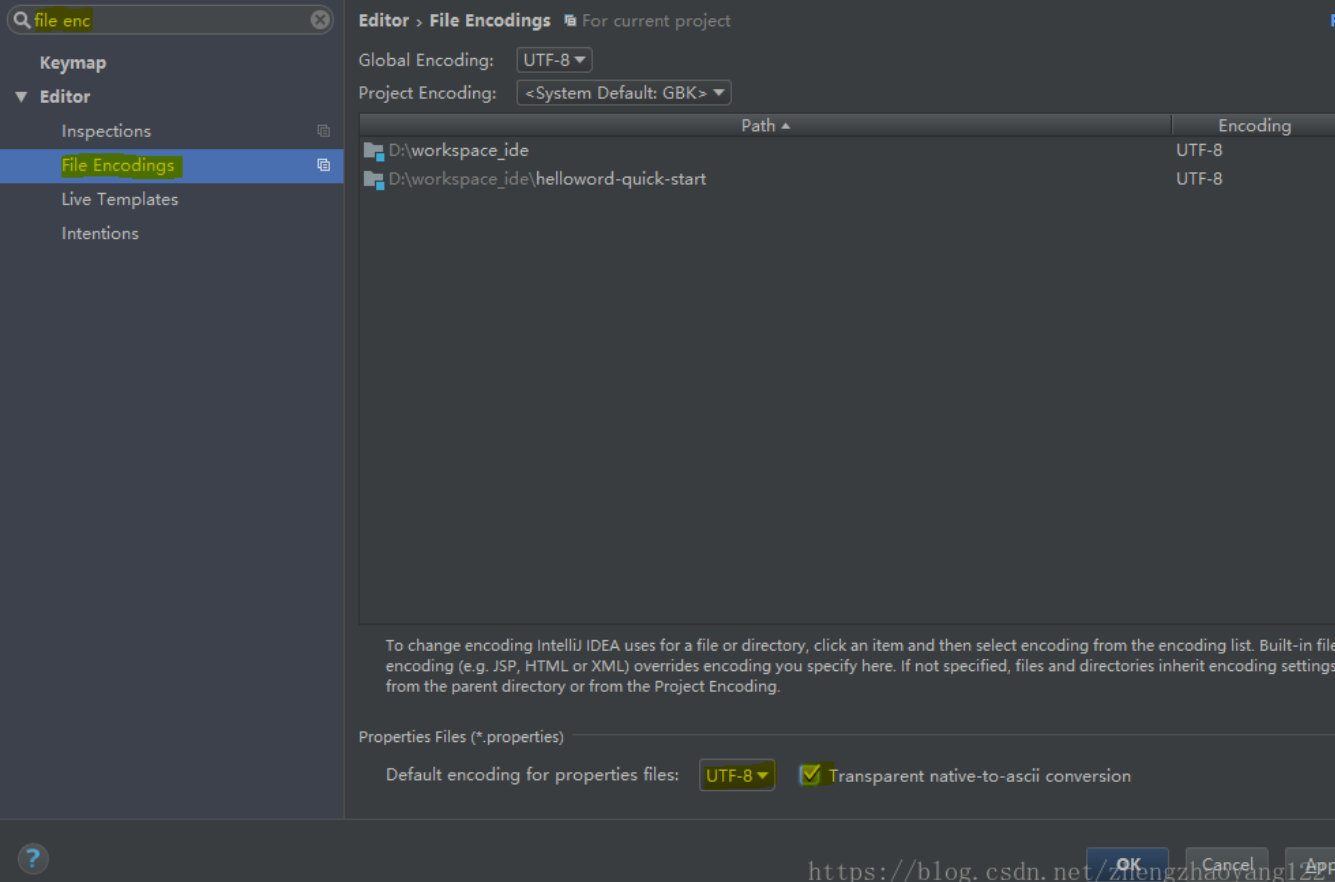
【7】第二种赋值方式:@Value(“字面量/${key}从环境变量、配置文件中获取值/#{SpEL}”)---三种传值方式
 1 @Component

 2 //@ConfigurationProperties(prefix ="person")

 3 public class Person {

 4     //@email @Value不支持校验(JSR303数据校验)

 5     @Value("${person.last-name}")

 6     private String lastName;

 7     //SPEL

 8     @Value("#{22*3}")

 9     private Integer age;

10     @Value("true")

11     private boolean boss;
● @Vaule与@ConfigurationProperties两者的区别如下:(其实@Value最多用在获取单个值的时候使用)
| @configuration | @value | |
| 功能 | 批量注入配置文件中的属性 | 每个属性单独配置 |
| 松散绑定(松散语法) | 支持(大小写不敏感) | 不支持(与配置文件保持一致) |
| SpEL | 不支持(不能用于逻辑计算) | 支持#{逻辑计算} |
| JSR303数据校验 | 支持@validated | 不支持 |
| 复杂类型封装 | 支持 | 不支持(map对象) |
二、@PropertySource 与 @ConfigurationProperties之间的区别
@ConfigurationProperties:默认从全局配置文件中加载值。
● @PropertySource:指向自己定义的 properties配置文件,新建 person.properties配置文件(省略),如下获取值。
1 //优先级高于@ConfigurationProperties(prefix ="person")

2 @PropertySource(value = {"classpath:person.properties"})

3 @Component

4 //@ConfigurationProperties(prefix ="person")

5 //@Validated

6 public class Person {
● @ImportResource:导入 Spring的配置文件,让配置文件里面的内容生效 。
1)、定义配置文件bean.xml(以前的配置,SpringBoot不这么用)
1 <?xml version="1.0" encoding="UTF-8"?>

2 <beans xmlns="http://www.springframework.org/schema/beans"

3        xmlns:xsi="http://www.w3.org/2001/XMLSchema-instance"

4        xsi:schemaLocation="http://www.springframework.org/schema/beans

5        http://www.springframework.org/schema/beans/spring-beans.xsd">

6

7     <bean id="helloService" class="com.atguigu.Servers.HelloService"></bean>

8 </beans>
2)、在主程序中使用@ImportResource注解导入bean.xml配置文件
@ImportResource(locations={"classpath:bean.xml"})

@SpringBootApplication

public class HellowordQuickStartApplication {
● SpringBoot中(配置类====配置文件xml)推荐使用配置类,如下创建:
 1 //@Configuration指明当前类是一个配置类 替代配置文件

 2 @Configuration

 3 public class MyAppConfig {

 4     //@bean注解就相当于<bean></bean>标签

 5     @Bean

 6     //方法名就相当于xml中的id , 项目启动时就会将组件加入容器中

 7     public HelloService helloService(){

 8         System.out.println("@Bean给容器中添加组件");

 9         return new HelloService();

10     }

11 }
三、配置文件占位符
【1】随机数(了解即期)
${random.value}、${random.int}、${random.log}、${random.int(10)}
【2】占位符(当属性不存在时,可以给一个默认值,例如下面age属性值得获取)
persion.last-name=张三

persion.dog.name=${persion.last_name}_dog

perdion.dog.age=${persion.noexistage:20}
四、Profile:是 Spring对不同环境提供不同配置功能的支持,可以通过激活、指定参数等方式快速切换环境
【1】多 profile文件形式(了解一下,我们使用更多的是2中的yml形式):我们可以编写多个配置文件,对应多个场景(开发、测试、生产等),文件名可以是 application-{profile}.properties/yml的形式命名,例如:application-dev.properties

项目启动时默认使用application.properties的配置,如果要激活开发配置文件,在application.properties中输入如下激活信息。
#激活dev开发模式的配置文件,就不用application.properties文件的配置了

spring.profiles.active=dev
【2】yml 支持多文档块方式(推荐使用):通过“---”来划分文档块,Document表示所处模块的位置/总块 。
 1 # --- 称为多文档快 , 简写1中的形式

 2 ---

 3 server:

 4   port: 8080

 5   path: /hello

 6 # 如下为激活profiles ,如果不激活则默认为Document1中的配置

 7 spring:

 8   profiles:

 9     active: dev

10 ---

11 server:

12   port: 8084

13 spring:

14   profiles: prod

15 ---

16 server:

17   port: 8081

18 spring:

19   profiles:

20     active: dev
【3】激活指定 profile方式,上面用的都是第一种:
1)在默认配置 application.properties 中设置spring.profiles.active属性
spring.profiles.active=dev
2)命令行:--spring.profiles.active=dev
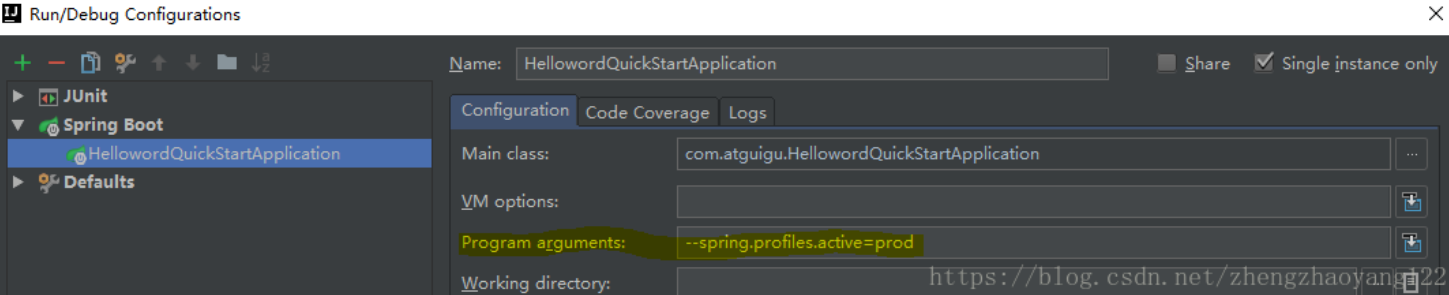
命令行运行 jar包的方式:java -jar xxx.jar --spring.profiles.active=dev;
3)虚拟机参数:-Dspring.profiles.active=prod;

五、配置文件加载位置:也就优先级
SpringBoot 启动时会扫描以下位置的application.properties 或者 application.yml 文件作为 SpringBoot 的默认配置文件:
【1】file:./config/ (项目底下的config目录)
【2】file:./ (直接位于项目底下的配置文件)
【3】classpath:/config/ (config文件默认没生成,需要自己创建)
【4】classpath:/ (项目创建后,配置文件默认位置)
以上是按照优先级从高到低的顺序,所有位置的文件都会被加载,高优先级配置内容会覆盖低优先级配置的相同内容。
我们也可以通过 spring.config.location 来改变默认配置(项目打包成功以后,我们可以使用命令行参数的形式,启动项目来指定配置文件的新位置;指定的配置文件会共同起作用,形成互补作用),这个优先级肯定最高了。而且我们要知道,打jar包的时候只包含src底下的main和resource文件,1、2中的不会被打包进去。其实将jar包与配置文件*.yml等放在同一个目录下的情况也比较多常见,因为灵活。项目启动时可以自动加载同目录下的*.yml等配置文件。且优先级高于内部的配置文件,之间互补配置。
#命令行添加配置,优先级最高

java -jar xxx.jar --spring.config.location=d:\xxx.properties
六、自动配置原理
【1】SpringBoot 启动的时候加载主配置类,@SpringBootApplication下开启了主配置功能@EnableAutoConfiguration
【2】@EnableAutoConfiguration作用:①、利用EnableAutoConfigurationImportSelector给容器导入一些组件。
②、可以查看 selectImports() 方法的内容:List configurations = getCandidateConfigurations(annotationMetadata, attributes);获取候选的配置。SpringFactoriesLoader.loadFactoryNames()扫描所有jar包类路径下 META‐INF/spring.factories 把扫描到的这些文件的内容包装成properties对象从properties中获取到EnableAutoConfiguration.class 类(类名)对应的值,然后把他们添加在容器中。
【3】将类路径下 META-INF/spring.factories 里面配置的所有 EnableAutoConfiguration的值加入到了容器中;
# EnableAutoConfiguration  对应 @EnableAutoConfiguration

org.springframework.boot.autoconfigure.EnableAutoConfiguration=\

org.springframework.boot.autoconfigure.admin.SpringApplicationAdminJmxAutoConfiguration,\

org.springframework.boot.autoconfigure.aop.AopAutoConfiguration,\

org.springframework.boot.autoconfigure.amqp.RabbitAutoConfiguration,\

org.springframework.boot.autoconfigure.batch.BatchAutoConfiguration,\

org.springframework.boot.autoconfigure.cache.CacheAutoConfiguration,\

org.springframework.boot.autoconfigure.cassandra.CassandraAutoConfiguration,\

org.springframework.boot.autoconfigure.cloud.CloudAutoConfiguration,\

org.springframework.boot.autoconfigure.context.ConfigurationPropertiesAutoConfiguration,\

org.springframework.boot.autoconfigure.context.MessageSourceAutoConfiguration,\

org.springframework.boot.autoconfigure.context.PropertyPlaceholderAutoConfiguration,\

org.springframework.boot.autoconfigure.couchbase.CouchbaseAutoConfiguration,\

org.springframework.boot.autoconfigure.dao.PersistenceExceptionTranslationAutoConfiguration,\

org.springframework.boot.autoconfigure.data.cassandra.CassandraDataAutoConfiguration,\

org.springframework.boot.autoconfigure.data.cassandra.CassandraReactiveDataAutoConfiguration,\
每一个这样的 xxxAutoConfiguration 类都是容器中的一个组件,都加入到容器中。用他们来做自动配置;
【4】每一个自动配置类进行自动配置功能,以 HttpEncodingAutoConfiguration(Http编码自动配置)为例解释自动配置原理;
 1 @Configuration //表示这是一个配置类,以前编写的配置文件一样,也可以给容器中添加组件

 2 @EnableConfigurationProperties(HttpEncodingProperties.class) //启动指定类的

 3 //ConfigurationProperties功能;将配置文件中对应的值和HttpEncodingProperties绑定起来;并把

 4 //HttpEncodingProperties加入到ioc容器中

 5 @ConditionalOnWebApplication //Spring底层@Conditional注解(Spring注解版),根据不同的条件,如果

 6 //满足指定的条件,整个配置类里面的配置就会生效; 判断当前应用是否是web应用,如果是,当前配置类生效

 7 @ConditionalOnClass(CharacterEncodingFilter.class) //判断当前项目有没有这个类

 8 //CharacterEncodingFilter;SpringMVC 中进行乱码解决的过滤器;

 9 //判断配置文件中是否存在某个配置 spring.http.encoding.enabled;如果不存在,判断也是成立的

10 @ConditionalOnProperty(prefix = "spring.http.encoding", value = "enabled", matchIfMissing = true)

11 //即使我们配置文件中不配置pring.http.encoding.enabled=true,也是默认生效的;

12 public class HttpEncodingAutoConfiguration {

13     //他已经和SpringBoot的配置文件映射了

14     private final HttpEncodingProperties properties;

15     //只有一个有参构造器的情况下,参数的值就会从容器中拿

16     public HttpEncodingAutoConfiguration(HttpEncodingProperties properties) {

17         this.properties = properties;

18     }

19

20     @Bean //给容器中添加一个组件,这个组件的某些值需要从properties中获取

21     @ConditionalOnMissingBean(CharacterEncodingFilter.class) //判断容器没有这个组件?

22     public CharacterEncodingFilter characterEncodingFilter() {

23         CharacterEncodingFilter filter = new OrderedCharacterEncodingFilter();

24         filter.setEncoding(this.properties.getCharset().name());

25         filter.setForceRequestEncoding(this.properties.shouldForce(Type.REQUEST));

26         filter.setForceResponseEncoding(this.properties.shouldForce(Type.RESPONSE));

27         return filter;

28     }
根据当前不同的条件判断,决定这个配置类是否生效?一但这个配置类生效;这个配置类就会给容器中添加各种组件;这些组件的属性是从对应的properties类中获取的,这些类里面的每一个属性又是和配置文件绑定的;
【5】所有在配置文件中能配置的属性都是在 xxxxProperties类中封装;配置文件能配置什么就可以参照某个功能对应的属性类
@ConfigurationProperties(prefix = "spring.http.encoding") //从配置文件中获取指定的值和bean的属性进行绑定

public class HttpEncodingProperties {

public static final Charset DEFAULT_CHARSET = Charset.forName("UTF‐8");
精髓:【1】SpringBoot 启动会加载大量的自动配置类;
【2】我们看我们需要的功能有没有SpringBoot默认写好的自动配置类;
【3】我们再来看这个自动配置类中到底配置了哪些组件;(只要我们要用的组件有,我们就不需要再来配置了)
【4】给容器中自动配置类添加组件的时候,会从properties类中获取某些属性。我们就可以在配置文件中指定这些属性的值;
xxxxAutoConfigurartion:自动配置类,给容器中添加组件。xxxxProperties:封装配置文件中相关属性;
七、@ConditionalOnxxx 中的 @Conditional 派生注解(Spring注解版原生的@Conditional作用)作用
必须是 @Conditional 指定的条件成立,才给容器中添加组件,配置配里面的所有内容才生效。

● 自动配置类必须在一定的条件下才能生效,那么我们如何知道哪些配置类生效哪些没有生效,其实我们可以通过在配置文件启用 debug=true属性,就可以查看哪些配置类生效。
debug=true
通过控制台打印自动配置报告,我们就可以知道哪些自动配置类生效(Positive matches:匹配成功的自动配置类)
Positive matches:

-----------------

   CodecsAutoConfiguration matched:

      - @ConditionalOnClass found required class 'org.springframework.http.codec.CodecConfigurer'; @ConditionalOnMissingClass did not find unwanted class (OnClassCondition)

   CodecsAutoConfiguration.JacksonCodecConfiguration matched:

      - @ConditionalOnClass found required class 'com.fasterxml.jackson.databind.ObjectMapper'; @ConditionalOnMissingClass did not find unwanted class (OnClassCondition)

   CodecsAutoConfiguration.JacksonCodecConfiguration#jacksonCodecCustomizer matched:

      - @ConditionalOnBean (types: com.fasterxml.jackson.databind.ObjectMapper; SearchStrategy: all) found bean 'jacksonObjectMapper' (OnBeanCondition)

   DispatcherServletAutoConfiguration matched:

      - @ConditionalOnClass found required class 'org.springframework.web.servlet.DispatcherServlet'; @ConditionalOnMissingClass did not find unwanted class (OnClassCondition)

      - found ConfigurableWebEnvironment (OnWebApplicationCondition)
自动配置未生效类(Negative matches:匹配失败的自动配置类)
Negative matches:

-----------------

   ActiveMQAutoConfiguration:

      Did not match:

         - @ConditionalOnClass did not find required classes 'javax.jms.ConnectionFactory', 'org.apache.activemq.ActiveMQConnectionFactory' (OnClassCondition)

   AopAutoConfiguration:

      Did not match:

         - @ConditionalOnClass did not find required classes 'org.aspectj.lang.annotation.Aspect', 'org.aspectj.lang.reflect.Advice', 'org.aspectj.weaver.AnnotatedElement' (OnClassCondition)

   ArtemisAutoConfiguration:

      Did not match:

         - @ConditionalOnClass did not find required classes 'javax.jms.ConnectionFactory', 'org.apache.activemq.artemis.jms.client.ActiveMQConnectionFactory' (OnClassCondition)

----关注公众号,获取更多内容----
SpringBoot——配置及原理的更多相关文章
- SpringBoot学习(六)-->SpringBoot的自动配置的原理
Spring Boot的自动配置的原理 Spring Boot在进行SpringApplication对象实例化时会加载META-INF/spring.factories文件,将该配置文件中的配置载入 ...
- springboot之启动原理解析
前言 SpringBoot为我们做的自动配置,确实方便快捷,但是对于新手来说,如果不大懂SpringBoot内部启动原理,以后难免会吃亏.所以这次博主就跟你们一起一步步揭开SpringBoot的神秘面 ...
- springboot配置详解
springboot配置详解 Author:SimpleWu properteis文件属性参考大全 springboot默认加载配置 SpringBoot使用两种全局的配置文件,全局配置文件可以对一些 ...
- SpringBoot 配置 Servlet、Filter、Listener
SpringBoot 配置 Servlet.Filter.Listener 在SpringBoot应用中,嵌入式的 Servlet 3.0+ 容器不会直接使用 ServletContainerInit ...
- SpringBoot配置(1) 配置文件application&yml
SpringBoot配置(1) 配置文件application&yml 一.配置文件 1.1 配置文件 SpringBoot使用一个全局的配置文件,配置文件名是固定的. application ...
- springboot之启动原理解析及源码阅读
前言 SpringBoot为我们做的自动配置,确实方便快捷,但是对于新手来说,如果不大懂SpringBoot内部启动原理,以后难免会吃亏.所以这次博主就跟你们一起一步步揭开SpringBoot的神秘面 ...
- SpringBoot启动过程原理
最近这两年springboot突然火起来了,那么我们就来看看springboot的运行原理. 一.springboot的三种启动方式: 1.运行带有main方法的2.通过命令 Java -jar命令3 ...
- SpringBoot启动流程分析(五):SpringBoot自动装配原理实现
SpringBoot系列文章简介 SpringBoot源码阅读辅助篇: Spring IoC容器与应用上下文的设计与实现 SpringBoot启动流程源码分析: SpringBoot启动流程分析(一) ...
- 浅谈SpringBoot核心注解原理
SpringBoot核心注解原理 今天跟大家来探讨下SpringBoot的核心注解@SpringBootApplication以及run方法,理解下springBoot为什么不需要XML,达到零配置 ...
- springboot4自动配置的原理(浅层)
自动配置的原理(浅层) @Configuration //这是一个配置类 @EnableConfigurationProperties(HttpProperties.class)//启用Configu ...
随机推荐
- .NET CORE 下收发邮件之 MAILKIT
背景 利用代码发送邮件在工作中还是比较常见的,相信大家都用过SmtpClient来处理发送邮件的操作,不过这个类以及被标记已过时,所以介绍一个微软推荐的库MailKit来处理. MailKit开源地址 ...
- C语言||一作业04
作业头 这个作业属于哪个课程 https://edu.cnblogs.com/campus/zswxy/SE2020-3 这个作业要求在哪 https://edu.cnblogs.com/campus ...
- STM32F103RCT6驱动AD7705(cubeide)
首先在cubeide上配置spi,使用spi1,由于正点开发板上的nr24l01与ad7705正好相同,因此根据引脚配置PA1为DRDY,PC4为CS片选 根据手册上所写,配置寄存器初始化 uint8 ...
- gdb 脚本 简单理解
1. gdb 脚本的语法简介: 摘录博客:https://blog.csdn.net/hejinjing_tom_com/article/details/50350865 1] # 为脚本注释命令 ...
- TypeScript系列 -> 遇到报错 Cannot find name ‘console‘. Do you need to change your target library?ging the ‘lib‘ compiler option
学习ts遇到的报错 Cannot find name 'console'. Do you need to change your target library?ging the 'lib' compi ...
- 添加新模块 import
import getpass username = input("username") password = input("password") #passwo ...
- OPENSSL 生成RSA公钥、私钥和证书
在命令窗口执行下列操作. 1)生成RSA私钥: openssl genrsa -out rsa_private_key.pem 2048 生成内容: -----BEGIN RSA PRIVATE KE ...
- 正则url匹配
今天来说一下正则的url匹配 示例:url ="https://v5.lairen.com/activity?id=862&code=ab9a61823398273b7b036fd9 ...
- Jmeter六、采样器解析
一.HTTP request sampler 默认端口:80 协议protocol:http,https,file 参数中有特殊字符,勾选编码encode send files with reques ...
- PDF转置
import pdfplumber #全是None with pdfplumber.open(r"C:\Users\yjiang3\Desktop\Inv.pdf") as pdf ...