ASP.NET Core的身份认证框架IdentityServer4(7)- 使用客户端证书控制API访问
一.前言
本文已更新到 .NET Core 2.2
本文包括后续的Demo都会放在github:https://github.com/stulzq/IdentityServer4.Samples (QuickStart的几个Demo随着本系列的更新,目前为从官方Demo仓库的拷贝,防止本文和Demo不匹配,因为官方Demo和文档一直在更新,本系列更新速度可能会慢一步)。
这里特别说明一下:快速入门以及Topic系列为了保持到最新,目前几乎都是翻译的官方文档(以往的不适合最新版本就换掉了),需要深入一点的请看实战系列。
二.使用客户端认证保护API
此示例介绍了使用IdentityServer保护API的最基本场景。
在这种情况下,我们将定义一个API和要访问它的客户端。 客户端将在IdentityServer上请求访问令牌,并使用它来访问API。
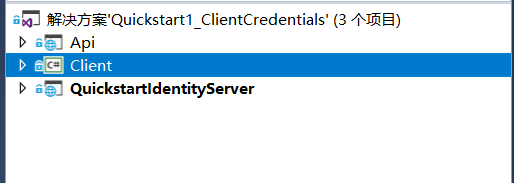
三.准备
创建一个名为QuickstartIdentityServer的ASP.NET Core Web 空项目(asp.net core 2.2),端口5000
创建一个名为Api的ASP.NET Core Web Api 项目(asp.net core 2.2),端口5001
创建一个名为Client的控制台项目(.net core 2.2)
四.定义API、Identity资源
在QuickstartIdentityServer项目中添加一个Config.cs文件:
public static class Config

    {

        public static IEnumerable<IdentityResource> GetIdentityResources()

        {

            return new IdentityResource[]

            {

                new IdentityResources.OpenId()

            };

        }

        public static IEnumerable<ApiResource> GetApis()

        {

            return new List<ApiResource>

            {

                new ApiResource("api1", "My API")

            };

        }

        public static IEnumerable<Client> GetClients()

        {

            return new List<Client>

            {

                new Client

                {

                    ClientId = "client",

                    // no interactive user, use the clientid/secret for authentication

                    AllowedGrantTypes = GrantTypes.ClientCredentials,

                    // secret for authentication

                    ClientSecrets =

                    {

                        new Secret("secret".Sha256())

                    },

                    // scopes that client has access to

                    AllowedScopes = { "api1" }

                }

            };

        }

    }
五.定义客户端
对于这种情况,客户端将不具有交互式(人机交互)用户,并将使用IdentityServer的客户端模式进行身份验证。 将以下代码添加到Config.cs文件中:
public static IEnumerable<Client> GetClients()

{

    return new List<Client>

    {

        new Client

        {

            ClientId = "client",

            // no interactive user, use the clientid/secret for authentication

            AllowedGrantTypes = GrantTypes.ClientCredentials,

            // secret for authentication

            ClientSecrets =

            {

                new Secret("secret".Sha256())

            },

            // scopes that client has access to

            AllowedScopes = { "api1" }

        }

    };

}
六.配置 IdentityServer
要配置IdentityServer以使用Scope和客户端定义,您需要向ConfigureServices方法添加代码。
Startup.cs
public void ConfigureServices(IServiceCollection services)

{

    var builder = services.AddIdentityServer()

        .AddDeveloperSigningCredential()

        .AddInMemoryIdentityResources(Config.GetIdentityResources())

        .AddInMemoryApiResources(Config.GetApis())

        .AddInMemoryClients(Config.GetClients());

    // rest omitted

}

public void Configure(IApplicationBuilder app)

{

        if (Environment.IsDevelopment())

        {

            app.UseDeveloperExceptionPage();

        }

        // uncomment if you want to support static files

        //app.UseStaticFiles();

        app.UseIdentityServer();

        // uncomment, if you wan to add an MVC-based UI

        //app.UseMvcWithDefaultRoute();

}
运行此项目,打开浏览器访问http://localhost:5000/.well-known/openid-configuration你将会看到IdentityServer的各种元数据信息。
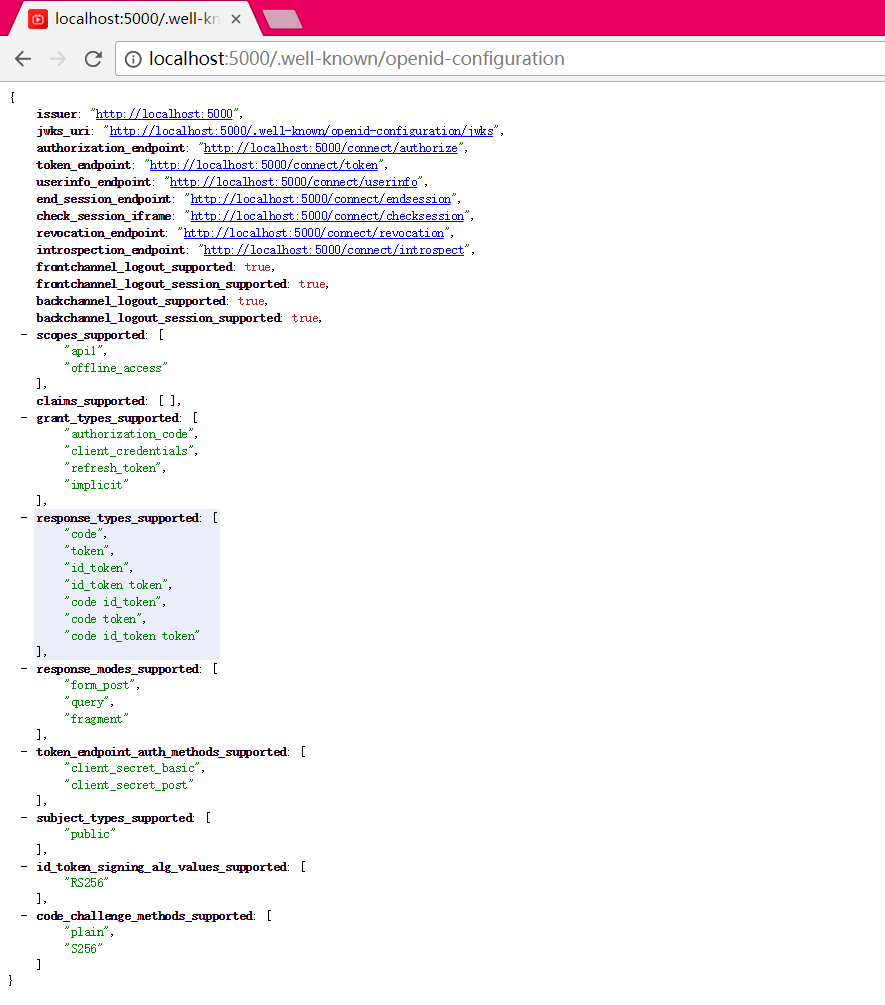
首次启动时,IdentityServer将为您创建一个开发人员签名密钥,它是一个名为tempkey.rsa的文件。 您不必将该文件检入源代码管理中,如果该文件不存在,将重新创建该文件。
七.添加API
在项目Api中添加一个Controller:IdentityController
[Route("identity")]

[Authorize]

public class IdentityController : ControllerBase

{

    [HttpGet]

    public IActionResult Get()

    {

        return new JsonResult(from c in User.Claims select new { c.Type, c.Value });

    }

}
最后一步是将身份验证服务添加到DI和身份验证中间件到管道。 这些将:
- 验证传入令牌以确保它来自受信任的颁发者
- 验证令牌是否有效用于此API(也称为 audience)
将Startup更新为如下所示:
public class Startup

{

    public void ConfigureServices(IServiceCollection services)

    {

        services.AddMvcCore()

            .AddAuthorization()

            .AddJsonFormatters();

        services.AddAuthentication("Bearer")

            .AddJwtBearer("Bearer", options =>

            {

                options.Authority = "http://localhost:5000";

                options.RequireHttpsMetadata = false;

                options.Audience = "api1";

            });

    }

    public void Configure(IApplicationBuilder app)

    {

        app.UseAuthentication();

        app.UseMvc();

    }

}
AddAuthentication 将身份认证服务添加到DI,并将“Bearer”配置为默认方案。 AddJwtBearer 将 JWT 认证处理程序添加到DI中以供身份认证服务使用。 UseAuthentication 将身份认证中间件添加到管道中,因此将在每次调用API时自动执行身份验证。
如果在浏览器访问(http:// localhost:5001/identity),你会得到HTTP 401的结果。 这意味着您的API需要凭据。
就是这样,API现在受 IdentityServer 保护。
八.创建客户端
为 "Client" 项目添加 Nuget 包:IdentityModel
IdentityModel 包括用于发现 IdentityServer 各个终结点(EndPoint)的客户端库。这样您只需要知道 IdentityServer 的地址 - 可以从元数据中读取实际的各个终结点地址:
// discover endpoints from metadata

var client = new HttpClient();

var disco = await client.GetDiscoveryDocumentAsync("http://localhost:5000");

if (disco.IsError)

{

    Console.WriteLine(disco.Error);

    return;

}
DiscoveryClient 已在最新版移除
接下来,您可以使用从 IdentityServer 元数据获取到的Token终结点请求令牌:
// request token

var tokenResponse = await client.RequestClientCredentialsTokenAsync(new ClientCredentialsTokenRequest

{

    Address = disco.TokenEndpoint,

    ClientId = "client",

    ClientSecret = "secret",

    Scope = "api1"

});

if (tokenResponse.IsError)

{

    Console.WriteLine(tokenResponse.Error);

    return;

}

Console.WriteLine(tokenResponse.Json);
九.调用API
要将Token发送到API,通常使用HTTP Authorization标头。 这是使用SetBearerToken扩展方法完成的:
// call api

var client = new HttpClient();

client.SetBearerToken(tokenResponse.AccessToken);

var response = await client.GetAsync("http://localhost:5001/identity");

if (!response.IsSuccessStatusCode)

{

    Console.WriteLine(response.StatusCode);

}

else

{

    var content = await response.Content.ReadAsStringAsync();

    Console.WriteLine(JArray.Parse(content));

}
输出应如下所示:
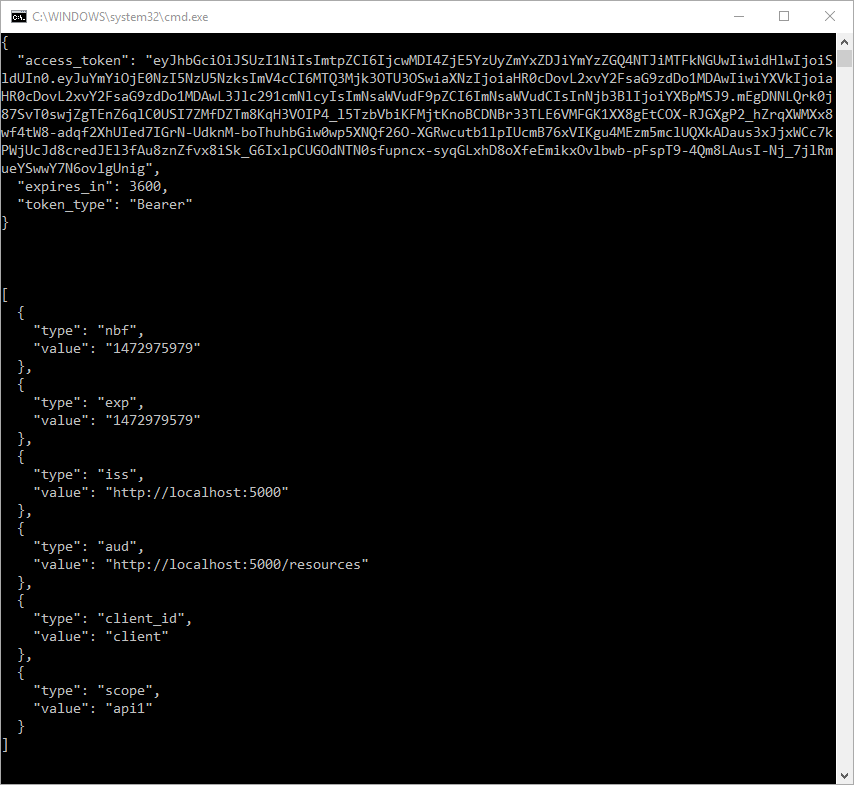
默认情况下,Token将包含有关 Scope,生命周期(nbf和exp),客户端ID(client_id)和颁发者名称(iss)的身份信息单元(Claim)。
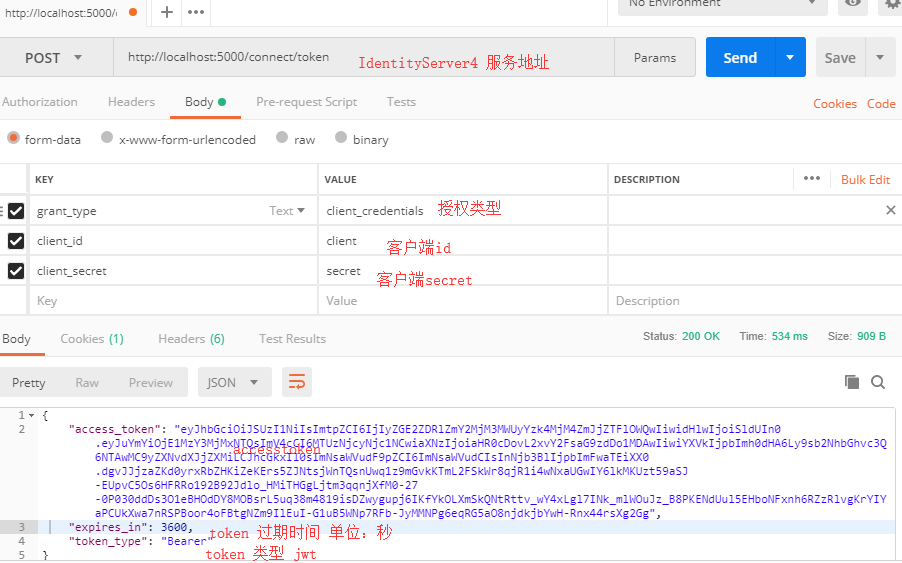
十.使用Postman调试
十一.项目所用代码
github地址: https://github.com/stulzq/IdentityServer4.Samples/tree/master/Quickstarts/1_ClientCredentials
ASP.NET Core的身份认证框架IdentityServer4(7)- 使用客户端证书控制API访问的更多相关文章
- ASP.NET Core的身份认证框架IdentityServer4(1)-特性一览
IdentityServer4是ASP.NET Core的一个包含OpenID和OAuth 2.0协议的框架.OpenID和OAuth 的区别请看 https://www.zhihu.com/ques ...
- ASP.NET Core的身份认证框架IdentityServer4(6)- 开始
安装和概述 启动一个新的IdentityServer项目有两种基本方法: 从头开始 从Visual Studio中的ASP.NET身份模板开始 如果从头开始,我们提供了一些文档.项目帮助和内存存储支持 ...
- ASP.NET Core的身份认证框架IdentityServer4(5)- 包和构建
包和构建 IdentityServer有许多nuget包 IdentityServer4 nuget | github 包含IdentityServer核心对象模型,服务和中间件. 仅支持内存配置和用 ...
- ASP.NET Core的身份认证框架IdentityServer4(9)-使用OpenID Connect添加用户认证
OpenID Connect OpenID Connect 1.0是OAuth 2.0协议之上的一个简单的身份层. 它允许客户端基于授权服务器执行的身份验证来验证最终用户的身份,以及以可互操作和类似R ...
- ASP.NET Core的身份认证框架IdentityServer4(3)-术语的解释
IdentityServer4 术语 IdentityServer4的规范.文档和对象模型使用了一些你应该了解的术语. 身份认证服务器(IdentityServer) IdentityServer是一 ...
- ASP.NET Core的身份认证框架IdentityServer4(8)- 使用密码认证方式控制API访问
前言 本文及IdentityServer这个系列使用的都是基于.net core 2.0的.上一篇博文在API项目中我使用了icrosoft.AspNetCore.Authentication.Jwt ...
- ASP.NET Core的身份认证框架IdentityServer4(4)- 支持的规范
IdentityServer实现以下规范: OpenID Connect OpenID Connect Core 1.0 (spec) OpenID Connect Discovery 1.0 (sp ...
- ASP.NET Core的身份认证框架IdentityServer4--入门
ASP.NET Core的身份认证框架IdentityServer4--入门 2018年08月11日 10:09:00 qq_42606051 阅读数 4002 https://blog.csdn ...
- ASP.NET Core的身份认证框架IdentityServer4--入门【转】
原文地址 Identity Server 4是IdentityServer的最新版本,它是流行的OpenID Connect和OAuth Framework for .NET,为ASP.NET Cor ...
随机推荐
- Python零基础学习系列之二--Python介绍及环境搭建
1-1.Python简介: Python是一种解释型.面向对象.动态数据类型的高级程序设计语言.Python由Guido van Rossum于1989年底发明,第一个公开发行版发行于1991年.像P ...
- 蓝桥杯比赛java 练习《立方变自身》
立方变自身 观察下面的现象,某个数字的立方,按位累加仍然等于自身.1^3 = 1 8^3 = 512 5+1+2=817^3 = 4913 4+9+1+3=17... 请你计算包括1,8, ...
- RSA简介(一)——数论原理
RSA是最常用的非对称加密算法. 所谓非对称加密,就是说有两个密钥,一个密钥加密只可以用另外一个密钥解密,一般一个作为公钥,公开给所有人用来加密用,而另一个用来解密其他拥有公钥的加密结果,叫做私钥.另 ...
- Android对话框和帧动画
Android对话框 在一个例子中展示四种对话框. 设置四个按钮 <LinearLayout xmlns:android="http://schemas.android.com/apk ...
- Fliptile 翻格子游戏[Usaco2007 Open]
题目描述 Farmer John knows that an intellectually satisfied cow is a happy cow who will give more milk. ...
- centos 系统常用命令
一:查看cpu信息more /proc/cpuinfo | grep "model name" grep "model name" /proc/cpuinfo ...
- HTML中表格
HTML表格 [表格table] 表格用table表示,表格中的每一行tr表示,一行中的每一列用td表示 th表示的是:表头.表头中的文字,默认为加粗居中.th要放在tr中,用于替换掉td. [tab ...
- python实战===输入密码以******的形式在cmd中展示
#设置密码输入,显示为****** import msvcrt,sys def pwd_input(): chars = [] while True: try: newChar = msvcrt.ge ...
- TX2(1)--Jetson TX2 刷机并安装JetPack3.0
一般而言,刷机是在Ubuntu16.04的系统上进行,本人在ubuntu16.04系统上进行了初步的测试,暂时存在一些问题,因此建议首先配备一台Ubuntu14.04的host主机(不建议使用虚拟机) ...
- Spring集成RabbitMQ-使用RabbitMQ更方便
如果提到Spring,你脑海中对他的印象还停留在SSH三大框架之一,那或许你该好好重新认识这个家伙. 在IT技术日新月异的今天,他还能让你忘不了并与他朝夕相处,他,肯定有自己的绝活.如今他早已经不是孤 ...