Ioc和Ao使用扩展
一、Bean作用域
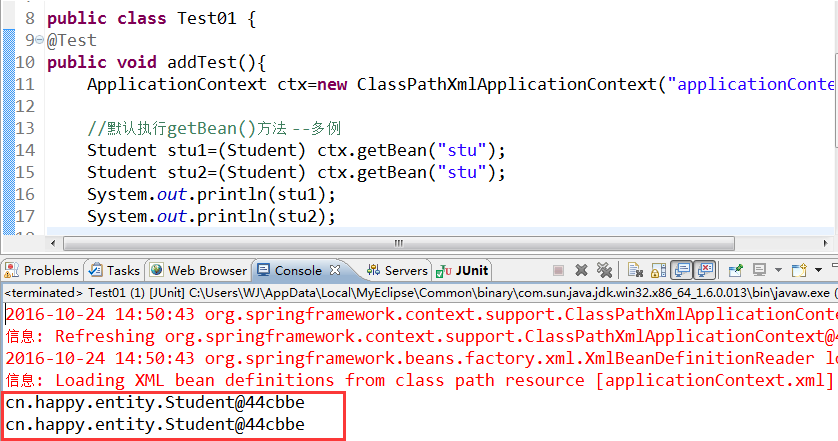
spring容器创建的时候,会将所有配置的bean对象创建出来,默认bean都是单例的。代码通过getBean()方法从容器获取指定的bean实例,容器首先会调用Bean类的无参构造器,创建实例对象
那么?我们如何说明出bean是单例的呢?
构建出两份学生对象,执行,发现两个对象的内存地址相同,内存中只有一份
如何使它成为多例的呢?那么则需要在配置文件中添加scope="prototype"该属性即可!
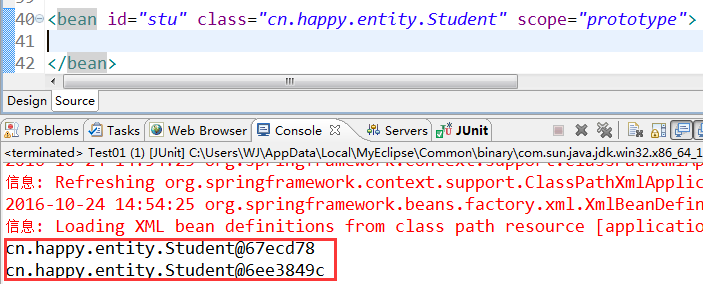
scope="prototype" 原型模式(N个对象):真正使用时才会创建,每获取一次,都会创建不同对象
scope="singleton" 单例模式:容器初始化时需要使用name建,每次获取的都是同一个对象,默认值
使用Spring通过getter访问器实现了对属性赋值,这种做法被称为设值注入。除此之外Spring还提供了通过构造方法赋值的能力,成为构造注入。
下面我们通过一个例子来深入了解一下
首先创建一个Car类
package cn.entity;

public class Car {

    private String color;

    private String brand;

    public String toString() {

        return "Car [color=" + color + "]";

    }

    public String getColor() {

        return color;

    }

    public void setColor(String color) {

        this.color = color;

    }

    public String getBrand() {

        return brand;

    }

    public void setBrand(String brand) {

        this.brand = brand;

    }

}
再书写Student类
package cn.entity;

public class Student {

    private String name;

    private String age;

    private Car car;

    public String getAge() {

        return age;

    }

    public void setAge(String age) {

        this.age = age;

    }

    @Override

    public String toString() {

        return "Student [name=" + name + ", age=" + age + ", myCar=" +car

                + "]";

    }

    public Car getCar() {

        return car;

    }

    public void setCar(Car car) {

        this.car = car;

    }

    public String getName() {

        return name;

    }

    public void setName(String name) {

        this.name = name;

    }

}
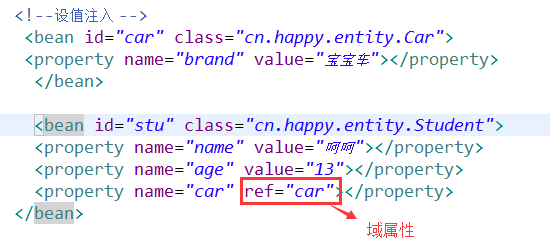
1.1设值注入(set方法注入):本质上是调用了Bean的setXXX()进行值的注入。分为普通属性和域属性
测试类:
|
1
2
3
4
5
6
7
8
|
public class Test01 {@Testpublic void addTest(){ ApplicationContext ctx=new ClassPathXmlApplicationContext("applicationContext.xml"); Student student=(Student) ctx.getBean("stu"); System.out.println(student);} |
实现效果:

三、集合属性注入[List、Set、Map]
package cn.entity;

import java.util.List;

import java.util.Map;

import java.util.Set;

public class CollectionBean {

    private List<String> list;

       private Set<String> set;

       private  Map<String,String> map;

    public List<String> getList() {

        return list;

    }

    public void setList(List<String> list) {

        this.list = list;

    }

    public Set<String> getSet() {

        return set;

    }

    public void setSet(Set<String> set) {

        this.set = set;

    }

    public Map<String, String> getMap() {

        return map;

    }

    public void setMap(Map<String, String> map) {

        this.map = map;

    }

}
applicationContext.xml配置文件书写
<?xml version="1.0" encoding="UTF-8"?>

<beans xmlns="http://www.springframework.org/schema/beans"

    xmlns:p="http://www.springframework.org/schema/p"

    xmlns:xsi="http://www.w3.org/2001/XMLSchema-instance"

    xsi:schemaLocation="

        http://www.springframework.org/schema/beans http://www.springframework.org/schema/beans/spring-beans.xsd

        ">

     <bean id="stu" class="cn.entity.Student" scope="prototype">

           <property name="color" value="红色"></property>

     </bean>

     <bean id="cars" class="cn.entity.Car" scope="prototype">

           <property name="color" value="红色"></property>

     </bean>

     <bean id="stu1" class="cn.entity.Student" scope="prototype">

           <property name="name" value="章撒"></property>

           <property name="age" value="12"></property>

           <property name="car" value="cars"></property>

     </bean>

     <bean id="car" class="cn.entity.Car">

           <property name="color" value="红色"></property>

        </bean>

     <bean id="stu2" class="cn.entity.Student">

          <property name="name" value="张三"></property>

          <property name="age" value="18"></property>

          <property name="car" ref="car"></property>

      </bean>

     <bean id="stu3" class="cn.entity.Student" p:name="李四" p:age="13" p:car-ref="car"/>

     <bean id="list" class="cn.entity.CollectionBean">

         <property name="list">

             <list>

                 <value>张三</value>

                 <value>李四</value>

             </list>

         </property>

     </bean>

     <bean id="set" class="cn.entity.CollectionBean">

         <property name="set">

             <set>

                 <value>张三1</value>

                 <value>李四1</value>

             </set>

         </property>

     </bean>

     <bean id="map" class="cn.entity.CollectionBean">

         <property name="map">

             <map>

                 <entry key="dq">

                     <value>张三2</value>

                 </entry>

                 <entry key="eq">

                     <value>李四2</value>

                 </entry>

             </map>

         </property>

     </bean>

 </beans>
测试类
package cn.test;

import org.junit.Test;

import org.springframework.context.ApplicationContext;

import org.springframework.context.support.ClassPathXmlApplicationContext;

import cn.entity.CollectionBean;

import cn.entity.HappyService;

import cn.entity.Student;

public class MyTest {

    public void listTest(){

        ApplicationContext ctx=new ClassPathXmlApplicationContext("applicationContext.xml");

        CollectionBean bean=(CollectionBean)ctx.getBean("list");

        System.out.println(bean.getList());

    }

    @Test

    public void setTest(){

        ApplicationContext ctx=new ClassPathXmlApplicationContext("applicationContext.xml");

        CollectionBean bean=(CollectionBean)ctx.getBean("set");

        System.out.println(bean.getSet());

    }

    @Test

    public void mapTest(){

        ApplicationContext ctx=new ClassPathXmlApplicationContext("applicationContext.xml");

        CollectionBean bean=(CollectionBean)ctx.getBean("map");

        System.out.println(bean.getMap());

    }

}
list()

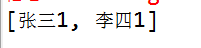
set()
map()

四、基于注解的DI
注:在项目中添加Spring AOP相关的JAR文件以及xsd约束文件。
由于是基于注解的DI,所以无需再Spring配置文件中进行节点配置,只需配置包扫描器即可!
配置包扫描器用途:
该包下以及子包中的类才可以被Spring扫描,去寻找被注解的类和属性,让Spring容器管理赋值
<?xml version="1.0" encoding="UTF-8"?>

<beans xmlns="http://www.springframework.org/schema/beans"

    xmlns:context="http://www.springframework.org/schema/context"

    xmlns:p="http://www.springframework.org/schema/p"

    xmlns:xsi="http://www.w3.org/2001/XMLSchema-instance"

    xsi:schemaLocation="

        http://www.springframework.org/schema/beans http://www.springframework.org/schema/beans/spring-beans.xsd

         http://www.springframework.org/schema/context http://www.springframework.org/schema/context/spring-context.xsd

        ">

                                             指定包名

       <context:component-scan base-package="cn.entitys"></context:component-scan>

</beans>
Student类:
指定@Component中的value即可在测试类中的getBean()中植入即可。
@Value为该属性赋值
等价于@Component的注解:
@Component[不分层的情况下]
@Repository() [Dao层]
@Service() [Biz层]
@Controller() [Action类]
@Component(value="stu")

public class Student {

@Value("呵呵")

private String name;

@Value("13")

private String age;

/*

 * JDK注解 @Resource(name="car2")

 */

/*

 * Spring注解

 */

@Autowired

@Qualifier(value="car2")

private Car car;

@Override

public String toString() {

    return "Student [name=" + name + ", age=" + age + ", car=" + car + "]";

}
Car类:
@Component(value="car2")

public class Car {

@Value("黑色")

private String color;

@Value("奥迪")

private String brand;

@Override

public String toString() {

    return "Car [color=" + color + ", brand=" + brand + "]";

}
测试类:
public class Test01 {

@Test

public void addTest(){

    ApplicationContext ctx=new ClassPathXmlApplicationContext("applicationContext.xml");

    Student student=(Student) ctx.getBean("stu");

    System.out.println(student);

}

}
效果展示

Ioc和Ao使用扩展的更多相关文章
- IOC和AOP使用扩展 多种方式实现依赖注入
多种方式实现依赖注入 1.Spring 使用setter访问器实现对属性的赋值, 2.Spring 构造constructor方法赋值, 3.接口注入 4.Spring P命名空间注入直接量 sett ...
- Spring IoC和AOP使用扩展
Spring提供了设值注入,构造注入等依赖注入方式. 使用p命令空间可以简化属性注入的配置. Spring提供的增强处理类型包括前置增强,异常抛出增强,环绕增强,最终增强等. 通过Schema形式将P ...
- IoC和AOP使用扩展。。。
实现依赖的多种方式. 1.理解构造注入. 2.掌握使用p命名空间实现属性注入. 3.理解不同的数据类型的注入方式. 4.如何通过构造注入为业务类注入所依赖的数据访问层对象,实现保存用户数据功能. 5. ...
- IOC和AOP使用扩展之AOP详解实现类
摘要: “Depend on yourself” is what nature says to every man. Parents can help you. Teachers can hel ...
- .NET MVC4 实训记录之一(引入Unity3.0 Ioc框架)
一直在做维护项目,没有机会接触完整的架构,于是自学.NET MVC.自今日起,将自学的过程.遇到的问题以及解决方案记录下来. 在WebApp项目中右键,使用NuGet引入Unity3.0.
- 轻量级IoC框架Ninject.NET搭建
说在之前的话 IOC的概念相信大家比较熟悉了,习惯性称之为依赖注入或控制反转,园子里对基于MVC平台IOC设计模式已经相当多了,但大家都只知道应该怎么应用一个IOC模式,比如Ninject, Unit ...
- Dubbo源码解析之SPI(一):扩展类的加载过程
Dubbo是一款开源的.高性能且轻量级的Java RPC框架,它提供了三大核心能力:面向接口的远程方法调用.智能容错和负载均衡,以及服务自动注册和发现. Dubbo最早是阿里公司内部的RPC框架,于 ...
- Spring(IOC、AOP和事务)
目录 Spring介绍 Spring IOC 传统代码对象管理的弊端 实现过程 bean标签属性介绍 对象创建方式 工厂bean bean的作用域 SpringBean的生命周期*** 依赖注入 注解 ...
- 【SOE】 ArcGIS Server对象扩展(SOE)开发注意事项
ArcGIS Server对象扩展(SOE)开发注意事项 1.SOE介绍 在ArcGIS 10.1中ArcGIS Server不在支持DCOM方式的连接,这也就意味着我们不能通过本地方式的连接使用A ...
随机推荐
- 推荐几款jquery图片切换插件
一.前言 毕业季到了,大家都在匆匆忙忙的记录大学里最美好的时光,照片中各种花式.各种姿势都涌现出来了.这么多的照片怎么展示出来给自己的好友看呢?有人选择做成视频,有人选择ps之后做成图片集,而我选择利 ...
- CRL快速开发框架系列教程八(使用CRL.Package)
本系列目录 CRL快速开发框架系列教程一(Code First数据表不需再关心) CRL快速开发框架系列教程二(基于Lambda表达式查询) CRL快速开发框架系列教程三(更新数据) CRL快速开发框 ...
- 如何重新注册VMware Update Manager(VUM)至vCenter Server中
在VMware的vSphere化境中,VUM的角色相当于Windows 环境中的WSUS(Windows 更新服务器),可以批量,自动化的完成所管辖ESXi主机的大版本迁移,小版本升级的任务,深受管理 ...
- Vertica 导出数据测试用例
需求:构建简单的测试用例,完成演示Vertica导出数据的功能. 测试用例:导出test业务用户t_jingyu表中的数据. 一.初始化测试环境 二.导出数据 2.1 vsql命令说明帮助 2.2 导 ...
- 网站实现微信登录之回调函数中登录逻辑的处理--基于yii2开发的描述
上一篇文章网站实现微信登录之嵌入二维码中描述了如何在自己的登录页面内嵌入登录二维码,今天的这篇文章主要是描述下在扫码成功之后微信重定向回网站后登录逻辑的处理,其实也就是验证身份信息,授权用户登录的逻辑 ...
- Android面试经验 -- 乐视
此次投的是三年经验的Android开发,最后反而因为自己的失误,没有准备充分而导致结果很悲剧,以此告诫自己千万不能疏忽大意. 面试过程 第一次去大公司面试,心里不是一般的激动和紧张,来到乐视大厦门口, ...
- 自己动手之使用反射和泛型,动态读取XML创建类实例并赋值
前言: 最近小匹夫参与的游戏项目到了需要读取数据的阶段了,那么觉得自己业余时间也该实践下数据相关的内容.那么从哪入手呢?因为用的是Unity3d的游戏引擎,思来想去就选择了C#读取XML文件这个小功能 ...
- Windows下删除.svn文件夹的最简易方法
建立一个文本文件,取名为kill-svn-folders.reg(扩展名由txt改为reg),内容如下: Windows Registry Editor Version 5.00 [HKEY_LOCA ...
- bootstrap(关于栅格布局)
栅格系统是通过行(.row)与列(column)的组合一起来创建页面布局的,所以只有列(column)可以作为行(row)的直接子元素,我们所要写的内容可以放在列里(column),不过在行的外层还需 ...
- Web 前端开发精华文章推荐(jQuery、HTML5、CSS3)【系列十二】
2012年12月12日,[<Web 前端开发人员和设计师必读文章>系列十二]和大家见面了.梦想天空博客关注 前端开发 技术,分享各种增强网站用户体验的 jQuery 插件,展示前沿的 HT ...