
mysql8.0.11绿色版安装教程
- 解压到安装目录
- 在根目录建立data文件夹
- 建立my.ini文件 代码如下
# Other default tuning values

# MySQL Server Instance Configuration File

# ----------------------------------------------------------------------

# Generated by the MySQL Server Instance Configuration Wizard

#

#

# Installation Instructions

# ----------------------------------------------------------------------

#

# On Linux you can copy this file to /etc/my.cnf to set global options,

# mysql-data-dir/my.cnf to set server-specific options

# (@localstatedir@ for this installation) or to

# ~/.my.cnf to set user-specific options.

#

# On Windows you should keep this file in the installation directory

# of your server (e.g. C:\Program Files\MySQL\MySQL Server X.Y). To

# make sure the server reads the config file use the startup option

# "--defaults-file".

#

# To run run the server from the command line, execute this in a

# command line shell, e.g.

# mysqld --defaults-file="D:\GreenSoft\MySQL\my.ini"

#

# To install the server as a Windows service manually, execute this in a

# command line shell, e.g.

# mysqld --install mysql --defaults-file="D:\GreenSoft\MySQL\my.ini"

#

# And then execute this in a command line shell to start the server, e.g.

# net start mysql

#

#

# Guildlines for editing this file

# ----------------------------------------------------------------------

#

# In this file, you can use all long options that the program supports.

# If you want to know the options a program supports, start the program

# with the "--help" option.

#

# More detailed information about the individual options can also be

# found in the manual.

#

# For advice on how to change settings please see

# http://dev.mysql.com/doc/refman/8.0/en/server-configuration-defaults.html

#

#

# CLIENT SECTION

# ----------------------------------------------------------------------

#

# The following options will be read by MySQL client applications.

# Note that only client applications shipped by MySQL are guaranteed

# to read this section. If you want your own MySQL client program to

# honor these values, you need to specify it as an option during the

# MySQL client library initialization.

#

[client]

no-beep

# pipe

# socket=0.0

port=

[mysql]

default-character-set=utf8

[mysqld]

# 这是8..4的新特性 caching_sha2_password,在linux上面使用命宁 mysql -uroot -proot 可以链接,但是使用windows下面的navict链接不成功

default_authentication_plugin = mysql_native_password

# These are commonly set, remove the # and set as required.

character-set-server = utf8

basedir = D:\Program Files\mysql-8.0.-winx64

datadir = D:\Program Files\mysql-8.0.-winx64\data

port =

server_id =

# Remove leading # and set to the amount of RAM for the most important data

# cache in MySQL. Start at % of total RAM for dedicated server, else %.

innodb_buffer_pool_size = 128M

# Remove leading # to turn on a very important data integrity option: logging

# changes to the binary log between backups.

# log_bin

# General and Slow logging.

log-output=FILE

general-log=

general_log_file="CUPID.log"

slow-query-log=

slow_query_log_file="CUPID-slow.log"

long_query_time=

# Binary Logging.

# log-bin

# Error Logging.

log-error="CUPID.err"

# Remove leading # to set options mainly useful for reporting servers.

# The server defaults are faster for transactions and fast SELECTs.

# Adjust sizes as needed, experiment to find the optimal values.

# join_buffer_size = 128M

# sort_buffer_size = 2M

# read_rnd_buffer_size = 2M

# 8.0.4版本的时候,用的是这个sql_mode,但在8..11版本中会报错,改成下面那个

# sql_mode=STRICT_TRANS_TABLES,NO_ZERO_IN_DATE,NO_ZERO_DATE,ERROR_FOR_DIVISION_BY_ZERO,NO_AUTO_CREATE_USER,NO_ENGINE_SUBSTITUTION

sql-mode="STRICT_TRANS_TABLES,NO_ENGINE_SUBSTITUTION"

default-storage-engine=INNODB

innodb_log_file_size = 512M

binlog_format='MIXED'

max_allowed_packet = 1G

# innodb_file_per_table =

# innodb_file_format = Barracuda

# 大小写是否敏感,0敏感 Linux下默认为0, Windows下默认值是 , MacOS下默认值是 (0敏感)

lower_case_table_names =

innodb_strict_mode =

max_connections =
- 管理员模式进入cmd
- cd:到mysql安装目录的bin下
- 初始化mysql
mysqld --initialize --user=mysql --console
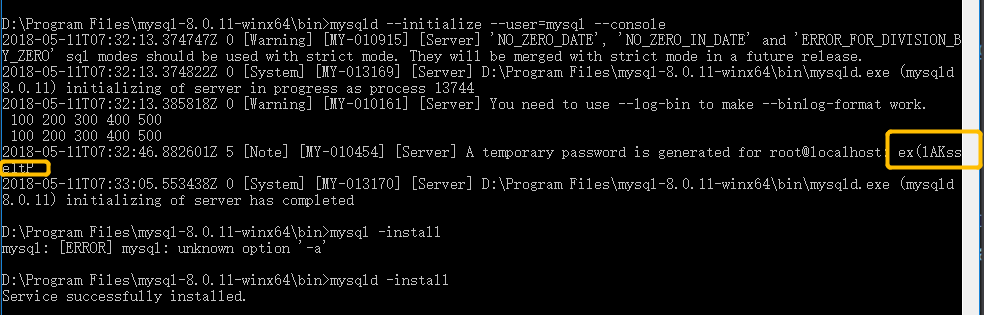
上面黄色的框,是自动生成的mysql临时密码,一会我们要用这个登录mysql服务
- 安装mysql服务
mysqld -install
- 开启服务
net start mysql
- 登录服务
mysql -uroot -p临时密码
- 修改密码
set password = 'root';
mysql8.0.11绿色版安装教程的更多相关文章
- windows10安装mysql8.0.11(免安装版)
1.MySQL8.0.11下载网址:https://dev.mysql.com/downloads/mysql/ 2.配置环境变量:我的电脑->属性->高级系统设置->环境变量-&g ...
- [linux]centos7.4上安装MySQL-8.0.11【完美安装】
版本声明 centos7.4 MySQL-8.0.11 1.我用的阿里云的虚拟主机,刚从windows换到linux,需要装下常用工具 #安装下sz rz常用到上传下载的命令 yum install ...
- phpstorm10.0.3破解版安装教程及汉化方法
phpstorm是一个轻量级且便捷的PHP IDE,其旨在提供用户效率,可深刻理解用户的编码,提供智能代码补全,快速导航以及即时错误检查.不但是php开发的利器,前端开发也是毫不逊色的.下面记录php ...
- mysql-8.0.16-winx64的最新安装教程
最近刚学习数据库,首先是了解数据库是什么,数据库.数据表的基本操作,这就面临了一个问题,mysql的安装,我这里下载的是64位的,基于Windows的,以下是在我电脑上的安装过程,希望可以帮助到大家. ...
- mysql8.0.19压缩版安装
1.官网下载.zip格式的MySQL Server的压缩包,选择x86或x64版,并解压. 2. 创建 data文件夹 及 my.ini文件,并编辑 [mysqld] # 设置为自己MYSQL的安装目 ...
- 高版本mysql8.0解压版安装步骤
解压版安装操作官网下载: mysql-installer-community-8.0.12.0.msi如上操作: http://www.cnblogs.com/elfin/p/9429877.html ...
- mysql8.0.11 在windows64安装 步骤
MySQL8.0 Windows zip包下载地址:https://cdn.mysql.com//Downloads/MySQL-8.0/mysql-8.0.11-winx64.zip 环境:Wind ...
- win10 压缩包安装mysql8.0.11报错:Access denied for user 'root'@'localhost'
按这篇:https://blog.csdn.net/Myuhua/article/details/84792121#commentsedit 这里精简下,还有update语句中authenticati ...
- Linux mysql8.0.11安装
准备:检查是否已安装过mysql,若有便删除(linux系统自带的) rpm -qa | grep mariadb rpm -e nodeps mariadb-libs-5.5.56-2.el7.x8 ...
随机推荐
- zookeeper3.4.6配置实现自动清理日志【转】
在使用zookeeper过程中,我们知道,会有dataDir和dataLogDir两个目录,分别用于snapshot和事务日志的输出(默认情况下只有dataDir目录,snapshot和事务日志都保存 ...
- hibernate框架学习之数据查询(QBC)
lQBC(Query By Criteria)是一种Hibernate中使用面向对象的格式进行查询的计数 lQBC查询方式步骤 •获取Session对象 •初始化Criteria对象(使用Sessio ...
- Excel 2013 表格自用技巧
参考 Excel表格的基本操作(精选36个技巧) Excel2013基本用法 关于VLOOKUP函数 目录 快速复制单元格 单元格内强制换行 锁定标题行 查找重复值 万元显示 单元格中显示001 按月 ...
- WinCE平台的程序编译到Win32平台下运行
最近做的项目中,有一个在WinCE平台上跑的程序,后来随着项目的发展,要求此程序在PC上也能跑.感谢VS 2005提供的多平台支持,只需要几分钟就可以解决这个问题,方法很简单,下面是我处理的过程. 1 ...
- winfrom里面打印类似小票
首先在窗体上拖一个printDocument1控件和一个Button按钮,然后双击该控件的PrintPage事件,在事件里面复制下面代码: Pen blackPen = new Pen(Color.B ...
- Python-数据类型 主键auto_increment
MySQL数据操作: DML========================================================在MySQL管理软件中,可以通过SQL语句中的DML语言来实 ...
- 解决KafKa数据存储与顺序一致性保证
“严格的顺序消费”有多么困难 下面就从3个方面来分析一下,对于一个消息中间件来说,”严格的顺序消费”有多么困难,或者说不可能. 发送端 发送端不能异步发送,异步发送在发送失败的情况下,就没办法保证消息 ...
- Poco::Crypto--加解密_RSA
Poco::Crypto--加解密(RSA) 1.简单的加解密 Cipher::Ptr pCipher = CipherFactory::defaultFactory().createCipher(R ...
- 转:如何在Vue项目中使用vw实现移动端适配
https://www.w3cplus.com/mobile/vw-layout-in-vue.html 有关于移动端的适配布局一直以来都是众说纷纭,对应的解决方案也是有很多种.在<使用Flex ...
- Ehcache
前言:设计一套缓存框架需要关注的要素 本文来源:RayChase 的<设计一套缓存框架需要关注的要素> 最近关注了一些缓存框架的特性和实现,包括OSCache.JCS.Ehcache.M ...