消息中间件-activemq实战整合Spring之Topic模式(五)
这一节我们看一下Topic模式下的消息发布是如何处理的。
applicationContext-ActiveMQ.xml配置:
<?xml version="1.0" encoding="UTF-8"?>

<beans xmlns="http://www.springframework.org/schema/beans"

       xmlns:xsi="http://www.w3.org/2001/XMLSchema-instance"

       xmlns:amq="http://activemq.apache.org/schema/core"

       xmlns:context="http://www.springframework.org/schema/context"

       xmlns:mvc="http://www.springframework.org/schema/mvc"

       xsi:schemaLocation="

http://www.springframework.org/schema/beans

http://www.springframework.org/schema/beans/spring-beans-4.1.xsd

http://www.springframework.org/schema/context

http://www.springframework.org/schema/context/spring-context-4.1.xsd

http://www.springframework.org/schema/mvc

http://www.springframework.org/schema/mvc/spring-mvc-4.1.xsd

http://activemq.apache.org/schema/core

http://activemq.apache.org/schema/core/activemq-core-5.12.1.xsd">

    <context:component-scan base-package="cn.edu.hust.activemq" />

    <mvc:annotation-driven />

    <amq:connectionFactory id="amqConnectionFactory"

                           brokerURL="tcp://127.0.0.1:61616"

                           userName="admin"

                           password="admin" />

    <!-- 配置JMS连接工厂 -->

    <bean id="connectionFactory"

          class="org.springframework.jms.connection.CachingConnectionFactory">

        <constructor-arg ref="amqConnectionFactory" />

        <property name="sessionCacheSize" value="100" />

    </bean>

    <!-- 定义消息队列(topic) -->

    <bean id="demoTopicDestination" class="org.apache.activemq.command.ActiveMQTopic">

        <!-- 设置消息队列的名字 -->

        <constructor-arg>

            <value>first-queue</value>

        </constructor-arg>

    </bean>

    <!-- 配置JMS模板(topic),Spring提供的JMS工具类,它发送、接收消息。 -->

    <bean id="jmsTemplate" class="org.springframework.jms.core.JmsTemplate">

        <property name="connectionFactory" ref="connectionFactory" />

        <property name="defaultDestination" ref="demoTopicDestination" />

        <property name="receiveTimeout" value="10000" />

        <property name="pubSubDomain" value="true" />

    </bean>

    <!-- 配置消息队列监听者(topic) -->

    <bean id="topicMessageListener" class="cn.edu.hust.activemq.filter.QueueMessageListener" />

    <bean id="topicMessageListener1" class="cn.edu.hust.activemq.filter.QueueMessageListener1" />

    <!-- 显示注入消息监听容器(topic),配置连接工厂,监听的目标是demoQueueDestination,监听器是上面定义的监听器 -->

    <bean id="queueListenerContainer"

          class="org.springframework.jms.listener.DefaultMessageListenerContainer">

        <property name="connectionFactory" ref="connectionFactory" />

        <property name="destination" ref="demoTopicDestination" />

        <property name="messageListener" ref="topicMessageListener" />

        <!--消息接收超时 -->

        <property name="receiveTimeout" value="10000" />

    </bean>

    <bean id="queueListenerContainerB"

          class="org.springframework.jms.listener.DefaultMessageListenerContainer">

        <property name="connectionFactory" ref="connectionFactory" />

        <property name="destination" ref="demoTopicDestination" />

        <property name="messageListener" ref="topicMessageListener1" />

        <!--消息接收超时 -->

        <property name="receiveTimeout" value="10000" />

    </bean>

</beans>
这里与queue模式不一样的地方在于订阅者有一个或是多个,有几个订阅者就需要配置监听器。
applicationContext.xml
<?xml version="1.0" encoding="UTF-8"?>

<!-- 查找最新的schemaLocation 访问 http://www.springframework.org/schema/ -->

<beans xmlns="http://www.springframework.org/schema/beans"

       xmlns:context="http://www.springframework.org/schema/context"

       xmlns:mvc="http://www.springframework.org/schema/mvc"

       xmlns:xsi="http://www.w3.org/2001/XMLSchema-instance"

       xsi:schemaLocation="http://www.springframework.org/schema/aop

http://www.springframework.org/schema/aop/spring-aop-4.0.xsd

http://www.springframework.org/schema/beans

http://www.springframework.org/schema/beans/spring-beans-4.0.xsd

http://www.springframework.org/schema/context

http://www.springframework.org/schema/context/spring-context-4.0.xsd

http://www.springframework.org/schema/mvc

http://www.springframework.org/schema/mvc/spring-mvc-4.0.xsd">

    <!-- 指定Sping组件扫描的基本包路径 -->

    <context:component-scan base-package="cn.edu.hust.activemq" >

        <!-- 这里只扫描Controller,不可重复加载Service -->

        <context:include-filter type="annotation" expression="org.springframework.stereotype.Controller"/>

    </context:component-scan>

    <!-- 启用MVC注解 -->

    <mvc:annotation-driven />

    <!-- JSP视图解析器-->

    <bean class="org.springframework.web.servlet.view.InternalResourceViewResolver">

        <property name="prefix" value="/" />

        <property name="suffix" value=".jsp" />

        <!--  定义其解析视图的order顺序为1 -->

        <property name="order" value="1" />

    </bean>

</beans>
web.xml
<?xml version="1.0" encoding="UTF-8"?>

<web-app xmlns="http://java.sun.com/xml/ns/javaee"

         xmlns:xsi="http://www.w3.org/2001/XMLSchema-instance"

         xsi:schemaLocation="http://java.sun.com/xml/ns/javaee

          http://java.sun.com/xml/ns/javaee/web-app_3_0.xsd"

         version="3.0">

<display-name>Archetype Created Web Application</display-name>

    <context-param>

        <param-name>contextConfigLocation</param-name>

        <param-value>classpath:applicationContext-ActiveMQ.xml</param-value>

    </context-param>

    <listener>

        <listener-class>org.springframework.web.context.ContextLoaderListener</listener-class>

    </listener>

    <servlet>

        <servlet-name>springMVC</servlet-name>

        <servlet-class>org.springframework.web.servlet.DispatcherServlet</servlet-class>

        <init-param>

            <param-name>contextConfigLocation</param-name>

            <param-value>classpath:applicationContext.xml</param-value>

        </init-param>

        <load-on-startup>1</load-on-startup>

    </servlet>

    <servlet-mapping>

        <servlet-name>springMVC</servlet-name>

        <url-pattern>/</url-pattern>

    </servlet-mapping>

    <!-- 处理编码格式 -->

    <filter>

        <filter-name>characterEncodingFilter</filter-name>

        <filter-class>org.springframework.web.filter.CharacterEncodingFilter</filter-class>

        <init-param>

            <param-name>encoding</param-name>

            <param-value>UTF-8</param-value>

        </init-param>

        <init-param>

            <param-name>forceEncoding</param-name>

            <param-value>true</param-value>

        </init-param>

    </filter>

    <filter-mapping>

        <filter-name>characterEncodingFilter</filter-name>

        <url-pattern>/*</url-pattern>

    </filter-mapping>

</web-app>
其余部分与queue模式代码一样,只是需要多配置一个监听器,目录结构如下:

ProducerService.java
import javax.jms.Destination;

/**

 * Created by Administrator on 2017/5/3.

 */

public interface ProducerService {

    void sendMessage(Destination destination,final String msg);

    void sendMessage(final String msg);

}
ProducerServiceImpl.java
import cn.edu.hust.activemq.service.ProducerService;
import org.springframework.jms.core.JmsTemplate;
import org.springframework.jms.core.MessageCreator;
import org.springframework.stereotype.Service;
import javax.annotation.Resource;
import javax.jms.Destination;
import javax.jms.JMSException;
import javax.jms.Message;
import javax.jms.Session;
/**
* Created by Administrator on 2017/5/3.
*/
@Service
public class ProducerServiceImpl implements ProducerService {
@Resource(name="jmsTemplate")
private JmsTemplate jmsTemplate;
@Override
public void sendMessage(Destination destination, final String msg) {
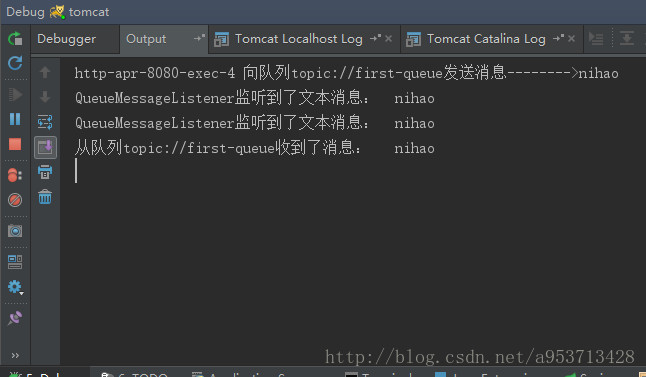
System.out.println(Thread.currentThread().getName()+" 向队列"+destination.toString()+"发送消息--------->"+msg);
jmsTemplate.send(destination, new MessageCreator() {
public Message createMessage(Session session) throws JMSException {
return session.createTextMessage(msg);
}
});
}
@Override
public void sendMessage(final String msg) {
String destination = jmsTemplate.getDefaultDestinationName();
System.out.println(Thread.currentThread().getName()+" 向队列"+destination+"发送消息-------->"+msg);
jmsTemplate.send(new MessageCreator() {
public Message createMessage(Session session) throws JMSException {
return session.createTextMessage(msg);
}
});
}
}ConsumerService.java
import javax.jms.Destination;

import javax.jms.TextMessage;

/**

 * Created by Administrator on 2017/5/3.

 */

public interface ConsumerService {

    TextMessage receive(Destination destination);

}
ConsumerServiceImpl.java
import cn.edu.hust.activemq.service.ConsumerService;

import javax.jms.Destination;

import javax.jms.TextMessage;

import org.springframework.jms.core.JmsTemplate;

import org.springframework.stereotype.Service;

import javax.annotation.Resource;

import javax.jms.JMSException;

/**

 * Created by Administrator on 2017/5/3.

 */

@Service

public class ConsumerServiceImpl implements ConsumerService {

    @Resource(name="jmsTemplate")

    private JmsTemplate jmsTemplate;

    @Override

    public TextMessage receive(Destination destination){

        TextMessage textMessage = (TextMessage) jmsTemplate.receive(destination);

        try{

            System.out.println("从队列" + destination.toString() + "收到了消息:\t"

                    + textMessage.getText());

        } catch (JMSException e) {

            e.printStackTrace();

        }

        return textMessage;

    }

}
QueueMessageListener.java
import javax.jms.JMSException;

import javax.jms.Message;

import javax.jms.MessageListener;

import javax.jms.TextMessage;

/**

 * Created by Administrator on 2017/5/3.

 */

public class QueueMessageListener implements MessageListener {

    public void onMessage(Message message) {

        TextMessage tm = (TextMessage) message;

        try {

            System.out.println("topicMessageListener监听到了文本消息:\t"

                    + tm.getText());

            //do something ...

        } catch (JMSException e) {

            e.printStackTrace();

        }

    }

}
QueueMessageListener1.java
import javax.jms.JMSException;

import javax.jms.Message;

import javax.jms.MessageListener;

import javax.jms.TextMessage;

/**

 * Created by Administrator on 2017/5/3.

 */

public class QueueMessageListener1 implements MessageListener {

    public void onMessage(Message message) {

        TextMessage tm = (TextMessage) message;

        try {

            System.out.println("topicMessageListener1监听到了文本消息:\t"

                    + tm.getText());

            //do something ...

        } catch (JMSException e) {

            e.printStackTrace();

        }

    }

}
接下来是controller:
import cn.edu.hust.activemq.service.ConsumerService;

import cn.edu.hust.activemq.service.ProducerService;

import org.slf4j.Logger;

import org.slf4j.LoggerFactory;

import org.springframework.stereotype.Controller;

import org.springframework.web.bind.annotation.RequestMapping;

import org.springframework.web.bind.annotation.RequestMethod;

import org.springframework.web.bind.annotation.ResponseBody;

import javax.annotation.Resource;

import javax.jms.Destination;

import javax.jms.TextMessage;

/**

 * Created by Administrator on 2017/5/3.

 */

@Controller

public class MessageController {

    private Logger logger = LoggerFactory.getLogger(MessageController.class);

    @Resource(name = "demoQueueDestination")

    private Destination destination;

    //队列消息生产者

    @Resource

    private ProducerService producer;

    //队列消息消费者

    @Resource

    private ConsumerService consumer;

    @RequestMapping(value = "/SendMessage", method = RequestMethod.GET)

    @ResponseBody

    public void send(String msg) {

        logger.info(Thread.currentThread().getName()+"------------开始发送消息");

        producer.sendMessage(msg);

        logger.info(Thread.currentThread().getName()+"------------发送完毕");

    }

    @RequestMapping(value= "/ReceiveMessage",method = RequestMethod.GET)

    @ResponseBody

    public Object receive(){

        logger.info(Thread.currentThread().getName()+"------------开始接受消息");

        TextMessage tm = consumer.receive(destination);

        logger.info(Thread.currentThread().getName()+"------------接受完毕");

        return tm;

    }

}我们启动工程,在地址栏中输入:http://localhost:8080/SendMessage?msg=nihao,
代码很简单我就没有写前台页面啦,msg部分你可以随便写。回车之后我们去看一下控制台两个订阅者都接收到消息。
消息中间件-activemq实战整合Spring之Topic模式(五)的更多相关文章
- 消息中间件-activemq实战之整合Spring(四)
前面的理论准备已经很充分,这一节我们来实战:将activemq整合到Spring框架才行中,因为Spring已经集成了JMS,这也为我们配置activermq带来了方便. 1. Spring对jms的 ...
- spring boot整合RabbitMQ(Topic模式)
1.Topic交换器介绍 Topic Exchange 转发消息主要是根据通配符. 在这种交换机下,队列和交换机的绑定会定义一种路由模式,那么,通配符就要在这种路由模式和路由键之间匹配后交换机才能转发 ...
- activeMq 消费者整合spring
package com.mq.consumer; import javax.jms.JMSException;import javax.jms.Message;import javax.jms.Mes ...
- ActiveMQ之整合spring
ActiveMQ可以轻松的与Spring进行整合,Spring提供了一系列的接口类,非常的好用! 比如异步消息数据.异步发送邮件.异步消息查询等 <dependency> <grou ...
- 消息中间件-activemq实战之消息持久化(六)
对于activemq消息的持久化我们在第二节的时候就简单介绍过,今天我们详细的来分析一下activemq的持久化过程以及持久化插件.在生产环境中为确保消息的可靠性,我们肯定的面临持久化消息的问题,今天 ...
- spring整合activemq发送MQ消息[Topic模式]实例
Topic模式消息发送实例 1.pom引入 <dependency> <groupId>junit</groupId> <artifactId>juni ...
- spring +ActiveMQ 实战 topic selecter指定接收
spring +ActiveMQ 实战 topic selecter指定接收 queue:点对点模式,一个消息只能由一个消费者接受 topic:一对多,发布/订阅模式,需要消费者都在线(可能会导致信息 ...
- 淘淘商城项目_同步索引库问题分析 + ActiveMQ介绍/安装/使用 + ActiveMQ整合spring + 使用ActiveMQ实现添加商品后同步索引库_匠心笔记
文章目录 1.同步索引库问题分析 2.ActiveM的介绍 2.1.什么是ActiveMQ 2.2.ActiveMQ的消息形式 3.ActiveMQ的安装 3.1.安装环境 3.2.安装步骤 4.Ac ...
- ActiveMQ学习总结------Spring整合ActiveMQ 04
通过前几篇的学习,相信大家已经对我们的ActiveMQ的原生操作已经有了个深刻的概念, 那么这篇文章就来带领大家一步一步学习下ActiveMQ结合Spring的实战操作 注:本文将省略一部分与Acti ...
随机推荐
- BZOJ 3289:Mato的文件管理(莫队算法+树状数组)
http://www.lydsy.com/JudgeOnline/problem.php?id=3289 题意:…… 思路:求交换次数即求逆序对数.确定了这个之后,先离散化数组.然后在后面插入元素的话 ...
- TypeScript算法与数据结构-队列和循环队列
本文涉及的源码,均在我的github.有两部分队列和循环队列.有问题的可以提个issue,看到后第一时间回复 1. 队列(Queue) 队列也是一种线性的数据结构, 队列是一种先进先出的数据结构.类似 ...
- QT知识整理
1.connect函数的SIGNAL可以是按键.定时器.其他对象的信号.如果是其他对象的信号,对象必须要在当前类中实例化. 2.Qt数据类型转换 1)int转QStringint a=10;QStri ...
- crontab 中curl命令无法正常执行
这里所指curl无法执行Url情况是针对带参数的链接,方法体中无法获取参数的值. 比如: */7 * * * * curl http://localhost:8088/backening/sysOrd ...
- Atom常用插件、快键键、使用技巧
atom 中间有一条白色的虚线,怎么去掉? Settings/Packages/wrap-guide disable 自动换行 File-Settings-Editor-Soft Wrap(打勾即可) ...
- python数据库-MongoDB的基本使用(54)
一.MongoDB 创建数据库 语法:MongoDB 创建数据库的语法格式如下: use DATABASE_NAME 如果数据库不存在,则创建数据库,否则切换到指定数据库. > use Hero ...
- CDQZ集训DAY10 日记
又一次跪了,跪在了神奇的数据范围上. T1上来打完暴力之后觉得是数据结构题,像三维偏序,于是开始往各种数据结构上想,主席树,线段树+calc,平衡树,树套树,CDQ……最终在经过一番思考之后选择去打C ...
- Java编程思想:泛型方法
import java.util.*; public class Test { public static void main(String[] args) { // GenericMethods.t ...
- 【POJ - 1995】Raising Modulo Numbers(快速幂)
-->Raising Modulo Numbers Descriptions: 题目一大堆,真没什么用,大致题意 Z M H A1 B1 A2 B2 A3 B3 ......... AH ...
- py+selenium 无法定位ShowModalDialog模态窗口【已解决】
问题:无法定位弹出的模态窗口. 前瞻: 模态窗口:关闭之前,无法操作其他窗口. 但是selenium无法定位到这类窗口,百度说是目前selenium不支持处理模态窗口. 目标:定位到窗口里面的元素,完 ...