
对照谈-官方spring-boot-starter和自定义starter异同分析
在前面我讲用spring-boot-starter-mail发邮件的时候,我侧重看的是spring boot发邮件的便利性,今天,我们聊下另外一个方面,spring-boot-starter自身的结构。
1、看看官方starter的jar里面都有啥
之前使用starter的时候,都是用了就完事了,这次发邮件的时候,好奇心上来了,点开了spring-boot-starter-mail的jar包内容,发现竟然只有一个MANIFEST.MF文件,没有class文件,没有配置文件,非常的简单。
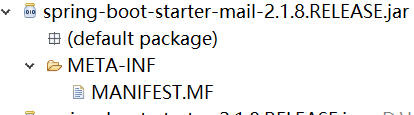
我们看下这个MANIFEST.MF里面都有些啥
Manifest-Version: 1.0

Implementation-Title: Spring Boot Mail Starter

Automatic-Module-Name: spring.boot.starter.mail

Implementation-Version: 2.1.8.RELEASE

Built-By: Spring

Build-Jdk-Spec: 1.8

Created-By: Maven Archiver 3.4.0
这个也非常的普通,比平平无奇的古天乐还要平平无奇,这不科学啊。如果只凭这个文件就能发邮件,那我早就靠收藏写真图片娶到新垣结衣了。肯定代码在别的地方,在找代码前,我们先动手自己制作一个starter。
2、突然要开始自己写个starter
自己写个starter也很简单,我们先从https://start.spring.io/下载一个基本的项目结构下来,然后需要修改几个地方。
首先是pom文件要修改,我的pom文件是这样的
<?xml version="1.0" encoding="UTF-8"?>

<project xmlns="http://maven.apache.org/POM/4.0.0"

	xmlns:xsi="http://www.w3.org/2001/XMLSchema-instance"

	xsi:schemaLocation="http://maven.apache.org/POM/4.0.0 https://maven.apache.org/xsd/maven-4.0.0.xsd">

	<modelVersion>4.0.0</modelVersion>

	<groupId>com.skyblue</groupId>

	<artifactId>mystarter-spring-boot-starter</artifactId>

	<version>1.0</version>

	<name>mystarter</name>

	<description>spring boot starter demo</description>

	<properties>

		<java.version>1.8</java.version>

	</properties>

	<dependencyManagement>

		<dependencies>

			<dependency>

				<groupId>org.springframework.boot</groupId>

				<artifactId>spring-boot-dependencies</artifactId>

				<version>2.1.9.RELEASE</version>

				<type>pom</type>

				<scope>import</scope>

			</dependency>

		</dependencies>

	</dependencyManagement>

	<dependencies>

		<dependency>

        <groupId>org.springframework.boot</groupId>

        <artifactId>spring-boot-autoconfigure</artifactId>

        <scope>compile</scope>

    </dependency>

    <dependency>

        <groupId>org.projectlombok</groupId>

        <artifactId>lombok</artifactId>

        <version>1.18.6</version>

        <optional>true</optional>

        <scope>provided</scope>

    </dependency>

    <dependency>

        <groupId>org.springframework.boot</groupId>

        <artifactId>spring-boot-starter-test</artifactId>

        <scope>test</scope>

    </dependency>

	</dependencies>

	<build>

		<plugins>

			<plugin>

				<groupId>org.springframework.boot</groupId>

				<artifactId>spring-boot-maven-plugin</artifactId>

			</plugin>

		</plugins>

	</build>

</project>
比起原始的pom.xml,改动了这么几个地方。
<artifactId>mystarter-spring-boot-starter</artifactId>spring 官方的推荐写artifactId的方法是这样
- 官方命名格式为: spring-boot-starter-{name}
- 非官方建议命名格式:{name}-spring-boot-starter
所以,官方用来发mail的starter是spring-boot-starter-mail,我这边用的就是mystarter-spring-boot-starter。
原始pom.xml会有这一段,是需要去掉的,否则打包的时候自己写的类加不进去,jar里面都是spring boot的类
<parent>

		<groupId>org.springframework.boot</groupId>

		<artifactId>spring-boot-starter-parent</artifactId>

		<version>2.1.9.RELEASE</version>

		<relativePath /> <!-- lookup parent from repository -->

</parent>
另外需要加至少两个依赖进去
	<dependencyManagement>

		<dependencies>

			<dependency>

				<groupId>org.springframework.boot</groupId>

				<artifactId>spring-boot-dependencies</artifactId>

				<version>2.1.9.RELEASE</version>

				<type>pom</type>

				<scope>import</scope>

			</dependency>

		</dependencies>

	</dependencyManagement>

	<dependencies>

		<dependency>

			<groupId>org.springframework.boot</groupId>

			<artifactId>spring-boot-autoconfigure</artifactId>

			<scope>compile</scope>

		</dependency>

	</dependencies>
其实把两个依赖都放在<dependencies>节点里面也行,<dependencyManagement>和<dependencies>的区别请自行搜索。
pom.xml改好了后我们需要为自己的starter写class啦,我们这边为了演示,就只实现打印两个值的功能,看代码
public interface MyStarterService {

	String getMessage();

    Integer getCode();

}

public class MyStarterServiceImpl implements MyStarterService{

	@Autowired

	private MyStarterProperties myStarterProperties;

	public String getMessage() {

		return myStarterProperties.getMessage();

	}

	public Integer getCode() {

		return myStarterProperties.getCode();

	}

}
这个接口和实现类就是简单的返回属性值而已,属性值的配置文件是这样的
@ConfigurationProperties(prefix = "mystarter")

public class MyStarterProperties {

	String message;

	int code;

	public String getMessage() {

		return message;

	}

	public void setMessage(String message) {

		this.message = message;

	}

	public int getCode() {

		return code;

	}

	public void setCode(int code) {

		this.code = code;

	}

}
@ConfigurationProperties注解表示MyStarterProperties 里面的参数message和code都会从配置文件里面读取,prefix = "mystarter"表示配置文件里面参数名称是有前缀的,前缀就是mystarter。举个具体的例子,比如我们之前发邮件的参数也是配置在application.properties,参数的内容是这样的
spring.mail.host=smtp.163.com

spring.mail.port=25

spring.mail.username=youname@163.com

spring.mail.password=yourpassword
里面host,port,username,password就是参数的名称,spring.mail就是前缀。
上面这些写好了相当于业务功能部分,现在需要把业务功能申明到spring-boot-starter体系里面去,需要靠下面这个类
@Configuration

//告诉spring容器配置文件读取用MyStarterProperties.class

@EnableConfigurationProperties({MyStarterProperties.class})

//导入业务组件MyStarterServiceImpl

@Import(MyStarterServiceImpl.class)

public class MyStarterAutoConfiguration {

}
我用的是最简单的方式,其实spring boot还提供了@Conditional 系列注解实现更加精确的配置加载Bean的条件,这里就不详述了。
最后,我们需要告诉spring boot在哪里去找到这个MyStarterAutoConfiguration ,在resources/META-INF下面建一个spring.factories文件
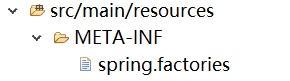
内容也很简单,就一句而已
org.springframework.boot.autoconfigure.EnableAutoConfiguration=\

com.skyblue.mystarter.MyStarterAutoConfiguration
这样,其实一个自定义的starter就完成了,用mvn install就可以直接生成一个starter了。
3、回头看spring-boot-starter-mail真正的实现代码
在给starter取名字的时候说了,官方命名格式是有固定格式的。其实官方的便利可不在名字上,而是代码都包含在spring boot的jar里面,我们引入spring boot的依赖时,会自动加载spring-boot-autoconfigure.xxx.jar,打开这个jar,就可以看到mail的真正代码了
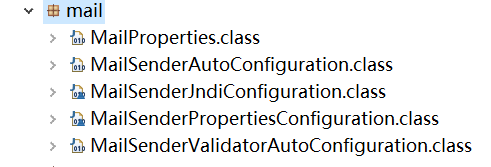
有没有一种很熟悉的感觉,MailProperties和上面的MyStarterProperties,MailSenderAutoConfiguration和上面的MyStarterAutoConfiguration,显然都是一样按照spring boot starter的规则写的,只是这个官方starter的代码不放在starter的jar包,而是包装到了spring-boot-autoconfigure的jar里面,我们看下MailSenderAutoConfiguration的源代码,可以看到它就用到了@Configuration、@EnableConfigurationProperties、@Import,还用到了我们没用到的@Conditional注解
@Configuration

@ConditionalOnClass({ MimeMessage.class, MimeType.class, MailSender.class })

@ConditionalOnMissingBean(MailSender.class)

@Conditional(MailSenderCondition.class)

@EnableConfigurationProperties(MailProperties.class)

@Import({ MailSenderJndiConfiguration.class, MailSenderPropertiesConfiguration.class })

public class MailSenderAutoConfiguration {

	/**

	 * Condition to trigger the creation of a {@link MailSender}. This kicks in if either

	 * the host or jndi name property is set.

	 */

	static class MailSenderCondition extends AnyNestedCondition {

		MailSenderCondition() {

			super(ConfigurationPhase.PARSE_CONFIGURATION);

		}

		@ConditionalOnProperty(prefix = "spring.mail", name = "host")

		static class HostProperty {

		}

		@ConditionalOnProperty(prefix = "spring.mail", name = "jndi-name")

		static class JndiNameProperty {

		}

	}

}
还有一个spring.factories文件,也可以在spring-boot-autoconfigure.jar里面找到
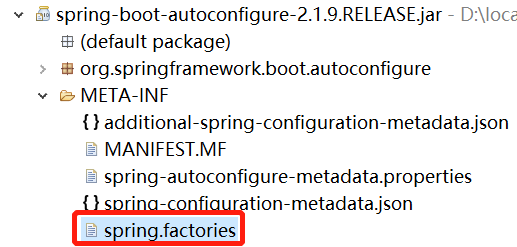
在里面,我们可以看到完整的spring boot官方starter的AutoConfiguration类列表
# Auto Configure

org.springframework.boot.autoconfigure.EnableAutoConfiguration=\

org.springframework.boot.autoconfigure.admin.SpringApplicationAdminJmxAutoConfiguration,\

org.springframework.boot.autoconfigure.aop.AopAutoConfiguration,\

org.springframework.boot.autoconfigure.amqp.RabbitAutoConfiguration,\

org.springframework.boot.autoconfigure.batch.BatchAutoConfiguration,\

org.springframework.boot.autoconfigure.cache.CacheAutoConfiguration,\

org.springframework.boot.autoconfigure.cassandra.CassandraAutoConfiguration,\

org.springframework.boot.autoconfigure.cloud.CloudServiceConnectorsAutoConfiguration,\

......
我这边就不全列出来了,大家根据这个去找需要的官方starter就比较方便了。
4、猛回头我们调用下我们的自定义starter
我们另外用https://start.spring.io/再创建一个项目,然后在pom.xml里面加载starter的依赖
<dependency>

			<groupId>com.skyblue</groupId>

			<artifactId>mystart</artifactId>

			<version>1.0</version>

			<type>jar</type>

			<scope>system</scope>

			<systemPath>D:\\workspace\\mystart\\target\\mystarter-spring-boot-starter-1.0.jar</systemPath>

		</dependency>
我为了图方便,就直接用pom.xml调用了本地打包的starter包,如果有maven的私服,就可以正常引入。配置application.properties文件
mystarter.message=hello world!

mystarter.code=42
写一个调用starter的类
@Service

public class TestService {

    @Resource

    private MyStarterService myStarterService;

    public void message() {

        System.out.println("code:" + myStarterService.getCode());

        System.out.println("message:" + myStarterService.getMessage());

    }

}
启动spring boot 查看结果
@SpringBootApplication

public class StartdemoApplication {

	public static void main(String[] args) {

		ApplicationContext context = SpringApplication.run(StartdemoApplication.class, args);

		((TestService)context.getBean("testService")).message();

	}

}
console可以看到打印出来的message和code
  .   ____          _            __ _ _

 /\\ / ___'_ __ _ _(_)_ __  __ _ \ \ \ \

( ( )\___ | '_ | '_| | '_ \/ _` | \ \ \ \

 \\/  ___)| |_)| | | | | || (_| |  ) ) ) )

  '  |____| .__|_| |_|_| |_\__, | / / / /

 =========|_|==============|___/=/_/_/_/

 :: Spring Boot ::        (v2.1.9.RELEASE)

2019-10-10 22:13:49.521  INFO 21952 --- [           main] c.w.startdemo.StartdemoApplication       : Starting StartdemoApplication on skyblue with PID 21952 (D:\workspace\startdemo\target\classes started by wphmo in D:\workspace\startdemo)

2019-10-10 22:13:49.527  INFO 21952 --- [           main] c.w.startdemo.StartdemoApplication       : No active profile set, falling back to default profiles: default

2019-10-10 22:13:50.405  INFO 21952 --- [           main] c.w.startdemo.StartdemoApplication       : Started StartdemoApplication in 1.353 seconds (JVM running for 1.983)

code:42

message:hello world!
这样,一个完整的自定义starter就运行成功了。
对照谈-官方spring-boot-starter和自定义starter异同分析的更多相关文章
- Spring Boot中如何自定义starter?
Spring Boot starter 我们知道Spring Boot大大简化了项目初始搭建以及开发过程,而这些都是通过Spring Boot提供的starter来完成的.品达通用权限系统就是基于Sp ...
- spring boot / cloud (四) 自定义线程池以及异步处理@Async
spring boot / cloud (四) 自定义线程池以及异步处理@Async 前言 什么是线程池? 线程池是一种多线程处理形式,处理过程中将任务添加到队列,然后在创建线程后自动启动这些任务.线 ...
- Spring boot 自动配置自定义配置文件
示例如下: 1. 新建 Maven 项目 properties 2. pom.xml <project xmlns="http://maven.apache.org/POM/4 ...
- Spring Boot 启动(一) SpringApplication 分析
Spring Boot 启动(一) SpringApplication 分析 Spring 系列目录(https://www.cnblogs.com/binarylei/p/10198698.html ...
- Spring Boot 揭秘与实战 源码分析 - 工作原理剖析
文章目录 1. EnableAutoConfiguration 帮助我们做了什么 2. 配置参数类 – FreeMarkerProperties 3. 自动配置类 – FreeMarkerAutoCo ...
- Spring Boot 揭秘与实战 源码分析 - 开箱即用,内藏玄机
文章目录 1. 开箱即用,内藏玄机 2. 总结 3. 源代码 Spring Boot提供了很多”开箱即用“的依赖模块,那么,Spring Boot 如何巧妙的做到开箱即用,自动配置的呢? 开箱即用,内 ...
- Spring Boot自动装配原理源码分析
1.环境准备 使用IDEA Spring Initializr快速创建一个Spring Boot项目 添加一个Controller类 @RestController public class Hell ...
- Spring Boot必备技能之Starter自定义
本文摘自于<Spring Cloud微服务 入门 实战与进阶>一书. 作者:尹吉欢 Spring Boot的方便体现在简化了很多繁琐的配置,对开发人员来说是一个福音,通过引入各种Spri ...
- Spring Boot中的自定义start pom
start pom是springboot中提供的简化企业级开发绝大多数场景的一个工具,利用好strat pom就可以消除相关技术的配置得到自动配置好的Bean. 举个例子,在一般使用中,我们使用基本的 ...
随机推荐
- SpringBoot中教你手把手配置 https
升级 https 记录 1.去阿里云购买证书(免费版),并提交审核资料 购买的证书 2.下载证书 下载证书 3.查看上图页面的第三步 JKS证书安装 4.在证书目录下执行阿里云提供的命令,密码都填 p ...
- 模拟80(a)
其实隔壁的那套题比这套难的多....一道都不会.. T1 题目中已经给出了递推公式,那么这题就没什么了,直接矩阵乘就完了. 然而考场上并没有看出矩阵,主要是用了好久发明crt,我知道原理,但是不会打了 ...
- 爬虫学习--Urllib库基本使用 Day1
一.Urllib库详解 1.什么是Urllib Python内置的HTTP请求库 urllib.request 请求模块(模拟实现传入网址访问) urllib.error ...
- UiPath之如何打印PDF
各位小伙伴,大家好,今天写一点基础知识,如何在UiPath中打印PDF. ---小U的QQ群(714733686):小U的订阅号[UiPath8888]--- 当然,我们最希望的就是有一个Activi ...
- beacon帧字段结构最全总结(三)——VHT字段总结
VHT Capabilities 802.11ac作为IEEE 无线技术的新标准,它借鉴了802.11n的各种优点并进一步优化,除了最明显的高吞吐特点外,不仅可以很好地兼容802.11a/n的设备,同 ...
- LocalDate类
LocalDate类与Date类不同.Date类是距离一个固定时间点的毫秒数(UTC 1970.1.1 00:00:00) Date类表示时间点,LocalDate类用来表示日历表示法. import ...
- PowerDesigner列名、注释内容互换
资料来源:PowerDesigner列名.注释内容互换 文中一共提供了2种操作的代码. (1)将Name中的字符COPY至Comment中 (2)将Comment中的字符COPY至Name中 使用方法 ...
- SqlServer2005 查询 第一讲 计算列
数据库查询[最重要且在数据库中难度最大] 声明一下我这里用的数据库样例是郝斌老师的(scott库) 我尽最大努力把复杂的问题简单化,方便理解,希望我写的东西能够帮助到你们 有些复杂的东西我我用自己的方 ...
- nyoj 803-A/B Problem
803-A/B Problem 内存限制:64MB 时间限制:1000ms 特判: No 通过数:2 提交数:4 难度:3 题目描述: 做了A+B Problem,A/B Problem不是什么问题了 ...
- 解放双手,在PC端进行Android真机调试
scrcpy简介(拼写是scrcpy,非Python爬虫框架Scrapy) 简单地来说,scrcpy就是通过adb调试的方式来将手机屏幕投到电脑上,并可以通过电脑控制您的Android设备.它可以通过 ...