
spring IOC 和AOP 方面
spring 的2大核心 是Ioc 和 aop
spring的依赖注入:在程序运行期间,由外部容器动态的将依赖对象注入到组件中
IOC:
spring的依赖注入三种方式
第一种:构造器注入(最常用)
第二种:使用属性的setter方法注入
第三种:使用Field注入(采用注解方式)
1.构造器注入:
<bean id="people" class="">
<construtor-arg index="0" type="java.lang.string" ref="axe" /> //index表示构造器参数第几个,type表示参数的类型,ref表示引用类型
</bean> <bean id="axe" class=""/>
2.setter 注入:
<bean id="people" class="">
<property name="name" value="jaryle" /> //属性setter注入
</bean> <bean id="axe" class=""/>
2.1 spring的依赖注入装配集合类型
set集合的注入 Set set= new HashSet();
<bean id="personService" class="com.jary.service.impl.PersonServiceBean" />
<property name="sets" >
<set>
<value> 第一个</value>
<value>第二个</value>
<value> 第三个</value>
</set>
</property>
</bean>
List集合的方式 List list = new ArraryList();
<bean id="personService" class="com.jary.service.impl.PersonServiceBean" />
<property name="lists" >
<list>
<value> 第一个</value>
<value>第二个</value>
<value> 第三个</value>
</list>
</property>
</bean>
Map集合的方式Map map=new HashMap();
<bean id="personService" class="com.jary.service.impl.PersonServiceBean" />
<property name="maps" >
<map>
<entry key="key1" value="value1" />
<entry key="key2" value="value2" />
<entry key="key3" value="value3" />
</map>
</property>
</bean>
3. 注解的方式
使用前提是标注在字段和setter方法上
需要在spring配置文件beans.xml加入注解的一些约束文件和配置注解的打开
<context:annocation-config /> //配置注解的打开(<context:component-scan base-package="com.*.*"/> 方式可替换该注解 )
@Autowired和@Resource注解进行装配,二者的区别是@Autowired默认按类型装配,@Resource默认是按照名称装配,当找不到与名称匹配的bean就会按照类型装配。
 @Service("")  //注明类的名字

  public class MyServiceImpl

  {

    @Autowired       //注入Dao层,利用注解ppDao,必须在注入的类声明一致

    private PeopleDao ppDao;

}<!--哪些包利用注解--> <context:component-scan base-package=""> <context:include-filter type="regex" expression=""/> //根据需要配置 <context:exclude-filter type="regex" expression=""/></context:component-scan>
常用注解:
@Component 指定名称的对象
@Service 服务层的组件
@Repository 数据层Dao的组件
@Controller 控制层的组件
@Autowired 注入属性,会从容器中自动查找对象并注入到@Autowired对象上面
@Scope 指定作用域
@Resource 在setter 方法上面定义
@PostConstuct 即定义init-method
@PreDestroy 即定义destroy-method
@Lazy
@DependsOn({“”,”“})
bean实现ApplicationContextAware,回调机制获取容器,自动注入spring容器
bean的作用域
singleton、protoType、request、session、global session
AOP:
spring AOP技术(Proxy代理对象)
spring中的AOP面向切面编程(重点掌握)
首先了解一下AOP中的概念
Aspect(切面):横切性关注点的抽象即为切面,它与类相似,只是二者的关注点不一样,类是对物体特征的抽象,而切面是横切性关注点的抽象
joinpoint(连接点):那些被拦截到的点,在spring中这些点指的是方法,因为spring只支持方法类型的连接点,实际上,joinpoint还可以是field和类构造器
Pointcut(切入点):对那些joinpoint进行拦截的定义
Advice(通知):拦截到joinpoint之后所要做的事情就是通知,通知分为前置通知,后置通知,异常通知,最终通知,环绕通知。
Target(目标对象):代理的目标对象
Weave(织入):指将aspect应用到target对象并导致proxy对象创建的过程即是织入。
Introduction(引入):在不修改类代码的前提下,Introduction可以在运行期为类动态的添加一些方法和field。
24. AOP通知
通知是个在方法执行前后要做的动作,实际上是程序执行时要通过SpringAOP框架触发的代码
Spring切面可以应用五种类型的通知:
before:前置通知,在一个方法执行前被调用。@Before
after: 在方法执行之后调用的通知,无论方法执行是否成功。@After
after-returning: 仅当方法成功完成后执行的通知。@AfterReturning
after-throwing: 在方法抛出异常退出时执行的通知。@AfterThrowing
around: 在方法执行之前和之后调用的通知。@Around
public interface Calculation {

    public int add(int x, int y);

    public int sub(int x, int y);

    public int mul(int x, int y);

    public int dev(int x, int y);

}
public class CalculationImpl implements Calculation {

    @Override

    public int add(int x, int y) {

        int result = x + y;

        System.out.println("executeing ...");

        return result;

    }

    @Override

    public int sub(int x, int y) {

        int result = x - y;

        return result;

    }

    @Override

    public int mul(int x, int y) {

        int result = x * y;

        return result;

    }

    @Override

    public int dev(int x, int y) {

        int result = x / y;

        System.out.println("executeing ...");

        return result;

    }

}
public class CalculationAspect {
public void afterReturnMethod(JoinPoint joinPoint, Object ret) {
String name = joinPoint.getSignature().getName();
List<Object> list = Arrays.asList(joinPoint.getArgs());
System.out.println("@AfterReturning ... ,method=" + name + ", args = "
+ list + ", return = " + ret);
}
public Object aroundMethod(ProceedingJoinPoint pjd) {
String name = pjd.getSignature().getName();
List<Object> list = Arrays.asList(pjd.getArgs());
Object obj = null;
System.out.println("前置通知 ... ,method=" + name + ", args = "
+ list);
try {
obj = pjd.proceed();
System.out.println("返回通知 ... ,method=" + name + ", args = "
+ list);
} catch (Throwable e) {
System.out.println("异常通知 ... , exception = " + e);
e.printStackTrace();
}
System.out.println("后置通知 ... ,method=" + name + ", args = "
+ list);
return obj;
}
}第一个切入方法,我们其中有后置返回通知、环绕通知两个方法。
public class ValidateAspect {

    public void validate(){

        System.out.println("验证方法 com.gp.spring.aop.impl.ValidateAspect");

    }

}
第二个切入方法。
public class ValidateAspect {

    public void validate(){

        System.out.println("验证方法 com.gp.spring.aop.impl.ValidateAspect");

    }

}
<beans xmlns="http://www.springframework.org/schema/beans"
xmlns:xsi="http://www.w3.org/2001/XMLSchema-instance" xmlns:aop="http://www.springframework.org/schema/aop"
xmlns:cache="http://www.springframework.org/schema/cache"
xsi:schemaLocation="http://www.springframework.org/schema/beans http://www.springframework.org/schema/beans/spring-beans.xsd
http://www.springframework.org/schema/aop http://www.springframework.org/schema/aop/spring-aop-4.1.xsd
http://www.springframework.org/schema/cache http://www.springframework.org/schema/cache/spring-cache-4.1.xsd">
<bean id="calculationImpl" class="com.gp.spring.aop.impl.xml.CalculationImpl"></bean>
<bean id="calculationAspect" class="com.gp.spring.aop.impl.xml.CalculationAspect"></bean>
<bean id="validateAspect" class="com.gp.spring.aop.impl.xml.ValidateAspect"></bean>
<aop:config>
<aop:pointcut
expression="execution(public int com.gp.spring.aop.impl.xml.Calculation.*(int, int))"
id="pointcut" />
<aop:aspect ref="calculationAspect" order="1">
<aop:after-returning method="afterReturnMethod"
pointcut-ref="pointcut" returning="ret" />
<aop:around method="aroundMethod" pointcut-ref="pointcut" />
</aop:aspect>
<aop:aspect ref="validateAspect" order="2">
<aop:before method="validate" pointcut-ref="pointcut" />
</aop:aspect>
</aop:config>
</beans>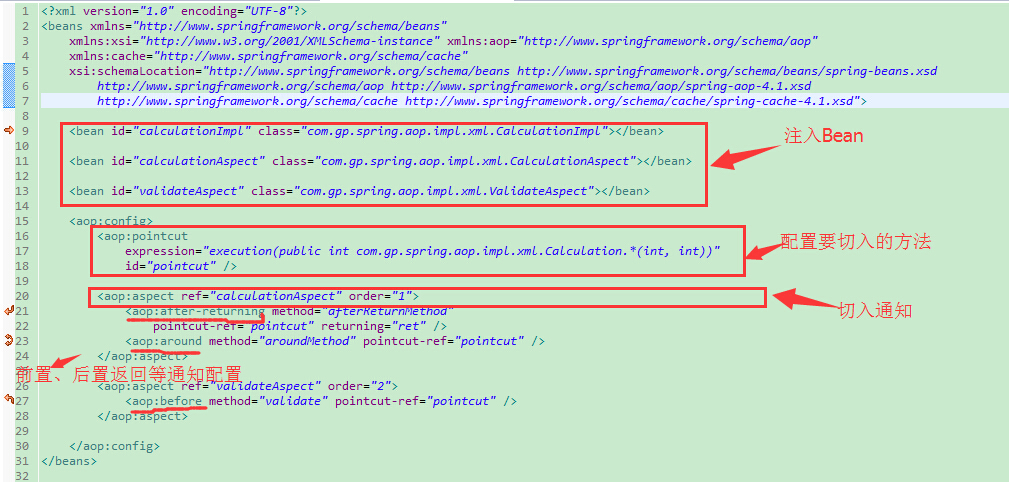
执行测试方法
    public static void main(String[] args) {

        ApplicationContext context = new ClassPathXmlApplicationContext("applicationContext-xml.xml");

        Calculation calculation = (Calculation)context.getBean("calculationImpl");

        int result = calculation.add(1, 3);

        System.out.println(result);

    }
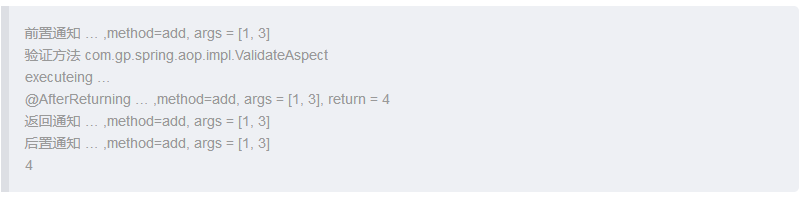
输出结果
xml配置方式参照了:https://blog.csdn.net/gaopeng0071/article/details/47148239注解方式配置通知方式
  以AfterReturnig 为例子
- // 定义一个切面
- @Aspect
- public class LogAspect
- {
- // 匹配com.owenapp.service.impl包下所有类的、
- // 所有方法的执行作为切入点
- @AfterReturning(returning="rvt"
- , pointcut="execution(* com.owen.app.service.impl.*.*(..))")
- // 声明rvt时指定的类型会限制目标方法必须返回指定类型的值或没有返回值
- // 此处将rvt的类型声明为Object,意味着对目标方法的返回值不加限制
- public void log(Object rvt)
- {
- System.out.println("获取目标方法返回值:" + rvt);
- System.out.println("模拟记录日志功能...");
- }
- }
上面的程序中使用@AfterReturning注解时,指定了一个returning属性,该属性值为rvt,这表明允许在Advice方法(log()方法)中定义名为rvt的形参,程序可通过rvt形参来访问目标方法的返回值
虽然AfterReturning增强处理可以访问到方法的返回值,但它不可以改变目标方法的返回值。
事务:
spring事务:
什么是事务:
事务逻辑上的一组操作,组成这组操作的各个逻辑单元,要么一起成功,要么一起失败.
事务特性(4种):
原子性 (atomicity):强调事务的不可分割.
一致性 (consistency):事务的执行的前后数据的完整性保持一致.
隔离性 (isolation):一个事务执行的过程中,不应该受到其他事务的干扰
持久性(durability) :事务一旦结束,数据就持久到数据库
如果不考虑隔离性引发安全性问题:
脏读 :一个事务读到了另一个事务的未提交的数据
不可重复读 :一个事务读到了另一个事务已经提交的 update 的数据导致多次查询结果不一致.
虚幻读 :一个事务读到了另一个事务已经提交的 insert 的数据导致多次查询结果不一致.
解决读问题: 设置事务隔离级别(5种)
DEFAULT 这是一个PlatfromTransactionManager默认的隔离级别,使用数据库默认的事务隔离级别.
未提交读(read uncommited) :脏读,不可重复读,虚读都有可能发生
已提交读 (read commited):避免脏读。但是不可重复读和虚读有可能发生
可重复读 (repeatable read) :避免脏读和不可重复读.但是虚读有可能发生.
串行化的 (serializable) :避免以上所有读问题.
Mysql 默认:可重复读
Oracle 默认:读已提交
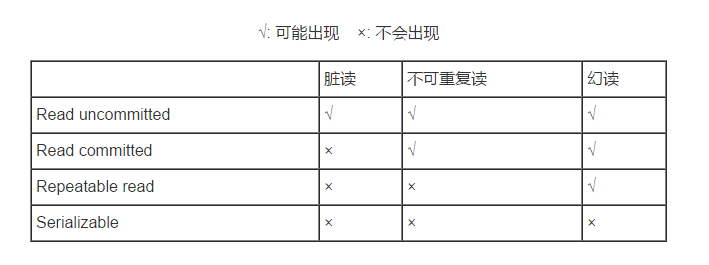
read uncommited:是最低的事务隔离级别,它允许另外一个事务可以看到这个事务未提交的数据。
read commited:保证一个事物提交后才能被另外一个事务读取。另外一个事务不能读取该事物未提交的数据。
repeatable read:这种事务隔离级别可以防止脏读,不可重复读。但是可能会出现幻象读。它除了保证一个事务不能被另外一个事务读取未提交的数据之外还避免了以下情况产生(不可重复读)。
serializable:这是花费最高代价但最可靠的事务隔离级别。事务被处理为顺序执行。除了防止脏读,不可重复读之外,还避免了幻象读(避免三种)。
事务的传播行为
PROPAGION_XXX :事务的传播行为
* 保证同一个事务中
PROPAGATION_REQUIRED 支持当前事务,如果不存在 就新建一个(默认)
PROPAGATION_SUPPORTS 支持当前事务,如果不存在,就不使用事务
PROPAGATION_MANDATORY 支持当前事务,如果不存在,抛出异常
* 保证没有在同一个事务中
PROPAGATION_REQUIRES_NEW 如果有事务存在,挂起当前事务,创建一个新的事务
PROPAGATION_NOT_SUPPORTED 以非事务方式运行,如果有事务存在,挂起当前事务
PROPAGATION_NEVER 以非事务方式运行,如果有事务存在,抛出异常
PROPAGATION_NESTED 如果当前事务存在,则嵌套事务执行
只读(read-only)
如果事务只进行读取的动作,则可以利用底层数据库在只读操作时发生的一些最佳化动作,由于这个动作利用到数据库在只读的事务操作最佳化,因而必须在事务中才有效,也就是说要搭配传播行为PROPAGATION_REQUIRED、PROPAGATION_REQUIRES_NEW、PROPAGATION_NESTED来设置。
事务超时(timeout)
有的事务操作可能延续很长一段的时间,事务本身可能关联到数据表的锁定,因而长时间的事务操作会有效率上的问题,对于过长的事务操作,考虑Roll back事务并要求重新操作,而不是无限时的等待事务完成。 可以设置事务超时期间,计时是从事务开始时,所以这个设置必须搭配传播行为PROPAGATION_REQUIRED、PROPAGATION_REQUIRES_NEW、PROPAGATION_NESTED来设置。
举例浅析Spring嵌套事务
- ServiceA {
- void methodA() {
- ServiceB.methodB();
- }
- }
- ServiceB {
- void methodB() {
- }
- }
PROPAGATION_REQUIRED
假如当前正要执行的事务不在另外一个事务里,那么就起一个新的事务
比如说,ServiceB.methodB的事务级别定义为PROPAGATION_REQUIRED, 那么由于执行ServiceA.methodA的时候
1、如果ServiceA.methodA已经起了事务,这时调用ServiceB.methodB,ServiceB.methodB看到自己已经运行在ServiceA.methodA的事务内部,就不再起新的事务。这时只有外部事务并且他们是共用的,所以这时ServiceA.methodA或者ServiceB.methodB无论哪个发生异常methodA和methodB作为一个整体都将一起回滚。
2、如果ServiceA.methodA没有事务,ServiceB.methodB就会为自己分配一个事务。这样,在ServiceA.methodA中是没有事务控制的。只是在ServiceB.methodB内的任何地方出现异常,ServiceB.methodB将会被回滚,不会引起ServiceA.methodA的回滚
PROPAGATION_SUPPORTS
如果当前在事务中,即以事务的形式运行,如果当前不再一个事务中,那么就以非事务的形式运行
PROPAGATION_MANDATORY
必须在一个事务中运行。也就是说,他只能被一个父事务调用。否则,他就要抛出异常
PROPAGATION_REQUIRES_NEW
启动一个新的, 不依赖于环境的 "内部" 事务. 这个事务将被完全 commited 或 rolled back 而不依赖于外部事务, 它拥有自己的隔离范围, 自己的锁, 等等. 当内部事务开始执行时, 外部事务将被挂起, 内务事务结束时, 外部事务将继续执行.
比如我们设计ServiceA.methodA的事务级别为PROPAGATION_REQUIRED,ServiceB.methodB的事务级别为PROPAGATION_REQUIRES_NEW,那么当执行到ServiceB.methodB的时候,ServiceA.methodA所在的事务就会挂起,ServiceB.methodB会起一个新的事务,等待ServiceB.methodB的事务完成以后,他才继续执行。他与PROPAGATION_REQUIRED 的事务区别在于事务的回滚程度了。因为ServiceB.methodB是新起一个事务,那么就是存在两个不同的事务。
1、如果ServiceB.methodB已经提交,那么ServiceA.methodA失败回滚,ServiceB.methodB是不会回滚的。
2、如果ServiceB.methodB失败回滚,如果他抛出的异常被ServiceA.methodA的try..catch捕获并处理,ServiceA.methodA事务仍然可能提交;如果他抛出的异常未被ServiceA.methodA捕获处理,ServiceA.methodA事务将回滚。
使用场景:
不管业务逻辑的service是否有异常,Log Service都应该能够记录成功,所以Log Service的传播属性可以配为此属性。最下面将会贴出配置代码。
PROPAGATION_NOT_SUPPORTED
当前不支持事务。比如ServiceA.methodA的事务级别是PROPAGATION_REQUIRED ,而ServiceB.methodB的事务级别是PROPAGATION_NOT_SUPPORTED ,那么当执行到ServiceB.methodB时,ServiceA.methodA的事务挂起,而他以非事务的状态运行完,再继续ServiceA.methodA的事务。
PROPAGATION_NEVER
不能在事务中运行。假设ServiceA.methodA的事务级别是PROPAGATION_REQUIRED, 而ServiceB.methodB的事务级别是PROPAGATION_NEVER ,那么ServiceB.methodB就要抛出异常了。
PROPAGATION_NESTED
开始一个 "嵌套的" 事务, 它是已经存在事务的一个真正的子事务. 潜套事务开始执行时, 它将取得一个 savepoint. 如果这个嵌套事务失败, 我们将回滚到此 savepoint. 潜套事务是外部事务的一部分, 只有外部事务结束后它才会被提交.
比如我们设计ServiceA.methodA的事务级别为PROPAGATION_REQUIRED,ServiceB.methodB的事务级别为PROPAGATION_NESTED,那么当执行到ServiceB.methodB的时候,ServiceA.methodA所在的事务就会挂起,ServiceB.methodB会起一个新的子事务并设置savepoint,等待ServiceB.methodB的事务完成以后,他才继续执行。。因为ServiceB.methodB是外部事务的子事务,那么
1、如果ServiceB.methodB已经提交,那么ServiceA.methodA失败回滚,ServiceB.methodB也将回滚。
2、如果ServiceB.methodB失败回滚,如果他抛出的异常被ServiceA.methodA的try..catch捕获并处理,ServiceA.methodA事务仍然可能提交;如果他抛出的异常未被ServiceA.methodA捕获处理,ServiceA.methodA事务将回滚。
理解Nested的关键是savepoint。他与PROPAGATION_REQUIRES_NEW的区别是:
PROPAGATION_REQUIRES_NEW 完全是一个新的事务,它与外部事务相互独立; 而 PROPAGATION_NESTED 则是外部事务的子事务, 如果外部事务 commit, 嵌套事务也会被 commit, 这个规则同样适用于 roll back.
在 spring 中使用 PROPAGATION_NESTED的前提:
1. 我们要设置 transactionManager 的 nestedTransactionAllowed 属性为 true, 注意, 此属性默认为 false!!!
2. java.sql.Savepoint 必须存在, 即 jdk 版本要 1.4+
3. Connection.getMetaData().supportsSavepoints() 必须为 true, 即 jdbc drive 必须支持 JDBC 3.0
确保以上条件都满足后, 你就可以尝试使用 PROPAGATION_NESTED 了.
基于xml配置方式实现事务:
- <?xml version="1.0" encoding="UTF-8"?>
- <beans xmlns="http://www.springframework.org/schema/beans"
- xmlns:xsi="http://www.w3.org/2001/XMLSchema-instance" xmlns:aop="http://www.springframework.org/schema/aop"
- xmlns:tx="http://www.springframework.org/schema/tx"
- xsi:schemaLocation="http://www.springframework.org/schema/beans http://www.springframework.org/schema/beans/spring-beans-2.0.xsd http://www.springframework.org/schema/tx http://www.springframework.org/schema/tx/spring-tx-2.0.xsd http://www.springframework.org/schema/aop http://www.springframework.org/schema/aop/spring-aop-2.0.xsd">
- <!-- configure transaction -->
- <tx:advice id="defaultTxAdvice" transaction-manager="transactionManager">
- <tx:attributes>
- <tx:method name="get*" read-only="true" />
- <tx:method name="query*" read-only="true" />
- <tx:method name="find*" read-only="true" />
- <tx:method name="*" propagation="REQUIRED" rollback-for="java.lang.Exception" />
- </tx:attributes>
- </tx:advice>
- <tx:advice id="logTxAdvice" transaction-manager="transactionManager">
- <tx:attributes>
- <tx:method name="get*" read-only="true" />
- <tx:method name="query*" read-only="true" />
- <tx:method name="find*" read-only="true" />
- <tx:method name="*" propagation="REQUIRES_NEW"
- rollback-for="java.lang.Exception" />
- </tx:attributes>
- </tx:advice>
- <aop:config>
- //切点
- <aop:pointcut id="defaultOperation"
- expression="@within(com.homent.util.DefaultTransaction)" />
- <aop:pointcut id="logServiceOperation"
- expression="execution(* com.homent.service.LogService.*(..))" />
- //定义通知器 在切点上开事务(advisor 通知器)
- <aop:advisor advice-ref="defaultTxAdvice" pointcut-ref="defaultOperation" />
- <aop:advisor advice-ref="logTxAdvice" pointcut-ref="logServiceOperation" />
- </aop:config>
- </beans>
如上面的Spring配置文件所示,日志服务的事务策略配置为propagation="REQUIRES_NEW",告诉Spring不管上下文是否有事务,Log Service被调用时都要求一个完全新的只属于Log Service自己的事务。通过该事务策略,Log Service可以独立的记录日志信息,不再受到业务逻辑事务的干扰。
基于注解配置事务:
@Transactonal(isolation="" noRollbackFor="" noRoolbackForClassName="" propagation=""readOnly="" rollbackFor="" timeout="")//参数可根据需要配置
@Transactonal //不配置参数则使用默认方式通过配置文件启动事务<bean id="transactionManager" class="org.springframework.orm.hibernate.HibernateTransactionManager">
<property name="sessionFactory" ref="sessionFactory"/>
</bean
<!--注解启动-->
<tx:annotation-driven transaction-manager="transactionManger"/>
<bean id="dataSource" class="com.mchange.v2.c3p0.ComboPooledDataSource">
<property name="driver">com.mysql.jdbc.Driver</property>
<property name="url">jdbc:mysql://localhost:3306/数据库名字</property>
<property name="user"/>
<property name="password"/>
</bean>
<bean id="sessionFactory" class="">
<property name="dataSource" ref="dataSource"/>
<property name="annotatedClasses">
<list>
<value>...class</value>
</list>
</property>
<property name="hibernateProperties">
<value>
hibernate.dialect=
......
</value
</property>
</bean>
参照文章:https://blog.csdn.net/jaryle/article/details/51219062;https://blog.csdn.net/DFL_always/article/details/53491561
https://www.cnblogs.com/hq233/p/6664798.html
spring IOC 和AOP 方面的更多相关文章
- 【转】spring - ioc和aop
[转]spring - ioc和aop 1.程序中为什么会用到spring的ioc和aop 2.什么是IOC,AOP,以及使用它们的好处,即详细回答了第一个问题 3.原理 关于1: a:我们平常使用对 ...
- J2EE进阶(十四)超详细的Java后台开发面试题之Spring IOC与AOP
J2EE进阶(十四)超详细的Java后台开发面试题之Spring IOC与AOP 前言 搜狐畅游笔试题中有一道问答题涉及到回答谈谈对Spring IOC与AOP的理解.特将相关内容进行整理. ...
- spring - ioc和aop
1.程序中为什么会用到spring的ioc和aop 2.什么是IOC,AOP,以及使用它们的好处,即详细回答了第一个问题 3.原理 关于1: a:我们平常使用对象的时候,一般都是直接使用关键字类new ...
- Spring IOC及AOP学习总结
一.Spring IOC体系学习总结: Spring中有两个容器体系,一类是BeanFactory.还有一类是ApplicationContext.BeanFactory提供了基础的容器功能.Appl ...
- Spring ioc与aop的理解
一 spring的特点 1.降低了组件之间的耦合性 ,实现了软件各层之间的解耦 2.可以使用容易提供的众多服务,如事务管理,消息服务等 3.容器提供单例模式支持 4.容器提供了AOP技术,利用它很容易 ...
- spring IOC与AOP
Spring IOC容器 spring IOC 容器有两种,分别是 BeanFactory 容器和 ApplicationContext 容器. BeanFactory如下: /*第一步,利用Clas ...
- Spring IOC、AOP、Transaction、MVC小结
1.IOC.AOP:把对象交给Spring进行管理,通过面向切面编程来实现一些“模板式”的操作,使得程序员解放出来,可以更多的关注业务实现. - ...
- BeanPostProcessor —— 连接Spring IOC和AOP的桥梁
之前都是从大Boss的视角,来介绍Spring,比如IOC.AOP. 今天换个视角,从一个小喽啰出发,来加深对Spring的理解. 这个小喽啰就是, BeanPostProcessor (下面简称 B ...
- 黑马-Spring(IOC&DI) AOP
IOC(控制翻转) 概念 把对象的创建.初始化.销毁等工作交给spring容器来做 案例 环境 步骤 1. 写一个HelloWorld类 2. 写一个配置文件 把hello类放到spring容 ...
随机推荐
- Hibernate注意项
Hibernate实体规则 1.持久化类提供无参数构造 2.成员变量私有,提供getset访问,提供实行 3.持久化类属性,尽量使用包装类型 4.持久化类需要提供oid与数据库中的主键列对应 5.不要 ...
- Hive数据导入导出
Hive三种不同的数据导出的方式 (1) 导出到本地文件系统 insert overwrite local directory '/home/anjianbing/soft/export_data/ ...
- WordPress上传到互联网搭建
1.建站流程: 1.购买域名 2.购买空间 3.解析绑定 4.上传安装 2.购买域名 域名的购买可以到相关域名出售的服务商那儿买,如阿里云,主机庙.这里就不做详细解释了 3.购买空间 域名的购买可以到 ...
- 通过class改变样式
1.判断class属性 判断一个元素中是否含有指定的class属性值 function hasClass(obj,cn){ //创建正则表达式 var reg=new RegExp("\\b ...
- TP方法中打印地址栏中所有的参数:
print_r($this->request->param());//打印出地址栏中所携带的所有参数:
- java多线程之yield,join,wait,sleep的区别
Java多线程之yield,join,wait,sleep的区别 Java多线程中,经常会遇到yield,join,wait和sleep方法.容易混淆他们的功能及作用.自己仔细研究了下,他们主要的区别 ...
- <文档学习>AirSim/using_car.md Choosing Your Vehicle: Car or Multirotor
如何在AirSim中使用汽车 默认情况下,AirSim中使用的车型为多转子multirotor. 如果你想使用汽车,那么只需在你的settings.json(https://github.com/Mi ...
- spring开启事务时启动报错SAXParseException
在启动项目时报解析xml文件异常: org.xml.sax.SAXParseException: cvc-complex-type.2.4.c 'aop:config'...... 由报错提示 ...
- servlet运行“/*”引起的java.lang.StackOverflowError
<servlet> <servlet-name>login</servlet-name> <servlet-class>com.jd.login.UI. ...
- main函数
class Main { public static void main(String[] args) //new String(0) { System.out.println(args); // [ ...