SpringCloud升级之路2020.0.x版-8.理解 NamedContextFactory

本系列为之前系列的整理重启版,随着项目的发展以及项目中的使用,之前系列里面很多东西发生了变化,并且还有一些东西之前系列并没有提到,所以重启这个系列重新整理下,欢迎各位留言交流,谢谢!~
spring-cloud-commons 中参考了 spring-cloud-netflix 的设计,引入了 NamedContextFactory 机制,一般用于对于不同微服务的客户端模块使用不同的 子 ApplicationContext 进行配置。
spring-cloud-commons 是 Spring Cloud 对于微服务基础组件的抽象。在一个微服务中,调用微服务 A 与调用微服务 B 的配置可能不同。比较简单的例子就是,A 微服务是一个简单的用户订单查询服务,接口返回速度很快,B 是一个报表微服务,接口返回速度比较慢。这样的话我们就不能对于调用微服务 A 和微服务 B 使用相同的超时时间配置。还有就是,我们可能对于服务 A 通过注册中心进行发现,对于服务 B 则是通过 DNS 解析进行服务发现,所以对于不同的微服务我们可能使用不同的组件,在 Spring 中就是使用不同类型的 Bean。
在这种需求下,不同微服务的客户端有不同的以及相同的配置,有不同的 Bean,也有相同的 Bean。所以,我们可以针对每一个微服务将他们的 Bean 所处于 ApplicationContext 独立开来,不同微服务客户端使用不同的 ApplicationContext。NamedContextFactory 就是用来实现这种机制的。
编写源码:
package com.github.hashjang.spring.cloud.iiford.service.common;

import org.junit.Assert;

import org.junit.Test;

import org.springframework.cloud.context.named.NamedContextFactory;

import org.springframework.context.annotation.AnnotationConfigApplicationContext;

import org.springframework.context.annotation.Bean;

import org.springframework.context.annotation.Configuration;

import org.springframework.core.env.Environment;

import java.util.List;

import java.util.Objects;

public class CommonNameContextTest {

    private static final String PROPERTY_NAME = "test.context.name";

    @Test

    public void test() {

        //创建 parent context

        AnnotationConfigApplicationContext parent = new AnnotationConfigApplicationContext();

        //添加 BaseConfig 相关配置

        parent.register(BaseConfig.class);

        //初始化 parent

        parent.refresh();

        //创建 testClient1,默认配置使用 ClientCommonConfig

        TestClient testClient1 = new TestClient(ClientCommonConfig.class);

        //创建 service1 与 service2 以及指定对应额外的配置类

        TestSpec testSpec1 = new TestSpec("service1", new Class[]{Service1Config1.class, Service1Config2.class});

        TestSpec testSpec2 = new TestSpec("service2", new Class[]{Service2Config.class});

        //设置 parent ApplicationContext 为 parent

        testClient1.setApplicationContext(parent);

        //将 service1 与 service2 的配置加入 testClient1

        testClient1.setConfigurations(List.of(testSpec1, testSpec2));

        BaseBean baseBean = testClient1.getInstance("service1", BaseBean.class);

        System.out.println(baseBean);

        //验证正常获取到了 baseBean

        Assert.assertNotNull(baseBean);

        ClientCommonBean commonBean = testClient1.getInstance("service1", ClientCommonBean.class);

        System.out.println(commonBean);

        //验证正常获取到了 commonBean

        Assert.assertNotNull(commonBean);

        Service1Bean1 service1Bean1 = testClient1.getInstance("service1", Service1Bean1.class);

        System.out.println(service1Bean1);

        //验证正常获取到了 service1Bean1

        Assert.assertNotNull(service1Bean1);

        Service1Bean2 service1Bean2 = testClient1.getInstance("service1", Service1Bean2.class);

        System.out.println(service1Bean2);

        //验证正常获取到了 service1Bean2

        Assert.assertNotNull(service1Bean2);

        BaseBean baseBean2 = testClient1.getInstance("service2", BaseBean.class);

        System.out.println(baseBean2);

        //验证正常获取到了 baseBean2 并且 baseBean2 就是 baseBean

        Assert.assertEquals(baseBean, baseBean2);

        ClientCommonBean commonBean2 = testClient1.getInstance("service2", ClientCommonBean.class);

        System.out.println(commonBean2);

        //验证正常获取到了 commonBean2 并且 commonBean 和 commonBean2 不是同一个

        Assert.assertNotNull(commonBean2);

        Assert.assertNotEquals(commonBean, commonBean2);

        Service2Bean service2Bean = testClient1.getInstance("service2", Service2Bean.class);

        System.out.println(service2Bean);

        //验证正常获取到了 service2Bean

        Assert.assertNotNull(service2Bean);

    }

    @Configuration(proxyBeanMethods = false)

    static class BaseConfig {

        @Bean

        BaseBean baseBean() {

            return new BaseBean();

        }

    }

    static class BaseBean {}

    @Configuration(proxyBeanMethods = false)

    static class ClientCommonConfig {

        @Bean

        ClientCommonBean clientCommonBean(Environment environment, BaseBean baseBean) {

            //在创建 NamedContextFactory 里面的子 ApplicationContext 的时候,会指定 name,这个 name 对应的属性 key 即 PROPERTY_NAME

            return new ClientCommonBean(environment.getProperty(PROPERTY_NAME), baseBean);

        }

    }

    static class ClientCommonBean {

        private final String name;

        private final BaseBean baseBean;

        ClientCommonBean(String name, BaseBean baseBean) {

            this.name = name;

            this.baseBean = baseBean;

        }

        @Override

        public String toString() {

            return "ClientCommonBean{" +

                    "name='" + name + '\'' +

                    ", baseBean=" + baseBean +

                    '}';

        }

    }

    @Configuration(proxyBeanMethods = false)

    static class Service1Config1 {

        @Bean

        Service1Bean1 service1Bean1(ClientCommonBean clientCommonBean) {

            return new Service1Bean1(clientCommonBean);

        }

    }

    static class Service1Bean1 {

        private final ClientCommonBean clientCommonBean;

        Service1Bean1(ClientCommonBean clientCommonBean) {

            this.clientCommonBean = clientCommonBean;

        }

        @Override

        public String toString() {

            return "Service1Bean1{" +

                    "clientCommonBean=" + clientCommonBean +

                    '}';

        }

    }

    @Configuration(proxyBeanMethods = false)

    static class Service1Config2 {

        @Bean

        Service1Bean2 service1Bean2() {

            return new Service1Bean2();

        }

    }

    static class Service1Bean2 {

    }

    @Configuration(proxyBeanMethods = false)

    static class Service2Config {

        @Bean

        Service2Bean service2Bean(ClientCommonBean clientCommonBean) {

            return new Service2Bean(clientCommonBean);

        }

    }

    static class Service2Bean {

        private final ClientCommonBean clientCommonBean;

        Service2Bean(ClientCommonBean clientCommonBean) {

            this.clientCommonBean = clientCommonBean;

        }

        @Override

        public String toString() {

            return "Service2Bean{" +

                    "clientCommonBean=" + clientCommonBean +

                    '}';

        }

    }

    static class TestSpec implements NamedContextFactory.Specification {

        private final String name;

        private final Class<?>[] configurations;

        public TestSpec(String name, Class<?>[] configurations) {

            this.name = name;

            this.configurations = configurations;

        }

        @Override

        public String getName() {

            return name;

        }

        @Override

        public Class<?>[] getConfiguration() {

            return configurations;

        }

    }

    static class TestClient extends NamedContextFactory<TestSpec> {

        public TestClient(Class<?> defaultConfigType) {

            super(defaultConfigType, "testClient", PROPERTY_NAME);

        }

    }

}
结果输出为:
com.github.hashjang.spring.cloud.iiford.service.common.CommonNameContextTest$BaseBean@3faf2e7d

ClientCommonBean{name='service1', baseBean=com.github.hashjang.spring.cloud.iiford.service.common.CommonNameContextTest$BaseBean@3faf2e7d}

Service1Bean1{clientCommonBean=ClientCommonBean{name='service1', baseBean=com.github.hashjang.spring.cloud.iiford.service.common.CommonNameContextTest$BaseBean@3faf2e7d}}

com.github.hashjang.spring.cloud.iiford.service.common.CommonNameContextTest$Service1Bean2@4648ce9

com.github.hashjang.spring.cloud.iiford.service.common.CommonNameContextTest$BaseBean@3faf2e7d

ClientCommonBean{name='service2', baseBean=com.github.hashjang.spring.cloud.iiford.service.common.CommonNameContextTest$BaseBean@3faf2e7d}

Service2Bean{clientCommonBean=ClientCommonBean{name='service2', baseBean=com.github.hashjang.spring.cloud.iiford.service.common.CommonNameContextTest$BaseBean@3faf2e7d}}
代码中实现了这样一个 Context 结构:
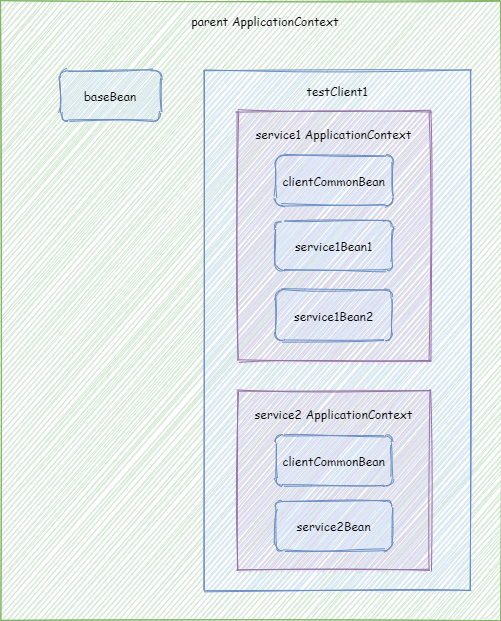
图中的被包含的 ApplicationContext 可以看到外层 ApplicationContext 的 Bean,也就是通过对被包含的 ApplicationContext 调用 getBean(xxx) 可以获取到外层 ApplicationContext 的 Bean (其实外层就是 parent ApplicationContext),但是外层的看不到内层私有的 Bean。
在我们的测试代码中,首先,创建了一个 AnnotationConfigApplicationContext。这个其实就是模拟了我们平常使用 Spring 框架的时候的根核心 ApplicationContext,所以我们将其命名为 parent。我们向里面注册了 BaseConfig,BaseConfig 里面的 BaseBean 会注册到 parent。之后我们 建 testClient1,默认配置使用 ClientCommonConfig。如果我们指定了 testClient1 的 parent ApplicationContext 为 parent,那么 parent 里面的 Bean 都能被 testClient1 里面的子 ApplicationContext 访问到。然后,我们创建 service1 与 service2 以及指定对应额外的配置类。service1 会创建 ClientCommonConfig、Service1Config1 和 Service1Config2 里面配置的 Bean。service2 会创建 ClientCommonConfig 和 Service2Config 里面配置的 Bean。
NamedContextFactory 的核心方法是 public <T> T getInstance(String name, Class<T> type),通过这个方法获取 NamedContextFactory 里面的子 ApplicationContext 里面的 Bean。源码是:
/**

 * 获取某个 name 的 ApplicationContext 里面的某个类型的 Bean

 * @param name 子 ApplicationContext 名称

 * @param type 类型

 * @param <T> Bean 类型

 * @return Bean

 */

public <T> T getInstance(String name, Class<T> type) {

	//获取或者创建对应名称的 ApplicationContext

	AnnotationConfigApplicationContext context = getContext(name);

	try {

		//从对应的 ApplicationContext 获取 Bean,如果不存在则会抛出 NoSuchBeanDefinitionException

		return context.getBean(type);

	}

	catch (NoSuchBeanDefinitionException e) {

		//忽略 NoSuchBeanDefinitionException

	}

	//没找到就返回 null

	return null;

}

protected AnnotationConfigApplicationContext getContext(String name) {

	//如果 map 中不存在,则创建

	if (!this.contexts.containsKey(name)) {

		//防止并发创建多个

		synchronized (this.contexts) {

			//再次判断,防止有多个等待锁

			if (!this.contexts.containsKey(name)) {

				this.contexts.put(name, createContext(name));

			}

		}

	}

	return this.contexts.get(name);

}

//根据名称创建对应的 context

protected AnnotationConfigApplicationContext createContext(String name) {

	AnnotationConfigApplicationContext context = new AnnotationConfigApplicationContext();

	//如果 configurations 中有对应名称的配置类,则注册之

	if (this.configurations.containsKey(name)) {

		for (Class<?> configuration : this.configurations.get(name).getConfiguration()) {

			context.register(configuration);

		}

	}

	//如果 configurations 中有名称开头为 default. 的配置类,则注册之

	for (Map.Entry<String, C> entry : this.configurations.entrySet()) {

		if (entry.getKey().startsWith("default.")) {

			for (Class<?> configuration : entry.getValue().getConfiguration()) {

				context.register(configuration);

			}

		}

	}

	//注册 PropertyPlaceholderAutoConfiguration,这样可以解析 spring boot 相关的 application 配置

	//注册默认的配置类 defaultConfigType

	context.register(PropertyPlaceholderAutoConfiguration.class, this.defaultConfigType);

	//将当前 context 的名称,放入对应的属性中,在配置类中可能会用到

	//我们上面举得例子,就是通过 environment.getProperty() 获取了这个属性

	context.getEnvironment().getPropertySources().addFirst(new MapPropertySource(this.propertySourceName,

			Collections.<String, Object>singletonMap(this.propertyName, name)));

	if (this.parent != null) {

		// Uses Environment from parent as well as beans

		context.setParent(this.parent);

		//spring boot 可以打包成一种 fatjar 的形式,将依赖的 jar 包都打入同一个 jar 包中

		//fatjar 中的依赖,通过默认的类加载器是加载不正确的,需要通过定制的类加载器

		//由于 JDK 11 LTS 相对于 JDK 8 LTS 多了模块化,通过 ClassUtils.getDefaultClassLoader() 有所不同

		//在 JDK 8 中获取的就是定制的类加载器,JDK 11 中获取的是默认的类加载器,这样会有问题

		//所以,这里需要手动设置当前 context 的类加载器为父 context 的类加载器

		context.setClassLoader(this.parent.getClassLoader());

	}

	//生成展示名称

	context.setDisplayName(generateDisplayName(name));

	context.refresh();

	return context;

}

我们这一节详细分析了 Spring Cloud 的基础 NamedContextFactory,搞清楚了其中的原理,并且举了一个简单的例子。接下来我们会详细分析下如何使用以及分析改造一个 Spring Cloud 组件。
微信搜索“我的编程喵”关注公众号,每日一刷,轻松提升技术,斩获各种offer:

SpringCloud升级之路2020.0.x版-8.理解 NamedContextFactory的更多相关文章
- SpringCloud升级之路2020.0.x版-1.背景
本系列为之前系列的整理重启版,随着项目的发展以及项目中的使用,之前系列里面很多东西发生了变化,并且还有一些东西之前系列并没有提到,所以重启这个系列重新整理下,欢迎各位留言交流,谢谢!~ Spring ...
- SpringCloud升级之路2020.0.x版-41. SpringCloudGateway 基本流程讲解(1)
本系列代码地址:https://github.com/JoJoTec/spring-cloud-parent 接下来,将进入我们升级之路的又一大模块,即网关模块.网关模块我们废弃了已经进入维护状态的 ...
- SpringCloud升级之路2020.0.x版-6.微服务特性相关的依赖说明
本系列代码地址:https://github.com/HashZhang/spring-cloud-scaffold/tree/master/spring-cloud-iiford spring-cl ...
- SpringCloud升级之路2020.0.x版-10.使用Log4j2以及一些核心配置
本系列代码地址:https://github.com/HashZhang/spring-cloud-scaffold/tree/master/spring-cloud-iiford 我们使用 Log4 ...
- SpringCloud升级之路2020.0.x版-43.为何 SpringCloudGateway 中会有链路信息丢失
本系列代码地址:https://github.com/JoJoTec/spring-cloud-parent 在开始编写我们自己的日志 Filter 之前,还有一个问题我想在这里和大家分享,即在 Sp ...
- SpringCloud升级之路2020.0.x版-29.Spring Cloud OpenFeign 的解析(1)
本系列代码地址:https://github.com/JoJoTec/spring-cloud-parent 在使用云原生的很多微服务中,比较小规模的可能直接依靠云服务中的负载均衡器进行内部域名与服务 ...
- SpringCloud升级之路2020.0.x版-34.验证重试配置正确性(1)
本系列代码地址:https://github.com/JoJoTec/spring-cloud-parent 在前面一节,我们利用 resilience4j 粘合了 OpenFeign 实现了断路器. ...
- SpringCloud升级之路2020.0.x版-2.微服务框架需要考虑的问题
本系列为之前系列的整理重启版,随着项目的发展以及项目中的使用,之前系列里面很多东西发生了变化,并且还有一些东西之前系列并没有提到,所以重启这个系列重新整理下,欢迎各位留言交流,谢谢!~ 上图中演示了一 ...
- SpringCloud升级之路2020.0.x版-3.Eureka Server 与 API 网关要考虑的问题
本系列为之前系列的整理重启版,随着项目的发展以及项目中的使用,之前系列里面很多东西发生了变化,并且还有一些东西之前系列并没有提到,所以重启这个系列重新整理下,欢迎各位留言交流,谢谢!~ 之前我们提到了 ...
随机推荐
- 使用jsonp实现跨源请求
jsonp 该技术用来实现跨源请求,即向协议.域名.端口号不同的服务器发送请求 通过使用 script 标签的 src 向服务器发送GET请求http://xxx/xxx?callback=callb ...
- 13、win10系统远程桌面oracle修正问题
1.A电脑(Windows 10)远程连接B电脑(Widows Server 2016), 出现错误: 出现身份验证错误.要求的函数不受支持 远程计算机:xx.xx.xx.xx 这可能是由于CredS ...
- 32、JavaScript介绍
32.1.JavaScript概述: 1.JavaScript的历史: 1992年Nombas开发出C-minus-minus(C--)的嵌入式脚本语言(最初绑定在CEnvi软件中),后将其改名Scr ...
- POJ 3026 Borg Maze 广搜(BFS)+最小生成树
题意:从S出发,去抓每一个A,求总路径最短长度.在S点和A点人可以分身成2人,不过一次只能让一个人走. 思路是先利用BFS求出各点之间的距离,建成图,再套用最小生成树模板. 一次性A了.不过觉得在判断 ...
- 010_Mybatis简介
目录 Mybatis简介 什么是 MyBatis? 如何获得Mybatis 持久化 持久层 为什么需要Mybatis 第一个Mybatis程序 搭建环境 建库建表 新建父工程 新建普通maven项目 ...
- CentOS-Docker搭建Kafka(单点,含:zookeeper、kafka-manager)
Docker搭建Kafka(单点,含:zookeeper.kafka-manager) 下载相关容器 $ docker pull wurstmeister/zookeeper $ docker pul ...
- java swagger ui 添加header请求头参数
我用到的swagger 主要有三款产品,swagger editor,swagger ui 和swagger codegen. swagger editor:主要是一个本地客户端,用来自己添加api, ...
- MindSpore模型精度调优实战:常用的定位精度调试调优思路
摘要:在模型的开发过程中,精度达不到预期常常让人头疼.为了帮助用户解决模型调试调优的问题,我们为MindSpore量身定做了可视化调试调优组件:MindInsight. 本文分享自华为云社区<技 ...
- ARM汇编指令-STM32单片机启动
EQU 给数字常量取一个符号名,相当于c中的define. AREA 告诉汇编器汇编一个新的代码段. SPACE 分配内存空间. PRESERVE 当前文件堆栈按照8字节对齐. EXPORT 声 ...
- C语言中的.h和.c文件
1.h为头文件,.c为源文件,其实两者都是代码,没有实质性的区别,只是后缀不一样,是一种编程规范,主要是为了解决定义与调用之间的混乱. 2.h文件一般写一些函数声明.宏定义.结构体等内容:c文件是程序 ...