Android应用程序注册广播接收器(registerReceiver)的过程分析
前 面我们介绍了Android系统的广播机制,从本质来说,它是一种消息订阅/发布机制,因此,使用这种消息驱动模型的第一步便是订阅消息;而对 Android应用程序来说,订阅消息其实就是注册广播接收器,本文将探讨Android应用程序是如何注册广播接收器以及把广播接收器注册到哪里去的。
在Android的广播机制中,ActivityManagerService扮演着广播中心的角色,负责系统中所有广播的注册和发布操作,因 此,Android应用程序注册广播接收器的过程就把是广播接收器注册到ActivityManagerService的过程。Android应用程序是 通过调用ContextWrapper类的registerReceiver函数来把广播接收器BroadcastReceiver注册到 ActivityManagerService中去的,而ContextWrapper类本身又借助ContextImpl类来注册广播接收器。
在Android应用程序框架中,Activity和Service类都继承了ContextWrapper类,因此,我们可以在Activity或者 Service的子类中调用registerReceiver函数来注册广播接收器。Activity、Service、ContextWrapper和 ContextImpl这四个类的关系可以参考前面Android系统在新进程中启动自定义服务过程(startService)的原理分析一文中描述的Activity类图。
这篇文章还是继续以实例来进行情景分析,所用到的例子便是上一篇文章Android系统中的广播(Broadcast)机制简要介绍和学习计划里 面介绍的应用程序了,所以希望读者在继续阅读本文之前,先看看这篇文章;又由于Android应用程序是把广播接器注册到 ActivityManagerService中去的,因此,这里又会涉入到Binder进程间通信机制,所以希望读者对Android系统的 Binder进程间通信机制有所了解,具体请参考Android进程间通信(IPC)机制Binder简要介绍和学习计划一文。
开始进入主题了,在Android系统中的广播(Broadcast)机制简要介绍和学习计划一文所介绍的例子中,注册广播接收器的操作是MainActivity发起的,我们先来看看注册过程的序列图:
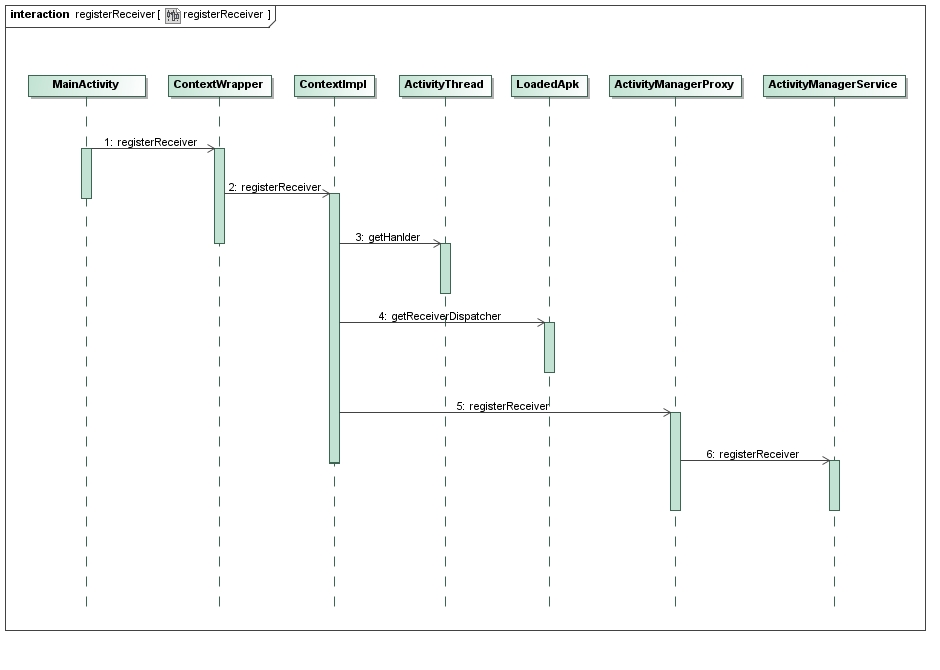
在分析这个序列图之前,我们先来看一下MainActivity是如何调用registerReceiver函数来注册广播接收器的:
- public class MainActivity extends Activity implements OnClickListener {
- ......
- @Override
- public void onResume() {
- super.onResume();
- IntentFilter counterActionFilter = new IntentFilter(CounterService.BROADCAST_COUNTER_ACTION);
- registerReceiver(counterActionReceiver, counterActionFilter);
- }
- ......
- }
MainActivity在onResume函数里,通过其父类ContextWrapper的registerReceiver函数注册了一个 BroadcastReceiver实例counterActionReceiver,并且通过IntentFilter实例 counterActionFilter告诉ActivityManagerService,它要订阅的广播是 CounterService.BROADCAST_COUNTER_ACTION类型的,这样,ActivityManagerService在收到 CounterService.BROADCAST_COUNTER_ACTION类型的广播时,就会分发给counterActionReceiver 实例的onReceive函数。
接下来,就开始分析注册过程中的每一个步骤了。
Step 1. ContextWrapper.registerReceiver
这个函数实现在frameworks/base/core/java/android/content/ContextWrapper.java文件中:
- public class ContextWrapper extends Context {
- Context mBase;
- ......
- @Override
- public Intent registerReceiver(
- BroadcastReceiver receiver, IntentFilter filter) {
- return mBase.registerReceiver(receiver, filter);
- }
- ......
- }
这里的成员变量mBase是一个ContextImpl实例,想知道为什么,可以回过头去看看Android应用程序启动过程源代码分析这篇文章>~<。
Step 2. ContextImpl.registerReceiver
这个函数实现在frameworks/base/core/java/android/app/ContextImpl.java文件中:
- class ContextImpl extends Context {
- ......
- @Override
- public Intent registerReceiver(BroadcastReceiver receiver, IntentFilter filter) {
- return registerReceiver(receiver, filter, null, null);
- }
- @Override
- public Intent registerReceiver(BroadcastReceiver receiver, IntentFilter filter,
- String broadcastPermission, Handler scheduler) {
- return registerReceiverInternal(receiver, filter, broadcastPermission,
- scheduler, getOuterContext());
- }
- private Intent registerReceiverInternal(BroadcastReceiver receiver,
- IntentFilter filter, String broadcastPermission,
- Handler scheduler, Context context) {
- IIntentReceiver rd = null;
- if (receiver != null) {
- if (mPackageInfo != null && context != null) {
- if (scheduler == null) {
- scheduler = mMainThread.getHandler();
- }
- rd = mPackageInfo.getReceiverDispatcher(
- receiver, context, scheduler,
- mMainThread.getInstrumentation(), true);
- } else {
- ......
- }
- }
- try {
- return ActivityManagerNative.getDefault().registerReceiver(
- mMainThread.getApplicationThread(),
- rd, filter, broadcastPermission);
- } catch (RemoteException e) {
- return null;
- }
- }
- ......
- }
通过两个函数的中转,最终就进入到ContextImpl.registerReceiverInternal这个函数来了。这里的成员变量 mPackageInfo是一个LoadedApk实例,它是用来负责处理广播的接收的,在后面一篇文章讲到广播的发送时 (sendBroadcast),会详细描述。参数broadcastPermission和scheduler都为null,而参数context是上 面的函数通过调用函数getOuterContext得到的,这里它就是指向MainActivity了,因为MainActivity是继承于 Context类的,因此,这里用Context类型来引用。
由于条件mPackageInfo != null和context != null都成立,而且条件scheduler == null也成立,于是就调用mMainThread.getHandler来获得一个Handler了,这个Hanlder是后面用来分发 ActivityManagerService发送过的广播用的。这里的成员变量mMainThread是一个ActivityThread实例,在前面Android应用程序启动过程源代码分析这篇文章也描述过了。我们先来看看ActivityThread.getHandler函数的实现,然后再回过头来继续分析ContextImpl.registerReceiverInternal函数。
Step 3. ActivityThread.getHandler
这个函数实现在frameworks/base/core/java/android/app/ActivityThread.java文件中:
- public final class ActivityThread {
- ......
- final H mH = new H();
- private final class H extends Handler {
- ......
- public void handleMessage(Message msg) {
- ......
- switch (msg.what) {
- ......
- }
- ......
- }
- ......
- }
- ......
- final Handler getHandler() {
- return mH;
- }
- ......
- }
有了这个Handler之后,就可以分发消息给应用程序处理了。
再回到上一步的ContextImpl.registerReceiverInternal函数中,它通过 mPackageInfo.getReceiverDispatcher函数获得一个IIntentReceiver接口对象rd,这是一个Binder 对象,接下来会把它传给ActivityManagerService,ActivityManagerService在收到相应的广播时,就是通过这个 Binder对象来通知MainActivity来接收的。
我们也是先来看一下mPackageInfo.getReceiverDispatcher函数的实现,然后再回过头来继续分析ContextImpl.registerReceiverInternal函数。
Step 4. LoadedApk.getReceiverDispatcher
这个函数实现在frameworks/base/core/java/android/app/LoadedApk.java文件中:
- final class LoadedApk {
- ......
- public IIntentReceiver getReceiverDispatcher(BroadcastReceiver r,
- Context context, Handler handler,
- Instrumentation instrumentation, boolean registered) {
- synchronized (mReceivers) {
- LoadedApk.ReceiverDispatcher rd = null;
- HashMap<BroadcastReceiver, LoadedApk.ReceiverDispatcher> map = null;
- if (registered) {
- map = mReceivers.get(context);
- if (map != null) {
- rd = map.get(r);
- }
- }
- if (rd == null) {
- rd = new ReceiverDispatcher(r, context, handler,
- instrumentation, registered);
- if (registered) {
- if (map == null) {
- map = new HashMap<BroadcastReceiver, LoadedApk.ReceiverDispatcher>();
- mReceivers.put(context, map);
- }
- map.put(r, rd);
- }
- } else {
- rd.validate(context, handler);
- }
- return rd.getIIntentReceiver();
- }
- }
- ......
- static final class ReceiverDispatcher {
- final static class InnerReceiver extends IIntentReceiver.Stub {
- final WeakReference<LoadedApk.ReceiverDispatcher> mDispatcher;
- ......
- InnerReceiver(LoadedApk.ReceiverDispatcher rd, boolean strong) {
- mDispatcher = new WeakReference<LoadedApk.ReceiverDispatcher>(rd);
- ......
- }
- ......
- }
- ......
- final IIntentReceiver.Stub mIIntentReceiver;
- final Handler mActivityThread;
- ......
- ReceiverDispatcher(BroadcastReceiver receiver, Context context,
- Handler activityThread, Instrumentation instrumentation,
- boolean registered) {
- ......
- mIIntentReceiver = new InnerReceiver(this, !registered);
- mActivityThread = activityThread;
- ......
- }
- ......
- IIntentReceiver getIIntentReceiver() {
- return mIIntentReceiver;
- }
- }
- ......
- }
在LoadedApk.getReceiverDispatcher函数中,首先看一下参数r是不是已经有相应的ReceiverDispatcher 存在了,如果有,就直接返回了,否则就新建一个ReceiverDispatcher,并且以r为Key值保在一个HashMap中,而这个 HashMap以Context,这里即为MainActivity为Key值保存在LoadedApk的成员变量mReceivers中,这样,只要给 定一个Activity和BroadcastReceiver,就可以查看LoadedApk里面是否已经存在相应的广播接收发布器 ReceiverDispatcher了。
在新建广播接收发布器ReceiverDispatcher时,会在构造函数里面创建一个InnerReceiver实例,这是一个Binder对象, 实现了IIntentReceiver接口,可以通过ReceiverDispatcher.getIIntentReceiver函数来获得,获得后就 会把它传给ActivityManagerService,以便接收广播。在ReceiverDispatcher类的构造函数中,还会把传进来的 Handle类型的参数activityThread保存下来,以便后面在分发广播的时候使用。
现在,再回到ContextImpl.registerReceiverInternal函数,在获得了IIntentReceiver类型的Binder对象后,就开始要把它注册到ActivityManagerService中去了。
Step 5. ActivityManagerProxy.registerReceiver
这个函数实现在frameworks/base/core/java/android/app/ActivityManagerNative.java文件中:
- class ActivityManagerProxy implements IActivityManager
- {
- ......
- public Intent registerReceiver(IApplicationThread caller,
- IIntentReceiver receiver,
- IntentFilter filter, String perm) throws RemoteException
- {
- Parcel data = Parcel.obtain();
- Parcel reply = Parcel.obtain();
- data.writeInterfaceToken(IActivityManager.descriptor);
- data.writeStrongBinder(caller != null ? caller.asBinder() : null);
- data.writeStrongBinder(receiver != null ? receiver.asBinder() : null);
- filter.writeToParcel(data, 0);
- data.writeString(perm);
- mRemote.transact(REGISTER_RECEIVER_TRANSACTION, data, reply, 0);
- reply.readException();
- Intent intent = null;
- int haveIntent = reply.readInt();
- if (haveIntent != 0) {
- intent = Intent.CREATOR.createFromParcel(reply);
- }
- reply.recycle();
- data.recycle();
- return intent;
- }
- ......
- }
这个函数通过Binder驱动程序就进入到ActivityManagerService中的registerReceiver函数中去了。
Step 6. ActivityManagerService.registerReceiver
这个函数实现在frameworks/base/services/java/com/android/server/am/ActivityManagerService.java文件中:
- public final class ActivityManagerService extends ActivityManagerNative
- implements Watchdog.Monitor, BatteryStatsImpl.BatteryCallback {
- ......
- public Intent registerReceiver(IApplicationThread caller,
- IIntentReceiver receiver, IntentFilter filter, String permission) {
- synchronized(this) {
- ProcessRecord callerApp = null;
- if (caller != null) {
- callerApp = getRecordForAppLocked(caller);
- if (callerApp == null) {
- ......
- }
- }
- List allSticky = null;
- // Look for any matching sticky broadcasts...
- Iterator actions = filter.actionsIterator();
- if (actions != null) {
- while (actions.hasNext()) {
- String action = (String)actions.next();
- allSticky = getStickiesLocked(action, filter, allSticky);
- }
- } else {
- ......
- }
- // The first sticky in the list is returned directly back to
- // the client.
- Intent sticky = allSticky != null ? (Intent)allSticky.get(0) : null;
- ......
- if (receiver == null) {
- return sticky;
- }
- ReceiverList rl
- = (ReceiverList)mRegisteredReceivers.get(receiver.asBinder());
- if (rl == null) {
- rl = new ReceiverList(this, callerApp,
- Binder.getCallingPid(),
- Binder.getCallingUid(), receiver);
- if (rl.app != null) {
- rl.app.receivers.add(rl);
- } else {
- ......
- }
- mRegisteredReceivers.put(receiver.asBinder(), rl);
- }
- BroadcastFilter bf = new BroadcastFilter(filter, rl, permission);
- rl.add(bf);
- ......
- mReceiverResolver.addFilter(bf);
- // Enqueue broadcasts for all existing stickies that match
- // this filter.
- if (allSticky != null) {
- ......
- }
- return sticky;
- }
- }
- ......
- }
函数首先是获得调用registerReceiver函数的应用程序进程记录块:
- ProcessRecord callerApp = null;
- if (caller != null) {
- callerApp = getRecordForAppLocked(caller);
- if (callerApp == null) {
- ......
- }
- }
这里得到的便是上一篇文章Android系统中的广播(Broadcast)机制简要介绍和学习计划里面介绍的应用程序Broadcast的进程记录块了,MainActivity就是在里面启动起来的。
- List allSticky = null;
- // Look for any matching sticky broadcasts...
- Iterator actions = filter.actionsIterator();
- if (actions != null) {
- while (actions.hasNext()) {
- String action = (String)actions.next();
- allSticky = getStickiesLocked(action, filter, allSticky);
- }
- } else {
- ......
- }
- // The first sticky in the list is returned directly back to
- // the client.
- Intent sticky = allSticky != null ? (Intent)allSticky.get(0) : null;
这里传进来的filter只有一个action,就是前面描述的CounterService.BROADCAST_COUNTER_ACTION了, 这里先通过getStickiesLocked函数查找一下有没有对应的sticky intent列表存在。什么是Sticky Intent呢?我们在最后一次调用sendStickyBroadcast函数来发送某个Action类型的广播时,系统会把代表这个广播的 Intent保存下来,这样,后来调用registerReceiver来注册相同Action类型的广播接收器,就会得到这个最后发出的广播。这就是为 什么叫做Sticky Intent了,这个最后发出的广播虽然被处理完了,但是仍然被粘住在ActivityManagerService中,以便下一个注册相应Action 类型的广播接收器还能继承处理。
这里,假设我们不使用sendStickyBroadcast来发送CounterService.BROADCAST_COUNTER_ACTION类型的广播,于是,这里得到的allSticky和sticky都为null了。
继续往下看,这里传进来的receiver不为null,于是,继续往下执行:
- ReceiverList rl
- = (ReceiverList)mRegisteredReceivers.get(receiver.asBinder());
- if (rl == null) {
- rl = new ReceiverList(this, callerApp,
- Binder.getCallingPid(),
- Binder.getCallingUid(), receiver);
- if (rl.app != null) {
- rl.app.receivers.add(rl);
- } else {
- ......
- }
- mRegisteredReceivers.put(receiver.asBinder(), rl);
- }
这里其实就是把广播接收器receiver保存一个ReceiverList列表中,这个列表的宿主进程是rl.app,这里就是 MainActivity所在的进程了,在ActivityManagerService中,用一个进程记录块来表示这个应用程序进程,它里面有一个列表 receivers,专门用来保存这个进程注册的广播接收器。接着,又把这个ReceiverList列表以receiver为Key值保存在 ActivityManagerService的成员变量mRegisteredReceivers中,这些都是为了方便在收到广播时,快速找到对应的广 播接收器的。
再往下看:
- BroadcastFilter bf = new BroadcastFilter(filter, rl, permission);
- rl.add(bf);
- ......
- mReceiverResolver.addFilter(bf);
上面只是把广播接收器receiver保存起来了,但是还没有把它和filter关联起来,这里就创建一个BroadcastFilter来把广播接收 器列表rl和filter关联起来,然后保存在ActivityManagerService中的成员变量mReceiverResolver中去。
这样,广播接收器注册的过程就介绍完了,比较简单,但是工作又比较琐碎,主要就是将广播接收器receiver及其要接收的广播类型filter保存在 ActivityManagerService中,以便以后能够接收到相应的广播并进行处理,在下一篇文章,我们将详细分析这个过程,敬请关注。
老罗的新浪微博:http://weibo.com/shengyangluo,欢迎关注!
Android应用程序注册广播接收器(registerReceiver)的过程分析的更多相关文章
- Android应用程序发送广播(sendBroadcast)的过程分析
文章转载至CSDN社区罗升阳的安卓之旅,原文地址:http://blog.csdn.net/luoshengyang/article/details/6744448 前面我们分析了Android应用程 ...
- Android -- 简单广播接收与发送(2)--动态注册广播接收器
1. 效果图
- Android组件系列----BroadcastReceiver广播接收器
[声明] 欢迎转载,但请保留文章原始出处→_→ 生命壹号:http://www.cnblogs.com/smyhvae/ 文章来源:http://www.cnblogs.com/smyhvae/p/3 ...
- Android应用程序资源的编译和打包过程分析
文章转载至CSDN社区罗升阳的安卓之旅,原文地址:http://blog.csdn.net/luoshengyang/article/details/8744683 我们知道,在一个APK文件中,除了 ...
- Android应用程序与SurfaceFlinger服务的连接过程分析
文章转载至CSDN社区罗升阳的安卓之旅,原文地址:http://blog.csdn.net/luoshengyang/article/details/7857163 前文在描述Android应用程序和 ...
- Android系统中的广播(Broadcast)机制简要介绍和学习计划
在Android系统中,广播(Broadcast)是在组件之间传播数据(Intent)的一种机制:这些组件甚至是可以位于不同的进程中,这样它就像Binder机制一样,起到进程间通信的作用:本文通过一个 ...
- Xamarin.Android广播接收器与绑定服务
一.前言 学习了前面的活动与服务后,你会发现服务对于活动而言似乎就是透明的,相反活动对于服务也是透明的,所以我们还需要一中机制能够将服务和活动之间架起一座桥梁,通过本节的学习,你将会学到广播与绑定服务 ...
- Android基础总结(4)——广播接收器
在Android中的每个应用程序可以对自己感兴趣的广播进行注册,这样该程序就只会接收自己所关心的广播内容,这些广播可能来自于系统的,也可能来自于其他应用程序的.Android提供了一整套完整的API, ...
- Android之路-------传说中的大喇叭(广播接收器)
前言 没想到离上一篇博文的时间已经有一个多星期了,时间真的不等人啊,在这里LP告诉你们一个道理,如果现在有谁正在看管理时间的书,那么请你们把这些书放下吧,看了也没有用,因为时间我们根本管不了,我们只能 ...
随机推荐
- bat处理文件
bat处理文件 作用:可以一次性执行多个命令的文件. 为什么要学bat处理文件? 快速运行一个软件一般都会把软件打包一个jar包,但是jar双击可以运行仅对图形化界面的软件起作用,对于控制台的程序是不 ...
- 伸缩放大的js
window.onload = function() { var div1 = document.getElementById('div1'); div1.onmous ...
- 使用Fiddler抓取手机上的数据包
在IIS中,如果网站已经绑定了域名在使用IP是不能访问的,需要添加一个空的主机名与IP的映射才能访问.如下图: Fiddler抓取手机包 在PC上建一个WIFI热的 勾选Fiddler中Tool-&g ...
- (转)[老老实实学WCF] 第四篇 初探通信--ChannelFactory
第四篇 初探通信--ChannelFactory 通过前几篇的学习,我们简单了解了WCF的服务端-客户端模型,可以建立一个简单的WCF通信程序,并且可以把我们的服务寄宿在IIS中了.我们不禁感叹WCF ...
- select radio readonly
首先 select radio 设置 disable的会无法提交数据. 这让我很头疼 而且 readonly 无效 后来发现.我把自己绕进去了..一般涉及 只读都是 不让用户修改 .而后台只更新 可 ...
- 图片拉伸(有保护区域) resizableImageWithCapInsets
在仿写QQ会话的时候背景蓝色图片是拉伸而来,但是有些地方是受保护的不能拉伸 所以定义了下面的工具类中的一个方法,专门拉伸图片 UIImageResizingModeStretch:拉伸模式,通过拉伸U ...
- Linux知识扫盲
1.发现linux中好多软件以d结尾,d代表什么? d 代表 deamon 守护进程守护进程是运行在Linux服务器后台的一种服务程序.现在比较常用 是 service 这个词.它周期性地执行某种任务 ...
- HTML5音频
<audio>用来播放声音文件. 案例1: <!DOCTYPE html><html><head lang="en"> <me ...
- iOS高仿城觅-感谢大神分享
项目展示,由于没有数据,所以所有的cell显示的都是我自己写的数据 抽屉 首页部分效果 首页效果 部分效果 发现 消息 搜索 设置 模糊效果 代码注释展示 代码注释展示 还有很多细节就不一一展示了,大 ...
- 收集点小文,讲CGI,FASTCGI,PHP-CGI,PHP-FPM之间通透点的文章
http://blog.csdn.net/meegomeego/article/details/36180343 http://www.opsers.org/linux-home/server/php ...