
gitlab之gitlab-ci和gitlab-runner<一>
一、概述
gitlab是开源代码托管软件,有ce和ee两种版本,一般情况下ce完全能满足企业使用,如果不差钱可以使用ee版本,这里使用的是ce版。之前也一直在做CI/CD,最开始采用gitlab+webhook+jenkins,但是这种组合略显笨重,后来经过一番探索原来gitlab早就自己做好了这一切,那就是gitlab-ci和gitlab-runner,gitlab-ci在安装gitlab的时候默认已经安装了,所以无需再次安装只需要安装一下gitlab-runner。
!gitlab-ci就是持续集成,每一次push代码,就触发一次构建流程包括测试、编译、(打包)、部署等一系列的内容,这个流程是pipeline执行一系列的脚本构成,根据自己的项目需求制作相应的流程和编写相关的脚本,.gitlab-ci.yml的脚本解析就由它来负责。
!gitlab-runner是脚本执行的地方,push代码后,gitlab-ci会解析.gitlab-ci.yml,然后根据pipeline规则在相应的runner上执行相应的脚本。
!.gitlab-ci.yml是在git项目的根目录下的一个文件,记录了一系列的阶段和执行规则。GitLab-CI在push后会解析它,根据里面的内容调用runner来运行,项目使用gitlab-ci要在相应的项目里面加上这个文件。
二、部署
1、安装gitlab
安装环境centos7
使用yum的方式安装gitlab-ce,设置repo:
#cat /etc/yum.repos.d/gitlab-ce.repo
[gitlab-ce]

name=Gitlab CE Repository

baseurl=https://mirrors.tuna.tsinghua.edu.cn/gitlab-ce/yum/el$releasever/

gpgcheck=

enabled=
#yum provides gitlab-ce
选择想要使用的版本尽享安装即可,这里我安装的是gitlab-ce-11.2.2-ce.0.el7.x86_64。
#yum -y install gitlab-ce-11.2.2-ce.0.el7.x86_64
结下来就是进行初始化、启动,首先要修改初始化文件,一般是在/etc/gitlab/gitlab.rb,主要是修改如下几项:
external_url 'http://10.2.6.7',#这个是gitlab url,就是以后访问要使用的,所以一定要设置好,严格按照格式设置,"http://"不能省略,生产环境建议使用域名。
邮件设置:
gitlab_rails['smtp_enable'] = true
gitlab_rails['smtp_address'] = "smtp.exmail.qq.com"
gitlab_rails['smtp_port'] = 25
gitlab_rails['smtp_user_name'] = "ci@app.com"
gitlab_rails['smtp_password'] = "1qaz*@WSX"
gitlab_rails['smtp_domain'] = "app.com"
gitlab_rails['smtp_authentication'] = "login"
gitlab_rails['smtp_enable_starttls_auto'] = true
gitlab_rails['smtp_tls'] = false
gitlab_rails['gitlab_email_enabled'] = true
gitlab_rails['gitlab_email_from'] = 'ci@app.com'
gitlab_rails['gitlab_email_display_name'] = 'gitlab'
gitlab_rails['gitlab_email_reply_to'] = 'ci@app.com'
gitlab_rails['gitlab_email_subject_suffix'] = 'dd'
gitlab_rails['time_zone'] = 'Asia/Shanghai'
还有就是数据目录存放,默认存放到/var/lib/gitlab下面,时间久了可能导致磁盘空间不够用,可以修改为其他较大空间的目录。
启动:
#gitlab-ctl reconfigure
启动完成后,查看一下状态:
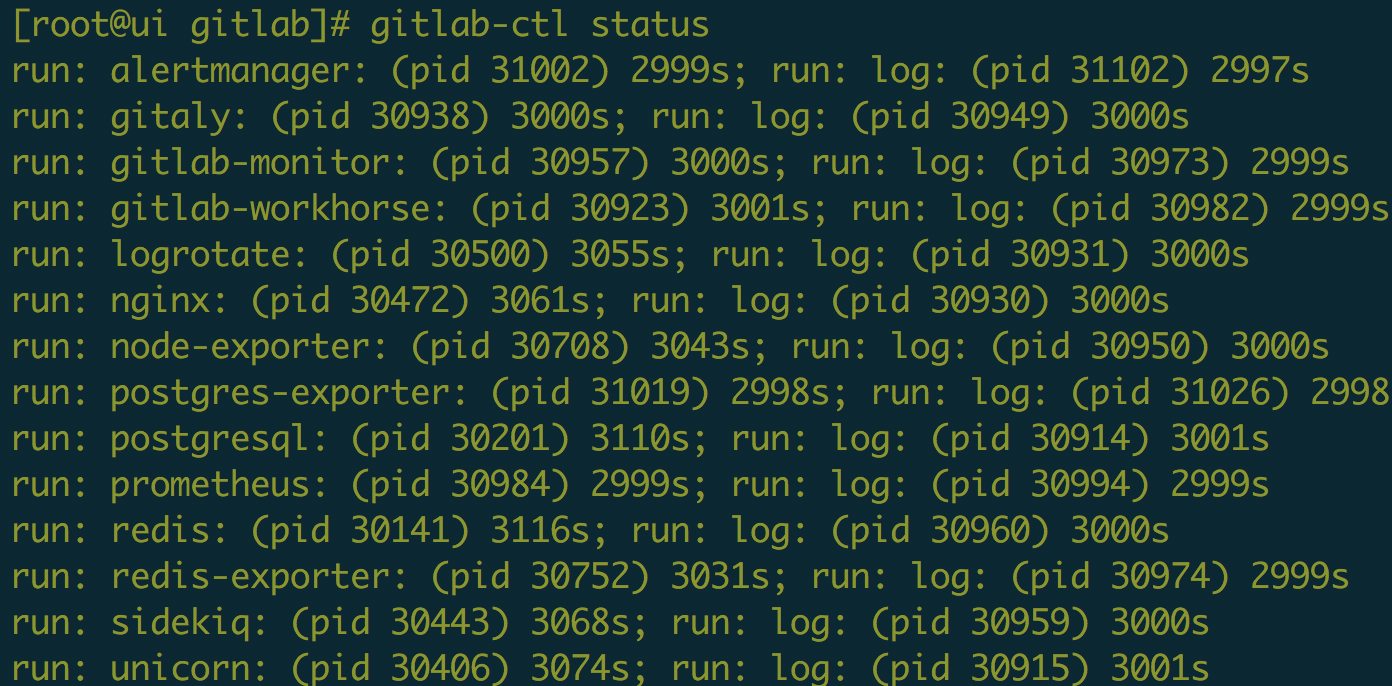
出现以上证明启动成功,使用上面设置的external_url 'http://10.2.6.7',访问一下,生产环境建议设置一个域名,使用nginx代理一下。
首次访问会提示更新密码,设置一个新的密码就可以了,默认用户名root。
2、安装gitlab-runner
#curl -L https://packages.gitlab.com/install/repositories/runner/gitlab-runner/script.rpm.sh | sudo bash
#yum provides gitlab-runner
选择匹配gitlab-ci的版本,这里选择gitlab-runner-11.2.0-1.x86_64
#yum -y install gitlab-runner-11.2.0-1.x86_64
2.1、注册gitlab-runner
参考:https://docs.gitlab.com/runner/register/index.html
根据提示填写即可。
#gitlab-runner register
Please enter the gitlab-ci coordinator URL (e.g. https://gitlab.com/):
http://10.42.68.77
Please enter the gitlab-ci token for this runner:
_9cgUcGks7zQ-2swKmhL
Please enter the gitlab-ci description for this runner:
[ui]: sp
Please enter the gitlab-ci tags for this runner (comma separated):
ll
Registering runner... succeeded runner=_9cgUcGk
Please enter the executor: parallels, docker-ssh+machine, kubernetes, docker, docker-ssh, virtualbox, docker+machine, shell, ssh:
docker
Please enter the default Docker image (e.g. ruby:2.1):
apline:latest
#这里的url填写gitlab的访问地址,token是在gitlab管理页面获得:
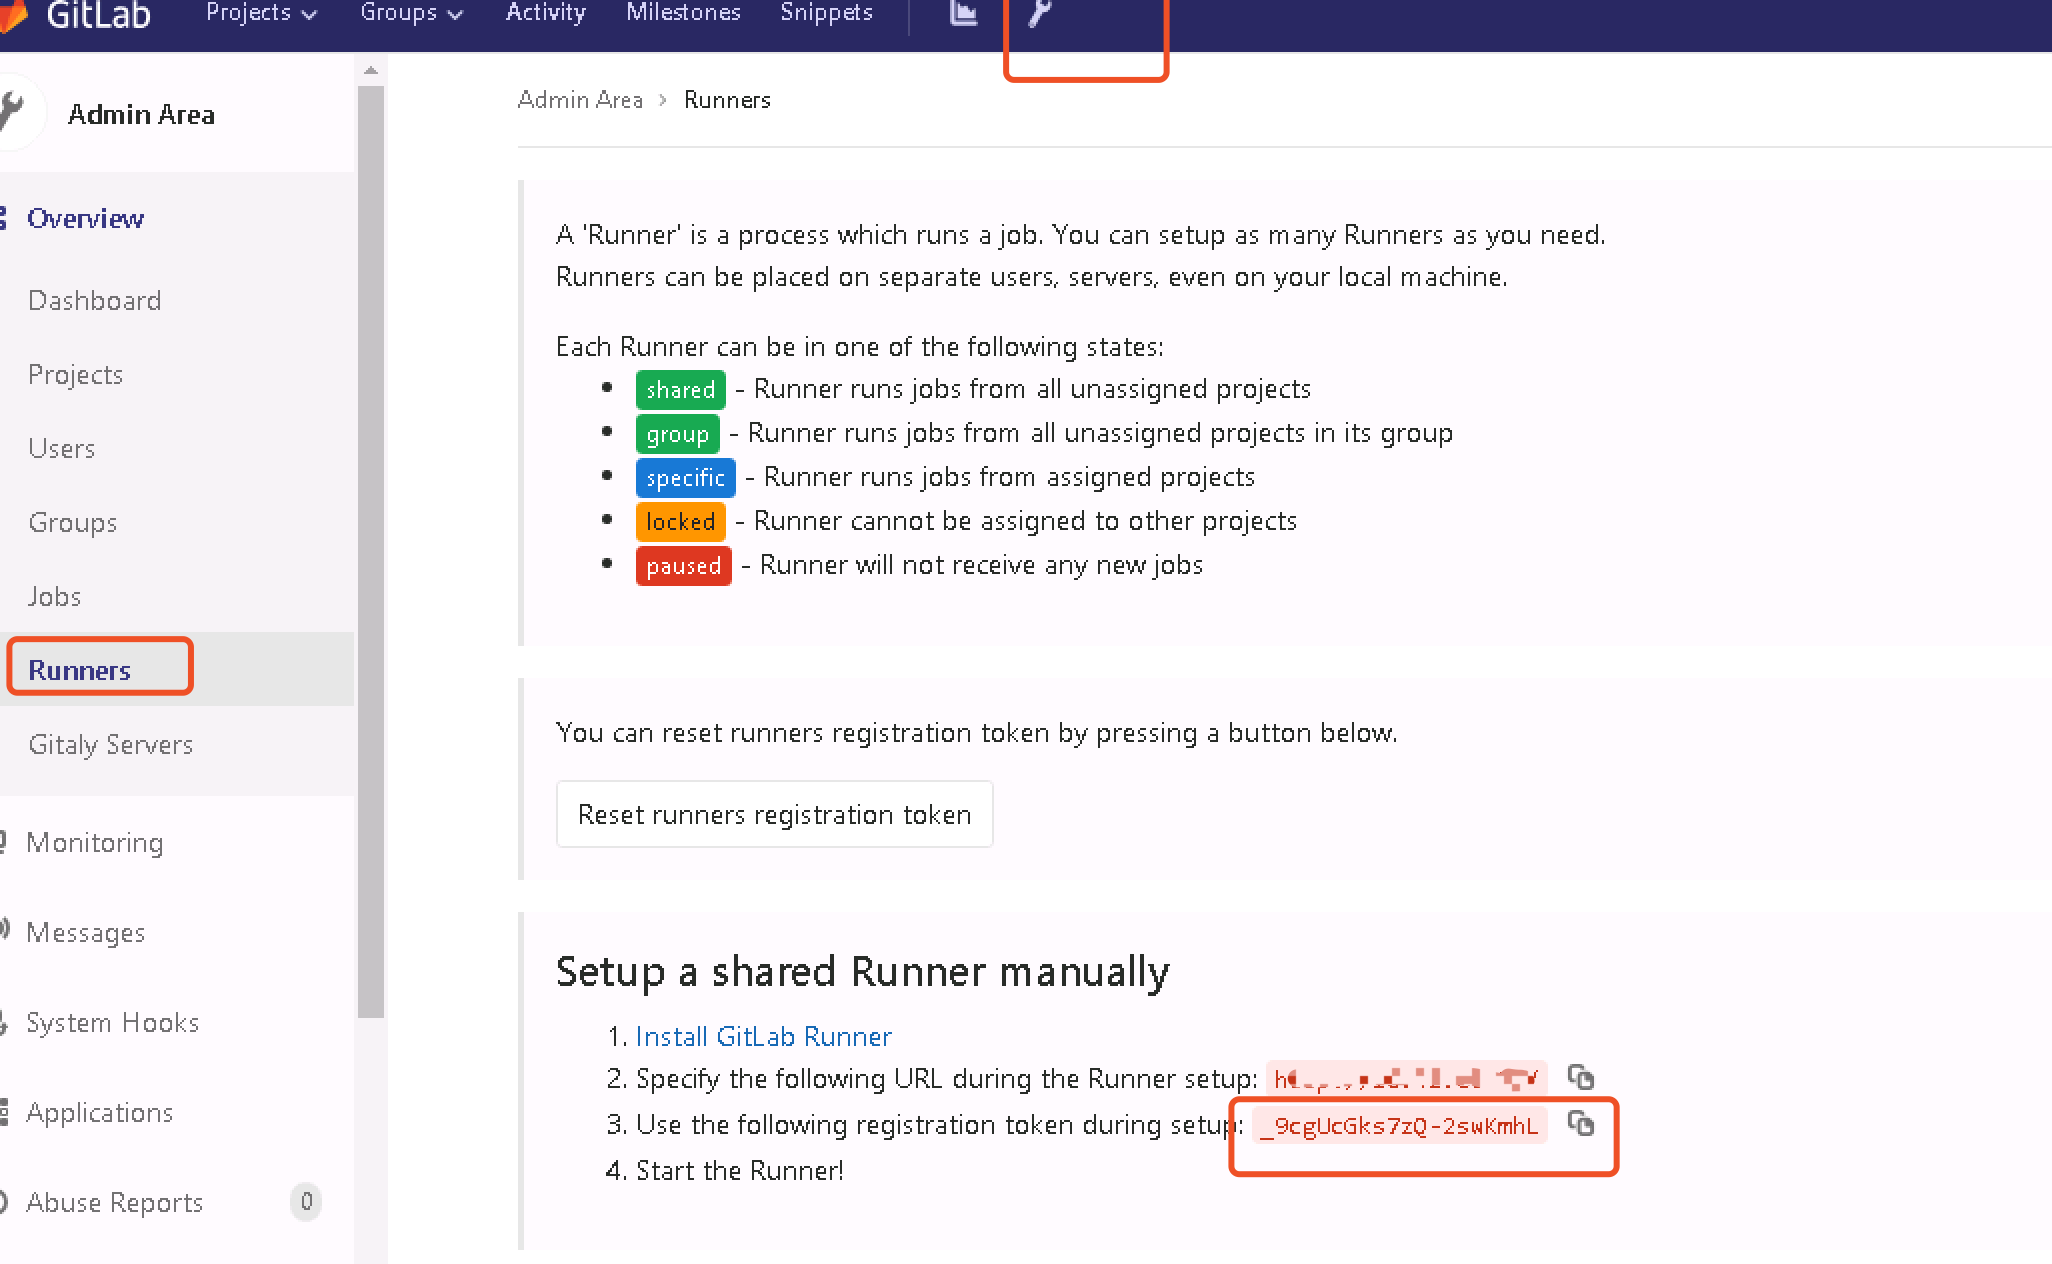
executor选择使用docker,上面设置完成后就注册完成了。

接下来是修改配置文件,runner注册完成后,会生成一个配置文件/etc/gitlab-runner/config.toml.
concurrent =

check_interval =

[[runners]]

  name = "ui"

  url = "http://10.42.68.77"

  token = "927ad1dacc341bc977836856a8533e"

  executor = "docker"

  cache_dir = "/data/tmp/cache"

  [runners.docker]

    tls_verify = false

    image = "docker:dind"

    privileged = true

    disable_cache = false

    volumes = ["/var/run/docker.sock:/var/run/docker.sock","/data/tmp/cache:/data/tmp/cache"]

    cache_dir = "/data/tmp/cache"

    shm_size =

  [runners.cache]
concurrent = 1
#设置一个runner并发jobs,concurrent = 20,表示这个runner可以同时最多执行20个job。
下面贴一份dind的配置:
cat /etc/gitlab-runner/config.toml
concurrent =

check_interval =

[[runners]]

  name = "kn2-saturn"

  url = "http://glab.nget.com/"

  token = "443ffc1bdaa0be1983c49b88e61"

  executor = "docker"

  cache_dir = "/data/tmp/cache"

  [runners.docker]

    tls_verify = false

    image = "docker:dind"

    privileged = true

    disable_cache = false

    volumes = ["/var/run/docker.sock:/var/run/docker.sock", "/data/tmp/cache:/data/tmp/cache"]

    cache_dir = "/data/tmp/cache"

    shm_size =

  [runners.cache]

[[runners]]

  name = "kn2-shared"

  url = "http://glab.nget.com/"

  token = "53abc8c08c14f386a40dd807853bc6"

  executor = "docker"

  cache_dir = "/data/tmp/cache"

  environment = ["httpProxy=http://10.4.15.13:8118", "no_proxy=localhost,.local,127.0.0.1,0.0.0.0,registry.npm.taobao.org"]

  [runners.docker]

    tls_verify = false

    image = "docker:dind"

    privileged = true

    disable_cache = false

    volumes = ["/var/run/docker.sock:/var/run/docker.sock", "/data/tmp/cache:/data/tmp/cache"]

    cache_dir = "/data/tmp/cache"

    shm_size =

  [runners.cache]

[[runners]]

  name = "kn2,kubernetes"

  url = "http://gitb.nget.com"

  token = "ce6d7c6c6bf96c05dd3ed9a3edb0"

  executor = "kubernetes"

  [runners.cache]

  [runners.kubernetes]

    host = ""

    bearer_token_overwrite_allowed = false

    image = ""

    namespace = ""

    namespace_overwrite_allowed = ""

    privileged = true

    service_account_overwrite_allowed = ""

    pod_annotations_overwrite_allowed = ""

    [runners.kubernetes.volumes]
gitlab之gitlab-ci和gitlab-runner<一>的更多相关文章
- 在gitlab上setup CI
安装gitlab runner docker pull gitlab/gitlab-runner 启动gitlab runner docker run -d --name gitlab-runner ...
- 如何搭建基于Docker的gitlab服务器集成CI/CD实现DEVOPS(完整版)
From this lesson you will learn about 1,How to install and configure a docker based gitlab server 2, ...
- gitlab自动化部署CI案例
参考: https://blog.csdn.net/hxpjava1/article/details/78514999 (简单操作) https://blog.csdn.net/wh211212/ ...
- gitlab+jenkins+tomcat CI/CD 部署
整个项目的框架为: gitlab的安装与使用(Centos7) gitlab的安装 新建yum源 vim /etc/yum.repos.d/gitlab-ce.repo [gitlab-ce] nam ...
- git学习------>在CenterOS系统上安装GitLab并自定义域名访问GitLab管理页面
目前就职的公司一直使用SVN作为版本管理,现在打算尝试从SVN迁移到Git.安排我来预言并搭建好相关的环境以及自己尝试使用Git.今天我就尝试在Center OS系统上安装GitLab,现在在此记录一 ...
- 使用docker安装gitlab,两台电脑gitlab库相互迁移
原文来自合伙呀 https://hehuoya.com/2019/09/30/gitlab-docker/ Docker for gitlab brew cask install docker do ...
- Docker DevOps实战:GitLab+Jenkins(1)- GitLab容器搭建、使用SourceTree pull/push项目
GitLab容器搭建 # 创建GitLab容器# --restart always #重启,容器自动重启# --privileged=true #容器内使用root权限 [root@localhost ...
- GitLab私有化部署 - CI/CD - 持续集成/交付/部署 - 源代码托管 & 自动化部署
预期目标 源代码管理 借助GitLab实现源代码托管,私有化部署版本,创建项目,创建用户组,分配权限,项目的签入/牵出等. 自动化部署 源代码产生变更时(如签入),自动化编译并发布到指定服务器中部署, ...
- 使用gitlab, jenkins搭建CI(持续集成)系统(1) -- 准备环境
1. 环境设计 搭建一个从开发到测试知道发布上线可以自动换完成的CI系统.这个系统中包含4个环境. 开发(dev)环境: 码农使用. 测试(test)环境: 测试人员使用. 预发布(prepublis ...
- KubeSphere CI/CD+GitLab+Harbor将Spring Boot项目部署至Kubernetes
上一篇文章分享了如何在 KubeSphere 对公共的代码仓库 GitHub 和镜像仓库 DockerHub 创建流水线,本文将继续使用 KubeSphere,基于 Harbor 和 GitLab 创 ...
随机推荐
- 5、Makefile基础知识汇总(转自陈皓总述)
一.Makefile里有什么? Makefile里主要包含了五个东西:显式规则.隐晦规则.变量定义.文件指示和注释. 1.显式规则.显式规则说明了,如何生成一个或多的的目标文件.这是由Makefile ...
- hdu 4902 线段树+逆向模拟
http://acm.hdu.edu.cn/showproblem.php?pid=4902 出n个数,然后对这n个数进行两种操作: 如果是 1 l r x,则把 [l, r] 区间里面的每一个数都变 ...
- bootstrap阶段测验【问题】
- Python自动化开发 - 常用模块(二)
本节内容 1.shutil模块 2.shelve模块 3.xml处理模块 4.configparser模块 5.hashlib模块 6.subprocess模块 7.re模块 一.shutil模块 高 ...
- JVM中的新生代、老年代和永生代
1.为什么会有年轻代 我们先来屡屡,为什么需要把堆分代?不分代不能完成他所做的事情么?其实不分代完全可以,分代的唯一理由就是优化GC性能.你先想想,如果没有分代,那我们所有的对象都在一块,GC的时候我 ...
- 一、winForm-DataGridView操作——控件绑定事件的两种方法
在winForm窗体中绑定(注册)事件的方法有两种: 一.绑定事件 双击控件,即进入.cs的代码编辑页面,会出现 类似于“ private void 控件名称_Click(object sender, ...
- MySQL字符集的设置
Notice:文章基于ubuntu系统而写 1.关于MySQL字符集 MySQL的字符集支持(Character Set Support)有两个方面: 字符集(Character set)和排序方式( ...
- TakePhoto实现拍照得到图片和从相册得到图片
在学郭霖大神的第一行代码的时候,学到利用相机拍照和从本地相册取照片的那一小节的时候,代码写出来但是出了很多问题,APP老是崩溃,一番百度最终还是没有找到解决办法 无奈只能用别人现成的轮子了,然后就发现 ...
- web 基础
web服务器和应用服务器以及web应用框架: web服务器:负责处理http请求,响应静态文件,常见的有Apache,Nginx以及微软的IIS. 应用服务器:负责处理逻辑的服务器.比如php.pyt ...
- Eclipse的使用与Oblect类的常用方法_DAY11
一.Java开发工具的使用 A:notepad windows自带的记事本. B:高级记事本 Editplus Notepad++ UE sublime2 C:集成开发工具(IDE) 开发和运行. E ...