
【Ray Tracing in One Weekend 超详解】 光线追踪1-3
学完了插值,我们来学习在场景里面添加一个立体彩色球(三维插值)
按照惯例,先看效果:
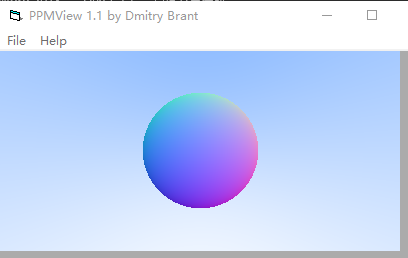
Chapter4: Adding a sphere
我们又一次面临图形学的主要任务。
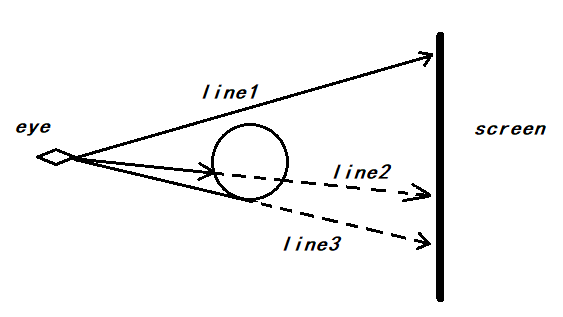
我们需要再次回顾coord1.1的坐标系统,如果有一个球,在眼睛和屏幕中间,那么如何将其绘制到屏幕上
假设我们沿着y负方向垂直往下看:
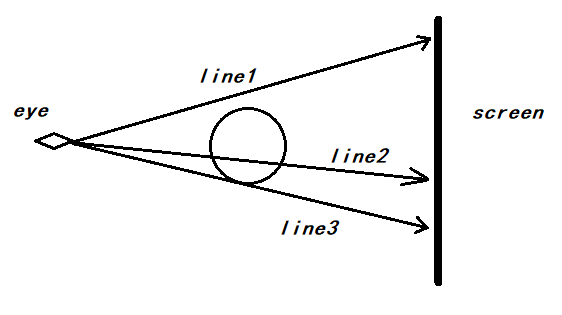
diagram 4-1
扫描屏幕位置的视线(有眼睛发出指向屏幕特定位置)的生成在上一节讲述完毕。
我们的方法是通过逐行扫描屏幕的每一个位置,然后发出对应的视线,检测视线是否与其他物体相交进而确定屏幕位置的像素值(rgb)。
那么,在此案例中,可能出现的三种视线如上
line1 视线不与球相交,畅通无阻,看到的应该是背景,所以,在屏幕上对应的位置为背景色
line2 视线与球体相交,穿过
line3 视线与球相切
那么,这就比较好办了
我们只需要推出判断直线与球是否相交的公式,此题得解
书上的最后的判定公式推错了,但是书上公式处代码是对的,我们自己推一遍。
依据符号约定,向量用粗斜体小写字母,矩阵用粗斜体大写字母,标量用正常体大写或小写字母
************************* 数学分割线 ***************************
球体方程:x*x + y*y + z*z = r * r.
如果球心为{hx,hy,hz},那么方程如下:
(x - hx)*(x - hx) + (y - hy)*(y - hy) + (z - hz)*(z - hz) = r*r.
我们设 p = (x,y,z), h = (hx,hy,hz).
则方程表示形式为:(p - h)·(p - h) = r * r
我们需要确定我们的光线p(t) = a + t * b. 是否曾经碰撞过这个球体
如果它碰撞过,那么存在系数t满足方程。
所以我们求下述公式是否满足
(p(t) - h)·(p(t) - h) = r * r
即: (a + t*b - h)·(a + t*b - h) = r * r
经过化简得到:
t*t* b·b + 2t* b·(a-h) + (a-h)·(a-h) - r * r = 0
化简过程也很简单,你先把a-h组合到一起,然后进行点乘分配律即可
************************* End ***************************
所有的向量都是已知量,我们要求取 t 是否存在,依此来判定屏幕上的点是否是背景色
所以,二次方程求根法, delt不小于0,说明存在,即视线遇到了球体
那么我们假定眼睛仍然在(0,0,0),球心在(0,0,-1),半径为0.5
看一个橘黄色的球
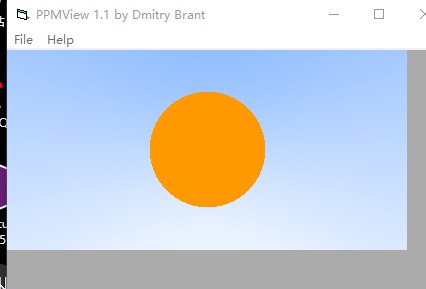
代码如下:
#define LOWPRECISION

#include <fstream>

#include "ray.h"          //https://www.cnblogs.com/lv-anchoret/p/10182002.html

using namespace lvgm;

#define stds std::

bool hit(const ray::vec_type& Center, const precision R, const ray& sight)

{

    ray::vec_type trace = sight.origin() - Center;

    precision a = dot(sight.direction(), sight.direction());

    precision b = 2.0 * dot(trace, sight.direction());

    precision c = dot(trace, trace) - R*R;

    precision delt = b*b - . * a*c;

    return delt > .;

}

const ray::vec_type lerp4(const ray& sight)

{

    ray::vec_type sphereHeart{ .,.,-. };

    if (hit(sphereHeart, 0.5, sight))

        return ray::vec_type{ 1.0f,0.6f,.f };

    ray::vec_type unit = sight.direction().ret_unitization();

    precision _t = 0.5*(unit.y() + .);

    return (1.0 - _t)*ray::vec_type{ 1.0f,1.0f,1.0f } +_t * ray::vec_type{ 0.5f,0.7f,1.0f };

}

void build_4_1()

{

    stds ofstream file("graph4-1.ppm");

    size_t W = , H = ;

    if (file.is_open())

    {

        file << "P3\n" << W << " " << H << "\n255\n" << stds endl;

        ray::vec_type eye{ .,.,. };

        ray::vec_type horizontal{ .,.,. };

        ray::vec_type vertical{ .,.,. };

        ray::vec_type start{ -.,-.,-. };

        for (int y = H - ; y >= ; --y)

            for (int x = ; x < W; ++x)

            {

                vec2<precision> para{ precision(x) / W,precision(y) / H };

                ray sight = { eye, start + para.u() * horizontal + para.v() * vertical };

                ray::vec_type color = lerp4(sight);

                int r = int(255.99 * color.r());

                int g = int(255.99 * color.g());

                int b = int(255.99 * color.b());

                file << r << " " << g << " " << b << stds endl;

            }

        stds cout << "complished" << stds endl;

        file.close();

    }

    else

        stds cerr << "open file error" << stds endl;

}

int main()

{

    build_4_1();

}
当然,你可以把球心的位置前后上下左右移动试试,它在屏幕上会进行对应的平移和放缩
不过,无论你怎么移动,你看到的背面和正面是一样的,下面我们就来解决区分背面和正面的方法
Chapter5-1: Surface normals and multiple objects.
这一篇,我们先讲表面法线,下一篇讲剩余部分
我们有了上一章节的知识,现在来实现我们最初的那张图,就很简单了。
还记不记得我们在上一篇文章中的二维插值,是根据平面中的二维位置坐标来进行区分和特化的。
那么我们如果要在三维坐标系中像上次那样,赋予每一个像素点独一无二的特征,我们也可以采取三维坐标位置,但是它不是很好解决上一章节Chapter4末尾提出的那个问题,所以我们还需要找出能够表明球体上某一点的另外一个独一无二的特征且能够区分出背面。那就是——Surface normals(表面法线)
引用书中一张图:
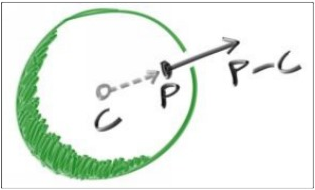
我还是画一个吧
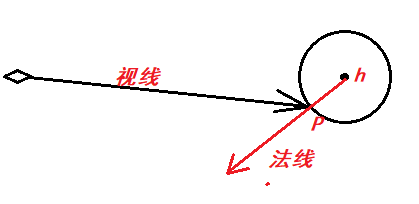
之前就说过,h的三维坐标就是视线到h的向量,p点坐标就是视线向量,因为eye的坐标为(0,0,0),这个应该没问题吧
好,这就好办了,关于平面上某一点的法线,就是该点所在的切平面的法向量,而对于球来说,表面某点p的切平面的法向量平行于向量(h->p),所以p - h 即为p点表面法线(向外),p - h,你可以理解为坐标相减得到的向量,也可以理解为两个向量相减(eye->p,eye->h)得到的向量,结果是一样的
所以,我们目前的任务就是求出p点
即,我们真正要求的是实线
结合
视线公式 p(t) = a + t * b
与
判定相交 t*t* b·b + 2t* b·(a-h) + (a-h)·(a-h) - r * r = 0
求出t系数,就求出了图中的实线向量
代码:
#define LOWPRECISION

#include <fstream>

#include "ray.h"            //https://www.cnblogs.com/lv-anchoret/p/10182002.html

using namespace lvgm;

#define stds std::

precision hit(const ray::vec_type& Heart, const precision R, const ray& sight)

{

    ray::vec_type trace = sight.origin() - Heart;

    precision a = dot(sight.direction(), sight.direction());

    precision b = 2.0 * dot(trace, sight.direction());

    precision c = dot(trace, trace) - R*R;

    precision delt = b*b - . * a*c;

    if (delt < .)    return -.;

    else return (-b - sqrt(delt)) / (.*a);        //根,正、背面

}

const ray::vec_type lerp5(const ray& sight)

{

    ray::vec_type sphereHeart{ .,.,-. };

    precision _t = hit(sphereHeart, 0.5, sight);

    if (_t > .)        //相交

    {

        ray::vec_type normUnit = (sight.go(_t) - sphereHeart).ret_unitization();    //单位法线 -1~1

        return 0.5*ray::vec_type{ normUnit.x() + .f ,normUnit.y() + .f,normUnit.z() + .f }; //映射到 0~1

    }

    //背景色

    ray::vec_type unit = sight.direction().ret_unitization();

    _t = 0.5*(unit.y() + .);

    return (1.0 - _t)*ray::vec_type{ 1.0f,1.0f,1.0f } +_t * ray::vec_type{ 0.5f,0.7f,1.0f };

}

void build_5_1()

{

    stds ofstream file("graph5-1.ppm");

    size_t W = , H = ;

    if (file.is_open())

    {

        file << "P3\n" << W << " " << H << "\n255\n" << stds endl;

        ray::vec_type eye{ .,.,. };

        ray::vec_type horizontal{ .,.,. };

        ray::vec_type vertical{ .,.,. };

        ray::vec_type start{ -.,-.,-. };

        for (int y = H - ; y >= ; --y)

            for (int x = ; x < W; ++x)

            {

                vec2<precision> para{ precision(x) / W,precision(y) / H };

                ray sight = { eye, start + para.u() * horizontal + para.v() * vertical };        //屏幕位置

                ray::vec_type color = lerp5(sight);

                int r = int(255.99 * color.r());

                int g = int(255.99 * color.g());

                int b = int(255.99 * color.b());

                file << r << " " << g << " " << b << stds endl;

            }

        stds cout << "complished" << stds endl;

        file.close();

    }

    else

        stds cerr << "open file error" << stds endl;

}

int main()

{

    build_5_1();

}
效果图就是开篇那个
感谢您的阅读,生活愉快~
【Ray Tracing in One Weekend 超详解】 光线追踪1-3的更多相关文章
- 【Ray Tracing The Next Week 超详解】 光线追踪2-9
我们来整理一下项目的代码 目录 ----include --hit --texture --material ----RTdef.hpp ----ray.hpp ----camera.hpp ---- ...
- 【Ray Tracing The Next Week 超详解】 光线追踪2-6 Cornell box
Chapter 6:Rectangles and Lights 今天,我们来学习长方形区域光照 先看效果 light 首先我们需要设计一个发光的材质 /// light.hpp // ------- ...
- 【Ray Tracing in One Weekend 超详解】 光线追踪1-4
我们上一篇写了Chapter5 的第一个部分表面法线,那么我们来学剩下的部分,以及Chapter6. Chapter5:Surface normals and multiple objects. 我们 ...
- 【Ray Tracing The Next Week 超详解】 光线追踪2-7 任意长方体 && 场景案例
上一篇比较简单,很久才发是因为做了一些好玩的场景,后来发现这一章是专门写场景例子的,所以就安排到了这一篇 Preface 这一篇要介绍的内容有: 1. 自己做的光照例子 2. Cornell box画 ...
- 【Ray Tracing The Next Week 超详解】 光线追踪2-8 Volume
Preface 今天有两个东东,一个是体积烟雾,一个是封面图 下一篇我们总结项目代码 Chapter 8:Volumes 我们需要为我们的光线追踪器添加新的物体——烟.雾,也称为participat ...
- 【Ray Tracing The Next Week 超详解】 光线追踪2-5
Chapter 5:Image Texture Mapping 先看效果: 我们之前的纹理是利用的是撞击点p处的位置信息,比如大理石纹理 而我们今天的图片映射纹理采用2D(u,v)纹理坐标来进行. 在 ...
- 【Ray Tracing in One Weekend 超详解】 光线追踪1-8 自定义相机设计
今天,我们来学习如何设计自定义位置的相机 ready 我们只需要了解我们之前的坐标体系,或者说是相机位置 先看效果 Chapter10:Positionable camera 这一章我们直接用概念 ...
- 【Ray Tracing The Next Week 超详解】 光线追踪2-4 Perlin noise
Preface 为了得到更好的纹理,很多人采用各种形式的柏林噪声(该命名来自于发明人 Ken Perlin) 柏林噪声是一种比较模糊的白噪声的东西:(引用书中一张图) 柏林噪声是用来生成一些看似杂乱 ...
- 【Ray Tracing The Next Week 超详解】 光线追踪2-3
Preface 终于到了激动人心的纹理章节了 然鹅,看了下,并不激动 因为我们之前就接触过 当初有一个 attenuation 吗? 对了,这就是我们的rgb分量过滤器,我们画出的红色.蓝色.绿色等 ...
- 【Ray Tracing The Next Week 超详解】 光线追踪2-2
Chapter 2:Bounding Volume Hierarchies 今天我们来讲层次包围盒,乍一看比较难,篇幅也多,但是咱们一步一步来,相信大家应该都能听懂 BVH 和 Perlin text ...
随机推荐
- PHP内核-环境搭建(一)
难得闲下来,发现自己没有系统的学习过PHP内核,希望我能够慢慢啃下PHP内核书籍,无论是抄袭也好,码字也好,一步一个脚印走下去. 学习来源:http://www.php-internals.com/b ...
- MySql数据库类型bit等与JAVA中的对应类型【布尔类型怎么存】
用char(1):可以表示字符或者数字,但是不能直接计算同列的值.存储消耗1个字节 用tinyint:只能表示数字,可以直接计算,存储消耗2个字节 用bit: 只能表示0或1,不能计算,存储消耗小于等 ...
- 设置 Linux 服务器中 MySQL 允许远程访问
开启 MySQL 远程访问权限: 在linux系统上登陆mysql服务. -- root 是用户名 [root@localhost ~]# mysql -u root -p Enter passwor ...
- Spark记录-org.apache.spark.sql.hive.HiveContext与org.apache.spark.sql.SQLContext包api分析
HiveContext/SQLContext val hiveContext=new HiveContext(new SparkContext(new SparkConf().setAppName(& ...
- ThinkPHP框架学习(一)
这几天呢,断断续续地在看孙叔华老师的ThinkPHP教程,期间还做了一些其他事情,出去办了点事,总结总结下一学期规划等等,不知不觉间又过去了大半个星期.现在呢,看完了一天的教程,在这里,还是希望稍微总 ...
- Zephir入门教程一
一.如何安装 zephir-安装和初体验:http://blog.csdn.net/u011142688/article/details/51619811 二.如何使用 需要切到工作目录下,也就是co ...
- CSS的力量:用一个DIV画图
这些图片都是用一个DIV绘制出来的,其实原理并不复杂. 这些图片都是由CSS绘制出来的,通过background-image叠加实现, 如蘑菇头的实现,通过 radial-gradient 径向渐变 ...
- Linux 静态库与动态库
静态库(.a) 一个deal.c usedeal.c 重点 1. gcc -c deal.c 生成 deal.o 2. ar -rsv libdeal.a deal.o 生成 libdeal.a ...
- 洛谷 P4609: [FJOI2016] 建筑师
本省省选题是需要做的. 题目传送门:洛谷P4609. 题意简述: 求有多少个 \(1\) 到 \(N\) 的排列,满足比之前的所有数都大的数正好有 \(A\) 个,比之后的所有数都大的数正好有 \(B ...
- Linux常见问题总结【转】
作为一名合格的 Linux 运维工程师,一定要有一套清晰.明确的解决故障思路,当问题出现时,才能迅速定位.解决问题,这里给出一个处理问题的一般思路: 重视报错提示信息:每个错误的出现,都是给出错误提示 ...