Gitlab仓库搭建及在Linux/windows中的免密使用
1. Gitlab简介
Gitlab:代码私有仓库,可以使用Git进行代码的管理。
GitHub:公共仓库。
GitLab 是一个用于仓库管理系统的开源项目,使用Git作为代码管理工具,并在此基础上搭建起来的web服务。
可通过Web界面进行访问公开的或者私人项目。它拥有与Github类似的功能,能够浏览源代码,管理缺陷和注释。可以管理团队对仓库的访问,它非常易于浏览提交过的版本并提供一个文件历史库。团队成员可以利用内置的简单聊天程序(Wall)进行交流。它还提供一个代码片段收集功能可以轻松实现代码复用。
可以将Gitlab理解为一个大型的容器,将代码一块一块的存放到其中,从远程进行连接使用,进行克隆或者下载。
管理的命令
gitlab-ctl stop
gitlab-ctl start
gitlab-ctl restart
2. Gitlab的安装使用
1> 上传二进制压缩包
[root@localhost ~]# rz

[root@localhost ~]# ls

anaconda-ks.cfg gitlab-ce-8.9.-ce..el7.x86_64.rpm STXINWEI.TTF work_git
2> 安装本地文件包
[root@localhost ~]# yum localinstall -y gitlab-ce-8.9.-ce..el7.x86_64.rpm #localinstall命令用来安装本地的rpm包

……..

Installed:

gitlab-ce.x86_64 :8.9.-ce..el7
3> 更改Gitlab配置文件,更改Gitlab的ip
[root@localhost ~]# vim /etc/gitlab/gitlab.rb

external_url 'http://192.168.16.4'              #修改为主机的ip地址
4> 重新配置,此处将内存改大一点,可以很快的完成配置。此处需要几分钟
[root@localhost ~]# gitlab-ctl reconfigure

Running handlers:

Running handlers complete

Chef Client finished, / resources updated in  minutes  seconds

gitlab Reconfigured!
题外话:以后搭建OpenStack内存不够用将swap分区改大一点
5> 配置完成后关掉占用80端口的服务,在windows端输入主机地址进行查看
[root@localhost ~]# ss -tnl

……

LISTEN   ::: :::*

[root@localhost ~]# systemctl stop httpd
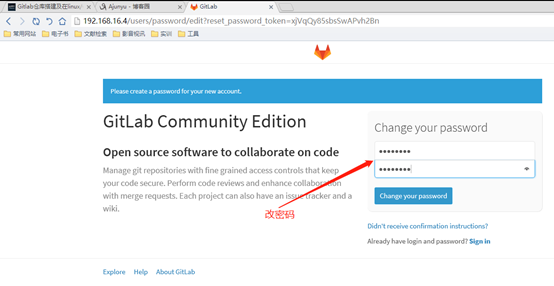
简单起见密码为12345678,密码少于八位无法通过。
密码修改完成后进入注册界面。
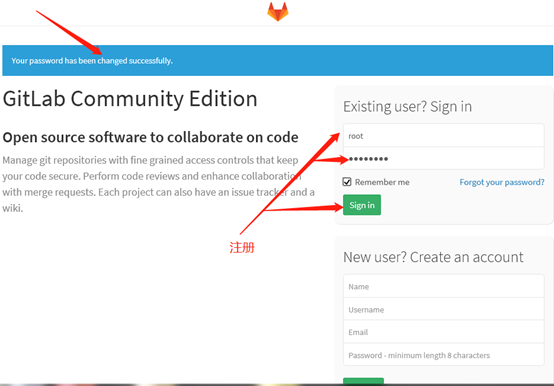
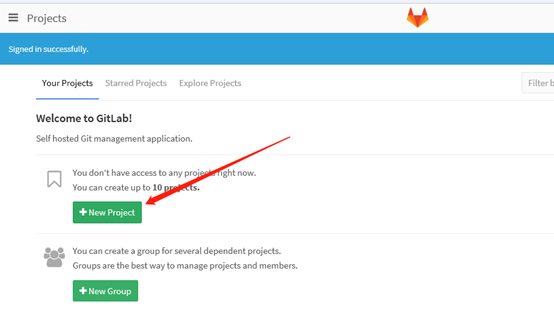
进入Gitlab,可以使用了。
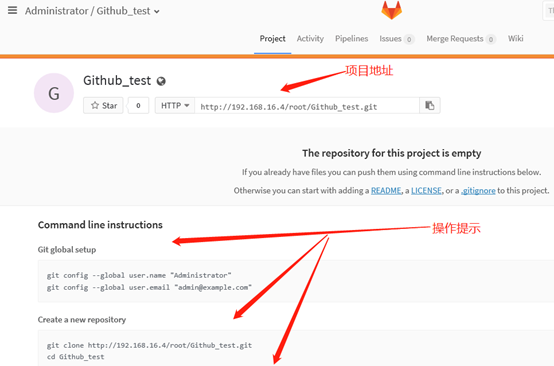
点击new project,创建新项目。
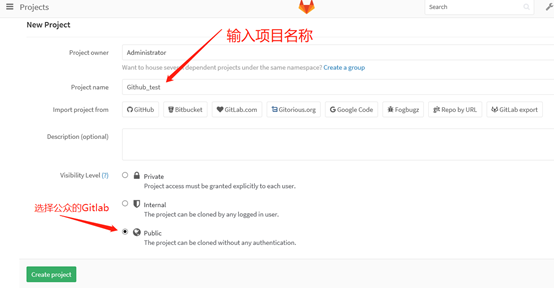
创建项目名称,选择公共的Gitlab,点击create project创建项目。
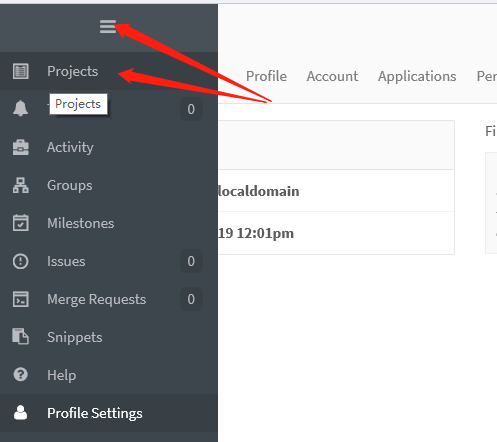
3. Gitlab项目使用
1> 创建Gitlab使用目录
[root@localhost ~]# mkdir gitlab_test

[root@localhost ~]# cd gitlab_test/

[root@localhost gitlab_test]#
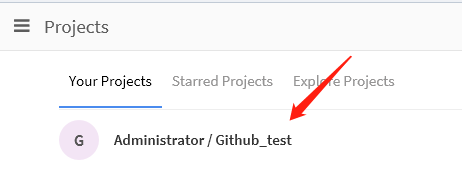
2> 克隆远程仓库至本地
[root@localhost gitlab_test]# git clone http://192.168.16.4/root/Github_test.git   # 地址为项目的http地址

Cloning into 'Github_test'...

warning: You appear to have cloned an empty repository.

[root@localhost gitlab_test]# ls

Github_test # 项目名称
3> 编辑文本信息进行推送
[root@localhost gitlab_test]# cd Github_test/

[root@localhost Github_test]# ls -a

. .. .git                                                                #含有git文件

[root@localhost Github_test]# touch zxj

[root@localhost Github_test]# echo "this is gitlab test contents" >> zxj #写入内容
4> 提交
[root@localhost Github_test]# git add .
[root@localhost Github_test]# git commit -m v1
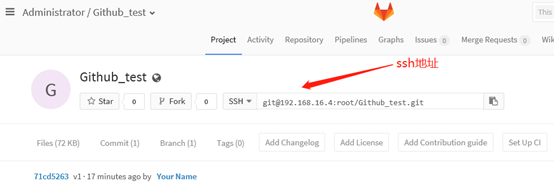
[master (root-commit) 71cd526] v1
file changed, insertion(+)
create mode zxj
5> 进行远程推送
[root@localhost Github_test]# git push -u origin master    #远程的、分支

Username for 'http://192.168.16.4': root                   #用户

Password for 'http://root@192.168.16.4':                   #密码

Counting objects: , done.

Writing objects: % (/),  bytes |  bytes/s, done.

Total  (delta ), reused  (delta )

To http://192.168.16.4/root/Github_test.git

* [new branch] master -> master

Branch master set up to track remote branch master from origin.

[root@localhost Github_test]#
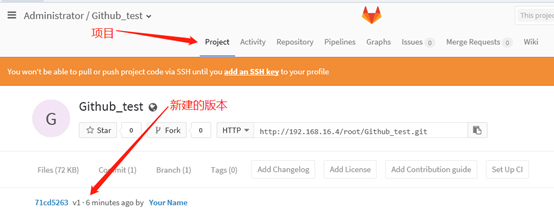
6> Gitlab仓库查看
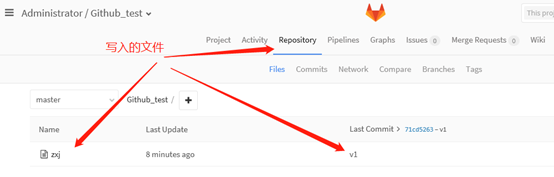
可以看到更新的v1版本
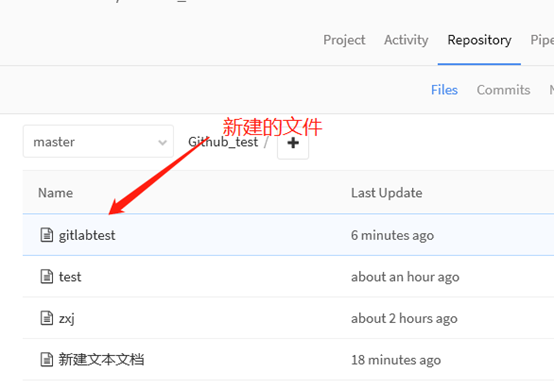
写入的文件
4. Linux中免密使用Gitlab
1> 生成秘钥
root@localhost Github_test]# ssh-keygen
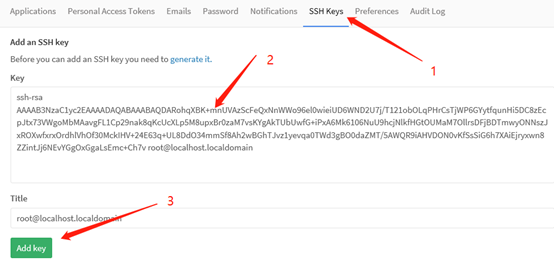
2> 复制公钥信息
[root@localhost Github_test]# cat /root/.ssh/id_rsa.pub #公钥文件

ssh-rsa AAAAB3NzaC1yc2EAAAADAQABAAABAQDARohqXBK+mnUVAzScFeQxNnWWo96el0wieiUD6WND2U7j/T121obOLqPHrCsTjWP6GYytfqunHi5DC8zEcpJtx73VWgoMbMAavgFL1Cp29nak8qKcUcXLp5M8upxBr0zaM7vsKYgAkTUbUwfG+iPxA6Mk6106NuU9hcjNlkfHGtOUMaM7OllrsDFjBDTmwyONNszJxROXwfxrxOrdhlVhOf30MckIHV+24E63q+UL8DdO34mmSf8Ah2wBGhTJvz1yevqa0TWd3gBO0daZMT/5AWQR9iAHVDON0vKfSsSiG6h7XAiEjryxwn8ZZintJj6NEvYGgOxGgaLsEmc+Ch7v root@localhost.localdomai
3> 把公钥复制到Gitlab中

回到项目。
获取ssh地址,利用ssh免密登录
[root@localhost zxj2]# git clone git@192.168.16.4:root/Github_test.git
[root@localhost zxj2]# cd Github_test/
[root@localhost Github_test]# ls
zxj
[root@localhost Github_test]# echo "123_ssh" >> test
[root@localhost Github_test]# cat test
123_ssh
[root@localhost Github_test]# ls
test zxj
[root@localhost Github_test]# git add .
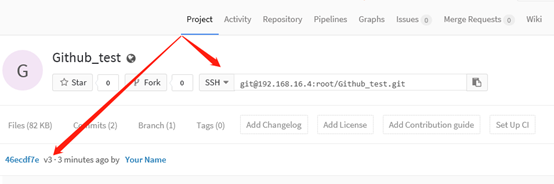
[root@localhost Github_test]# git commit -m v3
[master 46ecdf7] v3
file changed, insertion(+)
create mode test
[root@localhost Github_test]# git push origin master #直接推送,不再需要用户、密码
Counting objects: , done.
Compressing objects: % (/), done.
Writing objects: % (/), bytes | bytes/s, done.
Total (delta ), reused (delta )
To git@192.168.16.4:root/Github_test.git
71cd526..46ecdf7 master -> master
在windows端查看

5. 在windows当中免密使用Gitlab
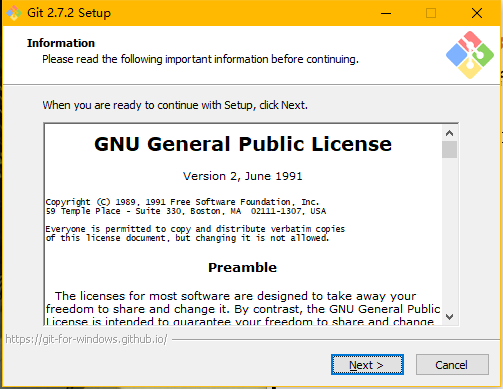
1> 安装软件
常规的windows软件安装步骤
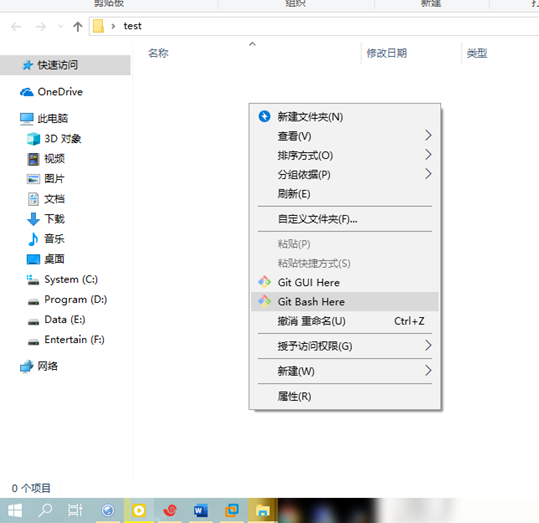
2> 创建目录test,进入后右键,点击bash进入代码
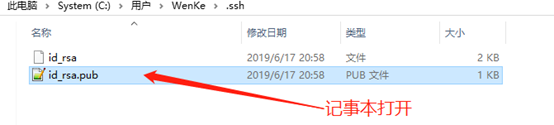
3> 生成秘钥

打开该秘钥文件,获得地址
4> 添加秘钥

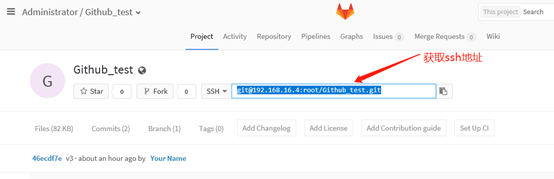
获取ssh地址
5> clone

6> 进入文件,创建v4版本
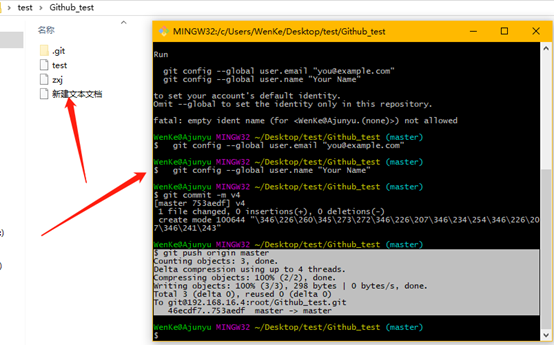
WenKe@Ajunyu MINGW32 ~/Desktop/test/Github_test (master)

$ git add .

WenKe@Ajunyu MINGW32 ~/Desktop/test/Github_test (master)

$ git commit -m v4

*** Please tell me who you are.

Run

git config --global user.email "you@example.com"

git config --global user.name "Your Name"

to set your account's default identity.

Omit --global to set the identity only in this repository.

fatal: empty ident name (for <WenKe@Ajunyu.(none)>) not allowed

WenKe@Ajunyu MINGW32 ~/Desktop/test/Github_test (master)

$ git config --global user.email "you@example.com"

WenKe@Ajunyu MINGW32 ~/Desktop/test/Github_test (master)

$ git config --global user.name "Your Name"

WenKe@Ajunyu MINGW32 ~/Desktop/test/Github_test (master)

$ git commit -m v4

[master 753aedf] v4

 file changed,  insertions(+),  deletions(-)

create mode  "\346\226\260\345\273\272\346\226\207\346\234\254\346\226\207\346\241\243"

$ git push origin master

Counting objects: , done.

Delta compression using up to  threads.

Compressing objects: % (/), done.

Writing objects: % (/),  bytes |  bytes/s, done.

Total  (delta ), reused  (delta )

To git@192.168.16.4:root/Github_test.git

46ecdf7..753aedf master -> master
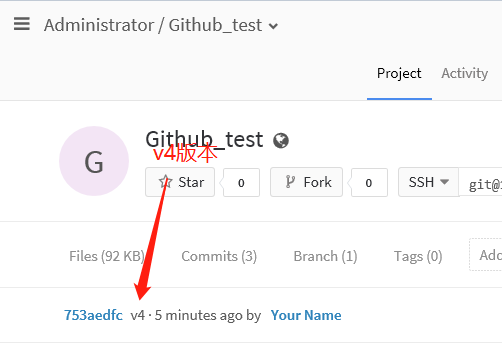
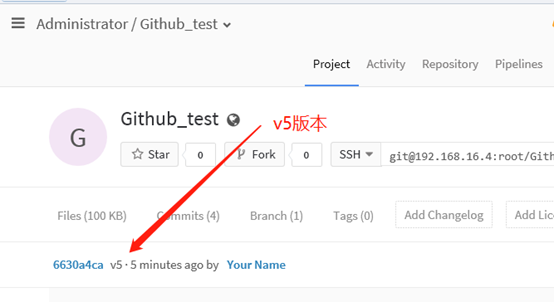
7> 浏览器端查看
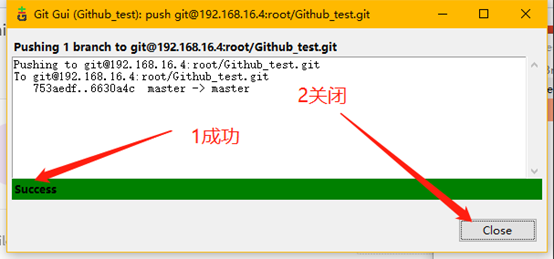
 8> 右键后点击GUI进入图形化界面
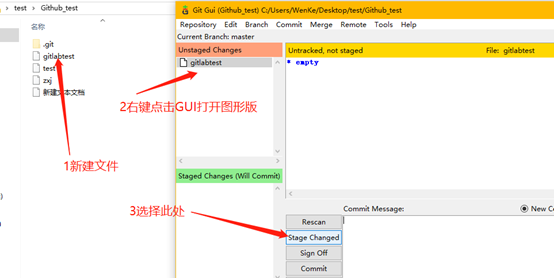
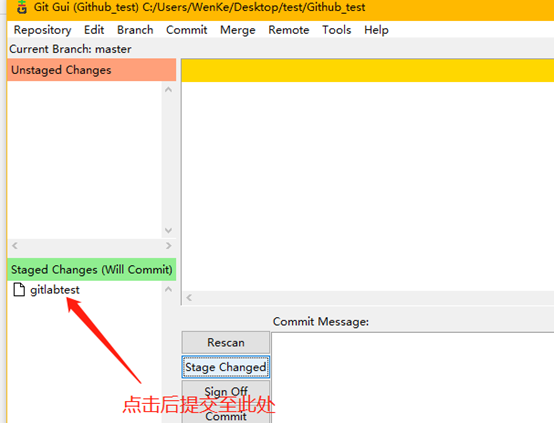
加入版本号进行提交

写入地址,进行push

关闭GUI图形化界面
浏览器端查看
Gitlab仓库搭建及在Linux/windows中的免密使用的更多相关文章
- Gitlab仓库搭建及在linux/windows中免密使用gitlab(二)--技术流ken
Gitlab简介 GitLab 是一个用于仓库管理系统的开源项目,使用Git作为代码管理工具,并在此基础上搭建起来的web服务. 可通过Web界面进行访问公开的或者私人项目.它拥有与Github类似的 ...
- linux系统中SSH免密设置报错
执行 ssh-add ~/.ssh/msi_rsa 时报下面错误 Could not open a connection to your authentication agent. 解决办法: 执行命 ...
- Windows到Ubuntu免密登陆
Windows到Ubuntu免密登陆 首先检查C盘用户文件夹下是否有.ssh文件夹,同时检查该文件夹中是否有至少两个文件,一个是xxx_rsa和xxx_rsa.pub,一个是私钥文件一个是公钥文件. ...
- 多台linux主机之间建立免密通信
多台linux主机之间设置免密通信 例:A 向 B设置免密通信 第一步 A生成密钥对 ssh-keygen -t rsa -t 指定秘钥的类型 rsa 秘钥类型 密钥目录:/root/.ssh/(如果 ...
- Linux OS 集群 免密登录
1. ssh-keygen 生成密钥 2. ssh-copy-id 集群主机名 参考: [图文详解]linux下配置远程免密登录
- windows配置ssh免密登录linux
客户端(windows)要做的事情 默认机器上已安装git,若没有,请先安装git 查看本地是否有ssh公钥文件夹,若没有,则创建文件夹 mkdir ~/.ssh //创建文件夹 生成公钥 邮箱最好为 ...
- Windows和Linux下实现ssh免密登录
------------恢复内容开始------------ SSH是一种通讯协议,可以实现远程安全登录.可以通过如putty.MobaXterm等工具通过ssh安全登录到虚拟机进行操作. Opens ...
- 【图文详解】linux下配置远程免密登录
linux下各种集群搭建往往需要配置远程免密登录,本文主要描述了CentOs6.3系统下配置免密登录的详细过程. ssh远程登录,两种身份验证: 用户名+密码 密钥验证 机器1生成密钥对并将公钥发给机 ...
- linux 下的ssh免密登陆设置
一,原理 说明: A为linux服务器a B为linux服务器b 每台linux都有ssh的服务端和客户端,linux下的ssh命令就是一个客户端 我们常用ssh协议来进行登陆或者是文件的拷贝,都需要 ...
随机推荐
- Trie树(小)总结 By cellur925
关于\(Trie\)树的详细介绍,还请移步这篇深度好文 基本操作 插入 void insert() { int p=0; int len=strlen(tmp+1); for(int i=1;i< ...
- Pycharm2018.3.1永久激活
Pycharm Professional 2018.3.1 版已正式发布,新版本添加对Python3.7的支持.作为强大的开发工具,但每次注册让人头疼,本着分享的心态,提供以下解决方案,亲测有效!本方 ...
- RN初始化项目报错
解决方法:全局删除yarn
- Linux - 查看并修改当前的系统时间
转载自Linux系统查看当前时间的命令 查看和修改Linux的时区 查看当前时区 命令 : date -R 修改设置Linux服务器时区 方法 A 命令 : tzselect 方法 B 仅限于RedH ...
- JQuery数组遍历 - $.each(),$().each()和forEach()
- django_auth模块
auth是django提供的标准权限管控系统,可以提供用户的身份认证.用户组和权限管理. auth可以和admin配合使用,可以快速建立网站的管理系统. USER user用于维护系统的用户信息,在数 ...
- oracle dual是个什么表
这几天一直在研究oracle,常常会用到dual这个系统表,dual表到底是一个什么表?带着疑问查了百度了一下,现在总结一下:DUAL是Oracle与数据字典一起自动创建的一个表,它只有一列:DUMM ...
- 转 如何诊断和解决high version count 10.2.0.4 and 11.2.0.4
转自 http://blog.csdn.net/notbaron/article/details/50927492 在Oracle 10g以上的版本,High version count可谓是一个臭名 ...
- 538 Convert BST to Greater Tree 把二叉搜索树转换为累加树
给定一个二叉搜索树(Binary Search Tree),把它转换成为累加树(Greater Tree),使得每个节点的值是原来的节点值加上所有大于它的节点值之和.例如:输入: 二叉搜索树: ...
- freertos之任务
taskYIELD(): 通知调度器自己放弃运行态,可立即进行任务切换,而不必等到当前任务的时间片耗尽.这对于相同任务优先级的2个任务来说可加速效率.