HttpClient测试框架
HttpClient是模拟Http协议客户端请求的一种技术,可以发送Get/Post等请求。 所以在学习HttpClient测试框架之前,先来看一下Http协议请求,主要看请求头信息。
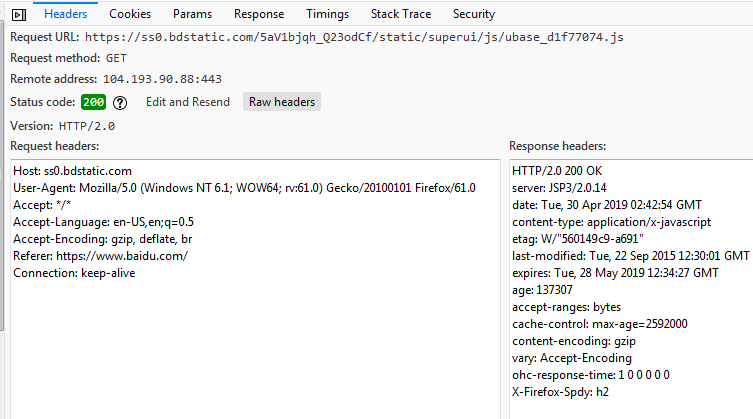
如何查看HTTP协议请求头信息: 打开浏览器-->输入任意一个网址-->按下F12 打开开发者工具-->Network-->刷新页面,可以在Network看到有Get或者post请求的URL,点击URL,可以看到该请求的Header/Cookies/Response等信息
例如我们打开www.baidu.com,查看它某个请求的信息,如下:
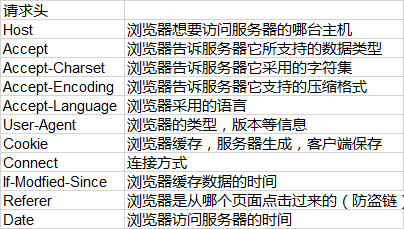
常用的请求头和响应头信息解释:

下面通过一个简单的例子学习HttpClient
import java.io.IOException;

import java.util.List;

import org.apache.http.HttpResponse;

import org.apache.http.client.CookieStore;

import org.apache.http.client.methods.HttpGet;

import org.apache.http.cookie.Cookie;

import org.apache.http.impl.client.DefaultHttpClient;

import org.apache.http.util.EntityUtils;

import org.testng.annotations.Test;

public class MyHttpClient {

    @Test

    public void test1() {

        String result;

        HttpGet get = new HttpGet("http://localhost:8888/getCookies");

        DefaultHttpClient client = new DefaultHttpClient();

        try {

            HttpResponse response = client.execute(get);

            result = EntityUtils.toString(response.getEntity());

            CookieStore cookieStore =   client.getCookieStore();

            List<Cookie> cookies =cookieStore.getCookies();

            System.out.println(cookies.size());

            for(Cookie c :cookies) {//get Cookies info

                System.out.println(c.getName() + ":" + c.getValue());

            }

        } catch (IOException e) {

            e.printStackTrace();

        }

    }

}
Run TestNG Test, 可以看到返回的result是HTML源码。这个是通过HttpClient Get请求方法实现的简单例子。下面结合Mock模拟数据,学习如何使用HttpClient。
Mock一个返回Cookies信息的请求:
{

   "description":"This get request with cookies return",

   "request":{

       "uri":"/getCookies",

       "method":"get"

   },

   "response":{

       "cookies":{

         "login":"true"

       },

       "text":"This is response with cookies"

   }

  }
具体如何Mock数据可以参考上一篇文章《Mock接口平台Moco学习》.
我们已经知道如何从服务端获取 Cookie信息了,那下一步学习客户端如何使用拿到的Cookie信息。
首先在Mock一个接口,这是携带/getCookies 接口返回的Cookies信息Get请求的接口:
{

   "description":"This is Get request with cookies",

   "request":{

       "uri":"/get/with/cookies",

       "method":"get",

       "cookies":{

          "login":"true"

       }

   },

   "response":{

       "text":"This is response for get request with cookies"

   }

 }
完整的代码:
import java.io.IOException;

import java.util.List;

import org.apache.http.HttpResponse;

import org.apache.http.client.CookieStore;

import org.apache.http.client.methods.HttpGet;

import org.apache.http.cookie.Cookie;

import org.apache.http.impl.client.DefaultHttpClient;

import org.apache.http.util.EntityUtils;

import org.testng.annotations.Test;

public class MyHttpClient {

    private CookieStore cookieStore;

    @Test

    public void test1() {

        String result;

        HttpGet get = new HttpGet("http://localhost:8888/getCookies");

        DefaultHttpClient client = new DefaultHttpClient();

        try {

            HttpResponse response = client.execute(get);

            result = EntityUtils.toString(response.getEntity());

            System.out.println("result=" + result);

            cookieStore = client.getCookieStore();

            List<Cookie> cookies = cookieStore.getCookies();

            System.out.println(cookies.size());

            for (Cookie c : cookies) {

                System.out.println(c.getName() + ":" + c.getValue());

            }

        } catch (IOException e) {

            e.printStackTrace();

        }

    }

    @Test(dependsOnMethods = { "test1" })

    public void testGetWithCookie() {

        HttpGet get = new HttpGet("http://localhost:8888/get/with/cookies");

        DefaultHttpClient client = new DefaultHttpClient();

        // Set cookie info

        client.setCookieStore(cookieStore);

        try {

            HttpResponse response = client.execute(get);

            // get response status

            int statusCode = response.getStatusLine().getStatusCode();

            // statusCode = 200 / 404 / 502.....

            System.out.println("Status = " + statusCode);

            if (statusCode == 200) {

                // Success

                String result = EntityUtils.toString(response.getEntity());

                System.out.println("result=" + result);

            }

        } catch (IOException e) {

            // TODO Auto-generated catch block

            e.printStackTrace();

        }

    }

}
HttpClient Post请求的实现:
首先还是Mock一个post请求
{

   "description":"This is Post request with cookies",

   "request":{

       "uri":"/post/with/cookies",

       "method":"post",

       "cookies":{

          "login":"true"

       },

       "json":{

           "name":"zhangsan",

           "age":"18"

       }

   },

   "response":{

       "status":200,

       "json":{

          "zhangsan":"success",

           "status":"1"

       }

   }

  }
完整的Post请求代码:
import java.io.IOException;

import java.util.List;

import org.apache.http.HttpResponse;

import org.apache.http.client.CookieStore;

import org.apache.http.client.methods.HttpGet;

import org.apache.http.client.methods.HttpPost;

import org.apache.http.cookie.Cookie;

import org.apache.http.entity.StringEntity;

import org.apache.http.impl.client.DefaultHttpClient;

import org.apache.http.util.EntityUtils;

import org.json.JSONObject;

import org.testng.Assert;

import org.testng.annotations.Test;

public class MyCookiesForPost {

    private CookieStore cookieStore;

    @Test

    public void test1() {

        String result;

        HttpGet get = new HttpGet("http://localhost:8888/getCookies");

        DefaultHttpClient client = new DefaultHttpClient();

        try {

            HttpResponse response = client.execute(get);

            result = EntityUtils.toString(response.getEntity());

            System.out.println("result=" + result);

            cookieStore = client.getCookieStore();

            List<Cookie> cookies = cookieStore.getCookies();

            System.out.println(cookies.size());

            for (Cookie c : cookies) {

                System.out.println(c.getName() + ":" + c.getValue());

            }

        } catch (IOException e) {

            e.printStackTrace();

        }

    }

    @Test(dependsOnMethods = { "test1" })

    public void testPostWithCookie() {

        //1. Define a client to excute

        //2. Define a post method

        //3. Add pamarater

        //4. Set request header info; set cookie inof

        //5. Execute

        //6. Get and handle Result

        //7. assert result

        DefaultHttpClient client = new DefaultHttpClient();

        HttpPost post = new HttpPost("http://localhost:8888/post/with/cookies");

        JSONObject param = new JSONObject();

        param.put("name", "zhangsan");

        param.put("age", "18");

        StringEntity entity = new StringEntity(param.toString(),"utf-8");

        post.setEntity(entity);

        post.addHeader("content-type", "application/json");

        client.setCookieStore(cookieStore);

        try {

           HttpResponse response = client.execute(post);

            String  result = EntityUtils.toString(response.getEntity());

            System.out.println("result=" + result);

            JSONObject object = new JSONObject(result);

            System.out.println("zhangsan=" + object.getString("zhangsan"));

            System.out.println("status=" + object.getString("status"));

            String actualResult = object.getString("zhangsan");

            Assert.assertEquals(actualResult,"success");

        } catch (IOException e) {

            // TODO Auto-generated catch block

            e.printStackTrace();

        }

    }

}
代码优化: 在实际的测试过程当中,我们一般不会直接将请求地址写在请求对象当中。而是定义在配置文件中,然后在代码中引用。具体用法如下。
创建一个.properties文件,如config.properties:
test.url=http://localhost:8888
然后在代码中读取该config.properties,并获取相应的地址:
    private ResourceBundle bundle;

    private String url;

    @BeforeTest

    public void beforeTest() {

        bundle = ResourceBundle.getBundle("config");

        url = bundle.getString("test.url");

    }
以上是HttpClient的常见用法和其中一个优化方案。
如果喜欢作者的文章,请关注"写代码的猿"订阅号以便第一时间获得最新内容。本文版权归作者所有,欢迎转载.

我的博客即将同步至腾讯云+社区,邀请大家一同入驻:https://cloud.tencent.com/developer/support-plan?invite_code=2wrsyxyyavcwc
HttpClient测试框架的更多相关文章
- spring测试框架的使用
junit的使用 1.加入 junit jar包 <dependency> <groupId>junit</groupId> <artifactId>j ...
- phpunit 测试框架安装
PHPUnit是一个轻量级的PHP测试框架.它是在PHP5下面对JUnit3系列版本的完整移植,是xUnit测试框架家族的一员(它们都基于模式先锋Kent Beck的设计).来自百度百科 一.下载wg ...
- 某互联网后台自动化组合测试框架RF+Sikuli+Python脚本
某互联网后台自动化组合测试框架RF+Sikuli+Python脚本 http://www.jianshu.com/p/b3e204c8651a 字数949 阅读323 评论1 喜欢0 一.**Robo ...
- selenium测试框架使用xml作为对象库
之前已经写过一篇: selenium测试框架篇,页面对象和元素对象的管理 上次使用的excel作为Locator对象管理,由于excel处理不够方便,有以下缺点: 不能实现分page 加载Locato ...
- selenium 测试框架中使用grid
之前的测试框架:http://www.cnblogs.com/tobecrazy/p/4553444.html 配合Jenkins可持续集成:http://www.cnblogs.com/tobecr ...
- selenium测试框架篇,页面对象和元素对象的管理
前期已经做好使用Jenkins做buildhttp://www.cnblogs.com/tobecrazy/p/4529399.html 做自动化框架,不可避免的就是对象库. 有一个好的对象库,可以让 ...
- Junit测试框架 Tips
关于Junit测试框架使用的几点总结: 1.Junit中的测试注解: @Test →每个测试方法前都需要添加该注解,这样才能使你的测试方法交给Junit去执行. @Before →在每个测试方法执行前 ...
- Python几种常用的测试框架
一.测试的常用规则 一个测试单元必须关注一个很小的功能函数,证明它是正确的: 每个测试单元必须是完全独立的,必须能单独运行.这样意味着每一个测试方法必须重新加载数据,执行完毕后做一些清理工作.通常通过 ...
- 测试框架Mocha与断言expect
测试框架Mocha与断言expect在浏览器和Node环境都可以使用除了Mocha以外,类似的测试框架还有Jasmine.Karma.Tape等,也很值得学习. 整个项目源代码: 为什么学习测试代码? ...
随机推荐
- PB系统颜色值
Colour Red Green Blue 值黑色 Black 0 0 0 0白色 White 255 255 255 16777215灰色 Gray 192 192 192 12632256深灰色 ...
- luogu P1020 导弹拦截 x
首先上题目~ luogu P1020 导弹拦截 题目描述 某国为了防御敌国的导弹袭击,发展出一种导弹拦截系统.但是这种导弹拦截系统有一个缺陷:虽然它的第一发炮弹能够到达任意的高度,但是以后每一发炮弹都 ...
- RabbitMQ-Window安装(一)
1.登录RabbitMq官网http://www.rabbitmq.com/ 2.点击Get Started 3.点击Download+Installation 4.找到Windows,点击 5.点击 ...
- Windows命令学习
总: 1.window dos命令不区分大小写 2.指令参数 /a -a 等价 更倾向于 / 3.命令有疑问: CMD输入help 或者单条命令 /? help time /? 用到的实用命令总 ...
- upc组队赛18 THE WORLD【时间模拟】
THE WORLD 题目链接 题目描述 The World can indicate world travel, particularly on a large scale. You mau be l ...
- 异常检测算法的Octave仿真
在基于高斯分布的异常检测算法一文中,详细给出了异常检测算法的原理及其公式,本文为该算法的Octave仿真.实例为,根据训练样例(一组网络服务器)的吞吐量(Throughput)和延迟时间(Latenc ...
- Winsows10-1909正式版原版下载资料
[简体中文版] 一.win10 1909消费者版(零售版),含家庭版.家庭单语言版.教育版.专业版.专业教育版.专业工作站版 (6个版本) 1.64位系统:Windows 10 (consumer e ...
- React后台管理手动封装图片上传组件
分为两个文件夹,index.js(逻辑文件) styled.js(样式文件) index.js文件,编写完成之后在对应的地方引入即可 import React from "react&quo ...
- 希希敬敬对Alpha阶段测试报告
已经完成的功能:1 GUI界面效果已经达到了设计要求,经过review代码完成度较好,GUI.PY代码可以使用,完成了“贴吧名字关键字与URL关联”. 2 能够实现"贴吧名字关键字与URL关 ...
- 用vuex写了一个购物车H5页面的示例代码
用vuex写了一个购物车H5页面的示例代码:https://www.jb51.net/article/152008.htm 通过购物车的一个案列,把vuex学习了一篇. vuex概念浅谈 Vuex 是 ...