Lab 10-2
The file for this lab is Lab10-02.exe.
Questions and Short Answers
Does this program create any files? If so, what are they?
A: The program creates the file C:\Windows System32 Mlwx486.sys. You can use procmon or another dynamic monitoring tool to see the file being created, but you cannot see the file on disk because it is hidden.
Does this program have a kernel component?
A: The program has a kernel component. It is stored in the file’s resource section, and then written to disk and loaded into the kernel as a service.
What does this program do?
A: The program is a rootkit designed to hide files. It uses SSDT hooking to overwrite the entry to
NtQueryDirectoryFile, which it uses to prevent the display of any files beginning with Mlwx (case-sensitive) in directory listings.
Detailed Analysis
Looking at the imports section of this executable, we see imports for CloseServiceHandle, CreateServiceA, OpenSCManagerA, and StartServiceA, which tell us that this program will create and start a service. Because the program also calls CreateFile and WriteFile, we know that it will write to a file at some point. We also see calls to LoadResource and SizeOfResource, which tell us that this program will do something with the resource section of Lab10-02.exe.
Recognizing that the program accesses the resource section, we use Resource Hacker to examine the resource section. There, we see that the file contains another PE header within the resource section, as shown in Figure 10-1L. This is probably another file of malicious code that Lab10-02.exe will use.
Next, we run the program and find that it creates a file and a service. Using procmon, we see that the program creates a file in C:\Windows\System32, and that it creates a service that uses that file as the executable. That file contains the kernel code that will be loaded by the OS.
We should next find the file that the program creates in order to analyze it and determine what the kernel code is doing. However, when we look in C:\Windows\System32, we find that there’s nothing there. We can see in procmon that the file is created, and there are no calls that would delete the file. Based on the facts that the file doesn’t appear but we don’t see how it was deleted and that a driver is involved, we should be suspicious that we’re dealing with a rootkit.
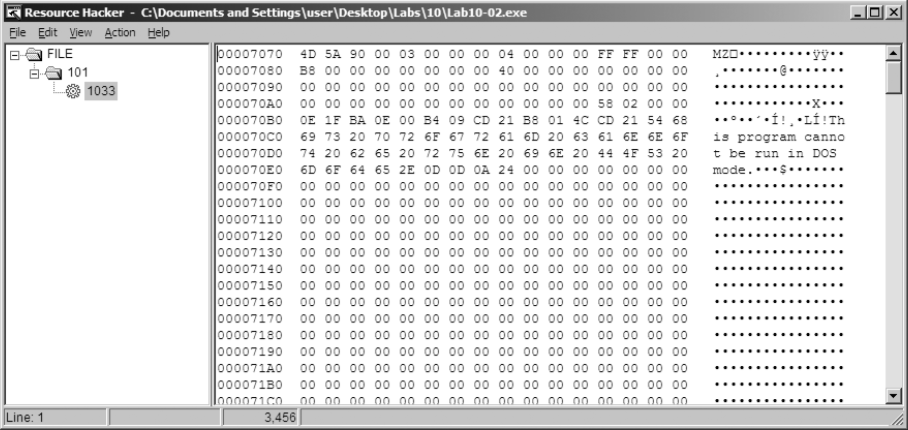
Figure 10-1L: An executable file stored in the resource section of Lab10-02.exe
Finding the Rootkit
In order to continue investigating, we want to check to see if our kernel driver is loaded. To do that, we use the sc command to check on the status of the service that is running our kernel driver, as shown in Listing 10-8L.
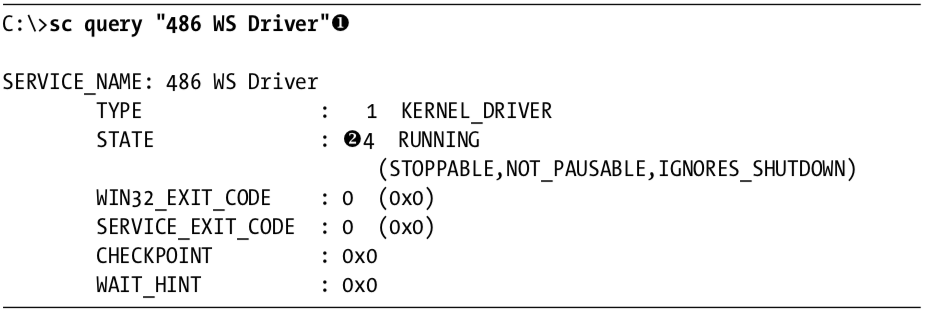
Listing 10-8L: Using the sc command to get information about a service
We query for the service name 486 WS Driver at \({\color{red}1}\), which was specified in the call to CreateServiceA. We see at \({\color{red}2}\) that the service is still running, which tells us that the kernel code is in memory. Something fishy is going on because the driver is still running, but it’s not on disk. Now, to determine what’s going on, we connect the kernel debugger to our virtual machine, and we check to see if the driver was actually loaded using the lm command. We see an entry that matches the filename that was created by Lab10-02.exe:

We are now certain that the driver is loaded into memory with the filename Mlwx486.sys, but the file does not appear on disk, suggesting that this might be a rootkit.
Next, we check the SSDT for any modified entries, as shown in Listing 10-9L.

Listing 10-9L: An excerpt from the SSDT with one entry that has been modified by a rootkit
We see that the entry at \({\color{red}1}\) is in a memory location that is clearly outside the bounds of the ntoskrnl module but within the loaded Mlwx486.sys driver. To determine which normal function is being replaced, we revert our virtual machine to before the rootkit was installed to see which function was stored at the offset into the SSDT that was overwritten. In this case, the function is NtQueryDirectoryFile, which is a versatile function that retrieves information about files and directories used by FindFirstFile and FindNextFile to traverse directory structures. This function is also used by Windows Explorer to display files and directories. If the rootkit is hooking this function, it could be hiding files, which would explain why we can’t find Mlwx486.sys. Now that we’ve found a function that is hooking the SSDT, we must analyze what that function is doing.
Examining the Hook Function
We now look more closely at the function called instead of NtQueryDirectoryFile, which we’ll call PatchFunction. The malicious PatchFunction must work with the same interface as the original function, so we first check the documentation of the original function. We find that NtQueryDirectoryFile is technically undocumented according to Microsoft, but a quick Internet search will provide all the information we need. The NtQueryDirectoryFile function is a very flexible one with a lot of different parameters that determine what will be returned.
Now, we want to look at the malicious function to see what is being done with the requests. We set a breakpoint on PatchFunction and discover that the first thing it does is call the original NtQueryDirectoryFile with all of the original parameters, as shown in Listing 10-10L.

Listing 10-10L: Assembly listing of PatchFunction
NOTE
It’s probably not completely clear from Listing 10-10L that the function being called is
NtQueryDirectoryFile. However, if we single-step over the call function, we see that it goes to another section of the file that jumps toNtQueryDirectoryFile. In IDA Pro, this call would have been labeledNtQueryDirectoryFile, but the disassembler included in WinDbg is much less sophisticated. Ideally, we would have the file to view in IDA Pro while we are debugging, but we can’t find this file because it’s hidden.
The PatchFunction checks the eighth parameter, FileInformationClass, and if it is any value other than 3, it returns NtQueryDirectoryFile’s original return value. It also checks the return value from NtQueryDirectoryFile and the value of the ninth parameter, ReturnSingleEntry. PatchFunction is looking for certain parameters. If the parameters don’t meet the criteria, then the functionality is exactly the same as the original NtQueryDirectoryFile. If the parameters do meet the criteria, PatchFunction will change the return value, which is what we’re interested in. To examine what happens during a call to PatchFunction with the correct parameters, we set a breakpoint on PatchFunction.
If we set a breakpoint on PatchFunction, it will break every time the function is called, but we’re interested in only some of the function calls. This is the perfect time to use a conditional breakpoint so that the breakpoint is hit only when the parameters to PatchFunction match our criteria. We set a breakpoint on PatchFunction, but the breakpoint will be hit only if the value of ReturnSingleEntry is 0, as follows:
kd> bp f7c4d486 ".if dwo(esp+0x24)==0 {} .else {gc}"NOTE
If you have Windows Explorer open in a directory, you might see this breakpoint hit over and over again in different threads, which could be annoying while you’re trying to analyze the function. To make it easier to analyze, you should close all of your Windows Explorer windows and use the
dircommand at a command line to trigger the breakpoint.
Once the code filters out interesting calls, we see another function stored at offset 0xf7c4d590. Although it isn’t automatically labeled by WinDbg, we can determine that it is RtlCompareMemory by looking at the disassembly or stepping into the function call. The code in Listing 10-11L shows the call to RtlCompareMemory at \({ \color {red} 1 }\).
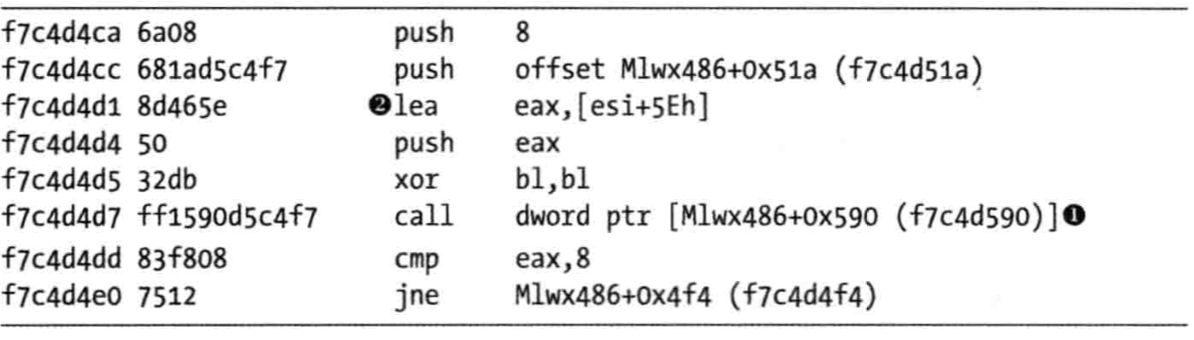
Listing 10-11L: Comparison of the filename to determine whether the rootkit will modify the returned information from NtQueryDirectoryFile
We can now see what PatchFunction is comparing. As shown in Listing 10-11L, the first parameter to RtlCompareMemory is eax, which stores the offset at esi+5eh at \({ \color {red} 2 }\), which is the offset to a filename. Earlier in our disassembly, we saw that esi was FileInformation, which contains the information filled in by NtQueryDirectoryFile. Examining the documentation for NtQueryDirectoryFile, we see that this is a FILE_BOTH_DIR_INFORMATION structure, and that an offset of 0x5E is where the filename is stored as a wide character string. (We could also use WinDbg to tell us what is stored there.)
To see what is stored at location esi+5eh, we use the db command, as shown in Listing 10-12L. This reveals that the filename is Installer.h.

Listing 10-12L: Examining the first argument to RtlCompareMemory
The other operand of the comparison is the fixed location f7c4d51a, and we can use the db command to view that as well. Listing 10-13L shows that the second parameter to RtlCompareMemory stores the letters Mlwx, which reminds us of the driver Mlwx486.sys.

Listing 10-13L: Examining the second argument to RtlCompareMemory
The call to RtlCompareMemory specifies a size of 8 bytes, which represents four characters in wide character strings. The code is comparing every file to see if it starts with the four characters Mlwx. We now have a pretty good idea that this driver is hiding files that begin with Mlwx.
Hiding Files
Having discovered which filenames PatchFunction will operate on, we analyze how it will change the return values of NtQueryDirectoryFile. Examining the documentation for NtQueryDirectoryFile, we see the FileInformation structure with a series of FILE_BOTH_DIR_INFORMATION structures. The first field in the FILE_BOTH_DIR_INFORMATION structure is the offset that points to the next FILE_BOTH_DIR_INFORMATION. As shown in Figure 10-2L, PatchFunction manipulates this field to hide certain files from the directory listing by moving the offset forward to point to the next entry if the current entry has a filename beginning with Mlwx.
Figure 10-2L shows what the return value of NtQueryDirectoryFile looks like for a directory that contains three files. There is one FILE_BOTH_DIR_INFORMATION structure for each file. Normally, the first structure would point to the second, and the second would point to the third, but the rootkit has modified the structure so that the first structure points to the third, thereby hiding the middle structure. This trick ensures that any files that begin with Mlwx are skipped and hidden from directory listings.
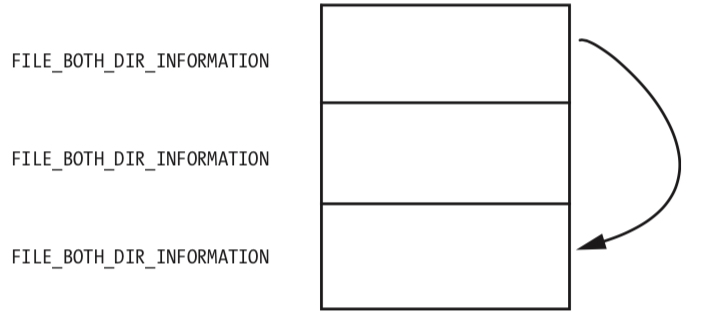
Figure 10-2L: A series of FILE_BOTH_DIR_INFORMATION structures being modified so that the middle structure is hidden
Recovering the Hidden File
Having identified the program that is hiding files, we can try to obtain the original file used by the driver in order to perform additional analysis. There are several ways to do this:
- Disable the service that starts the driver and reboot. When you reboot, the code won’t be running and the file won’t be hidden.
- Extract the file from the resource section of the executable file that installed it.
- Access the file even though it’s not available in the directory listing. The hook to
NtQueryDirectoryFileprevents the file from being shown in a directory listing, but the file still exists. For example, you could copy the file using the DOS commandcopy Mlwx486.sys NewFilename.sys. The NewFilename.sys file would not be hidden.
All of these options are simple enough, but the first is the best because it disables the driver. With the driver disabled, you should first search your system for files beginning with Mlwx in case there are other files being hidden by the Mlwx486.sys driver. (There are none in this case.)
Opening Mlwx486.sys in IDA Pro, we see that it is very small, so we should analyze all of it to make sure that the driver isn’t doing anything else that we’re not aware of. We see that the DriverEntry routine calls RtlInitUnicodeString with KeServiceDescriptorTable and NtQueryDirectoryFile, and then calls MmGetSystemRoutineAddress to find the offsets for those two addresses. It next looks for the entry in the SSDT for NtQueryDirectoryFile and overwrites that entry with the address of the PatchFunction. It doesn’t create a device, and it doesn’t add any function handlers to the driver object.
Preference
PRACTICAL MALWARE ANALYSIS: KERNEL DEBUGGING WITH WINDBG (LAB 10-02)
Lab 10-2的更多相关文章
- RH033读书笔记(9)-Lab 10 Understanding the Configuration Tools
Lab 10 Understanding the Configuration Tools Sequence 1: Configuring the Network with system-config- ...
- RH133读书笔记(10)-Lab 10 Exploring Virtualization
Lab 10 Exploring Virtualization Goal: To explore the Xen virtualization environment and the creation ...
- 7 天玩转 ASP.NET MVC — 第 3 天
目录 第 1 天 第 2 天 第 3 天 第 4 天 第 5 天 第 6 天 第 7 天 0. 前言 我们假定你在开始学习时已经阅读了前两天的学习内容.在第 2 天我们完成了关于显示 Employee ...
- 网络编程:基于C语言的简易代理服务器实现(proxylab)
本文记录了一个基于c socket的简易代理服务器的实现.(CS:APP lab 10 proxy lab) 本代理服务器支持keep-alive连接,将访问记录保存在log文件. Github: h ...
- vmware目录2
http://www.globalknowledge.com/training/course.asp?pageid=9&courseid=17880&country=United+St ...
- 很好的vmware目录
http://www.globalknowledge.com/training/course.asp?pageid=9&courseid=18023&country=United+St ...
- python迭代器生成器
1.生成器和迭代器.含有yield的特殊函数为生成器.可以被for循环的称之为可以迭代的.而可以通过_next()_调用,并且可以不断返回值的称之为迭代器 2.yield简单的生成器 #迭代器简单的使 ...
- Cygwin Run in the Windows(Simulation of UNIX)
Preface Environment Cygwin Run in the Windows(Simulation of UNIX) Resource Cygwin Install:http://cyg ...
- Ionic Cordova 环境配置window
1.安装java jdk http://www.oracle.com/technetwork/java/javase/downloads/jdk8-downloads-2133151.html 2.安 ...
- Java标签学习
今天早上看Java编程思想第四章控制执行流程,本来很简单的一些东西,但是突然看到了goto发现自己以前还真的没怎么用过,不过Java中对goto作为保留关键字,而是提供了一个叫标签的东西,我们一起来看 ...
随机推荐
- 构建RN或Weex项目时,使用Android Studio常遇到的问题
1 . androidStudio报错No cached version available for offline mode 解决方法 原因是之前为了提高编译速度,在Gradle设置选项中开启了Of ...
- zw版足彩大数据&报价
zw版足彩大数据&报价 ::zw增强版足彩大数据,文件名后缀是'.dat' ::文件格式是标准文本格式,逗号分隔 ::zw增强版,在标准版赔率基础上,增加了倒数.比率两组归一化数据 ::zw版 ...
- OpenCV学习笔记(二) - 写入视频、jpg格式
写入视频: import sys, os import cv2 imgDir = '/Users/xxx/salient/' videoName = 'vname' fps = 30 #帧频 outp ...
- Ant构建原理及build.xml文档描述
最近在改写jmeter,用到ant构建,记录一下. Ant的概念Make命令是一个项目管理工具,而Ant所实现功能与此类似.像make,gnumake和nmake这些编译工具都有一定的缺陷,但是Ant ...
- spring源码解析1--spring整体架构
一.Spring整体架构图 关于Spring的基本介绍就不再赘述了,先展示Spring框架的整体架构图如下示: 二.Spring结构介绍 Spring主要分为Core Container.Test.D ...
- 深入浅出Java探针技术1--基于java agent的字节码增强案例
Java agent又叫做Java 探针,本文将从以下四个问题出发来深入浅出了解下Java agent 一.什么是java agent? Java agent是在JDK1.5引入的,是一种可以动态修改 ...
- java基础5 (一维)数组和二维数组
本文知识点(目录): 一维数组(一维数组的概念.优点.格式.定义.初始化.遍历.常见异常.内存分析以及常见操作(找最大值.选择排序.冒泡排序等等)) 二维数组(二维数组的遍历.排序.查找.定义. ...
- .NET 常用ORM之NHibernate
NHibernate做.Net应该都不陌生,今天我们就算是温故下这个技术,概念性的东西就不说了,这次主要说本人在实际使用的遇到的问题,比较费解现在就当是记录下,避免以后再犯.本次主要使用的情况是1对N ...
- C++隐藏任务栏图标
在VC编程中,有时候我们需要将我们的程序在任务栏上的显示隐藏起来,我试过几种方法,下面我介绍一下我知道的三种方法. 第一种方法是设置窗口WS_EX_TOOLWINDOW扩展样式,通过在OnInitDi ...
- 【源码】HashMap源码及线程非安全分析
最近工作不是太忙,准备再读读一些源码,想来想去,还是先从JDK的源码读起吧,毕竟很久不去读了,很多东西都生疏了.当然,还是先从炙手可热的HashMap,每次读都会有一些收获.当然,JDK8对HashM ...