FastDFS的简单使用
互联网中有海量的文件,比如电商网站有海量的图片文件,视频网站有海量的视频文件,如果使用传统的模式上传文件,肯定是不可取的。因此需要使用第三方服务器来存储图片 。

一.FastDFS简介
FastDFS 是用 c 语言编写的一款开源的分布式文件系统。FastDFS 为互联网量身定制,充分考虑了冗余备份、负载均衡、线性扩容等机制,并注重高可用、高性能等指标,使用 FastDFS很容易搭建一套高性能的文件服务器集群提供文件上传、下载等服务。
FastDFS 架构包括 Tracker server 和 Storage server。客户端请求 Tracker server 进行文件上传、下载,通过 Tracker server 调度最终由 Storage server 完成文件上传和下载。
Tracker server 作用是负载均衡和调度,通过 Tracker server 在文件上传时可以根据一些策略找到 Storage server 提供文件上传服务。可以将 tracker 称为追踪服务器或调度服务器。
Storage server 作用是文件存储,客户端上传的文件最终存储在 Storage 服务器上,Storageserver 没有实现自己的文件系统而是利用操作系统 的文件系统来管理文件。可以将storage称为存储服务器。
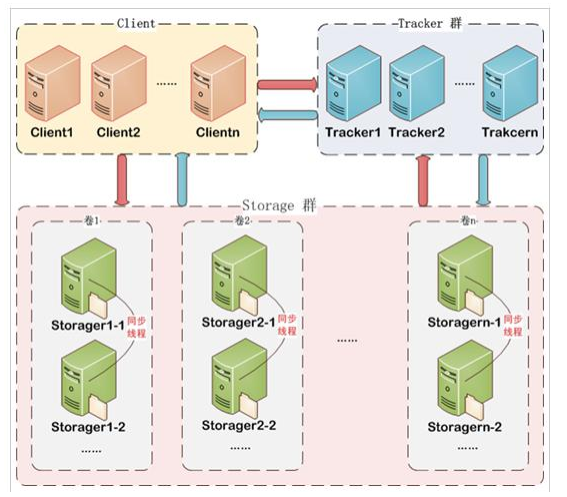
服务端两个角色:
Tracker:管理集群,tracker 也可以实现集群。每个 tracker 节点地位平等。收集 Storage 集群的状态。
Storage:实际保存文件 Storage 分为多个组,每个组之间保存的文件是不同的。每个组内部可以有多个成员, 组成员内部保存的内容是一样的,组成员的地位是一致的,没有主从的概念。
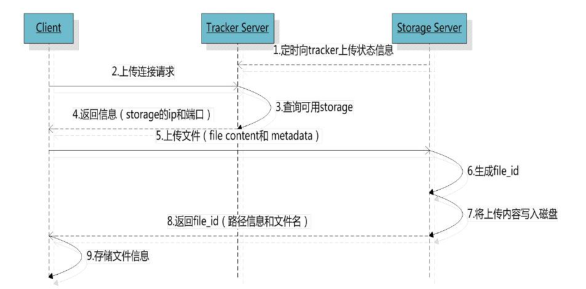
文件上传流程 :
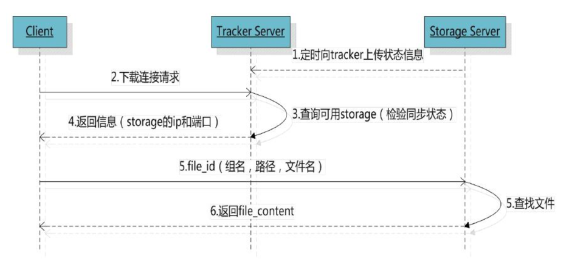
文件下载流程:
二.FastDFS的入门
使用FastDFS上传文件,我们以图片的上传为例(ssm环境)
第一步:在Spring项目中导入FastDFS的坐标
<!-- 分布式文件系统 -->

<dependency>

    <groupId>org.csource.fastdfs</groupId>

    <artifactId>fastdfs</artifactId>

    <version>1.2</version>

</dependency>

<!-- 文件上传组件 -->

<dependency>

    <groupId>commons-fileupload</groupId>

    <artifactId>commons-fileupload</artifactId>

    <version>1.3.1</version>

</dependency>
第二步:导入FastDFS的配置(resources/config/fdfs_client.conf)
# connect timeout in seconds

# default value is 30s

connect_timeout=30

# network timeout in seconds

# default value is 30s

network_timeout=60

# the base path to store log files

base_path=/home/fastdfs

# tracker_server can ocur more than once, and tracker_server format is

#  "host:port", host can be hostname or ip address

tracker_server=192.168.25.133:22122

#standard log level as syslog, case insensitive, value list:

### emerg for emergency

### alert

### crit for critical

### error

### warn for warning

### notice

### info

### debug

log_level=info

# if use connection pool

# default value is false

# since V4.05

use_connection_pool = false

# connections whose the idle time exceeds this time will be closed

# unit: second

# default value is 3600

# since V4.05

connection_pool_max_idle_time = 3600

# if load FastDFS parameters from tracker server

# since V4.05

# default value is false

load_fdfs_parameters_from_tracker=false

# if use storage ID instead of IP address

# same as tracker.conf

# valid only when load_fdfs_parameters_from_tracker is false

# default value is false

# since V4.05

use_storage_id = false

# specify storage ids filename, can use relative or absolute path

# same as tracker.conf

# valid only when load_fdfs_parameters_from_tracker is false

# since V4.05

storage_ids_filename = storage_ids.conf

#HTTP settings

http.tracker_server_port=80

#use "#include" directive to include HTTP other settiongs

##include http.conf
第三步:编写UploadController
/**

 * 图片上传的处理器

 * @author Mr.song

 * @date 2019/06/09 20:07

 */

@RestController

public class UploadController {

    // FastDFS服务器的ip地址

    private String server_url = "http://192.168.25.133/";

    @RequestMapping("/upload")

    public Result uploadFile(MultipartFile uploadFile) {

        //把file存到fastDFS上

        try {

            String fileName = uploadFile.getOriginalFilename();

            //获取文件扩展名称

            String exeName = fileName.substring(fileName.lastIndexOf(".") + 1);

            //创建上传客户端(封装的工具,见第六步)

            FastDFSClient client = new FastDFSClient("classpath:config/fdfs_client.conf");

            //完成上传,获得fileId

            String fileId = client.uploadFile(uploadFile.getBytes(), exeName);

            //拼接文件的访问路径并返回到前端页面

            String filePath = server_url + fileId;

            return new Result(true, filePath);

        } catch (Exception e) {

            e.printStackTrace();

            return new Result(false, "上传失败!");

        }

    }

}
第四步:在SpringMVC中添加文件解析器的配置
<!-- 配置文件上传解析器 -->

<bean id="multipartResolver"

      class="org.springframework.web.multipart.commons.CommonsMultipartResolver">

    <property name="defaultEncoding" value="UTF-8"></property>

    <!-- 设定文件上传的最大值 5MB, 5*1024*1024 -->

    <property name="maxUploadSize" value="5242880"></property>

</bean>
第五步:页面文件上传的方法(这里是AngularJS)
//在前端service层中

app.service("uploadService",function ($http) {

    this.uploadFile=function () {

        var formData = new FormData();//上传文件的数据模型

        //第一个参数:相当于表单的name,第二个参数需和文件上传框的id一致

        formData.append("uploadFile",file.files[0]);

        return $http({

            method:'post',

            url:'../upload.do',

            data:formData,

            //文件上传,类型必须是undefined,因为默认是text/plain(有默认值angularJS就不处理了)

            headers:{'Content-type':undefined},

            transformRequest:angular.identity //对整个表单进行二进制序列化

        })

    }

})
第六步:编写FastDFS的简单封装工具
/**

 * FastDFS使用的简单封装

 */

public class FastDFSClient {

    private TrackerClient trackerClient = null;

    private TrackerServer trackerServer = null;

    private StorageServer storageServer = null;

    private StorageClient1 storageClient = null;

    public FastDFSClient(String conf) throws Exception {

        if (conf.contains("classpath:")) {

            conf = conf.replace("classpath:", this.getClass().getResource("/").getPath());

        }

        ClientGlobal.init(conf);

        trackerClient = new TrackerClient();

        trackerServer = trackerClient.getConnection();

        storageServer = null;

        storageClient = new StorageClient1(trackerServer, storageServer);

    }

    /**

     * 上传文件方法

     * <p>Title: uploadFile</p>

     * <p>Description: </p>

     * @param fileName 文件全路径

     * @param extName 文件扩展名,不包含(.)

     * @param metas 文件扩展信息

     * @return

     * @throws Exception

     */

    public String uploadFile(String fileName, String extName, NameValuePair[] metas) throws Exception {

        String result = storageClient.upload_file1(fileName, extName, metas);

        return result;

    }

    public String uploadFile(String fileName) throws Exception {

        return uploadFile(fileName, null, null);

    }

    public String uploadFile(String fileName, String extName) throws Exception {

        return uploadFile(fileName, extName, null);

    }

    /**

     * 上传文件方法

     * <p>Title: uploadFile</p>

     * <p>Description: </p>

     * @param fileContent 文件的内容,字节数组

     * @param extName 文件扩展名

     * @param metas 文件扩展信息

     * @return

     * @throws Exception

     */

    public String uploadFile(byte[] fileContent, String extName, NameValuePair[] metas) throws Exception {

        String result = storageClient.upload_file1(fileContent, extName, metas);

        return result;

    }

    public String uploadFile(byte[] fileContent) throws Exception {

        return uploadFile(fileContent, null, null);

    }

    public String uploadFile(byte[] fileContent, String extName) throws Exception {

        return uploadFile(fileContent, extName, null);

    }

}
关注微信公众号,随时随地学习

FastDFS的简单使用的更多相关文章
- 分布式文件系统 fastDFS 安装步骤
安装 fastDFS 很简单. 先安装 libevent, 安装成功后,安装fastDFS. ./make.sh ./make.sh install 我使用一台tracker服务器 192.168. ...
- (转)分布式文件存储FastDFS(二)FastDFS安装
http://blog.csdn.net/xingjiarong/article/details/50559761 在前面的一篇中,我们分析了FastDFS的架构,知道了FastDFS是由客户端,跟踪 ...
- 23.app后端如何架设文件系统
现在app展现内容的形式多种多样的,有文字,图片,声音,视频等等,其中文件占了一个很大的比重.随着app不断运营,文件会越来越多,占用的磁盘空间也不断增大,架设一套高效的文件系统,对于整个app架构有 ...
- Hadoop小文件存储方案
原文地址:https://www.cnblogs.com/ballwql/p/8944025.html HDFS总体架构 在介绍文件存储方案之前,我觉得有必要先介绍下关于HDFS存储架构方面的一些知识 ...
- SeaweedFS上手使用指南
SeaweedFS是基于go语言开发的高可用文件存储系统,主要特性 1.成存储上亿的文件(最终受制于你的硬盘大小)2.速度快,内存占用小 上手使用比fastDFS要简单很多,自带Rest API. S ...
- 分布式文件系统 - FastDFS 简单了解一下
别问我在哪里 也许我早已不是我自己,别问我在哪里,我一直在这里. 突然不知道说些什么了... 初识 FastDFS 记得那是我刚毕业后进入的第一家公司,一个技术小白进入到当时的项目组后,在开发中上传用 ...
- dubbo 图片服务器(FastDFS) redis solr ActiveMQ等简单配置使用
一.dubbo 项目基于soa的架构,表现层和服务层是不同的工程.所以要实现商品列表查询需要两个系统之间进行通信. 1.1如何实现远程通信? 1.Webservice:效率不高基于soap协议.项目中 ...
- Nginx|构建简单的文件服务器(mac) 续-FastDFS安装(mac)|文件存储方案
目录 Nginx|构建简单的文件服务器(mac) 1 所需安装包 2 安装fastdfs-nginx-module-master 3 安装Nginx Nginx|构建简单的文件服务器(mac) 续上文 ...
- 分布式文件存储:FastDFS简单使用与原理分析
引言 FastDFS 属于分布式存储范畴,分布式文件系统 FastDFS 非常适合中小型项目,在我接手维护公司图片服务的时候开始接触到它,本篇文章目的是总结一下 FastDFS 的知识点. 用了 2 ...
随机推荐
- 【转载】在VS2008中使用WSE 3.0过程全记录
WSE全称是Web Service Enhancement,提供了更好的安全性实现,以及大对象传输的设计. 有关WSE的一些介绍,如果不清楚,可以参考下面的链接 官方介绍:http://www.mic ...
- C# 性能优化 之 秒表 Stopwatch。 Dapper一个和petapoco差不多的轻量级ORM框架
Sweet小马 小马同学的编程日记. C# 性能优化 之 秒表 Stopwatch. 生词解释:Diagnostics[,daɪəg'nɑstɪks] n.诊断学 using System.Diagn ...
- SpringBoot项目报错Cannot determine embedded database driver class for database type NONE
原因: Cannot determine embedded database driver class for database type NONE 这是因为spring boot默认会加载org.s ...
- POJ 1125 Stockbroker Grapevine (Floyd最短路)
Floyd算法计算每对顶点之间的最短路径的问题 题目中隐含了一个条件是一个人能够同一时候将谣言传递给多个人 题目终于的要求是时间最短.那么就要遍历一遍求出每一个点作为源点时,最长的最短路径长是多少,再 ...
- slf4j的总结
参考文章 log4j2使用总结 slf4j介绍以及实现原理窥探 使用Slf4j集成Log4j2构建项目日志系统的完美解决方案 slf4j(全称是Simple Loging Facade For Jav ...
- linux进程编程入门
1.进程的创建与操作 任务描述: 在父进程中创建一个全局变量,一个局部变量,并赋予初始值,用fork函数创建子进程.在子进程中对父进程的变量进行自加操作,并且输出变量值,然后父进程睡眠一段时间 各进程 ...
- android ndk环境搭建,如果是mac,请先装mac make编译器(可以使用Xcode进行安装)
Android SDK:android-sdk-mac_86Android NDK: android-ndk-r4b-darwin-x86EclipseADTCDTANT搭建Android SDK开发 ...
- 解耦与分离 —— 面向切面编程(AOP)
家里的电表总结起来有两大特性: 电视机需要(电量管理),空调需要(电量管理),热水器也需要电量管理,即一组对象都需要某一功能特性: 电视机根据信号输出画面,空调吹出冷风,热水器将水加热,这些业务功能的 ...
- AutoIT: ControlCommand是一个非常重要的指令
ControlCommand可以确定窗口中的复选框是否选中状态,然后可以对这些复选框进行操作.可以对ComboBox和ListBox进行操作如选择下拉框的某个选项 if WinExists(" ...
- 洛谷P3243 [HNOI2015]菜肴制作——拓扑排序
题目:https://www.luogu.org/problemnew/show/P3243 正向按字典序拓扑排序很容易发现是不对的,因为并不是序号小的一定先做: 但若让序号大的尽可能放在后面,则不会 ...