vue SSR 部署详解
先用vue cli初始化一个项目吧。
输入命令行开始创建项目:
vue create my-vue-ssr
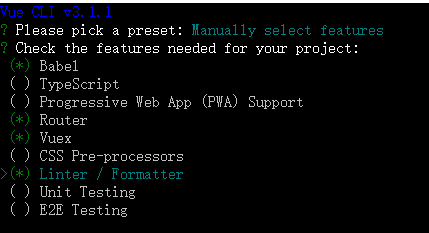
记得不要选PWA,不知为何加了这个玩意儿就报错。
后续选router模式记得选 history 模式。
项目就绪后,cd 进入,开始改造。
先贴项目结构:
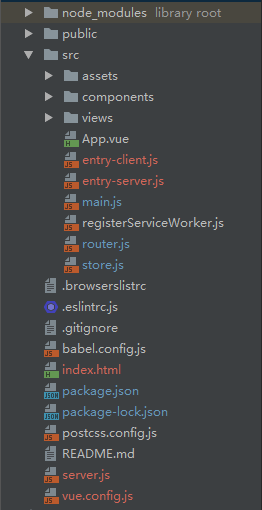
改造main.js、router.js和store.js
根据vue ssr官方文档进行路由和代码分割,将 router.js 改造如下:
// router.jsimport Vue from 'vue'
import Router from 'vue-router'

Vue.use(Router)

export default function createRouter() {
  return new Router({
    mode: 'history',
    base: process.env.BASE_URL,
    routes: [
      {
        path: '/',
        name: 'home',
        component: () => import('./views/Home.vue')
      },
      {
        path: '/about',
        name: 'about',
        component: () => import('./views/About.vue')
      }
    ]
  })
}
返回一个router构造函数(此处没有什么特别之处)。
再修改 store.js
// store.jsimport Vue from 'vue'
import Vuex from 'vuex'

Vue.use(Vuex)

export default function createStore () {
  return new Vuex.Store({
    state: {

    },
    mutations: {

    },
    actions: {

    }
  })
}
此处还是返回一个构建函数,store 的用法和注意事项参考官方文档数据预取和状态。
接下来是main.js改造,在纯客户端应用程序中,我们将在此文件中创建根 Vue 实例,并直接挂载到 DOM。但是,对于服务器端渲染(SSR),责任转移到纯客户端 entry 文件。
sync方法用于连接store和router,这样就可以在组件中直接访问 this.$store.state.route.
main.js 简单地使用 export 导出一个 createApp 函数:
// main.js
import Vue from 'vue'
import App from './App.vue'
import createRouter from './router'
import createStore from './store'
import { sync } from 'vuex-router-sync'

Vue.config.productionTip = false

export default function createApp () {
  // 创建 router 和 store 实例
  const router = createRouter()
  const store = createStore()

  // 同步路由状态(route state)到 store
  sync(store, router)

  const app = new Vue({
    router,
    store,
    render: h => h(App)
  })
  return {app, router, store}
}
注意:此处new Vue之后没有 $mount('#app') 方法,该步骤放到客户端渲染方法中。
entry-client.js
客户端 entry 只需创建应用程序,并且将其挂载到 DOM 中:
// entry-client.js
import createApp from './main'

const {app, router, store} = createApp()

if (window.__INITIAL_STATE__) {
  store.replaceState(window.__INITIAL_STATE__)
}

router.onReady(() => {
  // 添加路由钩子函数,用于处理 asyncData.
  // 在初始路由 resolve 后执行,
  // 以便我们不会二次预取(double-fetch)已有的数据。
  // 使用 `router.beforeResolve()`,以便确保所有异步组件都 resolve。
  router.beforeResolve((to, from, next) => {
    const matched = router.getMatchedComponents(to)
    const prevMatched = router.getMatchedComponents(from)

    // 我们只关心非预渲染的组件
    // 所以我们对比它们,找出两个匹配列表的差异组件
    let diffed = false
    const activated = matched.filter((c, i) => {
      return diffed || (diffed = (prevMatched[i] !== c))
    })

    if (!activated.length) {
      return next()
    }

    // 这里如果有加载指示器 (loading indicator),就触发

    Promise.all(activated.map(c => {
      if (c.asyncData) {
        return c.asyncData({ store, route: to })
      }
    })).then(() => {

      // 停止加载指示器(loading indicator)

      next()
    }).catch(next)
  })

  app.$mount('#app')
})
window.__INITIAL_STATE__ 保存的是服务端返回的 context.state,客户端在挂载之前,将其替换到 store.state 中。
注意:上面代码是在路由导航之前解析数据。使用此策略,应用程序会等待视图所需数据全部解析之后,再传入数据并处理当前视图。好处在于,可以直接在数据准备就绪时,传入视图渲染完整内容,但是如果数据预取需要很长时间,用户在当前视图会感受到"明显卡顿"。因此,如果使用此策略,建议提供一个数据加载指示器 (data loading indicator)。
官方还提供了另外一种方法,即把 asyncData 函数放到 beforeMount 或 beforeRouteUpdate 中执行。
Vue.mixin({
  beforeMount () {
    const { asyncData } = this.$options
    if (asyncData) {
      // 将获取数据操作分配给 promise
      // 以便在组件中,我们可以在数据准备就绪后
      // 通过运行 `this.dataPromise.then(...)` 来执行其他任务
      this.dataPromise = asyncData({
        store: this.$store,
        route: this.$route
      })
    }
  }
})
当路由组件重用(同一路由,但是 params 或 query 已更改,例如,从 user/1 到 user/2)时,也应该调用 asyncData 函数。
Vue.mixin({
  beforeRouteUpdate (to, from, next) {
    const { asyncData } = this.$options
    if (asyncData) {
      asyncData({
        store: this.$store,
        route: to
      }).then(next).catch(next)
    } else {
      next()
    }
  }
})
entry-server.js
服务器 entry 使用 default export 导出函数,并在每次渲染中重复调用此函数。此时,除了创建和返回应用程序实例之外,它不会做太多事情 - 但是稍后我们将在此执行服务器端路由匹配 (server-side route matching) 和数据预取逻辑 (data pre-fetching logic)。
// entry-server.js
import createApp from './main'

export default context => {
  return new Promise((resolve, reject) => {
    const { app, router, store } = createApp()

    router.push(context.url)

    router.onReady(() => {
      const matchedComponents = router.getMatchedComponents()
      if (!matchedComponents.length) {
        return reject({ code: 404 })
      }

      // 对所有匹配的路由组件调用 `asyncData()`
      Promise.all(matchedComponents.map(Component => {
        if (Component.asyncData) {
          return Component.asyncData({
            store,
            route: router.currentRoute
          })
        }
      })).then(() => {
        // 在所有预取钩子(preFetch hook) resolve 后,
        // 我们的 store 现在已经填充入渲染应用程序所需的状态。
        // 当我们将状态附加到上下文,
        // 并且 `template` 选项用于 renderer 时,
        // 状态将自动序列化为 `window.__INITIAL_STATE__`,并注入 HTML。
        context.state = store.state

        resolve(app)
      }).catch(reject)
    }, reject)
  })
}
需要注意的是,你仍然需要在挂载 app 之前调用 router.onReady,因为路由器必须要提前解析路由配置中的异步组件,才能正确地调用组件中可能存在的路由钩子。
在 entry-server.js 中,我们可以通过路由获得与 router.getMatchedComponents() 相匹配的组件,如果组件暴露出 asyncData,我们就调用这个方法。然后我们需要将解析完成的状态,附加到渲染上下文(render context)中。注意,由于此函数会在组件实例化之前调用,所以它无法访问 this。
在路由组件上暴露出一个自定义静态函数 asyncData:
<!-- Item.vue -->
<template>
  <div>{{ item.title }}</div>
</template>

<script>
export default {
  asyncData ({ store, route }) {
    // 触发 action 后,会返回 Promise
    return store.dispatch('fetchItem', route.params.id)
  },
  computed: {
    // 从 store 的 state 对象中的获取 item。
    item () {
      return this.$store.state.items[this.$route.params.id]
    }
  }
}
</script>
接下来在根目录创建 server.js 和作为模板的index.html:
<!DOCTYPE html>
<html>
    <head>
        <meta charset="utf-8">
        <meta http-equiv="X-UA-Compatible" content="IE=edge">
        <meta name="viewport" content="width=device-width,initial-scale=1.0">
        <title>{{title}}</title>
    </head>
    <body>
        <!--vue-ssr-outlet-->
    </body>
</html>
注意 <!--vue-ssr-outlet--> 注释 -- 这里将是应用程序 HTML 标记注入的地方。
模板还支持简单插值。
<html>
  <head>
    <!-- 使用双花括号(double-mustache)进行 HTML 转义插值(HTML-escaped interpolation) -->
    <title>{{ title }}</title>

    <!-- 使用三花括号(triple-mustache)进行 HTML 不转义插值(non-HTML-escaped interpolation) -->
    {{{ meta }}}
  </head>
  <body>
    <!--vue-ssr-outlet-->
  </body>
</html>
渲染一个 Vue 实例
// server.js
const http = require('http')
const path = require('path')
const fs = require('fs')
const express = require('express')
const {createBundleRenderer} = require('vue-server-renderer')
const serverBundle = require('./dist/server/vue-ssr-server-bundle.json')
const clientManifest = require('./dist/client/vue-ssr-client-manifest.json')

const app = express()
app.set('port', 8001);
// 静态文件目录指向dist文件夹
app.use(express.static(path.join(__dirname, './dist/client')))

const renderer = createBundleRenderer(serverBundle, {
  runInNewContext: false,
  template: fs.readFileSync(path.resolve(__dirname, './index.html'), 'utf-8'),
  clientManifest
})

app.get('*', (req, res) => {
  const context = {
    title: 'Hello SSR',
    url: req.url
  }

  renderer.renderToString(context, (err, html) => {
    if (err) {
      if (err.code === 404) {
        res.status(404).end('404 not found')
      } else {
        res.status(500).end(err.message)
      }
    } else {
      res.end(html)
    }
  })
})

/*服务启动*/
http.createServer(app).listen(app.get('port'), function () {
  console.log('service start at ' + app.get('port'));
});
此处与express集成,核心方法是通过 renderer.renderToString 返回渲染结果。
对于客户端应用程序和服务器应用程序,我们都要使用 webpack 打包 - 服务器需要「服务器 bundle」然后用于服务器端渲染(SSR),而「客户端 bundle」会发送给浏览器,用于混合静态标记。
webpack在构建过程中会分别生成 vue-ssr-client-manifest.json 和 vue-ssr-server-bundle.json,vue-server-renderer 提供一个名为 createBundleRenderer 的 API,使用 server bundle 和(可选的)选项创建一个 BundleRenderer 实例。具体参数与使用方法参看官方文档。bundle renderer 在调用 renderToString 时,它将自动执行「由 bundle 创建的应用程序实例」所导出的函数(传入上下文作为参数),然后渲染它。
构建配置
在根目录新建vue.config.js
// vue.config.js
const VueSSRServerPlugin = require('vue-server-renderer/server-plugin')
const VueSSRClientPlugin = require('vue-server-renderer/client-plugin')
const nodeExternals = require('webpack-node-externals')
const env = process.env
const isServer = env.RUN_ENV === 'server'

module.exports = {
  publicPath: './',
  outputDir: `dist/${env.RUN_ENV}`,
  configureWebpack: {
    // 将 entry 指向应用程序的 server / client 文件
    entry: `./src/entry-${env.RUN_ENV}.js`,
    devtool: 'eval',
    // 这允许 webpack 以 Node 适用方式(Node-appropriate fashion)处理动态导入(dynamic import),
    // 并且还会在编译 Vue 组件时,
    // 告知 `vue-loader` 输送面向服务器代码(server-oriented code)。
    target: isServer ? 'node' : 'web',
    // 此处告知 server bundle 使用 Node 风格导出模块(Node-style exports)
    output: {
      libraryTarget: isServer ? 'commonjs2' : undefined
    },
    // https://webpack.js.org/configuration/externals/#function
    // https://github.com/liady/webpack-node-externals
    // 外置化应用程序依赖模块。可以使服务器构建速度更快,
    // 并生成较小的 bundle 文件。
    externals: isServer ? nodeExternals({
      // 不要外置化 webpack 需要处理的依赖模块。
      // 你可以在这里添加更多的文件类型。例如,未处理 *.vue 原始文件,
      // 你还应该将修改 `global`(例如 polyfill)的依赖模块列入白名单
      whitelist: /\.css$/
    }) : undefined,
    // 这是将服务器的整个输出
    // 构建为单个 JSON 文件的插件。
    // 服务端默认文件名为 `vue-ssr-server-bundle.json`
    // 客户端默认文件名为 `vue-ssr-client-manifest.json`
    plugins: [
      isServer ? new VueSSRServerPlugin() : new VueSSRClientPlugin(),
    ]
  }
}
此处合并了服务端配置和客户端配置,通过命令参数 RUN_ENV来区分服务端配置和客户端配置。服务器配置,是用于生成传递给 createBundleRenderer 的 server bundle。 官方文档
最后
在package.json中添加以下命令:
    "start": "npm run build:server && npm run build:client && npm run service",
    "build:client": "cross-env RUN_ENV=client vue-cli-service build",
    "build:server": "cross-env RUN_ENV=server vue-cli-service build --mode server",
    "service": "node server.js",
build:server 命令用于构建服务端bundle,build:client用于构建客户端 bundle,service 启动服务。
vue SSR 部署详解的更多相关文章
- vue 源码详解(一):原型对象和全局 `API`的设计
vue 源码详解(一):原型对象和全局 API的设计 1. 从 new Vue() 开始 我们在实际的项目中使用 Vue 的时候 , 一般都是在 main.js 中通过 new Vue({el : ' ...
- centos7.2环境elasticsearch-5.0.1+kibana-5.0.1+zookeeper3.4.6+kafka_2.9.2-0.8.2.1部署详解
centos7.2环境elasticsearch-5.0.1+kibana-5.0.1+zookeeper3.4.6+kafka_2.9.2-0.8.2.1部署详解 环境准备: 操作系统:centos ...
- 【转】Nginx+php-fpm+MySQL分离部署详解
转:http://www.linuxidc.com/Linux/2015-07/120580.htm Nginx+php-fpm+MySQL分离部署详解 [日期:2015-07-26] 来源:Linu ...
- Solr部署详解
Solr部署详解 时间:2013-11-24 方式:转载 目录 1 solr概述 1.1 solr的简介 1.2 solr的特点 2 Solr安装 2.1 安装JDK 2.2 安装Tomcat 2.3 ...
- MySQL高可用方案-PXC(Percona XtraDB Cluster)环境部署详解
MySQL高可用方案-PXC(Percona XtraDB Cluster)环境部署详解 Percona XtraDB Cluster简称PXC.Percona Xtradb Cluster的实现是在 ...
- vue 文件目录结构详解
vue 文件目录结构详解 本篇文章主要介绍了vue 文件目录结构详解,小编觉得挺不错的,现在分享给大家,也给大家做个参考.一起跟随小编过来看看吧 项目简介 基于 vue.js 的前端开发环境,用于前后 ...
- Vue props用法详解
Vue props用法详解 组件接受的选项之一 props 是 Vue 中非常重要的一个选项.父子组件的关系可以总结为: props down, events up 父组件通过 props 向下传递数 ...
- legend3---Windows 7/8/10 系统下Laravel框架的开发环境安装及部署详解(Vagrant + Homestead)
legend3---Windows 7/8/10 系统下Laravel框架的开发环境安装及部署详解(Vagrant + Homestead) 一.总结 一句话总结: 1.安装的话就是下载好git,va ...
- main.js index.html与app.vue三者关系详解
main.js index.html与app.vue三者关系详解 2019年01月23日 11:12:15 Pecodo 阅读数 186 main.js与index.html是nodejs的项目启 ...
随机推荐
- 【HDU2037】今年暑假不AC
http://acm.hdu.edu.cn/showproblem.php?pid=2037 “今年暑假不AC?”“是的.”“那你干什么呢?”“看世界杯呀,笨蛋!”“@#$%^&*%...” ...
- 4-2 买家类目-dao(下)
查询出来的对象ProductCategory就已经有updateTime和createTime了,然而你只是把对象的categoryType给修改了一下,修改之后就执行save方法保存了.所以它还是原 ...
- E20170606-gg
complete adj. 完整的; 完成的; (用以强调) 完全的; 达到结尾的; vt. 完成,使完满; 完成或结束; 填写(表格); process n. 过程; 工序; 做事方法; 工艺 ...
- [Swift通天遁地]一、超级工具-(12)使用Toaster制作简短提示语的吐司窗口
★★★★★★★★★★★★★★★★★★★★★★★★★★★★★★★★★★★★★★★★➤微信公众号:山青咏芝(shanqingyongzhi)➤博客园地址:山青咏芝(https://www.cnblogs. ...
- 二分图最大匹配(匈牙利算法) URAL 1721 Two Sides of the Same Coin
题目传送门 /* 题意:三种人,statements,testdata,anthing.要求两个人能完成s和t两个工作,且rank相差2 二分图匹配:此题学习建图技巧,两个集和内部一定没有边相连,ra ...
- DHTML_____window对象方法
<html> <head> <meta charset="utf-8"> <title>window对象方法</title&g ...
- ora-20000 unable to analyze
ora-20000 unable to analyze 无法分析表 check: select * from wmsprdata.cmp3$88278表不存在. result:应该是系统自动任务2:0 ...
- 273 Integer to English Words 整数转换英文表示
将非负整数转换为其对应的英文表示,给定的输入是保证小于 231 - 1 的.示例:123 -> "One Hundred Twenty Three"12345 -> & ...
- Ajax学习笔记之一----------第一个Ajax Demo[转载]
原文地址: http://www.cnblogs.com/pjx412/archive/2011/05/04/2037014.html 一.核心推动力:XMLHttpRequest对象XMLHttpR ...
- [转]深入ASP.NET MVC之九:Ajax支持
本文转自:http://www.cnblogs.com/yinzixin/archive/2012/12/22/2824384.html 目前前端页面和服务端进行Ajax交互大多采用的都是jQuery ...