《SpringBoot》自动装配原理(简单易懂)
引入
先看SpringBoot的主配置类
@SpringBootApplication

public class DemoApplication{

    public static void main(String[] args)

    {

        SpringApplication.run(StartEurekaApplication.class, args);

    }

}
@SpringBootApplication
点进@SpringBootApplication来看,发现@SpringBootApplication是一个组合注解。
@Target(ElementType.TYPE)

@Retention(RetentionPolicy.RUNTIME)

@Documented

@Inherited

@SpringBootConfiguration

@EnableAutoConfiguration

@ComponentScan(excludeFilters = {

      @Filter(type = FilterType.CUSTOM, classes = TypeExcludeFilter.class),

      @Filter(type = FilterType.CUSTOM, classes = AutoConfigurationExcludeFilter.class) })

public @interface SpringBootApplication {

}
@SpringBootApplication 由 @Configuration、@EnableAutoConfiguration、@ComponentScan 注解的集合组成:
- @Configuration:允许注册额外的 bean 或导入其他配置类
- @EnableAutoConfiguration:启用 SpringBoot 的自动配置机制
- @ComponentScan:扫描被@Component (@Repository,@Service,@Controller)注解的 bean,注解默认会扫描该类所在的包下所有的类。
@SpringBootConfiguration
@SpringBootConfiguration 注解源码如下:
@Target({ElementType.TYPE})

@Retention(RetentionPolicy.RUNTIME)

@Documented

@Configuration

public @interface SpringBootConfiguration {

}
可以看到这个注解除了元注解以外,就只有一个@Configuration,那也就是说这个注解相当于@Configuration,所以这两个注解作用是一样的,也就是能够去注册一些额外的Bean,并且导入一些额外的配置。
@Configuration还有一个作用就是把该类变成一个配置类,不需要额外的XML进行配置。所以@SpringBootConfiguration就相当于@Configuration。
进入@Configuration,发现@Configuration核心是@Component,说明Spring的配置类也是Spring的一个组件。
@Target({ElementType.TYPE})

@Retention(RetentionPolicy.RUNTIME)

@Documented

@Component

public @interface Configuration {

    @AliasFor(

        annotation = Component.class

    )

    String value() default "";

}
@EnableAutoConfiguration
继续看@EnableAutoConfiguration,这个注解是开启自动配置的功能,源码如下:
@Target({ElementType.TYPE})

@Retention(RetentionPolicy.RUNTIME)

@Documented

@Inherited

@AutoConfigurationPackage

@Import({AutoConfigurationImportSelector.class})

public @interface EnableAutoConfiguration {

    String ENABLED_OVERRIDE_PROPERTY = "spring.boot.enableautoconfiguration";

    Class<?>[] exclude() default {};

    String[] excludeName() default {};

}
可以看到它是由 @AutoConfigurationPackage,@Import(EnableAutoConfigurationImportSelector.class)这两个而组成的,
@AutoConfigurationPackage
先看@AutoConfigurationPackage,这是为了让包中的类以及子包中的类能够被自动扫描到spring容器中。
源码如下:
@Target({ElementType.TYPE})

@Retention(RetentionPolicy.RUNTIME)

@Documented

@Inherited

@Import({Registrar.class})

public @interface AutoConfigurationPackage {

}
可以看到,这里使用@Import 来给Spring容器中导入一个组件 ,这里导入的是Registrar.class。来看下这个Registrar:
static class Registrar implements ImportBeanDefinitionRegistrar, DeterminableImports {

        Registrar() {

        }

        public void registerBeanDefinitions(AnnotationMetadata metadata, BeanDefinitionRegistry registry) {

            AutoConfigurationPackages.register(registry, (new AutoConfigurationPackages.PackageImport(metadata)).getPackageName());

        }

        public Set<Object> determineImports(AnnotationMetadata metadata) {

            return Collections.singleton(new AutoConfigurationPackages.PackageImport(metadata));

        }

    }
就是通过以上这个方法获取扫描的包路径,可以debug查看具体的值:

那metadata是什么呢,可以看到是标注在@SpringBootApplication注解上的DemoApplication,也就是主配置类Application:

其实就是将主配置类(即@SpringBootApplication标注的类)的所在包及子包里面所有组件扫描加载到Spring容器。因此要把DemoApplication放在项目的最高级中(最外层目录)。
@Import(AutoConfigurationImportSelector.class)
看看注解@Import(AutoConfigurationImportSelector.class),@Import注解就是给Spring容器中导入一些组件,这里传入了一个组件的选择器:AutoConfigurationImportSelector。
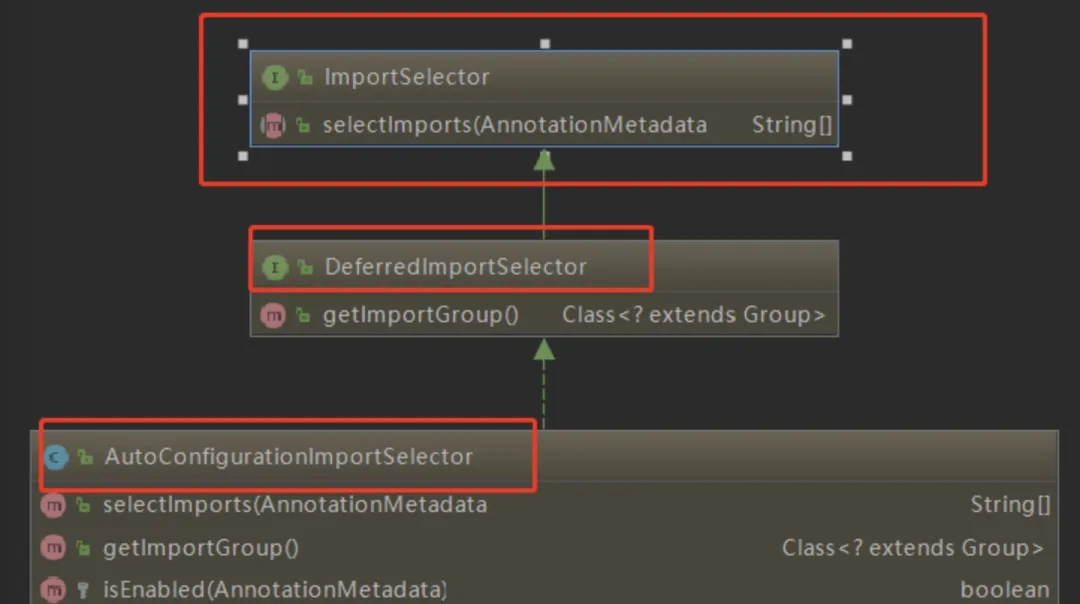
可以从图中看出AutoConfigurationImportSelector 继承了 DeferredImportSelector 继承了 ImportSelector,ImportSelector有一个方法为:selectImports。将所有需要导入的组件以全类名的方式返回,这些组件就会被添加到容器中。
public String[] selectImports(AnnotationMetadata annotationMetadata) {

    if (!this.isEnabled(annotationMetadata)) {

        return NO_IMPORTS;

    } else {

        AutoConfigurationMetadata autoConfigurationMetadata = AutoConfigurationMetadataLoader.loadMetadata(this.beanClassLoader);

        AutoConfigurationImportSelector.AutoConfigurationEntry autoConfigurationEntry =

        this.getAutoConfigurationEntry(autoConfigurationMetadata, annotationMetadata);

        return StringUtils.toStringArray(autoConfigurationEntry.getConfigurations());

    }

}
这里会给容器中导入 自动配置类(xxxAutoConfiguration),也就是给容器中导入这个场景需要的所有组件,并配置好这些组件。

有了自动配置类,就免去了手动编写配置注入功能组件等的工作。
那是如何获取到这些配置类的呢,看看下面这个方法:
protected AutoConfigurationImportSelector.AutoConfigurationEntry

  getAutoConfigurationEntry(AutoConfigurationMetadata autoConfigurationMetadata, AnnotationMetadata annotationMetadata) {

    if (!this.isEnabled(annotationMetadata)) {

        return EMPTY_ENTRY;

    } else {

        AnnotationAttributes attributes = this.getAttributes(annotationMetadata);

        List<String> configurations = this.getCandidateConfigurations(annotationMetadata, attributes);

        configurations = this.removeDuplicates(configurations);

        Set<String> exclusions = this.getExclusions(annotationMetadata, attributes);

        this.checkExcludedClasses(configurations, exclusions);

        configurations.removeAll(exclusions);

        configurations = this.filter(configurations, autoConfigurationMetadata);

        this.fireAutoConfigurationImportEvents(configurations, exclusions);

        return new AutoConfigurationImportSelector.AutoConfigurationEntry(configurations, exclusions);

    }

}
可以看到getCandidateConfigurations()这个方法,他的作用就是引入系统已经加载好的一些类,那么到底是那些类呢:
protected List<String> getCandidateConfigurations(AnnotationMetadata metadata, AnnotationAttributes attributes) {

    List<String> configurations = SpringFactoriesLoader.loadFactoryNames(this.getSpringFactoriesLoaderFactoryClass(), this.getBeanClassLoader());

    Assert.notEmpty(configurations,

    "No auto configuration classes found in META-INF/spring.factories. If you are using a custom packaging, make sure that file is correct.");

    return configurations;

}

public static List<String> loadFactoryNames(Class<?> factoryClass, @Nullable ClassLoader classLoader) {

    String factoryClassName = factoryClass.getName();

    return (List)loadSpringFactories(classLoader).getOrDefault(factoryClassName, Collections.emptyList());

}
会从META-INF/spring.factories中获取资源,然后通过Properties加载资源:
private static Map<String, List<String>> loadSpringFactories(@Nullable ClassLoader classLoader) {

    MultiValueMap<String, String> result = (MultiValueMap)cache.get(classLoader);

    if (result != null) {

        return result;

    } else {

        try {

            Enumeration<URL> urls = classLoader !=

          null ? classLoader.getResources("META-INF/spring.factories") : ClassLoader.getSystemResources("META-INF/spring.factories");

            LinkedMultiValueMap result = new LinkedMultiValueMap();

            while(urls.hasMoreElements()) {

                URL url = (URL)urls.nextElement();

                UrlResource resource = new UrlResource(url);

                Properties properties = PropertiesLoaderUtils.loadProperties(resource);

                Iterator var6 = properties.entrySet().iterator();

                while(var6.hasNext()) {

                    Map.Entry<?, ?> entry = (Map.Entry)var6.next();

                    String factoryClassName = ((String)entry.getKey()).trim();

                    String[] var9 = StringUtils.commaDelimitedListToStringArray((String)entry.getValue());

                    int var10 = var9.length;

                    for(int var11 = 0; var11 < var10; ++var11) {

                        String factoryName = var9[var11];

                        result.add(factoryClassName, factoryName.trim());

                    }

                }

            }

            cache.put(classLoader, result);

            return result;

        } catch (IOException var13) {

            throw new IllegalArgumentException("Unable to load factories from location [META-INF/spring.factories]", var13);

        }

    }

}
可以知道SpringBoot在启动的时候从类路径下的META-INF/spring.factories中获取EnableAutoConfiguration指定的值,将这些值作为自动配置类导入到容器中,自动配置类就生效,帮我们进行自动配置工作。以前需要自己配置的东西,自动配置类都帮我们完成了。
如下图可以发现Spring常见的一些类已经自动导入。

@ComponentScan
接下来看@ComponentScan注解,@ComponentScan(excludeFilters = { @Filter(type = FilterType.CUSTOM, classes = TypeExcludeFilter.class), @Filter(type = FilterType.CUSTOM, classes = AutoConfigurationExcludeFilter.class) }),这个注解就是扫描包,然后放入spring容器。
@ComponentScan(excludeFilters = {

  @Filter(type = FilterType.CUSTOM,classes = {TypeExcludeFilter.class}),

  @Filter(type = FilterType.CUSTOM,classes = {AutoConfigurationExcludeFilter.class})})

public @interface SpringBootApplication {}
总结下@SpringbootApplication:就是说,他已经把很多东西准备好,具体是否使用取决于我们的程序或者说配置。
小结
总的来说,SpringBoot的自动装配原理就是 通过@EnableAutoConfiguration注解在类路径的META-INF/spring.factories文件中找到所有的对应配置类,然后将这些自动配置类加载到spring容器中
run方法
public static void main(String[] args) {

        SpringApplication.run(Application.class, args);

    }
来看下在执行run方法到底有没有用到哪些自动配置的东西,点进run:
public ConfigurableApplicationContext run(String... args) {

    //计时器

    StopWatch stopWatch = new StopWatch();

    stopWatch.start();

    ConfigurableApplicationContext context = null;

    Collection<SpringBootExceptionReporter> exceptionReporters = new ArrayList();

    this.configureHeadlessProperty();

    //监听器

    SpringApplicationRunListeners listeners = this.getRunListeners(args);

    listeners.starting();

    Collection exceptionReporters;

    try {

        ApplicationArguments applicationArguments = new DefaultApplicationArguments(args);

        ConfigurableEnvironment environment = this.prepareEnvironment(listeners, applicationArguments);

        this.configureIgnoreBeanInfo(environment);

        Banner printedBanner = this.printBanner(environment);

        //准备上下文

        context = this.createApplicationContext();

        exceptionReporters = this.getSpringFactoriesInstances(SpringBootExceptionReporter.class,                       new Class[]{ConfigurableApplicationContext.class}, context);

        //预刷新context

        this.prepareContext(context, environment, listeners, applicationArguments, printedBanner);

        //刷新context

        this.refreshContext(context);

        //刷新之后的context

        this.afterRefresh(context, applicationArguments);

        stopWatch.stop();

        if (this.logStartupInfo) {

            (new StartupInfoLogger(this.mainApplicationClass)).logStarted(this.getApplicationLog(), stopWatch);

        }

        listeners.started(context);

        this.callRunners(context, applicationArguments);

    } catch (Throwable var10) {

        this.handleRunFailure(context, var10, exceptionReporters, listeners);

        throw new IllegalStateException(var10);

    }

    try {

        listeners.running(context);

        return context;

    } catch (Throwable var9) {

        this.handleRunFailure(context, var9, exceptionReporters, (SpringApplicationRunListeners)null);

        throw new IllegalStateException(var9);

    }

}
那我们关注的就是 refreshContext(context); 刷新context,我们点进来看。
private void refreshContext(ConfigurableApplicationContext context) {

   refresh(context);

   if (this.registerShutdownHook) {

      try {

         context.registerShutdownHook();

      }

      catch (AccessControlException ex) {

         // Not allowed in some environments.

      }

   }

}
继续点进refresh(context);
protected void refresh(ApplicationContext applicationContext) {

   Assert.isInstanceOf(AbstractApplicationContext.class, applicationContext);

   ((AbstractApplicationContext) applicationContext).refresh();

}
会调用 ((AbstractApplicationContext) applicationContext).refresh();方法,点进来看:
public void refresh() throws BeansException, IllegalStateException {

   synchronized (this.startupShutdownMonitor) {

      // Prepare this context for refreshing.

      prepareRefresh();

      // Tell the subclass to refresh the internal bean factory.

      ConfigurableListableBeanFactory beanFactory = obtainFreshBeanFactory();

      // Prepare the bean factory for use in this context.

      prepareBeanFactory(beanFactory);

      try {

         // Allows post-processing of the bean factory in context subclasses.

         postProcessBeanFactory(beanFactory);

         // Invoke factory processors registered as beans in the context.

         invokeBeanFactoryPostProcessors(beanFactory);

         // Register bean processors that intercept bean creation.

         registerBeanPostProcessors(beanFactory);

         // Initialize message source for this context.

         initMessageSource();

         // Initialize event multicaster for this context.

         initApplicationEventMulticaster();

         // Initialize other special beans in specific context subclasses.

         onRefresh();

         // Check for listener beans and register them.

         registerListeners();

         // Instantiate all remaining (non-lazy-init) singletons.

         finishBeanFactoryInitialization(beanFactory);

         // Last step: publish corresponding event.

         finishRefresh();

      }catch (BeansException ex) {

         if (logger.isWarnEnabled()) {

            logger.warn("Exception encountered during context initialization - " +

                  "cancelling refresh attempt: " + ex);

         }

         // Destroy already created singletons to avoid dangling resources.

         destroyBeans();

         // Reset 'active' flag.

         cancelRefresh(ex);

         // Propagate exception to caller.

         throw ex;

      }finally {

         // Reset common introspection caches in Spring's core, since we

         // might not ever need metadata for singleton beans anymore...

         resetCommonCaches();

      }

   }

}
由此可知,就是一个spring的bean的加载过程。继续来看一个方法叫做 onRefresh():
protected void onRefresh() throws BeansException {

   // For subclasses: do nothing by default.

}
在这里并没有直接实现,找他的具体实现:

比如Tomcat跟web有关,可以看到有个ServletWebServerApplicationContext:
@Override

protected void onRefresh() {

   super.onRefresh();

   try {

      createWebServer();

   }

   catch (Throwable ex) {

      throw new ApplicationContextException("Unable to start web server", ex);

   }

}
可以看到有一个createWebServer()方法,用于创建web容器,而Tomcat不就是web容器。
那是如何创建的呢:
private void createWebServer() {

   WebServer webServer = this.webServer;

   ServletContext servletContext = getServletContext();

   if (webServer == null && servletContext == null) {

      ServletWebServerFactory factory = getWebServerFactory();

      this.webServer = factory.getWebServer(getSelfInitializer());

   }

   else if (servletContext != null) {

      try {

         getSelfInitializer().onStartup(servletContext);

      }

      catch (ServletException ex) {

         throw new ApplicationContextException("Cannot initialize servlet context",

               ex);

      }

   }

   initPropertySources();

}
factory.getWebServer(getSelfInitializer()),显然是通过工厂的方式创建的。
public interface ServletWebServerFactory {

   WebServer getWebServer(ServletContextInitializer... initializers);

}
可以看到 它是一个接口,为什么会是接口。因为不止是Tomcat一种web容器,可以看到还有Jetty

接下来看TomcatServletWebServerFactory:
@Override

public WebServer getWebServer(ServletContextInitializer... initializers) {

   Tomcat tomcat = new Tomcat();

   File baseDir = (this.baseDirectory != null) ? this.baseDirectory

         : createTempDir("tomcat");

   tomcat.setBaseDir(baseDir.getAbsolutePath());

   Connector connector = new Connector(this.protocol);

   tomcat.getService().addConnector(connector);

   customizeConnector(connector);

   tomcat.setConnector(connector);

   tomcat.getHost().setAutoDeploy(false);

   configureEngine(tomcat.getEngine());

   for (Connector additionalConnector : this.additionalTomcatConnectors) {

      tomcat.getService().addConnector(additionalConnector);

   }

   prepareContext(tomcat.getHost(), initializers);

   return getTomcatWebServer(tomcat);

}
这块代码,就是要寻找的内置Tomcat,在这个过程当中,可以看到创建Tomcat的一个流程。
也就是:
- 首先从main找到run()方法,在执行run()方法之前new一个SpringApplication对象
- 进入run()方法,创建应用监听器SpringApplicationRunListeners开始监听
- 然后加载SpringBoot配置环境(ConfigurableEnvironment),然后把配置环境(Environment)加入监听对象中
- 然后加载应用上下文(ConfigurableApplicationContext),当做run方法的返回对象
- 最后创建Spring容器,refreshContext(context),实现starter自动化配置和bean的实例化等工作。
面试题专栏
Java面试题专栏已上线,欢迎访问。
- 如果你不知道简历怎么写,简历项目不知道怎么包装;
- 如果简历中有些内容你不知道该不该写上去;
- 如果有些综合性问题你不知道怎么答;
那么可以私信我,我会尽我所能帮助你。
《SpringBoot》自动装配原理(简单易懂)的更多相关文章
- SpringBoot启动流程分析(五):SpringBoot自动装配原理实现
SpringBoot系列文章简介 SpringBoot源码阅读辅助篇: Spring IoC容器与应用上下文的设计与实现 SpringBoot启动流程源码分析: SpringBoot启动流程分析(一) ...
- springboot自动装配原理,写一个自己的start
springboot自动装配原理 第一次使用springboot的时候,都感觉很神奇.只要加入一个maven的依赖,写几行配置,就能注入redisTemple,rabbitmqTemple等对象. 这 ...
- SpringBoot自动装配原理解析
本文包含:SpringBoot的自动配置原理及如何自定义SpringBootStar等 我们知道,在使用SpringBoot的时候,我们只需要如下方式即可直接启动一个Web程序: @SpringBoo ...
- springboot自动装配原理
最近开始学习spring源码,看各种文章的时候看到了springboot自动装配实现原理.用自己的话简单概括下. 首先打开一个基本的springboot项目,点进去@SpringBootApplica ...
- SpringBoot | 2.1 SpringBoot自动装配原理
@ 目录 前言 1. 引入配置文件与配置绑定 @ImportResource @ConfigurationProperties 1.1 @ConfigurationProperties + @Enab ...
- 【Springboot】Springboot自动装配原理
1.核心注解就是 EnableAutoConfiguration 该注解会激活SpringBoot的自动装配功能: 代码如下: @Target(ElementType.TYPE) @Retentio ...
- SpringBoot 自动装配原理
早期的Spring项目需要添加需要配置繁琐的xml,比如MVC.事务.数据库连接等繁琐的配置.Spring Boot的出现就无需这些繁琐的配置,因为Spring Boot基于约定大于配置的理念,在项目 ...
- springboot自动装配原理回顾、配置文件分析
配置文件 spring boot官方文档 官方外部配置文件说明参考文档 自动配置原理分析 1. SpringBoot启动的时候加载主配置类,开启了自动配置功能@EnableAutoConfigurat ...
- SpringBoot自动装配原理剖析(自己理解,有错请指出)
注解 主类 @SpringBootApplication @EnableAutoConfiguration @Import({AutoConfigurationImportSelector.class ...
- SpringBoot自动装配原理之Configuration以及@Bean注解的使用
Configuration以及Bean注解的使用 该知识点在Spring中应该学过,没有学过或者遗忘的的朋友需要预习或温习前置知识点.SpringBoot其实就是Spring的进一步简化,所以前置知识 ...
随机推荐
- Maven打包项目的精准指定——流程管理
作用 Maven不仅可以进行依赖管理的自动化,还可以自动化实现编译,打包,发布,等,也被成为构建流程 生命周期(lifecycle) 构成 Maven生命周期本身可以看做一个集合,在这个集合中包含了一 ...
- dephi winspy Demo
在spy+中未找到这样的功能 有个隐藏窗口的进程,相让窗口显示出来,虽然可以找到进程ID,然后再逐步找到主窗口句柄,但又没句柄发各种消息的软件. 计得以前有个窗口精灵之类的,网上找了很多,要么没有此功 ...
- NZOJ 模拟赛7
T1 字符串 小X十分热爱学习.有一天,他刚学完"漂亮的k字符串"的概念:给定长度为n的字符串和整数k,k能整除n,如果该字符串满足以下两个条件: s是一个回文串,即对于任意1≤i ...
- php 如何实现 git diff
无意间想到这个问题,如何用php来实现git diff,如果实现了这个功能,岂不是能够使用php对在线编辑文件的功能做更进一步的优化和提升? 查了一下还真有这样的库,话不多说,开始执行 compose ...
- shell最简单的办法实现进度条
一直很好奇shell命令行安装脚本的时候怎么实现自动增长进度条而且不增加新输出的问题.以前一直觉得是不断print出来东西,但是已经输出到命令行终端的为什么也能被覆盖呢,于是看到别人写的进度条,不断尝 ...
- Pcb-Merging:无需训练的多任务模型合并方案 | NeurIPS'24
来源:晓飞的算法工程笔记 公众号,转载请注明出处 论文: Parameter Competition Balancing for Model Merging 论文地址:https://arxiv.or ...
- 高性能计算-gemm-openmp效率测试(10)
1. 目标 设计一个程序,使用OpenMP并行化实现矩阵乘法.给定两个矩阵 A 和 B,矩阵大小均为1024*1024,你的任务是计算它们的乘积 C. 要求: (1).使用循环结构体的知识点,包括fo ...
- Linux中tar文件压缩与解压
文件压缩与解压缩 一般什么情况下使用文件压缩? 备份数据,数据传输 节省磁盘空间 减少带宽使用 减少负载 减少IO操作 什么情况下进行压缩比较合适? 错过业务高峰期,由于文件的压缩会瞬间加大cpu的负 ...
- (Redis基础教程之九) 如何在Redis中使用Sorted Sets
介绍 Redis是一个开源的内存中键值数据存储.在Redis的,排序集合类似于一个数据类型集在这两者都是串的非重复的组.不同之处在于,已排序集中的每个成员都与一个分数相关联,从而可以从最小分数到最大分 ...
- HBuilderX代码缩进问题
前情 uni-app是我很喜欢的跨平台框架,它能开发小程序,H5,APP(安卓/iOS),对前端开发很友好,自带的IDE让开发体验也很棒,公司项目就是主推uni-app,自然也是用官方自带的IDE了 ...