
Linux的桌面虚拟化技术KVM(三)——KVM虚拟机克隆和快照
Linux的桌面虚拟化技术KVM(一)——新建KVM虚拟机
Linux的桌面虚拟化技术KVM(二)——远程桌面管理
(1).KVM虚拟机克隆
KVM虚拟克隆命令virt-clone [选项]
常用选项:
-o [原虚拟机],--original [原虚拟机]  原虚拟机,必须关闭或暂停状态

-n [新虚拟机],--name [新虚拟机]  新虚拟机

-f [新虚拟机存储文件],--file [新虚拟机存储文件]  新虚拟机使用的磁盘镜像文件
基于centos7.0克隆一台虚拟机centos7.0-bak
[root@youxi1 ~]# ll -h /var/lib/libvirt/images/

总用量 12G  //总共才是12G

-rw------- 1 root root 11G 9月   8 11:34 centos7.0.qcow2

-rw------- 1 root root 11G 9月   8 15:53 centos75.img

[root@youxi1 ~]# ll -h /var/lib/libvirt/images/

总用量 12G

-rw------- 1 root root 11G 9月 8 11:34 centos7.0.qcow2

-rw------- 1 root root 11G 9月 8 15:53 centos75.img

[root@youxi1 ~]# virt-clone -o centos7.0 -n centos7.0-bak -f /var/lib/libvirt/images/centos7.0-bak.img

正在分配 'centos7.0-bak.img' | 10 GB 00:30

成功克隆 'centos7.0-bak'。

[root@youxi1 ~]# ll -h /var/lib/libvirt/images/

总用量 14G

-rw------- 1 root root 1.4G 9月 8 18:23 centos7.0-bak.img  //没开启之前才1.4G

-rw------- 1 root root 11G 9月 8 11:34 centos7.0.qcow2

-rw------- 1 root root 11G 9月 8 15:53 centos75.img

[root@youxi1 ~]# ls /etc/libvirt/qemu/  //查看一下虚拟机的配置文件

autostart centos7.0-bak.xml centos7.0.xml centos75.xml networks
//可以使用vimdiff对比克隆前后的配置文件
[root@youxi1 ~]# vimdiff /etc/libvirt/qemu/centos7.0-bak.xml /etc/libvirt/qemu/centos7.0.xml

[root@youxi1 ~]# virsh list --all

Id 名称 状态

----------------------------------------------------

- centos7.0 关闭

- centos7.0-bak 关闭

- centos75 关闭
我这里的Mac是不一样的,启动虚拟机centos7.0-bak和centos7.0
[root@youxi1 ~]# virsh start centos7.0

域 centos7.0 已开始

[root@youxi1 ~]# virsh start centos7.0-bak

域 centos7.0-bak 已开始
用VNC连接一下,查看这两台虚拟机的IP地址
虚拟机centos7.0的IP地址:

虚拟机centos7.0-bak的IP地址:
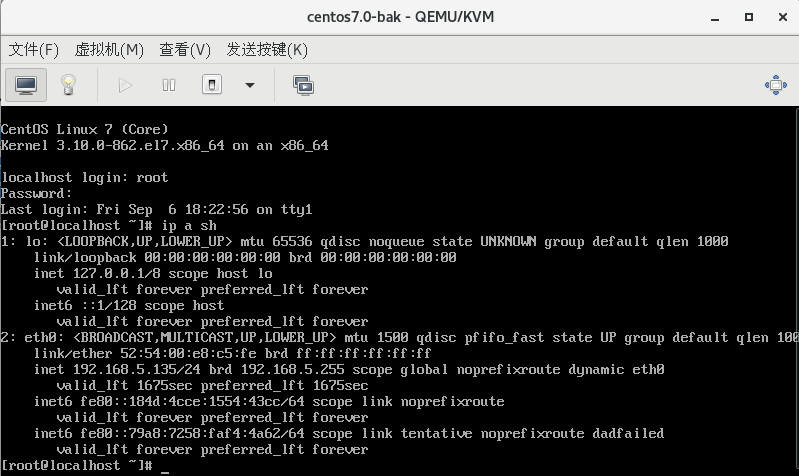
两者都可以上网。
注意:如果是CentOS6的系统进行克隆,那么只能开启一台,进入系统中去修改IP和MAC地址。
(2).KVM虚拟机快照
KVM快照分两种:1.使用LVM快照,如果分区是LVM,那么利用LVM进行KVM的快照备份;2.使用qcow2格式的镜像创建快照。
快照的作用:1.热备;2.灾难恢复;3.回滚到某个历史节点。
快照使用的空间大小:第一次快照使用的空间最大,之后都是在此基础上空间只占用修改过的数据,类似增量备份。
1)创建快照
所以在快照之前需要确保虚拟机镜像格式为qcow2
[root@youxi1 ~]# qemu-img info /var/lib/libvirt/images/centos75.img

image: /var/lib/libvirt/images/centos75.img

file format: qcow2

virtual size: 10G (10737418240 bytes)

disk size: 1.3G

cluster_size: 65536

Format specific information:

    compat: 1.1

    lazy refcounts: true
之后对虚拟机创建快照,虚拟机可以是开启状态,也可以是关闭状态。一般建议关机创建快照,因为关机创建快照更快,并且如果开机创建快照需要把内存中的内容写到磁盘上,记录虚拟机此刻的状态。
[root@youxi1 ~]# virsh list --all

 Id    名称                         状态

----------------------------------------------------

 -     centos7.0                      关闭

 -     centos7.0-bak                  关闭

 -     centos75                       关闭

[root@youxi1 ~]# virsh snapshot-create centos75  //创建快照

已生成域快照 1567998395

[root@youxi1 ~]# virsh snapshot-list centos75

 名称               生成时间              状态

------------------------------------------------------------

 1567998395           2019-09-09 11:06:35 +0800 shutoff

[root@youxi1 ~]# virsh snapshot-create-as centos75 httpd  //创建快照并起名

已生成域快照 httpd

[root@youxi1 ~]# virsh snapshot-list centos75

 名称               生成时间              状态

------------------------------------------------------------

 1567998395           2019-09-09 11:06:35 +0800 shutoff

 httpd                2019-09-09 11:08:44 +0800 shutoff
在创建快照时,建议使用virsh snapshot-create-as [虚拟机名称] [快照名称],方便去辨别该快照的作用和历史节点。另外快照名虽然可以使用中文,但不建议使用。
查看快照占用的空间大小
[root@youxi1 ~]# qemu-img info /var/lib/libvirt/images/centos75.img

image: /var/lib/libvirt/images/centos75.img

file format: qcow2

virtual size: 10G (10737418240 bytes)

disk size: 1.3G

cluster_size: 65536

Snapshot list:

ID        TAG                 VM SIZE                DATE       VM CLOCK

1         1567998395                0 2019-09-09 11:06:35   00:00:00.000

2         httpd                     0 2019-09-09 11:08:44   00:00:00.000

Format specific information:

    compat: 1.1

    lazy refcounts: true
2)删除快照
[root@youxi1 ~]# virsh snapshot-delete centos75 1567998395  //删除掉这个糟糕的快照

已删除域快照 1567998395

[root@youxi1 ~]# virsh snapshot-list centos75

 名称               生成时间              状态

------------------------------------------------------------

 httpd                2019-09-09 11:08:44 +0800 shutoff
3)恢复快照
为了显示出差别,这里我先启动虚拟机,安装httpd
[root@youxi1 ~]# virsh list --all

 Id    名称                         状态

----------------------------------------------------

 2     centos75                       running

 -     centos7.0                      关闭

 -     centos7.0-bak                  关闭

[root@youxi1 ~]# virsh console centos75

连接到域 centos75

换码符为 ^]

CentOS Linux 7 (Core)

Kernel 3.10.0-862.el7.x86_64 on an x86_64

kvm-CentOS7 login: root

密码:

Last login: Mon Sep  9 10:09:21 on ttyS0

[root@kvm-CentOS7 ~]# yum -y install httpd

[root@kvm-CentOS7 ~]# systemctl status httpd  //可以看到httpd服务

● httpd.service - The Apache HTTP Server

Loaded: loaded (/usr/lib/systemd/system/httpd.service; disabled; vendor preset: disabled)

Active: inactive (dead)

Docs: man:httpd(8)

man:apachectl(8)
然后关闭虚拟机,执行快照恢复。注意:恢复快照必须关闭虚拟机
[root@youxi1 ~]# virsh snapshot-revert centos75 httpd

[root@youxi1 ~]# virsh start centos75 --console

......

kvm-CentOS7 login: root

密码:

Last login: Mon Sep 9 10:09:21 on ttyS0

[root@kvm-CentOS7 ~]# systemctl status httpd  //此时就没有httpd了

Unit httpd.service could not be found.
4)获取或设定当前快照
[root@youxi1 ~]# virsh snapshot-current centos75  //获取

<domainsnapshot>

  <name>real-httpd</name>

  <state>shutoff</state>

  <parent>

    <name>httpd</name>

  </parent>

  <creationTime>1568000560</creationTime>

  <memory snapshot='no'/>

  <disks>

    <disk name='vda' snapshot='internal'/>

    <disk name='hda' snapshot='no'/>

  </disks>

  <domain type='kvm'>

    <name>centos75</name>

    <uuid>8b7d2976-11a6-42a6-99f1-1f36ab8dd488</uuid>

    <memory unit='KiB'>1048576</memory>

    <currentMemory unit='KiB'>1048576</currentMemory>

    <vcpu placement='static'>1</vcpu>

    <os>

      <type arch='x86_64' machine='pc-i440fx-rhel7.0.0'>hvm</type>

      <boot dev='hd'/>

    </os>

    <features>

      <acpi/>

      <apic/>

    </features>

    <cpu mode='custom' match='exact' check='partial'>

      <model fallback='allow'>IvyBridge</model>

    </cpu>

    <clock offset='utc'>

      <timer name='rtc' tickpolicy='catchup'/>

      <timer name='pit' tickpolicy='delay'/>

      <timer name='hpet' present='no'/>

    </clock>

    <on_poweroff>destroy</on_poweroff>

    <on_reboot>restart</on_reboot>

    <on_crash>destroy</on_crash>

    <pm>

      <suspend-to-mem enabled='no'/>

      <suspend-to-disk enabled='no'/>

    </pm>

    <devices>

      <emulator>/usr/libexec/qemu-kvm</emulator>

      <disk type='file' device='disk'>

        <driver name='qemu' type='qcow2'/>

        <source file='/var/lib/libvirt/images/centos75.img'/>

        <target dev='vda' bus='virtio'/>

        <address type='pci' domain='0x0000' bus='0x00' slot='0x06' function='0x0'/>

      </disk>

      <disk type='file' device='cdrom'>

        <driver name='qemu' type='raw'/>

        <target dev='hda' bus='ide'/>

        <readonly/>

        <address type='drive' controller='0' bus='0' target='0' unit='0'/>

      </disk>

      <controller type='usb' index='0' model='ich9-ehci1'>

        <address type='pci' domain='0x0000' bus='0x00' slot='0x04' function='0x7'/>

      </controller>

      <controller type='usb' index='0' model='ich9-uhci1'>

        <master startport='0'/>

        <address type='pci' domain='0x0000' bus='0x00' slot='0x04' function='0x0' multifunction='on'/>

      </controller>

      <controller type='usb' index='0' model='ich9-uhci2'>

        <master startport='2'/>

        <address type='pci' domain='0x0000' bus='0x00' slot='0x04' function='0x1'/>

      </controller>

      <controller type='usb' index='0' model='ich9-uhci3'>

        <master startport='4'/>

        <address type='pci' domain='0x0000' bus='0x00' slot='0x04' function='0x2'/>

      </controller>

      <controller type='ide' index='0'>

        <address type='pci' domain='0x0000' bus='0x00' slot='0x01' function='0x1'/>

      </controller>

      <controller type='virtio-serial' index='0'>

        <address type='pci' domain='0x0000' bus='0x00' slot='0x05' function='0x0'/>

      </controller>

      <controller type='pci' index='0' model='pci-root'/>

      <interface type='bridge'>

        <mac address='52:54:00:71:3c:50'/>

        <source bridge='br0'/>

        <model type='virtio'/>

        <address type='pci' domain='0x0000' bus='0x00' slot='0x03' function='0x0'/>

      </interface>

      <serial type='pty'>

        <target type='isa-serial' port='0'>

          <model name='isa-serial'/>

        </target>

      </serial>

      <console type='pty'>

        <target type='serial' port='0'/>

      </console>

      <channel type='unix'>

        <target type='virtio' name='org.qemu.guest_agent.0'/>

        <address type='virtio-serial' controller='0' bus='0' port='1'/>

      </channel>

      <input type='mouse' bus='ps2'/>

      <input type='keyboard' bus='ps2'/>

      <memballoon model='virtio'>

        <address type='pci' domain='0x0000' bus='0x00' slot='0x07' function='0x0'/>

      </memballoon>

      <rng model='virtio'>

        <backend model='random'>/dev/urandom</backend>

        <address type='pci' domain='0x0000' bus='0x00' slot='0x08' function='0x0'/>

      </rng>

    </devices>

  </domain>

</domainsnapshot>
Linux的桌面虚拟化技术KVM(三)——KVM虚拟机克隆和快照的更多相关文章
- Linux的桌面虚拟化技术KVM(五)——virsh常用命令
Linux的桌面虚拟化技术KVM(一)——新建KVM虚拟机 Linux的桌面虚拟化技术KVM(二)——远程桌面管理 Linux的桌面虚拟化技术KVM(三)——KVM虚拟机克隆和快照 Linux的桌面虚 ...
- Linux的桌面虚拟化技术KVM(四)——虚拟机镜像格式对比与转换
Linux的桌面虚拟化技术KVM(一)——新建KVM虚拟机 Linux的桌面虚拟化技术KVM(二)——远程桌面管理 Linux的桌面虚拟化技术KVM(三)——KVM虚拟机克隆和快照 (1).常用镜像格 ...
- Linux的桌面虚拟化技术KVM(二)——远程桌面管理
Linux的桌面虚拟化技术KVM(一)——新建KVM虚拟机 远程桌面管理,指的是远程图形界面管理,所以要保证物理机要有图形化界面. (1).VNC管理 安装VNC-server服务,并进行配置 [ro ...
- Linux的桌面虚拟化技术KVM(一)——新建KVM虚拟机
(1).虚拟化产品对比介绍 虚拟化技术有以下三种:仿真虚拟化,这是一种对系统硬件没有要求,但性能最低的虚拟化技术:半虚拟化,这是一种直接使用物理硬件,性能高,但需要修改内核的虚拟化技术:全虚拟化,这是 ...
- 主流服务器虚拟化技术简单使用——KVM(二)
通过Linux工具管理KVM 主流服务器虚拟化技术简单使用——KVM(一)部署了一台KVM主机,提到KVM可以通过命令行工具(virt-install.virsh)和GUI工具(virt-manage ...
- VMware vSphere 服务器虚拟化之二十二桌面虚拟化之创建View Composer链接克隆的虚拟桌面池
VMware vSphere 服务器虚拟化之二十二桌面虚拟化之创建View Composer链接克隆的虚拟桌面池 在上一节我们创建了完整克隆的自动专有桌面池,在创建过程比较缓慢,这次我们将学习创建Vi ...
- 虚拟化技术xen,kvm,qemu区别
虚拟化类型 全虚拟化(Full Virtualization) 全虚拟化也成为原始虚拟化技术,该模型使用虚拟机协调guest操作系统和原始硬件,VMM在guest操作系统和裸硬件之间用于工作协调,一些 ...
- KVM虚拟化技术(七)虚拟机配置文件
KVM虚拟机的配置文件在/etc/libvirt/qemu/下,为xml文件 整体结构如下: <domain type='kvm'> 虚拟机整体信息 系统信息 硬件资源特性 突发事件处理 ...
- KVM虚拟化技术(五)虚拟机管理
一.为了提高内存.硬盘.网络的性能,需要支持半虚拟化:virtio半虚拟化驱动 二.对虚拟机的管理都是通过libvirt:所有必须要启用一个守护程序libvirtd. 三.virt-manager ① ...
随机推荐
- BZOJ 2159: Crash 的文明世界 第二类斯特林数+树形dp
这个题非常巧妙啊~ #include <bits/stdc++.h> #define M 170 #define N 50003 #define mod 10007 #define LL ...
- qDeleteAll与clear
qDeleteAll:专门用于指针容器,对容器或者迭代器中的每个对象进行delete操作,而不是从容器中移除对象.源代码如下: void qDeleteAll(ForwardIterator begi ...
- EL运算符和基本运算
1.EL存取器:.和[] ${applicationScope.list[].name} 获取applicationScope中list集合的第二个元素的name属性. 2.三元运算符: ${> ...
- golang 常见变成问题01
Golang常见编程问题 --语言简单 func CopyFile (dst, src string) (w int64, err error) { srcFile, err := os.Open ( ...
- AWS服务器上安全组端口设置和访问的问题
在搭建测试环境时使用AWS服务器环境,AWS EC2需要设置安全组开放端口,如果端口未进行授权则不允许访问,后台授权界面如下: 1.查看某个端口是否在AWS后台被开放,并允许访问: netstat - ...
- 「雅礼集训 2017 Day10」拍苍蝇
传送门 Description 有一天,小 A 的母亲对他家里的卫生状况非常不满意,他的房间里有非常多的苍蝇.在母亲的威逼利诱下,小 A 拿起了苍蝇拍去消灭家里的苍蝇.然而,小 A 以前从来没有亲手消 ...
- webpack-merge使用说明
webpack-merge 配置分离 随着我们业务逻辑的增多,图片.字体.css.ES6以及CSS预处理器和后处理器逐渐的加入到我们的项目中来,进而导致配置文件的增多,使得配置文件书写起来比较繁琐 ...
- select2多选设置select多选,select2取值和赋值
select2设置select多选,select2取值和赋值,作为筛选条件的时候,取值相对简单,把选中的id值转为字符串传给后端查询,查询之后会刷新页面,为了在下拉框中显示刚刚选中的值,就需要给sel ...
- Nodejs技巧之---Exceljs
工作中我们可能会遇到制作表格的需求,那么针对nodejs如何制作一个汇总表格呢? 今天我们就在此介绍下exceljs的基本使用,应该可以满足我们大部分的需求. 第一部分 下载 npm install ...
- Spring boot druid 的配置使用
依赖加入 <dependency> <groupId>com.alibaba</groupId> <artifactId>druid</artif ...