
Python开发【十一章】:RabbitMQ队列
RabbitMQ队列
rabbitMQ是消息队列;想想之前的我们学过队列queue:threading queue(线程queue,多个线程之间进行数据交互)、进程queue(父进程与子进程进行交互或者同属于同一父进程下的多个子进程进行交互);如果两个独立的程序,那么之间是不能通过queue进行交互的,这时候我们就需要一个中间代理即rabbitMQ
消息队列:
- RabbitMQ
- ZeroMQ
- ActiveMQ
- ...........
原理:

1、安装和基本使用
安装RabbitMQ服务 http://www.rabbitmq.com/install-standalone-mac.html
python安装RabbitMQ模块
pip install pika

or

easy_install pika

or

源码

https://pypi.python.org/pypi/pika
2、实现最简单的队列通信
发送端:
#!/usr/bin/env python

# -*- coding:utf-8 -*-

#-Author-Lian

import pika

connection = pika.BlockingConnection(pika.ConnectionParameters('localhost'))

channel = connection.channel()      #声明一个管道(管道内发消息)

channel.queue_declare(queue='lzl')    #声明queue队列

channel.basic_publish(exchange='',

                      routing_key='lzl',  #routing_key 就是queue名

                      body='Hello World!'

)

print("Sent 'Hello,World!'")

connection.close()      #关闭
接收端:
#!/usr/bin/env python

# -*- coding:utf-8 -*-

#-Author-Lian

import pika

connection = pika.BlockingConnection(pika.ConnectionParameters('localhost'))

channel = connection.channel()

channel.queue_declare(queue='lzl')

def callback(ch,method,properties,body):

    print(ch,method,properties)

    #ch:<pika.adapters.blocking_connection.BlockingChannel object at 0x002E6C90>    管道内存对象地址

    #methon:<Basic.Deliver(['consumer_tag=ctag1.03d155a851b146f19cee393ff1a7ae38',   #具体信息

            # 'delivery_tag=1', 'exchange=', 'redelivered=False', 'routing_key=lzl'])>

    #properties:<BasicProperties>

    print("Received %r"%body)

channel.basic_consume(callback,     #如果收到消息,就调用callback函数处理消息

                      queue="lzl",

                      no_ack=True)   #接受到消息后不返回ack,无论本地是否处理完消息都会在队列中消失

print(' [*] Waiting for messages. To exit press CTRL+C')

channel.start_consuming()   #开始收消息
注:windows连linux上的rabbitMQ会出现报错,需要提供用户名密码
3、RabbitMQ消息分发轮询
先启动消息生产者,然后再分别启动3个消费者,通过生产者多发送几条消息,你会发现,这几条消息会被依次分配到各个消费者身上
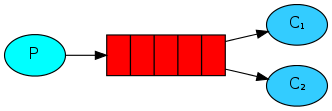
在这种模式下,RabbitMQ会默认把p发的消息公平的依次分发给各个消费者(c),跟负载均衡差不多
#!/usr/bin/env python

# -*- coding:utf-8 -*-

#-Author-Lian

import pika

connection = pika.BlockingConnection(pika.ConnectionParameters('localhost'))

channel = connection.channel()      #声明一个管道(管道内发消息)

channel.queue_declare(queue='lzl')    #声明queue队列

channel.basic_publish(exchange='',

                      routing_key='lzl',  #routing_key 就是queue名

                      body='Hello World!'

)

print("Sent 'Hello,World!'")

connection.close()      #关闭
pubulish.py
#!/usr/bin/env python

# -*- coding:utf-8 -*-

#-Author-Lian

import pika

connection = pika.BlockingConnection(pika.ConnectionParameters('localhost'))

channel = connection.channel()

channel.queue_declare(queue='lzl')

def callback(ch,method,properties,body):

    print(ch,method,properties)

    #ch:<pika.adapters.blocking_connection.BlockingChannel object at 0x002E6C90>    管道内存对象地址

    #methon:<Basic.Deliver(['consumer_tag=ctag1.03d155a851b146f19cee393ff1a7ae38',   #具体信息

            # 'delivery_tag=1', 'exchange=', 'redelivered=False', 'routing_key=lzl'])>

    #properties:<BasicProperties>

    print("Received %r"%body)

channel.basic_consume(callback,     #如果收到消息,就调用callback函数处理消息

                      queue="lzl",

                      no_ack=True)

print(' [*] Waiting for messages. To exit press CTRL+C')

channel.start_consuming()   #开始收消息
consume.py
通过执行pubulish.py和consume.py可以实现上面的消息公平分发,那假如c1收到消息之后宕机了,会出现什么情况呢?rabbitMQ是如何处理的?现在我们模拟一下
#!/usr/bin/env python

# -*- coding:utf-8 -*-

#-Author-Lian

import pika

connection = pika.BlockingConnection(pika.ConnectionParameters('localhost'))

channel = connection.channel()      #声明一个管道(管道内发消息)

channel.queue_declare(queue='lzl')    #声明queue队列

channel.basic_publish(exchange='',

                      routing_key='lzl',  #routing_key 就是queue名

                      body='Hello World!'

)

print("Sent 'Hello,World!'")

connection.close()      #关闭
publish.py
#!/usr/bin/env python

# -*- coding:utf-8 -*-

#-Author-Lian

import pika,time

connection = pika.BlockingConnection(pika.ConnectionParameters('localhost'))

channel = connection.channel()

channel.queue_declare(queue='lzl')

def callback(ch,method,properties,body):

    print("->>",ch,method,properties)

    time.sleep(15)              # 模拟处理时间

    print("Received %r"%body)

channel.basic_consume(callback,     #如果收到消息,就调用callback函数处理消息

                      queue="lzl",

                      no_ack=True)

print(' [*] Waiting for messages. To exit press CTRL+C')

channel.start_consuming()   #开始收消息
consume.py
在consume.py的callback函数里增加了time.sleep模拟函数处理,通过上面程序进行模拟发现,c1接收到消息后没有处理完突然宕机,消息就从队列上消失了,rabbitMQ把消息删除掉了;如果程序要求消息必须要处理完才能从队列里删除,那我们就需要对程序进行处理一下
#!/usr/bin/env python

# -*- coding:utf-8 -*-

#-Author-Lian

import pika

connection = pika.BlockingConnection(pika.ConnectionParameters('localhost'))

channel = connection.channel()      #声明一个管道(管道内发消息)

channel.queue_declare(queue='lzl')    #声明queue队列

channel.basic_publish(exchange='',

                      routing_key='lzl',  #routing_key 就是queue名

                      body='Hello World!'

)

print("Sent 'Hello,World!'")

connection.close()      #关闭
publish.py
#!/usr/bin/env python

# -*- coding:utf-8 -*-

#-Author-Lian

import pika,time

connection = pika.BlockingConnection(pika.ConnectionParameters('localhost'))

channel = connection.channel()

channel.queue_declare(queue='lzl')

def callback(ch,method,properties,body):

    print("->>",ch,method,properties)

    #time.sleep(15)              # 模拟处理时间

    print("Received %r"%body)

    ch.basic_ack(delivery_tag=method.delivery_tag)

channel.basic_consume(callback,     #如果收到消息,就调用callback函数处理消息

                      queue="lzl",

                      )

print(' [*] Waiting for messages. To exit press CTRL+C')

channel.start_consuming()   #开始收消息
consume.py
通过把consume.py接收端里的no_ack=True去掉之后并在callback函数里面添加ch.basic_ack(delivery_tag = method.delivery_tag,就可以实现消息不被处理完不能在队列里清除
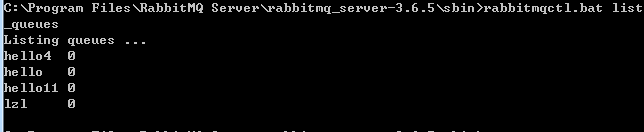
查看消息队列数:
4、消息持久化
如果消息在传输过程中rabbitMQ服务器宕机了,会发现之前的消息队列就不存在了,这时我们就要用到消息持久化,消息持久化会让队列不随着服务器宕机而消失,会永久的保存下去
发送端:
#!/usr/bin/env python

# -*- coding:utf-8 -*-

#-Author-Lian

import pika

connection = pika.BlockingConnection(pika.ConnectionParameters('localhost'))

channel = connection.channel()      #声明一个管道(管道内发消息)

channel.queue_declare(queue='lzl',durable=True)    #队列持久化

channel.basic_publish(exchange='',

                      routing_key='lzl',  #routing_key 就是queue名

                      body='Hello World!',

                      properties=pika.BasicProperties(

                          delivery_mode = 2     #消息持久化

                      )

)

print("Sent 'Hello,World!'")

connection.close()      #关闭
接收端:
#!/usr/bin/env python

# -*- coding:utf-8 -*-

#-Author-Lian

import pika,time

connection = pika.BlockingConnection(pika.ConnectionParameters('localhost'))

channel = connection.channel()

channel.queue_declare(queue='lzl',durable=True)

def callback(ch,method,properties,body):

    print("->>",ch,method,properties)

    time.sleep(15)              # 模拟处理时间

    print("Received %r"%body)

    ch.basic_ack(delivery_tag=method.delivery_tag)

channel.basic_consume(callback,     #如果收到消息,就调用callback函数处理消息

                      queue="lzl",

                      )

print(' [*] Waiting for messages. To exit press CTRL+C')

channel.start_consuming()   #开始收消息
5、消息公平分发
如果Rabbit只管按顺序把消息发到各个消费者身上,不考虑消费者负载的话,很可能出现,一个机器配置不高的消费者那里堆积了很多消息处理不完,同时配置高的消费者却一直很轻松。为解决此问题,可以在各个消费者端,配置perfetch=1,意思就是告诉RabbitMQ在我这个消费者当前消息还没处理完的时候就不要再给我发新消息了
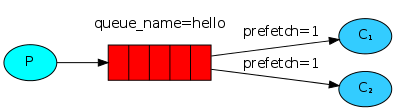
channel.basic_qos(prefetch_count=1)
带消息持久化+公平分发
#!/usr/bin/env python

# -*- coding:utf-8 -*-

#-Author-Lian

import pika

connection = pika.BlockingConnection(pika.ConnectionParameters('localhost'))

channel = connection.channel()      #声明一个管道(管道内发消息)

channel.queue_declare(queue='lzl',durable=True)    #队列持久化

channel.basic_publish(exchange='',

                      routing_key='lzl',  #routing_key 就是queue名

                      body='Hello World!',

                      properties=pika.BasicProperties(

                          delivery_mode = 2     #消息持久化

                      )

)

print("Sent 'Hello,World!'")

connection.close()      #关闭
pubulish.py
#!/usr/bin/env python

# -*- coding:utf-8 -*-

#-Author-Lian

import pika,time

connection = pika.BlockingConnection(pika.ConnectionParameters('localhost'))

channel = connection.channel()

channel.queue_declare(queue='lzl',durable=True)

def callback(ch,method,properties,body):

    print("->>",ch,method,properties)

    time.sleep(15)              # 模拟处理时间

    print("Received %r"%body)

    ch.basic_ack(delivery_tag=method.delivery_tag)

channel.basic_qos(prefetch_count=1)

channel.basic_consume(callback,     #如果收到消息,就调用callback函数处理消息

                      queue="lzl",

                      )

print(' [*] Waiting for messages. To exit press CTRL+C')

channel.start_consuming()   #开始收消息
consume.py
6、Publish\Subscribe(消息发布\订阅)
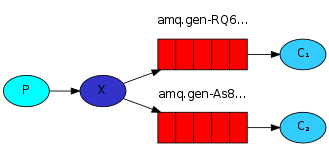
之前的例子都基本都是1对1的消息发送和接收,即消息只能发送到指定的queue里,但有些时候你想让你的消息被所有的Queue收到,类似广播的效果,这时候就要用到exchange了,
An exchange is a very simple thing. On one side it receives messages from producers and the other side it pushes them to queues. The exchange must know exactly what to do with a message it receives. Should it be appended to a particular queue? Should it be appended to many queues? Or should it get discarded. The rules for that are defined by the exchange type.
Exchange在定义的时候是有类型的,以决定到底是哪些Queue符合条件,可以接收消息
fanout: 所有bind到此exchange的queue都可以接收消息
direct: 通过routingKey和exchange决定的那个唯一的queue可以接收消息
topic:所有符合routingKey(此时可以是一个表达式)的routingKey所bind的queue可以接收消息
headers: 通过headers 来决定把消息发给哪些queue
表达式符号说明:#代表一个或多个字符,*代表任何字符
例:#.a会匹配a.a,aa.a,aaa.a等
*.a会匹配a.a,b.a,c.a等
注:使用RoutingKey为#,Exchange Type为topic的时候相当于使用fanout
① fanout接收所有广播:广播表示当前消息是实时的,如果没有一个消费者在接受消息,消息就会丢弃,在这里消费者的no_ack已经无用,因为fanout不会管你处理消息结束没有,发过的消息不会重发,记住广播是实时的
#!/usr/bin/env python

# -*- coding:utf-8 -*-

#-Author-Lian

import pika

import sys

connection = pika.BlockingConnection(pika.ConnectionParameters(

    host='localhost'))

channel = connection.channel()

channel.exchange_declare(exchange='logs',

                         type='fanout')

message = "info: Hello World!"

channel.basic_publish(exchange='logs',

                      routing_key='',   #广播不用声明queue

                      body=message)

print(" [x] Sent %r" % message)

connection.close()
publish.py
#!/usr/bin/env python

# -*- coding:utf-8 -*-

#-Author-Lian

import pika

connection = pika.BlockingConnection(pika.ConnectionParameters(

    host='localhost'))

channel = connection.channel()

channel.exchange_declare(exchange='logs',

                         type='fanout')

result = channel.queue_declare(exclusive=True)  # 不指定queue名字,rabbit会随机分配一个名字,

                                                # exclusive=True会在使用此queue的消费者断开后,自动将queue删除

queue_name = result.method.queue

channel.queue_bind(exchange='logs',         # 绑定转发器,收转发器上面的数据

                   queue=queue_name)

print(' [*] Waiting for logs. To exit press CTRL+C')

def callback(ch, method, properties, body):

    print(" [x] %r" % body)

channel.basic_consume(callback,

                      queue=queue_name,

                      no_ack=True)

channel.start_consuming()
consume.py
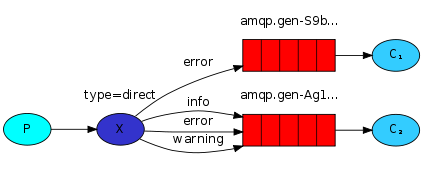
② 有选择的接收消息 direct: 同fanout一样,指定exchange及routingkey;消费端声明queue断开后不自动销毁,no_ack设置为Flase ,消息不会丢失,再次连接消息重新消费
RabbitMQ还支持根据关键字发送,即:队列绑定关键字,发送者将数据根据关键字发送到消息exchange,exchange根据 关键字 判定应该将数据发送至指定队列
import pika

import sys

connection = pika.BlockingConnection(pika.ConnectionParameters(

        host='localhost'))

channel = connection.channel()

channel.exchange_declare(exchange='direct_logs',

                         type='direct')

severity = sys.argv[1] if len(sys.argv) > 1 else 'info'

message = ' '.join(sys.argv[2:]) or 'Hello World!'

channel.basic_publish(exchange='direct_logs',

                      routing_key=severity,

                      body=message)

print(" [x] Sent %r:%r" % (severity, message))

connection.close()
publish.py
import pika

import sys

connection = pika.BlockingConnection(pika.ConnectionParameters(

        host='localhost'))

channel = connection.channel()

channel.exchange_declare(exchange='direct_logs',

                         type='direct')

result = channel.queue_declare(exclusive=True)

queue_name = result.method.queue

severities = sys.argv[1:]

if not severities:

    sys.stderr.write("Usage: %s [info] [warning] [error]\n" % sys.argv[0])

    sys.exit(1)

for severity in severities:

    channel.queue_bind(exchange='direct_logs',

                       queue=queue_name,

                       routing_key=severity)

print(' [*] Waiting for logs. To exit press CTRL+C')

def callback(ch, method, properties, body):

    print(" [x] %r:%r" % (method.routing_key, body))

channel.basic_consume(callback,

                      queue=queue_name,

                      no_ack=True)

channel.start_consuming()
consume.py
③ 更细致的消息过滤 topic:
Although using the direct exchange improved our system, it still has limitations - it can't do routing based on multiple criteria.
In our logging system we might want to subscribe to not only logs based on severity, but also based on the source which emitted the log. You might know this concept from the syslog unix tool, which routes logs based on both severity (info/warn/crit...) and facility (auth/cron/kern...).
That would give us a lot of flexibility - we may want to listen to just critical errors coming from 'cron' but also all logs from 'kern'

import pika

import sys

connection = pika.BlockingConnection(pika.ConnectionParameters(

        host='localhost'))

channel = connection.channel()

channel.exchange_declare(exchange='topic_logs',

                         type='topic')

routing_key = sys.argv[1] if len(sys.argv) > 1 else 'anonymous.info'

message = ' '.join(sys.argv[2:]) or 'Hello World!'

channel.basic_publish(exchange='topic_logs',

                      routing_key=routing_key,

                      body=message)

print(" [x] Sent %r:%r" % (routing_key, message))

connection.close()
publish.py
import pika

import sys

connection = pika.BlockingConnection(pika.ConnectionParameters(

        host='localhost'))

channel = connection.channel()

channel.exchange_declare(exchange='topic_logs',

                         type='topic')

result = channel.queue_declare(exclusive=True)

queue_name = result.method.queue

binding_keys = sys.argv[1:]

if not binding_keys:

    sys.stderr.write("Usage: %s [binding_key]...\n" % sys.argv[0])

    sys.exit(1)

for binding_key in binding_keys:

    channel.queue_bind(exchange='topic_logs',

                       queue=queue_name,

                       routing_key=binding_key)

print(' [*] Waiting for logs. To exit press CTRL+C')

def callback(ch, method, properties, body):

    print(" [x] %r:%r" % (method.routing_key, body))

channel.basic_consume(callback,

                      queue=queue_name,

                      no_ack=True)

channel.start_consuming()
consume.py
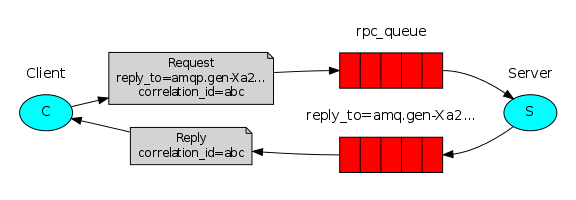
RPC(Remote procedure call )双向通信
To illustrate how an RPC service could be used we're going to create a simple client class. It's going to expose a method named call which sends an RPC request and blocks until the answer is received:
rpc client:
#!/usr/bin/env python

# -*- coding:utf-8 -*-

#-Author-Lian

import pika

import uuid,time

class FibonacciRpcClient(object):

    def __init__(self):

        self.connection = pika.BlockingConnection(pika.ConnectionParameters(

            host='localhost'))

        self.channel = self.connection.channel()

        result = self.channel.queue_declare(exclusive=True)

        self.callback_queue = result.method.queue

        self.channel.basic_consume(self.on_response, #只要收到消息就执行on_response

                                   no_ack=True,     #不用ack确认

                                   queue=self.callback_queue)

    def on_response(self, ch, method, props, body):

        if self.corr_id == props.correlation_id:    #验证码核对

            self.response = body

    def call(self, n):

        self.response = None

        self.corr_id = str(uuid.uuid4())

        print(self.corr_id)

        self.channel.basic_publish(exchange='',

                                   routing_key='rpc_queue',

                                   properties=pika.BasicProperties(

                                       reply_to=self.callback_queue,    #发送返回信息的队列name

                                       correlation_id=self.corr_id,     #发送uuid 相当于验证码

                                   ),

                                   body=str(n))

        while self.response is None:

            self.connection.process_data_events()   #非阻塞版的start_consuming

            print("no messages")

            time.sleep(0.5)     #测试

        return int(self.response)

fibonacci_rpc = FibonacciRpcClient()    #实例化

print(" [x] Requesting fib(30)")

response = fibonacci_rpc.call(30)       #执行call方法

print(" [.] Got %r" % response)
rpc server:
#!/usr/bin/env python

# -*- coding:utf-8 -*-

#-Author-Lian

import pika

import time

connection = pika.BlockingConnection(pika.ConnectionParameters(

    host='localhost'))

channel = connection.channel()

channel.queue_declare(queue='rpc_queue')

def fib(n):

    if n == 0:

        return 0

    elif n == 1:

        return 1

    else:

        return fib(n - 1) + fib(n - 2)

def on_request(ch, method, props, body):

    n = int(body)

    print(" [.] fib(%s)" % n)

    response = fib(n)

    ch.basic_publish(exchange='',

                     routing_key=props.reply_to,    #回信息队列名

                     properties=pika.BasicProperties(correlation_id=

                                                         props.correlation_id),

                     body=str(response))

    ch.basic_ack(delivery_tag=method.delivery_tag)

#channel.basic_qos(prefetch_count=1)

channel.basic_consume(on_request,

                      queue='rpc_queue')

print(" [x] Awaiting RPC requests")

channel.start_consuming()
Python开发【十一章】:RabbitMQ队列的更多相关文章
- 路飞学城-Python开发-第一章
# 基础需求: # 让用户输入用户名密码 # 认证成功后显示欢迎信息 # 输错三次后退出程序 username = 'pandaboy' password = ' def Login(username ...
- Python第十一章-常用的核心模块01-collections模块
python 自称 "Batteries included"(自带电池, 自备干粮?), 就是因为他提供了很多内置的模块, 使用这些模块无需安装和配置即可使用. 本章主要介绍 py ...
- Python第十一章-常用的核心模块03-json模块
python 自称 "Batteries included"(自带电池, 自备干粮?), 就是因为他提供了很多内置的模块, 使用这些模块无需安装和配置即可使用. 本章主要介绍 py ...
- Python第十一章-常用的核心模块04-datetime模块
python 自称 "Batteries included"(自带电池, 自备干粮?), 就是因为他提供了很多内置的模块, 使用这些模块无需安装和配置即可使用. 本章主要介绍 py ...
- 流畅的python第十一章接口学习记录
鸭子协议(忽略对象真正类型,转而关注对象有没有实现所需的方法,签名和语义) 标准库中的抽象基类 collections.abc模块中的抽象基类 抽象方法是抽象基类中用来强制子类必须实现的方法,如果子类 ...
- 路飞学城-Python开发-第二章
''' 数据结构: menu = { '北京':{ '海淀':{ '五道口':{ 'soho':{}, '网易':{}, 'google':{} }, '中关村':{ '爱奇艺':{}, '汽车之家' ...
- python开发笔记-连接rabbitmq异常问题unacked处理
待补充 思路:捕获程序处理异常,异常情况下,也给队列生产者返回“确认”消息
- 进击的Python【第十一章】:消息队列介绍、RabbitMQ&Redis的重点介绍与简单应用
消息队列介绍.RabbitMQ.Redis 一.什么是消息队列 这个概念我们百度Google能查到一大堆文章,所以我就通俗的讲下消息队列的基本思路. 还记得原来写过Queue的文章,不管是线程queu ...
- 第二百九十二节,RabbitMQ多设备消息队列-Python开发
RabbitMQ多设备消息队列-Python开发 首先安装Python开发连接RabbitMQ的API,pika模块 pika模块为第三方模块 对于RabbitMQ来说,生产和消费不再针对内存里的一 ...
随机推荐
- 【Android】命令行jarsigner签字和解决找不到证书链错误
1.签名失败 $jarsigner -verbose -keystore /Volumes/Study/resourcesLib/Qunero-achivements/AndroidApp/QuLor ...
- Oracle 11g新特性延迟段创建和truncate的增强
下面测试Oracle 11g开始的新特性truncate的增强和延迟段空间创建. Oracle从11g开始,当用户创建一张空表的时候不会先分配段和空间,只有当对这张表插入第一行数据的时候才分配段和空间 ...
- 几种服务器端IO模型的简单介绍及实现
一些概念: 同步和异步 同步和异步是针对应用程序和内核的交互而言的,同步指的是用户进程触发I/O操作并等待或者轮询的去查看I/O操作是否就绪,而异步是指用户进程触发I/O操作以后便开始做自己的事情,而 ...
- VS2015 自动添加头部注释
让VS自动生成类的头部注释,只需修改两个文集即可,一下两个路径下个有一个 Class.cs文件 D:\Program Files (x86)\Microsoft Visual Studio 14.0\ ...
- ASP.NET4.5Web API及非同步程序开发系列(1)
认识非同步程序开发设计模型 从VS2012开始引入的新的非同步程序设计的支持-------async/await设计模型 之前的当我们支持非同步作业的时候,往往使用多线程开解决,我们比较熟悉的就是 执 ...
- Android客户端性能优化(魅族资深工程师毫无保留奉献)
本文由魅族科技有限公司资深Android开发工程师degao(嵌入式企鹅圈原创团队成员)撰写,是degao在嵌入式企鹅圈发表的第一篇原创文章,毫无保留地总结分享其在领导魅族多个项目开发中的Androi ...
- 【CentOS】学习Bash
一.特性 命令历史 history , !! , !$ , !字符 , !n (n为第几条命令) Tab可以补全文件路径或者命令 alias a="b", unalias a ...
- ContentControl与ContentPresenter区别?
<TextBlock HorizontalAlignment="Left" Text="{Binding HwContent, Converter={StaticR ...
- jQuery插件(拖拽)
拖曳插件draggable的功能是拖动被绑定的元素,当这个jQuery UI插件与元素绑定后,可以通过调用draggable()方法,实现各种拖曳元素的效果,调用格式如下: $(selector). ...
- SpringMVC注解@RequestMapping全面解析---打酱油的日子
@RequestMapping 可以出现在类级别上,也可以出现在方法上.如果出现在类级别上,那请求的 url 为 类级别上的@RequestMapping + 方法级别上的 @RequestMappi ...