
Jumpserver简介,部署使用
Jumpserver简介
Jumpserver 是一款使用 Python, Django 开发的开源跳板机系统, 为亏联网企业提供了认证,授权,审计,自动化运维等功能,基于ssh协议来管理,客户端无需安装agent。
jumpserver功能特点
/*

	1. 完全开源,GPL授权

	2. Python编写,容易二开

	3. 实现了跳板机基本功能,身份认证、访问控制、授权、审计、批量操作等。

	4. 集成了Ansible,批量命令等

	5. 支持WebTerminal

	6. Bootstrap编写,界面美观

	7. 自动收集硬件信息

	8. 录像回放

	9. 命令搜索

	10. 实时监控

	11. 批量上传下载

*/
主要组件
JumpServer 为管理后台, 管理员可以通过 Web 页面进行资产管理、用户管理、资产授权等操作, 用户可以通过 Web 页面进行资产登录, 文件管理等操作
1.koko 为 SSH Server 和 Web Terminal Server 。用户可以使用自己的账户通过 SSH 或者 Web Terminal 访问 SSH 协议和 Telnet 协议资产
2.Luna 为 Web Terminal Server 前端页面, 用户使用 Web Terminal 方式登录所需要的组件
3.Guacamole 为 RDP 协议和 VNC 协议资产组件, 用户可以通过 Web Terminal 来连接 RDP 协议和 VNC 协议资产 (暂时只能通过 Web Terminal 来访问)
部署
安装jumpserver 3.0版本,相对于jumpserver 2.0版本,在新的版本3.0中取消了LDAP授权,取而代之的是ssh进行推送;界面也有所变化,功能更完善,安装更简单。
初始化
#!/usr/bin/env bash

# Author: ZhouJian

# Mail: 18621048481@163.com

# Time: 2019-9-3

# Describe: CentOS 7 Initialization Script

clear

echo -ne "\\033[0;33m"

cat<<EOT

                                  _oo0oo_

                                 088888880

                                 88" . "88

                                 (| -_- |)

                                  0\\ = /0

                               ___/'---'\\___

                             .' \\\\\\\\|     |// '.

                            / \\\\\\\\|||  :  |||// \\\\

                           /_ ||||| -:- |||||- \\\\

                          |   | \\\\\\\\\\\\  -  /// |   |

                          | \\_|  ''\\---/''  |_/ |

                          \\  .-\\__  '-'  __/-.  /

                        ___'. .'  /--.--\\  '. .'___

                     ."" '<  '.___\\_<|>_/___.' >'  "".

                    | | : '-  \\'.;'\\ _ /';.'/ - ' : | |

                    \\  \\ '_.   \\_ __\\ /__ _/   .-' /  /

                ====='-.____'.___ \\_____/___.-'____.-'=====

                                  '=---='

              ^^^^^^^^^^^^^^^^^^^^^^^^^^^^^^^^^^^^^^^^^^^^^^^^

                建议系统                    CentOS7

              ^^^^^^^^^^^^^^^^^^^^^^^^^^^^^^^^^^^^^^^^^^^^^^^^

EOT

echo -ne "\\033[m"

init_hostname() {

while read -p "请输入您想设定的主机名:" name

do

	if [ -z "$name" ];then

		echo -e "\033[31m 您没有输入内容,请重新输入 \033[0m"

		continue

	fi

	read -p "您确认使用该主机名吗?[y/n]: " var

	if [ $var == 'y' -o $var == 'yes' ];then

		hostnamectl set-hostname $name

		break

	fi

done

}

init_security() {

systemctl stop firewalld

systemctl disable firewalld &>/dev/null

setenforce 0

sed -i '/^SELINUX=/ s/enforcing/disabled/'  /etc/selinux/config

sed -i '/^GSSAPIAu/ s/yes/no/' /etc/ssh/sshd_config

sed -i '/^#UseDNS/ {s/^#//;s/yes/no/}' /etc/ssh/sshd_config

systemctl enable sshd crond &> /dev/null

echo -e "\033[32m [安全配置] ==> OK \033[0m"

}

init_yumsource() {

if [ ! -d /etc/yum.repos.d/backup ];then

	mkdir /etc/yum.repos.d/backup

fi

mv /etc/yum.repos.d/* /etc/yum.repos.d/backup 2>/dev/null

if ! ping -c 2 baidu.com &>/dev/null

then

	echo "您无法上外网,不能配置yum源"

	exit

fi

	curl -o /etc/yum.repos.d/163.repo http://mirrors.163.com/.help/CentOS7-Base-163.repo &>/dev/null

	curl -o /etc/yum.repos.d/epel.repo http://mirrors.aliyun.com/repo/epel-7.repo &>/dev/null

timedatectl set-timezone Asia/Shanghai

echo "nameserver 114.114.114.114" > /etc/resolv.conf

echo "nameserver 8.8.8.8" >> /etc/resolv.conf

chattr +i /etc/resolv.conf

echo -e "\033[32m [YUM Source] ==> OK \033[0m"

}

init_install_package() {

echo -e "\033[32m 安装系统需要的软件,请稍等~ ~ ~ \033[0m"

yum -y install lsof tree wget vim  bash-completion lftp bind-utils  &>/dev/null

yum -y install atop htop nethogs net-tools libcurl-devel libxml2-devel openssl-devel unzip  psmisc ntpdate nslookup &>/dev/null

echo -e "\033[32m [安装常用工具] ==> OK \033[0m"

}

init_kernel_parameter() {

cat > /etc/sysctl.conf <<EOF

fs.file-max = 999999

kernel.sysrq = 0

kernel.core_uses_pid = 1

kernel.msgmnb = 65536

kernel.msgmax = 65536

kernel.shmmax = 68719476736

kernel.shmall = 4294967296

net.ipv6.conf.all.disable_ipv6 = 1

net.ipv6.conf.default.disable_ipv6 = 1

net.ipv4.icmp_echo_ignore_broadcasts = 1

net.ipv4.icmp_ignore_bogus_error_responses = 1

net.ipv4.ip_forward = 0

net.ipv4.conf.all.send_redirects = 0

net.ipv4.conf.default.send_redirects = 0

net.ipv4.conf.all.rp_filter = 1

net.ipv4.conf.default.rp_filter = 1

net.ipv4.conf.all.accept_source_route = 0

net.ipv4.conf.default.accept_source_route = 0

net.ipv4.tcp_syncookies = 1

net.ipv4.tcp_max_tw_buckets = 6000

net.ipv4.tcp_sack = 1

net.ipv4.tcp_window_scaling = 1

net.ipv4.tcp_rmem = 4096 87380 4194304

net.ipv4.tcp_wmem = 4096 16384 4194304

net.ipv4.tcp_max_orphans = 3276800

net.ipv4.tcp_max_syn_backlog = 262144

net.ipv4.tcp_timestamps = 0

net.ipv4.tcp_synack_retries = 1

net.ipv4.tcp_syn_retries = 1

net.ipv4.tcp_tw_recycle = 1

net.ipv4.tcp_tw_reuse = 1

net.ipv4.tcp_mem = 94500000 915000000 927000000

net.ipv4.tcp_fin_timeout = 1

net.ipv4.tcp_keepalive_time = 30

net.ipv4.ip_local_port_range = 1024 65000

net.ipv4.conf.all.accept_redirects = 0

net.ipv4.conf.default.accept_redirects = 0

net.ipv4.conf.all.secure_redirects = 0

net.ipv4.conf.default.secure_redirects = 0

net.core.wmem_default = 8388608

net.core.rmem_default = 8388608

net.core.rmem_max = 16777216

net.core.wmem_max = 16777216

net.core.netdev_max_backlog = 262144

vm.swappiness = 10

EOF

sysctl -p /etc/sysctl.conf >/dev/null 2>&1

echo -e "\033[32m [内核 优化] ==> OK \033[0m"

}

# **************************************************

init_system_limit() {

cat >> /etc/security/limits.conf <<EOF

* soft nproc 65530

* hard nproc 65530

* soft nofile 65530

* hard nofile 65530

EOF

ulimit -n 65535

ulimit -u 20480

echo -e "\033[32m [ulimits 配置] ==> OK \033[0m"

cat >> /etc/profile <<EOF

export HISTTIMEFORMAT="%Y-%m-%d %H:%M:%S "

EOF

source /etc/profile

}

main() {

init_hostname

init_security

init_yumsource

init_install_package

init_kernel_parameter

init_system_limit

}

main
修改字符集
localedef -c -f UTF-8 -i zh_CN zh_CN.UTF-8

export LC_ALL=zh_CN.UTF-8

echo 'LANG="zh_CN.UTF-8"' > /etc/locale.conf
安装基础包和依赖
yum -y install wget vim lrzsz xz gcc git epel-release python-pip python-devel mysql-devel automake autoconf sqlite-devel zlib-devel openssl-devel sshpass readline-devel

yum -y install python36 python36-devel

cd /opt

python3.6 -m venv py3

source /opt/py3/bin/activate
安装Jumpserver
git clone --depth=1 https://github.com/jumpserver/jumpserver.git

cd /opt/jumpserver/requirements

yum -y install $(cat rpm_requirements.txt)

pip install -r requirements.txt -i https://mirrors.aliyun.com/pypi/simple/

pip install --upgrade pip setuptools

pip install -r requirements.txt
安装redis
(py3) [root@kvm-47 requirements]#  yum -y install redis

(py3) [root@kvm-47 requirements]# systemctl enable redis && systemctl start redis
安装Mysql
(py3) [root@kvm-47 requirements]#  yum -y install mariadb mariadb-devel mariadb-server

(py3) [root@kvm-47 requirements]# systemctl enable mariadb &&  systemctl start mariadb

(py3) [root@kvm-47 jumpserver]# mysqladmin -u root password 'ZHOUjian.20'

(py3) [root@kvm-47 jumpserver]# DB_PASSWORD=`cat /dev/urandom | tr -dc A-Za-z0-9 | head -c 24`

(py3) [root@kvm-47 jumpserver]# echo $DB_PASSWORD

hDh4XtVKUxsRUPwYdEFznKTK

(py3) [root@kvm-47 jumpserver]# mysql -uroot -pZHOUjian.20 -e "create database jumpserver default charset 'utf8'; grant all on jumpserver.* to 'jumpserver'@'127.0.0.1' identified by '$DB_PASSWORD'; flush privileges;"
配置jumpserver
(py3) [root@kvm-47 requirements]# cd /opt/jumpserver/

(py3) [root@kvm-47 jumpserver]# ls

apps                docs           logs          run_server.py

config_example.yml  entrypoint.sh  README_EN.md  tmp

data                jms            README.md     utils

Dockerfile          LICENSE        requirements  Vagrantfile

(py3) [root@kvm-47 jumpserver]# cp config_example.yml config.yml

SECRET_KEY=`cat /dev/urandom | tr -dc A-Za-z0-9 | head -c 50`

echo "SECRET_KEY=$SECRET_KEY" >> ~/.bashrc

BOOTSTRAP_TOKEN=`cat /dev/urandom | tr -dc A-Za-z0-9 | head -c 16`

echo "BOOTSTRAP_TOKEN=$BOOTSTRAP_TOKEN" >> ~/.bashrc

sed -i "s/SECRET_KEY:/SECRET_KEY: $SECRET_KEY/g" /opt/jumpserver/config.yml

sed -i "s/BOOTSTRAP_TOKEN:/BOOTSTRAP_TOKEN: $BOOTSTRAP_TOKEN/g" /opt/jumpserver/config.yml

sed -i "s/# DEBUG: true/DEBUG: false/g" /opt/jumpserver/config.yml

sed -i "s/# LOG_LEVEL: DEBUG/LOG_LEVEL: ERROR/g" /opt/jumpserver/config.yml

sed -i "s/# SESSION_EXPIRE_AT_BROWSER_CLOSE: false/SESSION_EXPIRE_AT_BROWSER_CLOSE: true/g" /opt/jumpserver/config.yml

sed -i "s/DB_PASSWORD: /DB_PASSWORD: $DB_PASSWORD/g" /opt/jumpserver/config.yml
启动关闭jumpservere
(py3) [root@kvm-47 jumpserver]# cd /opt/jumpserver/

(py3) [root@kvm-47 jumpserver]# ./jms start all -d

(py3) [root@kvm-47 jumpserver]# ./jms stop
部署coco
支持终端管理,默认port为2222
手动部署
cd /opt

git clone --depth=1 https://github.com/jumpserver/coco.git

cd /opt/coco/requirements

pip install --upgrade pip

pip install -r requirements.txt

yum -y install $(cat rpm_requirements.txt)

pip install --upgrade pip setuptools==45.2.0

pip install -r requirements.txt -i https://mirrors.aliyun.com/pypi/simple/

cd /opt/coco

cp config_example.yml config.yml

sed -i "s/BOOTSTRAP_TOKEN: <PleasgeChangeSameWithJumpserver>/BOOTSTRAP_TOKEN: $BOOTSTRAP_TOKEN/g" /opt/coco/config.yml

sed -i "s/# LOG_LEVEL: INFO/LOG_LEVEL: ERROR/g" /opt/coco/config.yml

./cocod start -d
部署luna
与nginx结合支持Web Terminal前端
cd /opt

wget https://github.com/jumpserver/luna/releases/download/1.4.10/luna.tar.gz

tar xf luna.tar.gz

chown -R root:root luna
配置nginx
vi /etc/yum.repos.d/nginx.repo

[nginx-stable]

name=nginx stable repo

baseurl=http://nginx.org/packages/centos/$releasever/$basearch/

gpgcheck=1

enabled=1

gpgkey=https://nginx.org/keys/nginx_signing.key

yum install -y nginx

yum makecache fast

systemctl enable nginx

rm -rf /etc/nginx/conf.d/default.conf

cd /etc/nginx/

sed -i '/^ *#/d'  nginx.conf

sed -ri '/^[[:space:]]*(#|$)/d'  nginx.conf

server {

    listen 80;

    client_max_body_size 100m;  # 录像及文件上传大小限制

    location /luna/ {

        try_files $uri / /index.html;

        alias /opt/luna/;  # luna 路径, 如果修改安装目录, 此处需要修改

    }

    location /media/ {

        add_header Content-Encoding gzip;

        root /opt/jumpserver/data/;  # 录像位置, 如果修改安装目录, 此处需要修改

    }

    location /static/ {

        root /opt/jumpserver/data/;  # 静态资源, 如果修改安装目录, 此处需要修改

    }

    location /socket.io/ {

        proxy_pass       http://localhost:5000/socket.io/;

        proxy_buffering off;

        proxy_http_version 1.1;

        proxy_set_header Upgrade $http_upgrade;

        proxy_set_header Connection "upgrade";

        proxy_set_header X-Real-IP $remote_addr;

        proxy_set_header Host $host;

        proxy_set_header X-Forwarded-For $proxy_add_x_forwarded_for;

        access_log off;

    }

    location /coco/ {

        proxy_pass       http://localhost:5000/coco/;

        proxy_set_header X-Real-IP $remote_addr;

        proxy_set_header Host $host;

        proxy_set_header X-Forwarded-For $proxy_add_x_forwarded_for;

        access_log off;

    }

    location /guacamole/ {

        proxy_pass       http://localhost:8081/;

        proxy_buffering off;

        proxy_http_version 1.1;

        proxy_set_header Upgrade $http_upgrade;

        proxy_set_header Connection $http_connection;

        proxy_set_header X-Real-IP $remote_addr;

        proxy_set_header Host $host;

        proxy_set_header X-Forwarded-For $proxy_add_x_forwarded_for;

        access_log off;

    }

    location / {

        proxy_pass http://localhost:8080;

        proxy_set_header X-Real-IP $remote_addr;

        proxy_set_header Host $host;

        proxy_set_header X-Forwarded-For $proxy_add_x_forwarded_for;

    }

}
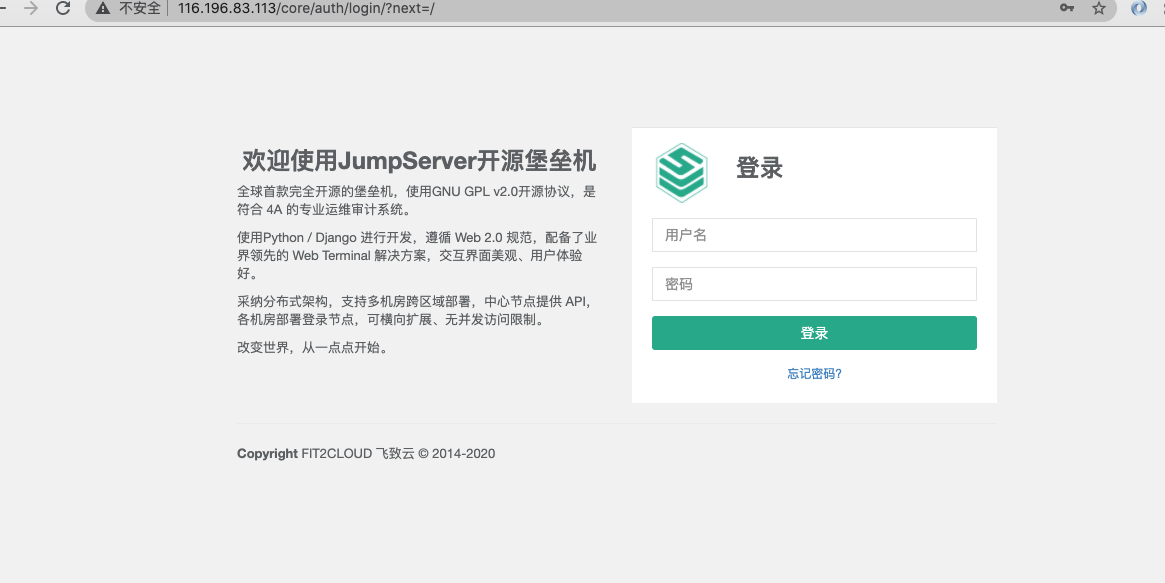
登录测试
# 检查应用是否已经正常运行

# 服务全部启动后, 访问 jumpserver 服务器 nginx 代理的 80 端口, 不要通过8080端口访问

# 默认账号: admin 密码: admin
Jumpserver简介,部署使用的更多相关文章
- Jumpserver 一键部署(支持离线安装)
1.教程介绍1.1::通过本教程起到抛砖引玉效果,希望各位喜爱Jumpserver堡垒机的朋友受益良多. 1.2::以下提供的任何软件仅供学习交流使用. 2.下载链接2.1::centos_1810最 ...
- 01 . Go框架之Beego简介部署及程序流程分析
Beego简介 beego是一个使用Go语言来开发WEB引用的GoWeb框架,该框架起始于2012年,由一位中国的程序员编写并进行公开,其目的就是为大家提供一个高效率的web应用开发框架.该框架采用模 ...
- 01 . OpenResty简介部署,优缺点,压测,适用场景及用Lua实现服务灰度发布
简介 OpenResty 是一个基于 Nginx 与 Lua 的高性能 Web 平台,其内部集成了大量精良的 Lua 库.第三方模块以及大多数的依赖项.用于方便地搭建能够处理超高并发.扩展性极高的动态 ...
- day131:2RenMJ:2RenMJ游戏简介&部署MJ项目到本地
目录 1.游戏简介 1.如何做出一款麻将游戏? 2.麻将运行界面 3.麻将项目所用技术快速概览 4.web开发 / 游戏开发 / APP开发 比较 5.firefly游戏框架介绍 2.部署麻将项目到本 ...
- tomcat -> 简介&部署
Tomcat 简介 Tomcat是Apache软件基金会(Apache Software Foundation)的Jakarta 项目中的一个核心项目,由Apache.Sun和其他一些公司及个人共同开 ...
- Centos6.8部署jumpserver(完整版)
环境: 系统 Centos6.8 IP:192.168.66.131 关闭selinux和防火墙 # 修改字符集,否则可能报 input/output error的问题,因为日志里打印了中文 # lo ...
- 快速部署jumpserver堡垒机
jumpserver版本:Version 1.4.1-2 (社区版) 主机IP地址:10.0.0.105 准备环境1.安装依赖yum -y install wget sqlite-devel xz g ...
- centos7 jumpserver 部署和使用手册(二)
前面已经介绍了jumpserver的部署,基于这篇部署文档,下面介绍下部署完成后的的功能使用: 一.系统设置 1.1根据提供的帐号密码(admin/admin)登录jumpserver 修改 url ...
- centos7 jumpserver 部署和使用手册(一)
测试推荐环境 CPU: 64位双核处理器 内存: 4G DDR3 数据库:mysql 版本大于等于 5.6 mariadb 版本大于等于 5.5.6 环境 系统: CentOS 7.2 IP: 192 ...
随机推荐
- mapreduce的一些简单使用
一.键值对RDD的创建 1.从文件中加载 /opt目录下创建wordky.txt文件. wordky.txt文件中输入以下三行字符: Hadoop is good Spark is fast Spar ...
- 实验1:Mininet源码安装和可视化拓扑工具
一.实验目的 掌握 Mininet 的源码安装方法和 miniedit 可视化拓扑生成工具. 二.实验任务 使用源码安装 Mininet 的 2.3.0d6 版本,并使用可视化拓扑工具生成一个最简拓扑 ...
- 栈和队列数据结构的基本概念及其相关的Python实现
先来回顾一下栈和队列的基本概念: 相同点:从"数据结构"的角度看,它们都是线性结构,即数据元素之间的关系相同. 不同点:栈(Stack)是限定只能在表的一端进行插入和删除操作的线性 ...
- 【题解】CF375D Tree and Queries
Link \(\text{Solution:}\) 讲实话这题有点烦,不知道为啥改了下\(\text{dfs}\)就过了--原版本\(dfs\)好像没啥错啊-- 其实对于子树问题,我们求出原来树的\( ...
- [转载]volitale关键字详解
来看这个代码: int fun(int& a) { int b = a; int c = a; return a+b+c; } int main() { int a=1; //........ ...
- springboot2.2.2企业级项目整合redis与redis 工具类大全
1.springboot2.2.2整合redis教程很多,为此编写了比较完整的redis工具类,符合企业级开发使用的工具类 2.springboot与redis maven相关的依赖 <depe ...
- html学习(1)
认识html标签 1.<h1></h1>就是标题标签,<p></p>是段落标签,img是图片标签. 2.html中的标签一般都是成对出现的,分开始标签 ...
- Elasticsearch索引的操作,利用kibana 创建/删除一个es的索引及mapping映射
索引的创建及删除 1. 通过索引一篇文档创建了一个新的索引 .这个索引采用的是默认的配置,新的字段通过动态映射的方式被添加到类型映射. 利用Kibana提供的DevTools来执行命令,要创建一个索引 ...
- go 下载图片
package main import ( "net/http" "fmt" "io/ioutil" "strings" ...
- centos8平台mysql日志的按天切分
一,mysqladmin使用flush-logs的文档: mysql8官网上面针对mysqladmin的文档地址 https://dev.mysql.com/doc/refman/8.0/en/mys ...