为树莓派3B添加LCD1602液晶屏
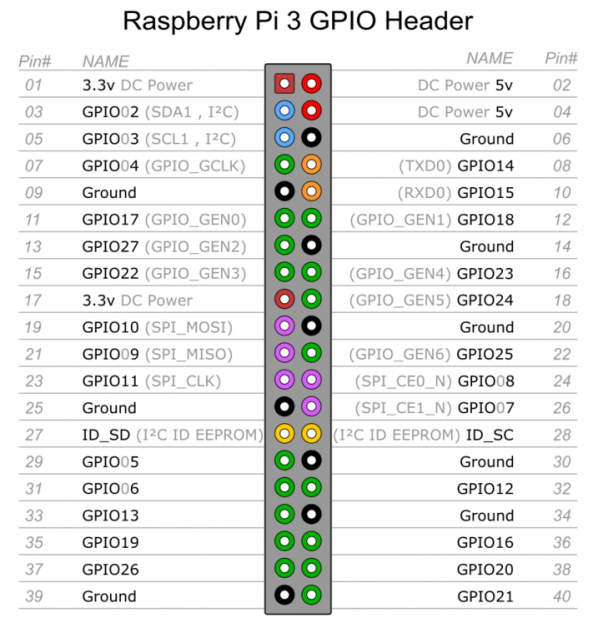
树莓派3B针脚说明
LCD1602接线说明
VSS,接地
VDD,接5V电源
VO,液晶对比度调节,接电位器中间的引脚,电位器两边的引脚分别接5V和接地。
RS,寄存器选择,接GPIO14
RW,读写选择,接地,表示写模式
EN,使能信号,接GPIO15
D0,数据位0,4位工作模式下不用,不接
D1,数据位1,4位工作模式下不用,不接
D2,数据位2,4位工作模式下不用,不接
D3,数据位3,4位工作模式下不用,不接
D4,数据位4,接GPIO17
D5,数据位5,接GPIO18
D6,数据位6,接GPIO27
D7,数据位7,接GPIO22
A,液晶屏背光+,接5V
K,液晶屏背光-,接地
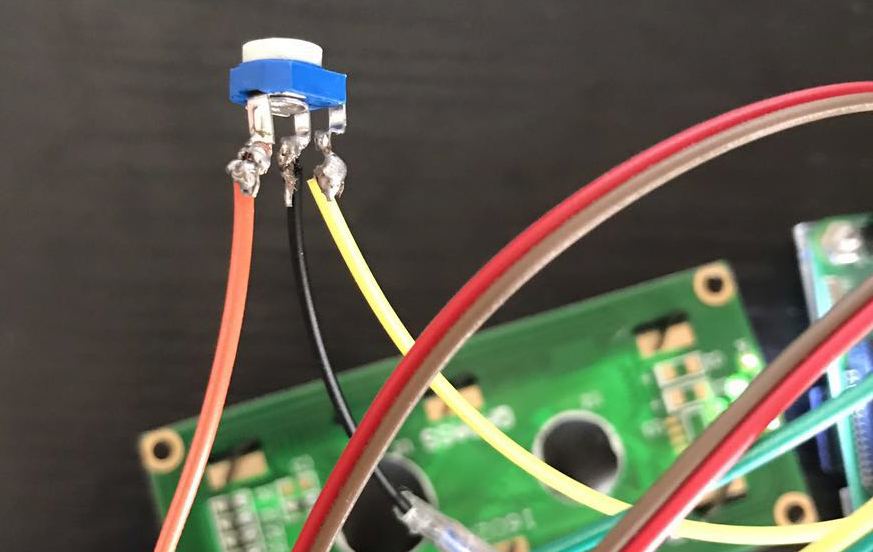
调整电位器
因为缺少1个5V的线,直接破皮拧一根进去就行,电位器调整到屏幕显示正常的对比度即可,第一次玩烙铁,焊的略丑…
lcd1602.py
#!/usr/bin/python |
1602.py
#!/usr/bin/python |
将以上两个文件保存在同一个目录下,运行1602.py即可打印信息到LCD上。
效果图

参考链接
http://www.cnblogs.com/xiaowuyi/p/4051238.html
https://www.6zou.net/tech/raspberry-pi-lcd1602-system-monitor.html
为树莓派3B添加LCD1602液晶屏的更多相关文章
- 树莓派3b添加python时间同步脚本
树莓派没有电池,因此断电后系统时间会停止,直到你开机后又继续计时,所以会造成系统时间和实际时间有很大的误差. 因为项目需要用到本地时间,精度要求不高不想折腾(如果需要高精度,需要安装ntp),所以考虑 ...
- [记录]学习树莓派3B接DHT11和LCD1602和修改树莓派时区
前提 树莓派系统安装好 apache web 服务器,如未安装,可在树莓派内执行sudo apt-get install apache2 进行安装apache 也可以通过命令获取GPIO信息: gpi ...
- 使用Python控制1602液晶屏实时显示时间(附PyCharm远程调试)
前言 原创文章,转载引用务必注明链接.水平有限,如有疏漏,欢迎指正. 本文介绍一下UP板的GPIO资源使用,以及一个使用Python演示一个简单的demo. 本文使用Markdown写成,为获得更好的 ...
- 树莓派3b在rt-thread上移植LittlevGL
树莓派3b在rt-thread上移植LittlevGL 目录 树莓派3b在rt-thread上移植LittlevGL 1.本文概述 2.资源准备 3.上手体验 4.rt-thread与lvgl进行无缝 ...
- s3c2440液晶屏驱动 (内核自带) linux-4.1.24
自带有一部分驱动的配置信息,只要修改这部分就能支援 不同的液晶屏 - /arch/arm/mach-s3c24xx/mach-smdk2440.c 另一部分在 /drivers/video/fbdev ...
- 树莓派3B+(一)
第一步:安装raspbian系统 介绍:Raspbian是为树莓派设计,基于Debian的操作系统,由一个小团队开发.其不隶属于树莓派基金会,但被列为官方支持的操作系统. 下载地址:https://w ...
- ARM40-A5应用——fbset与液晶屏参数的适配【转】
转自:https://blog.csdn.net/vonchn/article/details/80784579 ARM40-A5应用——fbset与液晶屏参数的适配 2018.6.18 版权声明:本 ...
- 树莓派3b安装Nginx和php7和百度语音合成模块
1.安装sox系统mp3音频播放模块(项目需要) sudo apt-get install lame sudo apt-get install sox sudo apt-get install lib ...
- 树莓派3B+首次登陆通过网络
树莓派3B+默认串口不能登录,即使可使用可需要通过连线方式连接,如何才能直接通过网络ssh登录树莓派呢? 串口问题及使用 树莓派3的UART串口的使用问题,该串口问题的官方反馈及回复请参考这两篇官方博 ...
随机推荐
- RocketMQ—消息队列入门
消息队列功能介绍 字面上说的消息队列是数据结构中"先进先出"的一种数据结构,但是如果要求消除单点故障,保证消息传输可靠性,应对大流量的冲击,对消息队列的要求就很高了.现在互联网的& ...
- Centos7.4 小白式安装(初学)
虚拟机安装Centos7.4系统 适用人群(初学者) 下载Centos7.4镜像 https://pan.baidu.com/s/1NtjfdHV3OWAvfDj5vrR7HQ 提取码:hzzw 虚 ...
- Linux的环境变量配置在/etc/profile或/etc/profile.d/*.sh文件中的区别是什么?
@ 目录 login shell non-login shell 它们的区别 Linux的环境变量可在多个文件中配置,如/etc/profile,/etc/profile.d/*.sh,~/.bash ...
- Linux网卡没有eth0显示ens33原因以及解决办法
原因 首先说明下eth0与ens33的关系: 目前的主流网卡为使用以太网络协定所开发出来的以太网卡 (Ethernet),因此我们 Linux 就称呼这种网络接口为 ethN (N 为数字). 举例来 ...
- WPF权限控制——【1】界面布局
本来就不怎么喜欢写博客,好不容易申请了博客园的账号,迈出了先前没有跨越的第一步:转眼间几年的时间就过去了,还是空空如也.今天的心境是这样的,发现wpf相关的资料及源码实在不多,就想写下随笔:一方面是自 ...
- git 分支合并时如何忽略某个文件
[转]git 分支合并时如何忽略某个文件 - 神奇的旋风 - 博客园 https://www.cnblogs.com/xuan52rock/p/13268872.html Git - git-merg ...
- 我们都可以把它放 Sidecar 容器中,这样微服务具备了 Super power,一种超能力
云原生时代,微服务如何演进? 原创 李响 阿里技术 2020-08-28 https://mp.weixin.qq.com/s/KQG2U8_aotDL4YFB8ee6Zw 一 微服务架构与云原 ...
- HttpURLConnection下载文件流
package com.loan.modules; import sun.net.www.protocol.file.Handler; import java.io.*; import java.ne ...
- 6.DHCP配置故障转移(Windows2012)
准备: 子网对应核心交换机网关配置多个中继 interface Vlan64 ip address 10.10.64.1 255.255.248.0 ip helper-address 10.10.1 ...
- (15)Linux命令基本格式
1.命令提示符 登录系统后,第一眼看到的内容是: [root@localhost ~]# 这就是 Linux 系统的命令提示符.那么,这个提示符的含义是什么呢? []:这是提示符的分隔符号,没有特殊含 ...