
spring aop 源码分析(三) @Scope注解创建代理对象
一.源码环境的搭建:
@Component

@Scope(scopeName = ConfigurableBeanFactory.SCOPE_SINGLETON,proxyMode = ScopedProxyMode.TARGET_CLASS)

public class MyMath implements Calc{

   public Integer add(int num1,int num2){

        return num1+num2;

    }

}


@Configuration

@ComponentScan("com.yang.xiao.hui.aop")

public class App

{

    public static void main( String[] args )

    {

        ApplicationContext ctx = new AnnotationConfigApplicationContext(App.class);

        MyMath myMath = (MyMath)ctx.getBean("myMath");

        System.out.println(myMath.getClass());

        System.out.println(ctx.getBean("scopedTarget.myMath").getClass());

    }

}
启动main方法:

二.源码分析,先看Scope注解:

scope注解的proxyMode的属性决定了被该注解标注的类是否会被代理,这是一个枚举,有如下几个值:
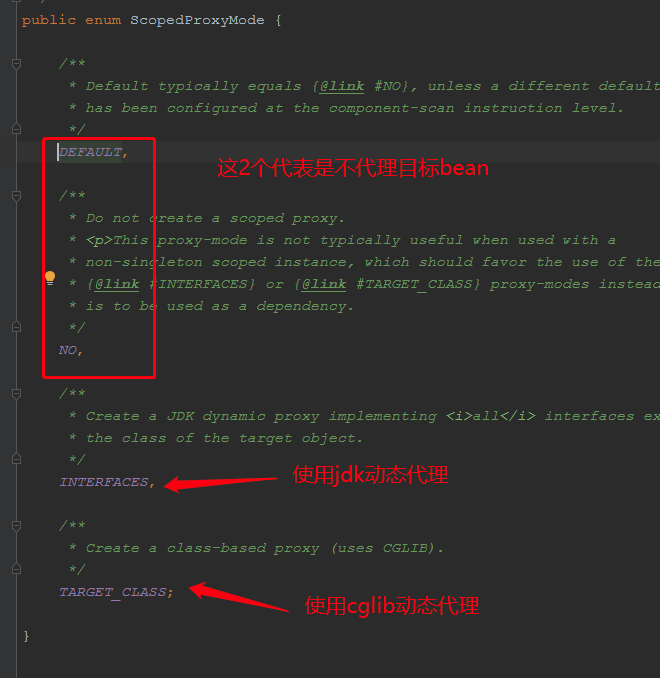
本次测试代码使用的是cglib代理,被Scope标注的对象,如果代理模式是jdk或者cglib代理的话,会在spring容器中产生2个bean,一个是代理的bean,一个是原始的bean,原始的bean的beanName被命名为:scopedTarget.xx:
debug调试:
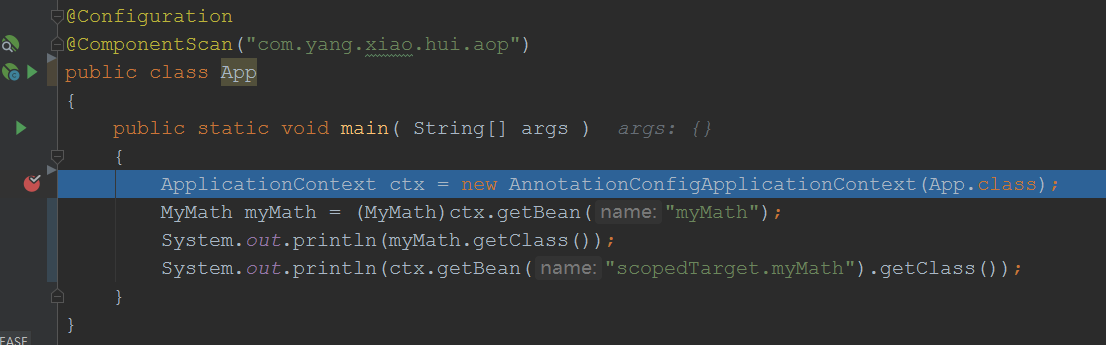

省略n步:

我们在这个方法里面可以看到spring是如何解析主启动类,扫描到其他的bean的:
protected final SourceClass doProcessConfigurationClass(ConfigurationClass configClass, SourceClass sourceClass)

            throws IOException {

        if (configClass.getMetadata().isAnnotated(Component.class.getName())) { //解析Component注解

            // Recursively process any member (nested) classes first

            processMemberClasses(configClass, sourceClass);

        }

        // Process any @PropertySource annotations

        for (AnnotationAttributes propertySource : AnnotationConfigUtils.attributesForRepeatable(

                sourceClass.getMetadata(), PropertySources.class,

                org.springframework.context.annotation.PropertySource.class)) {

            if (this.environment instanceof ConfigurableEnvironment) {

                processPropertySource(propertySource);

            }

            else {

                logger.info("Ignoring @PropertySource annotation on [" + sourceClass.getMetadata().getClassName() +

                        "]. Reason: Environment must implement ConfigurableEnvironment");

            }

        }

        // Process any @ComponentScan annotations

        Set<AnnotationAttributes> componentScans = AnnotationConfigUtils.attributesForRepeatable( //解析Component注解ComponentScan.class

                sourceClass.getMetadata(), ComponentScans.class, ComponentScan.class);

        if (!componentScans.isEmpty() &&

                !this.conditionEvaluator.shouldSkip(sourceClass.getMetadata(), ConfigurationPhase.REGISTER_BEAN)) {

            for (AnnotationAttributes componentScan : componentScans) {

                // The config class is annotated with @ComponentScan -> perform the scan immediately

                Set<BeanDefinitionHolder> scannedBeanDefinitions =

                        this.componentScanParser.parse(componentScan, sourceClass.getMetadata().getClassName()); //componentScan解析器,对该注解进行解析

                // Check the set of scanned definitions for any further config classes and parse recursively if needed

                for (BeanDefinitionHolder holder : scannedBeanDefinitions) {

                    BeanDefinition bdCand = holder.getBeanDefinition().getOriginatingBeanDefinition();

                    if (bdCand == null) {

                        bdCand = holder.getBeanDefinition();

                    }

                    if (ConfigurationClassUtils.checkConfigurationClassCandidate(bdCand, this.metadataReaderFactory)) {

                        parse(bdCand.getBeanClassName(), holder.getBeanName());

                    }

                }

            }

        }


  //..............................省略部分代码

 }


protected Set<BeanDefinitionHolder> doScan(String... basePackages) {

        Assert.notEmpty(basePackages, "At least one base package must be specified");

        Set<BeanDefinitionHolder> beanDefinitions = new LinkedHashSet<>();

        for (String basePackage : basePackages) {

            Set<BeanDefinition> candidates = findCandidateComponents(basePackage);//通过包名,扫描该包名下的所有bean的定义信息

            for (BeanDefinition candidate : candidates) {

                ScopeMetadata scopeMetadata = this.scopeMetadataResolver.resolveScopeMetadata(candidate); //scope注解解析器,获取Scope注解的属性信息,封装成ScopeMetadata

                candidate.setScope(scopeMetadata.getScopeName());

                String beanName = this.beanNameGenerator.generateBeanName(candidate, this.registry);//beanName生成器,这里是myMath

                if (candidate instanceof AbstractBeanDefinition) {

                    postProcessBeanDefinition((AbstractBeanDefinition) candidate, beanName);

                }

                if (candidate instanceof AnnotatedBeanDefinition) {

                    AnnotationConfigUtils.processCommonDefinitionAnnotations((AnnotatedBeanDefinition) candidate);

                }

                if (checkCandidate(beanName, candidate)) {

                    BeanDefinitionHolder definitionHolder = new BeanDefinitionHolder(candidate, beanName);

                    definitionHolder =

                            AnnotationConfigUtils.applyScopedProxyMode(scopeMetadata, definitionHolder, this.registry); //这里处理scope注解,下面跟进这个

                    beanDefinitions.add(definitionHolder);

                    registerBeanDefinition(definitionHolder, this.registry);

                }

            }

        }

        return beanDefinitions;

    }
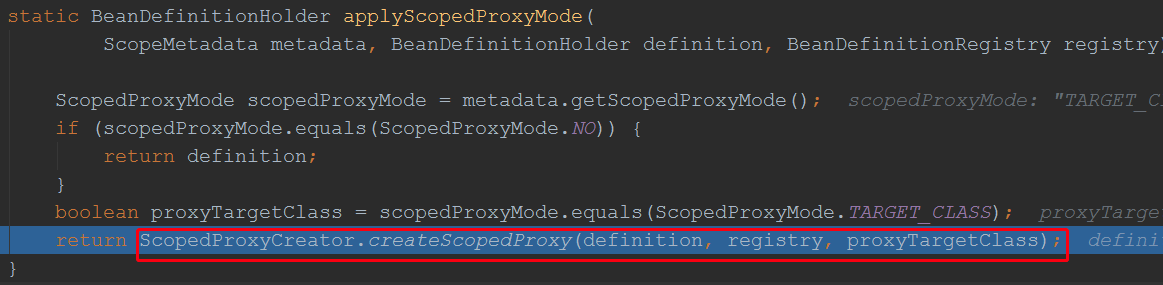
public static BeanDefinitionHolder createScopedProxy(BeanDefinitionHolder definition,

            BeanDefinitionRegistry registry, boolean proxyTargetClass) {

        String originalBeanName = definition.getBeanName();//原始的beanName: myMath

        BeanDefinition targetDefinition = definition.getBeanDefinition(); //原始的bean定义信息

        String targetBeanName = getTargetBeanName(originalBeanName); //scopedTarget.myMath

        // Create a scoped proxy definition for the original bean name,

        // "hiding" the target bean in an internal target definition.

        RootBeanDefinition proxyDefinition = new RootBeanDefinition(ScopedProxyFactoryBean.class); //创建一个代理对象

        proxyDefinition.setDecoratedDefinition(new BeanDefinitionHolder(targetDefinition, targetBeanName)); //将原始的bean定义信息作为被装饰的bean定义信息

        proxyDefinition.setOriginatingBeanDefinition(targetDefinition);//设置原始的bean定义信息

        proxyDefinition.setSource(definition.getSource());

        proxyDefinition.setRole(targetDefinition.getRole());

        proxyDefinition.getPropertyValues().add("targetBeanName", targetBeanName);

        if (proxyTargetClass) {

            targetDefinition.setAttribute(AutoProxyUtils.PRESERVE_TARGET_CLASS_ATTRIBUTE, Boolean.TRUE);

            // ScopedProxyFactoryBean's "proxyTargetClass" default is TRUE, so we don't need to set it explicitly here.

        }

        else {

            proxyDefinition.getPropertyValues().add("proxyTargetClass", Boolean.FALSE);

        }

        // Copy autowire settings from original bean definition.

        proxyDefinition.setAutowireCandidate(targetDefinition.isAutowireCandidate());

        proxyDefinition.setPrimary(targetDefinition.isPrimary());

        if (targetDefinition instanceof AbstractBeanDefinition) {

            proxyDefinition.copyQualifiersFrom((AbstractBeanDefinition) targetDefinition);

        }

        // The target bean should be ignored in favor of the scoped proxy.

        targetDefinition.setAutowireCandidate(false);

        targetDefinition.setPrimary(false);

        // Register the target bean as separate bean in the factory.

        registry.registerBeanDefinition(targetBeanName, targetDefinition);//这里将原始的bean定义信息注册到了spring容器,而bean的名称是scopedTarget.myMath

        // Return the scoped proxy definition as primary bean definition

        // (potentially an inner bean).

        return new BeanDefinitionHolder(proxyDefinition, originalBeanName, definition.getAliases()); //这里将代理bean定义信息返回,bean的名称是原始的beanName,myMath,该beanHodler返回去后,会被注册到spring

    }

总结:
一个被Scope注解标注的类,如果scope的proxyMode不是no 或者defualt,那么会在spring创建2个bean,一个是代理bean,类型为ScopedProxyFactoryBean.class,一个是原始的bean:
这里我们的MyMath类,生成了2个beanDefinition,一个是代理的beanDefinition,beanName为myMath,一个是原始的beanDefinition,beanName为scopedTarget.myMath;
下面我们要分析ScopedProxyFactoryBean的创建过程了,我们知道XXFactoryBean会有一个getObject()方法返回XX代理对象:先看ScopedProxyFactoryBean继承体系
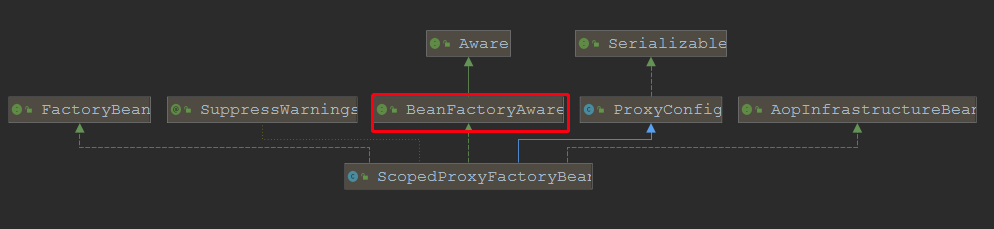

通过继承图,我们知道,ScopedProxyFactoryBean实现了BeanFactoryAware接口,因此在ScopedProxyFactoryBean的创建过程中,会回调setBeanFactory(BeanFactory beanFactory),所以我们debug在该方法:
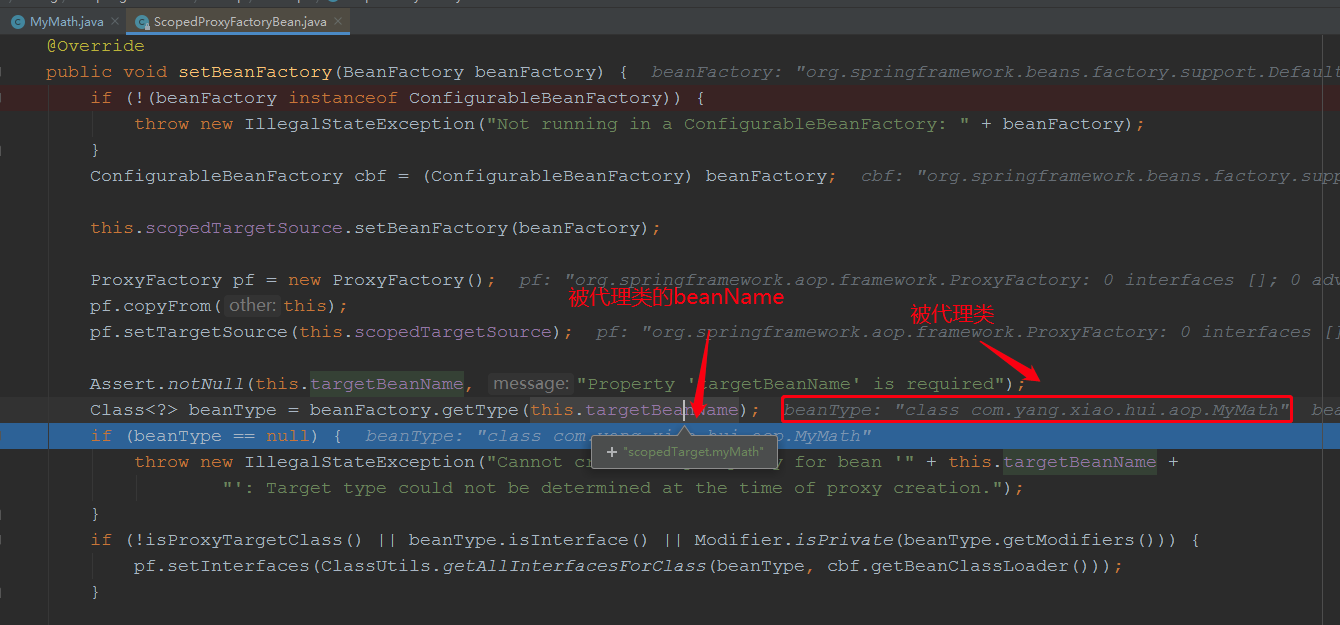
我们详细看看该方法:
@Override

    public void setBeanFactory(BeanFactory beanFactory) {

        if (!(beanFactory instanceof ConfigurableBeanFactory)) {

            throw new IllegalStateException("Not running in a ConfigurableBeanFactory: " + beanFactory);

        }

        ConfigurableBeanFactory cbf = (ConfigurableBeanFactory) beanFactory;

        this.scopedTargetSource.setBeanFactory(beanFactory);

        ProxyFactory pf = new ProxyFactory(); //创建代理工厂

        pf.copyFrom(this);

        pf.setTargetSource(this.scopedTargetSource);

        Assert.notNull(this.targetBeanName, "Property 'targetBeanName' is required");

        Class<?> beanType = beanFactory.getType(this.targetBeanName);//获取被代理类

        if (beanType == null) {

            throw new IllegalStateException("Cannot create scoped proxy for bean '" + this.targetBeanName +

                    "': Target type could not be determined at the time of proxy creation.");

        }

        if (!isProxyTargetClass() || beanType.isInterface() || Modifier.isPrivate(beanType.getModifiers())) {

            pf.setInterfaces(ClassUtils.getAllInterfacesForClass(beanType, cbf.getBeanClassLoader())); //获取被代理类的所有实现的接口

        }

        // Add an introduction that implements only the methods on ScopedObject.

        ScopedObject scopedObject = new DefaultScopedObject(cbf, this.scopedTargetSource.getTargetBeanName());

        pf.addAdvice(new DelegatingIntroductionInterceptor(scopedObject));//这里添加了一个增强器,在执行目标方法时,会拦截

        // Add the AopInfrastructureBean marker to indicate that the scoped proxy

        // itself is not subject to auto-proxying! Only its target bean is.

        pf.addInterface(AopInfrastructureBean.class);

        this.proxy = pf.getProxy(cbf.getBeanClassLoader());//创建代理对象

    }

创建代理对象过程,跟之前aop源码分析一和源码分析二的时侯分析的一样了,这里不重复了
spring aop 源码分析(三) @Scope注解创建代理对象的更多相关文章
- 5.2 spring5源码--spring AOP源码分析三---切面源码分析
一. AOP切面源码分析 源码分析分为三部分 1. 解析切面 2. 创建动态代理 3. 调用 源码的入口 源码分析的入口, 从注解开始: 组件的入口是一个注解, 比如启用AOP的注解@EnableAs ...
- Spring AOP 源码分析 - 创建代理对象
1.简介 在上一篇文章中,我分析了 Spring 是如何为目标 bean 筛选合适的通知器的.现在通知器选好了,接下来就要通过代理的方式将通知器(Advisor)所持有的通知(Advice)织入到 b ...
- Spring AOP源码分析(三):基于JDK动态代理和CGLIB创建代理对象的实现原理
AOP代理对象的创建 AOP相关的代理对象的创建主要在applyBeanPostProcessorsBeforeInstantiation方法实现: protected Object applyBea ...
- spring AOP源码分析(三)
在上一篇文章 spring AOP源码分析(二)中,我们已经知道如何生成一个代理对象了,那么当代理对象调用代理方法时,增强行为也就是拦截器是如何发挥作用的呢?接下来我们将介绍JDK动态代理和cglib ...
- 5.2 Spring5源码--Spring AOP源码分析二
目标: 1. 什么是AOP, 什么是AspectJ 2. 什么是Spring AOP 3. Spring AOP注解版实现原理 4. Spring AOP切面原理解析 一. 认识AOP及其使用 详见博 ...
- 5.2 spring5源码--spring AOP源码分析二--切面的配置方式
目标: 1. 什么是AOP, 什么是AspectJ 2. 什么是Spring AOP 3. Spring AOP注解版实现原理 4. Spring AOP切面原理解析 一. 认识AOP及其使用 详见博 ...
- Spring AOP 源码分析 - 拦截器链的执行过程
1.简介 本篇文章是 AOP 源码分析系列文章的最后一篇文章,在前面的两篇文章中,我分别介绍了 Spring AOP 是如何为目标 bean 筛选合适的通知器,以及如何创建代理对象的过程.现在我们的得 ...
- Spring AOP 源码分析 - 筛选合适的通知器
1.简介 从本篇文章开始,我将会对 Spring AOP 部分的源码进行分析.本文是 Spring AOP 源码分析系列文章的第二篇,本文主要分析 Spring AOP 是如何为目标 bean 筛选出 ...
- Spring AOP 源码分析系列文章导读
1. 简介 前一段时间,我学习了 Spring IOC 容器方面的源码,并写了数篇文章对此进行讲解.在写完 Spring IOC 容器源码分析系列文章中的最后一篇后,没敢懈怠,趁热打铁,花了3天时间阅 ...
- Spring Ioc源码分析系列--@Autowired注解的实现原理
Spring Ioc源码分析系列--@Autowired注解的实现原理 前言 前面系列文章分析了一把Spring Ioc的源码,是不是云里雾里,感觉并没有跟实际开发搭上半毛钱关系?看了一遍下来,对我的 ...
随机推荐
- filebeat 启动失败
最近在ELK架构中启动filebeat时,启动失败,检查启动节点不存在 查看/var/log/message中报错日志,有如下内容 filebeat: Exiting:error loading co ...
- jmeter http并发测试时报错
错误信息如下:jmeter Response code: Non HTTP response code: java.net.URISyntaxException 网上收了一大堆,都没法解决 我的用到了 ...
- k8s-1.15.0集群部署+dashboard
环境:外网环境硬件master-centos7.4 2核4G node1-centos7.4 2核4Gnode2-centos7.4 2核4G软件:三台服务器 :docker-19. ...
- vmware虚拟机Bridged(桥接模式)、NAT(网络地址转换模式)、Host-Only(仅主机模式)详解
原文来自http://note.youdao.com/share/web/file.html?id=236896997b6ffbaa8e0d92eacd13abbf&type=note 我怕链 ...
- 理解Word2Vec
一.简介 Word2vec 是 Word Embedding 的方法之一,属于NLP 领域.它是将词转化为「可计算」「结构化」的向量的过程.它是 2013 年由谷歌的 Mikolov 提出了一套新的词 ...
- Android开发之AlertDialog警告提示框删除与取消 详解代码
package cc.jiusansec.www; import android.app.Activity; import android.app.AlertDialog; import androi ...
- 微信小程序|小游戏
[官]小游戏开发 https://developers.weixin.qq.com/minigame/dev/index.html 官网 https://mp.weixin.qq.com 做了4个微信 ...
- 【原】“Error getting 'android:label' attribute”
项目上线过程中遇到“Error getting 'android:label' attribute: attribute is not a string value”这个错误. 备忘下:是因为有act ...
- JAVA 各种锁机制
可重入锁 可重锁是指同一个线程,外层函数获取锁后,内层函数可以自动获取到锁. java中synchronized和ReentrantLock都是可重入锁. 对于synchronized,其实现机制有j ...
- 发送post请求
题目: http://123.206.87.240:8002/post/ Brup抓包 1.修改Get 为 POST 2.添加 Content-Type: application/x-www-form ...