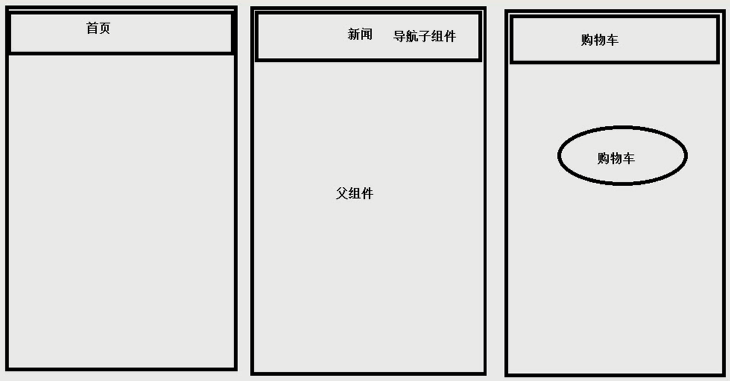
Angular 父子组件传值
Angular 父子组件传值 @Input @Output @ViewChild
新建一个头部组件 newsheader

在主组件引用 news 组件,在news组件添加 newsheader 组件。
设置newsheader组件样式
设置newsheader组件的内容,添加一个class属性
<h2 class="header">这是一个头部组件</h2>
如果需要全局设置,则在 style.css 中设置。

如果单独设置自己的,则在自己组件的css中设置。

此项目案例设置全局的。
/* You can add global styles to this file, and also import other style files */

.header{

    height: 44px;

    line-height: 44px;

    text-align: center;

    background-color: #000;

    color: #fff;

    text-align: center;

}

把新闻页面的数据传给头组件(父组件向子组件传值) @Input
首先在新闻界组件定义一个数据(在父组件定义一个数据)
在父组件中创建一个变量,用于传递给子组件:
public message = "这是新闻组件的MSG"
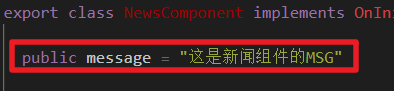
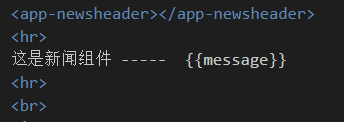
这个 message 属性属于新闻组件(父组件),我们可以在新闻组件上打印出来。
<app-newsheader></app-newsheader>

<hr>

这是新闻组件 -----  {{message}}

<hr>

<br>

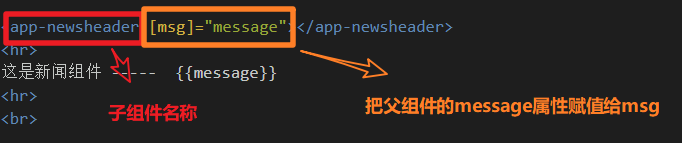
在头部组件(子组件)中并没有定义 message 属性,我们在头部(子组件)是拿不到数据的,他们数据不能共享,因此我们需要通过父组件把需要的值(message)传给子组件。
1.父组件调用子组件的时候传入数据
<app-newsheader [msg]="message"></app-newsheader>
2.子组件引入 Input 模块
import { Component, OnInit,Input } from '@angular/core';

3.接收父组件传进的数据
@Input() msg:string; /**通过Input接收父组件传进的msg */

4.在头部(子组件)使用父组件传进的数据 msg
<h2 class="header">这是一个头部组件 -- {{msg}}</h2>


如果多个变量就添加多个HTML属性
假如 父组件 ts 文件有两个属性需要传给子组件

父组件调用子组件的HTML代码也传入两个属性

子组件在去接收父组件传进的两个值
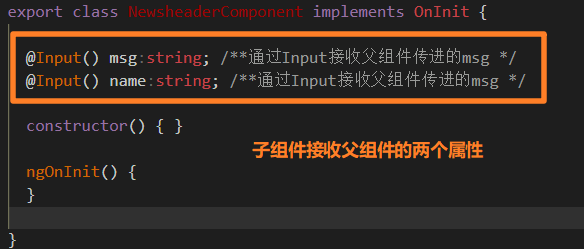
子组件就可以使用了


子组件执行父组件的方法 @Input
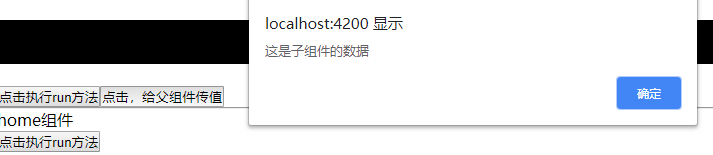
创建一个新的组件 home

创建一个新的组件 footer

通过 home 组件和 footer 组件来讲解子组件执行父组件的方法。
在 根组件 引入 home 组件,在 home组件 引入 footer 组件。
1.在home组件(父组件)创建一个 run 方法
ts文件
import { Component, OnInit } from '@angular/core';
@Component({
selector: 'app-home',
templateUrl: './home.component.html',
styleUrls: ['./home.component.css']
})
export class HomeComponent implements OnInit {
public msg = "我是home组件的msg"
constructor() { }
ngOnInit() {
}
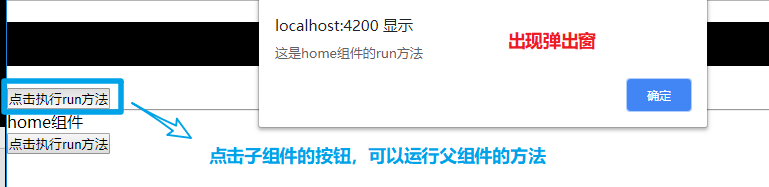
run(){
alert('这是home组件的run方法')
}
}
html 文件
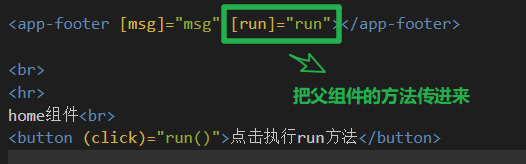
<app-footer [msg]="msg" [run]="run"></app-footer>

<br>

<hr>

home组件<br>

<button (click)="run()">点击执行run方法</button>
2.子组件接收父组件传进的数据和方法
ts 文件
import { Component, OnInit,Input } from '@angular/core';
@Component({
selector: 'app-footer',
templateUrl: './footer.component.html',
styleUrls: ['./footer.component.css']
})
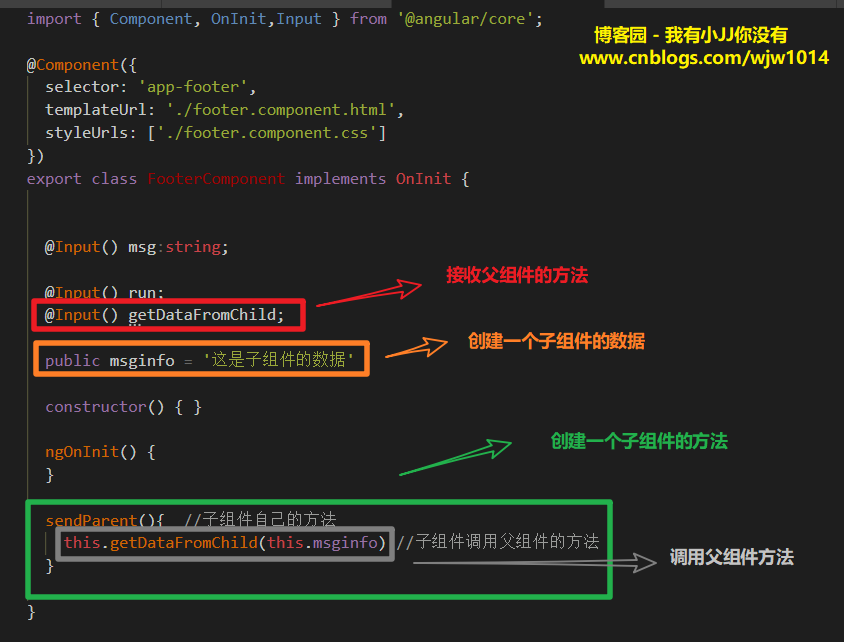
export class FooterComponent implements OnInit {
@Input() msg:string;
@Input() run;
constructor() { }
ngOnInit() {
}
}

html 文件
<h2 class="header">footer子组件 -- {{msg}}</h2>

<br>

<button (click)="run()">点击执行run方法</button>

父组件接收子组件返回的数据
在父组件创建一个方法,用于接收子组件数据
  // 接收子组件的数据

  getDataFromChild(childData){

    alert(childData)

  }

把 getDataFromChild 方法在调用子组件的时候传给子组件
<app-footer [msg]="msg" [run]="run" [getDataFromChild]="getDataFromChild"></app-footer>

<br>

<hr>

home组件<br>

<button (click)="run()">点击执行run方法</button>

子组件接收父组件传进来的方法,并且创建方法返回给父组件数据
import { Component, OnInit,Input } from '@angular/core';

@Component({

  selector: 'app-footer',

  templateUrl: './footer.component.html',

  styleUrls: ['./footer.component.css']

})

export class FooterComponent implements OnInit {

  @Input() msg:string;

  @Input() run;

  @Input() getDataFromChild;

  public msginfo = '这是子组件的数据'

  constructor() { }

  ngOnInit() {

  }

  sendParent(){  //子组件自己的方法

    this.getDataFromChild(this.msginfo) //子组件调用父组件的方法

  }

}
给子组件添加一个按钮给父组件传数据
<h2 class="header">footer子组件 -- {{msg}}</h2>

<br>

<button (click)="run()">点击执行run方法</button>

<button (click)="sendParent()">点击,给父组件传值</button>

子组件用 @Output 的方法执行父组件方法
使用最开始的 news 组件 和 newsheader 组件。
子组件引入 Output 和 EventEmitter
import { Component, OnInit ,Input,Output,EventEmitter} from '@angular/core';

子组件中实例化 EventEmitter
@Output() private outer=new EventEmitter<string>();

 /*用 EventEmitter 和 output 装饰器配合使用 <string>指定类型变量*/

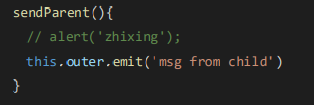
子组件通过 EventEmitter 对象 outer 实例广播数据
sendParent(){

 // alert('zhixing');

 this.outer.emit('msg from child')

 }
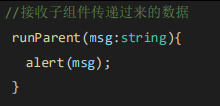
父组件调用子组件的时候,定义接收事件 , outer 就是子组件的 EventEmitter 对象 outer
<app-header (outer)="runParent($event)"></app-header>

父组件接收到数据会调用自己的 runParent 方法,这个时候就能拿到子组件的数据
//接收子组件传递过来的数据

 runParent(msg:string){

 alert(msg);

 }
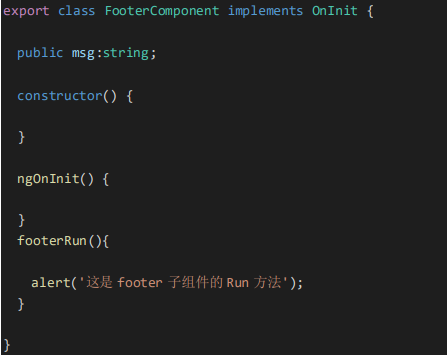
父组件主动获取子组件的属性和方法
定义 footer 组件
export class FooterComponent implements OnInit {

 public msg:string;

 constructor() {

 }

 ngOnInit() {

 }

 footerRun(){

 alert('这是 footer 子组件的 Run 方法');

 }

}
父组件调用子组件的时候给子组件起个名字
<app-footer #footer></app-footer>

直接获取执行子组件的方法
<button (click)='footer.footerRun()'>获取子组件的数据</button>

父组件通过局部变量获取子组件的引用,通过 ViewChild 主动获取子组件的数据和方法
调用子组件给子组件定义一个名称
<app-footer #footerChild></app-footer>
引入 ViewChild
import { Component, OnInit ,ViewChild} from '@angular/core';
ViewChild 和刚才的子组件关联起来
@ViewChild('footerChild') footer;
调用子组件
run(){

 this.footer.footerRun();

 }
Angular 父子组件传值的更多相关文章
- angular父子组件传值和ngOnChanges的使用
父组件中定义: public detailbaseinfo = {}; //详情基本信息 其中detailbaseinfo 数据会通过请求获取 父组件传值给子组件如下: 子组件接收父组件传值 imp ...
- angular 父子组件传值 用get set 访问器设置默认值
private _PLACEHOLDER: string; @Input() public set placeholder(v: string) { this._PLACEHOLDER = v; } ...
- angular 4+中关于父子组件传值的示例
home.component.ts import { Component, OnInit } from '@angular/core'; @Component({ selector: 'app-hom ...
- vue 非父子组件传值
/*非父子组件传值 1.新建一个js文件 然后引入vue 实例化vue 最后暴露这个实例 2.在要广播的地方引入刚才定义的实例 3.通过 VueEmit.$emit('名称','数据') 4.在接收收 ...
- 使用react进行父子组件传值
在单页面里面,父子组件传值是比较常见的,之前一直用vue开发,今天研究了一下react的父子组件传值,和vue差不多的思路,父组件向子组件传值,父通过初始state,子组件通过this.props进行 ...
- 【vue】父组件主动调用子组件 /// 非父子组件传值
一 父组件主动调用子组件: 注意:在父组件使用子组件的标签上注入ref属性,例如: <div id="home"> <v-header ref="he ...
- vue父子组件传值加例子
例子:http://element-cn.eleme.io/#/zh-CN/component/form 上进行改的 父传子:用prop:子组件能够改变父组件的值,是共享的,和父操作是 ...
- Vue中非父子组件传值的问题
父子组件传值的问题,前面已经讲过,不再叙述,这里来说一种非父子组件的传值. vue官网指出,可以使用一个空vue实例作为事件中央线! 也就是说 非父子组件之间的通信,必须要有公共的实例(可以是空的), ...
- 创建组件的方法,组件的props属性、state属性的用法和特点,父子组件传值,兄弟组件传值
1.创建组件的方法 函数组件 class组件 1.1 函数组 无状态函数式组件形式上表现为一个只带有一个 `render()` 方法的组件类,通过函数形式或者 `ES6` 箭头 `functi ...
随机推荐
- 超实用教程,教你用墨刀做出小红书app原型
一个新手怎么用1小时快速学会APP原型设计? 1小时很短,这意味着学习时必须把握APP原型设计中的重点.难点,而非面面俱到. 要在短时间内理解.掌握一个工具的使用,最有效的方式莫过于临摹: 看实例视频 ...
- 《大道至简》第一章读后感Java伪代码
在<大道至简>第一章中,周爱民先生引用一则<愚公移山>的寓言,引出了编程的根本:顺序.选择.循环.“愚公移山”的工程虽然庞大,但是可以通过极其简单的变成来完成.我身边的有一些人 ...
- mac系统搭建SVN版本控制
版权声明:本文为博主原创文章,未经博主允许不得转载. SmartSVN 8.6和Keygen for mac(完美破解)http://pan.baidu.com/s/1bnm72qz 一.里面包含Sm ...
- spring之拦截器
拦截器 实现HandlerInterceptor接口:注册拦截器<mvc:inteceptors> spring和springMVC父子容器的关系 在spring整体框架的核心概念中,容器 ...
- 018-AJAX异步请求XMLHttpRequest
创建XMLHttpRequest对象 一.先来创建XMLHttpRequest对象在IE.Firefox.safari和Opera中创建该对象的JavaScript代码为: var xhr = new ...
- linux命令目录
一.文件和目录.(文件目录的增删改查) ls pwd cd mkdir touch rmdir ln dd rm cp mv nl cat tac more less head tail stat # ...
- rpgmakermv(8) XY_TitleMenu插件
插件作用:设置标题 /*: * @plugindesc v1.00 Display Multiple Menu in Title Screen. * @author XueYu Plugins * * ...
- 6.Daemon线程
1.如下代码: package com.bawei.multithread; public class Recursive { private static int counter = 0; publ ...
- linux设置时间显示格式和系统版本
[修改显示日期格式] vim /etc/bashrc alias ll='ls -l --time-style="+%Y-%m-%d %H:%M:%S"' alias date=' ...
- Yii数据对象笔记
要执行一个SQL查询,应该遵循以下步骤 - 创建一个 yii\db\Command 的 SQL查询命令 绑定参数(非必须) 执行命令 第1步 - 创建一个 actionTestDb()方法在 Site ...