redis 6.0下redis-cluster-proxy代理尝试
Redis 6.0以及redis-cluster-proxy gcc 5+编译环境依赖
类似错误参考这里:https://wanghenshui.github.io/2019/12/31/redis-ce
1,https://stackoverflow.com/questions/55345373/how-to-install-gcc-g-8-on-centos,测试可行
redis cluster 集群信息,参考之前的文章,redis cluster 自动化安装、扩容和缩容,快速实现Redis集群搭建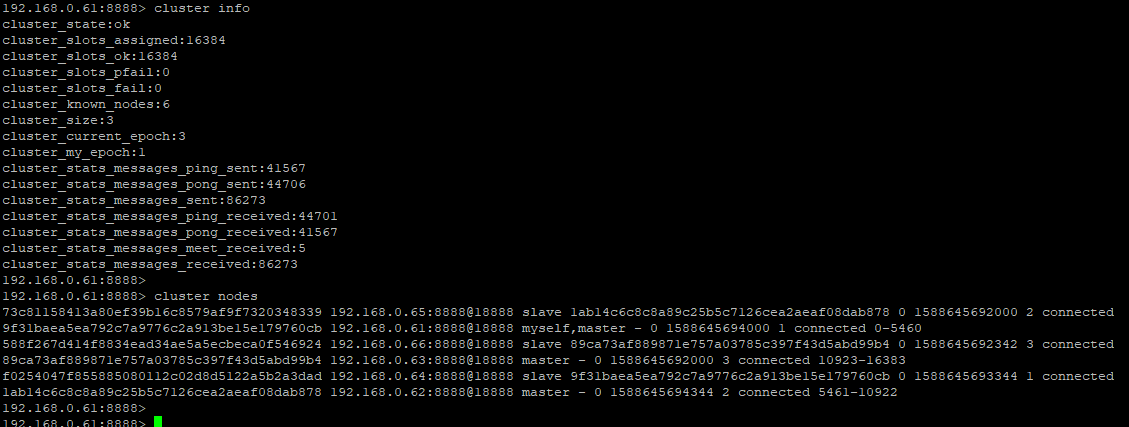
安装步骤:
cd redis-cluster-proxy
后来尝试如下这种方法可行,参考https://stackoverflow.com/questions/55345373/how-to-install-gcc-g-8-on-centos
On CentOS , you can install GCC  from Developer Toolset. First you need to enable the Software Collections repository:

yum install centos-release-scl

Then you can install GCC  and its C++ compiler:

yum install devtoolset--gcc devtoolset--gcc-c++

To switch to a shell which defaults gcc and g++ to this GCC version, use:

scl enable devtoolset- -- bash

You need to wrap all commands under the scl call, so that the process environment changes performed by this command affect all subshells. For example, you could use the scl command to invoke a shell script that performs the required actions.
# Redis Cluster Proxy configuration file example.
# 如果指定以配置文件的方式启动,必须指定-c 参数
# ./redis-cluster-proxy -c /path/to/proxy.conf ################################## INCLUDES ###################################
# Include one or more other config files here. Include files can include other files.
# 指定配置文件的路径
# If instead you are interested in using includes to override configuration options, it is better to use include as the last line.
# include /path/to/local.conf
# include /path/to/other.conf ######################## CLUSTER ENTRY POINT ADDRESS ##########################
# Indicate the entry point address in the same way it can be indicated in the
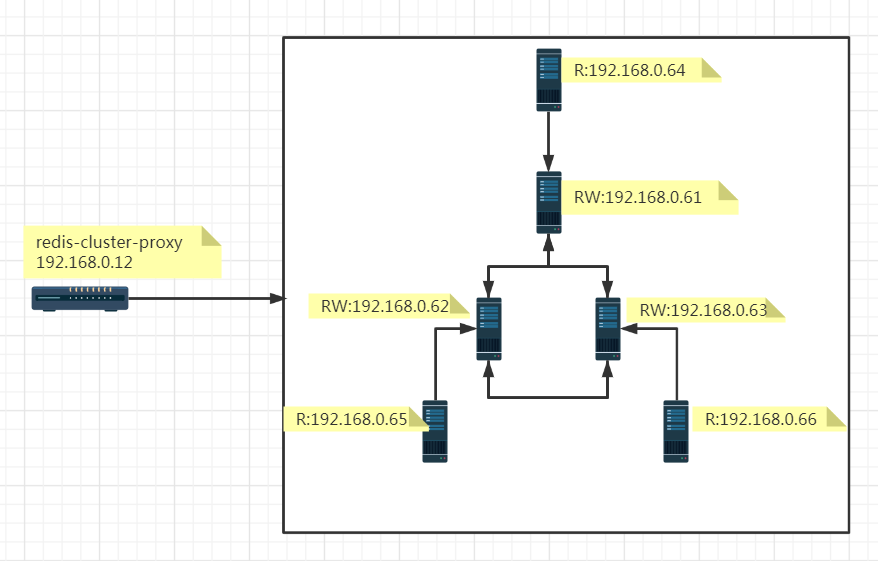
# redis cluster集群自身节点信息,这里是3主3从的6个节点,分别是192.168.0.61~192.168.0.66
# redis-cluster-proxy command line arguments.
# Note that it can be overridden by the command line argument itself.
# You can also specify multiple entry-points, by adding more lines, ie:
# cluster 127.0.0.1:7000
# cluster 127.0.0.1:7001
# You can also use the "entry-point" alias instead of cluster, ie:
# entry-point 127.0.0.1:7000
#
# cluster 127.0.0.1:7000
cluster 192.168.0.61:8888
cluster 192.168.0.62:8888
cluster 192.168.0.63:8888
cluster 192.168.0.64:8888
cluster 192.168.0.65:8888
cluster 192.168.0.66:8888 ################################### MAIN ######################################
# Set the port used by Redis Cluster Proxy to listen to incoming connections
# redis-cluster-proxy 端口号指定
# from clients (default 7777)
port 7777 # IP地址绑定,这里指定为redis-proxy-cluster所在节点的IP地址
# If you want you can bind a single interface, if the bind option is not
# specified all the interfaces will listen for incoming connections.
# You can also bind on multiple interfaces by declaring bind on multiple lines
#
# bind 127.0.0.1
bind 192.168.0.12 # socket 文件路径
# Specify the path for the Unix socket that will be used to listen for
# incoming connections. There is no default, so Redis Cluster Proxy won't
# listen on a Unix socket when not specified.
#
# unixsocket /path/to/proxy.socket # Set the Unix socket file permissions (default 0)
#
# unixsocketperm 760 # 线程数量
# Set the number of threads.
threads 8 # Set the TCP keep-alive value on the Redis Cluster Proxy's socket
#
# tcpkeepalive 300 # Set the TCP backlog on the Redis Cluster Proxy's socket
#
# tcp-backlog 511 # 连接池信息
# Size of the connections pool used to provide ready-to-use sockets to
# private connections. The number (size) indicates the number of starting
# connections in the pool.
# Use 0 to disable connections pool at all.
# Every thread will have its pool of ready-to-use connections.
# When the proxy starts, every thread will populate a pool containing
# connections to all the nodes of the cluster.
# Whenever a client needs a private connection, it can take a connection
# from the pool, if available. This will speed-up the client transition from
# the thread's shared connection to its own private connection, since the
# connection from the thread's pool should be already connected and
# ready-to-use. Otherwise, clients with priovate connections must re-connect
# the the nodes of the cluster (this re-connection will act in a 'lazy' way).
#
# connections-pool-size 10 # Minimum number of connections in the the pool. Below this value, the
# thread will start re-spawning connections at the defined rate until
# the pool will be full again.
#
# connections-pool-min-size 10 # Interval in milliseconds used to re-spawn connections in the pool.
# Whenever the number of connections in the pool drops below the minimum
# (see 'connections-pool-min-size' above), the thread will start
# re-spawing connections in the pool, until the pool will be full again.
# New connections will be added at this specified interval.
#
# connections-pool-spawn-every 50 # Number of connections to re-spawn in the pool at every cycle that will
# happen with an interval defined by 'connections-pool-spawn-every' (see above).
#
# connections-pool-spawn-rate 50 # 运行模式,一开始最好指定为no,运行时直接打印出来启动日志或者异常信息,这样可以方便地查看启动异常
# 非常奇怪的是:笔者一开始指定为yes,异常日志输出到文件,竟然跟直接打印日志输出的信息不一致
# Run Redis Cluster Proxy as a daemon.
daemonize yes # pid 文件指定
# If a pid file is specified, the proxy writes it where specified at startup
# and removes it at exit.
#
# When the proxy runs non daemonized, no pid file is created if none is
# specified in the configuration. When the proxy is daemonized, the pid file
# is used even if not specified, defaulting to
# "/var/run/redis-cluster-proxy.pid".
#
# Creating a pid file is best effort: if the proxy is not able to create it
# nothing bad happens, the server will start and run normally.
#
#pidfile /var/run/redis-cluster-proxy.pid # 日志文件指定,如果可以正常启动,强烈建议指定一个输出日志文件,所有的运行异常或者错误都可以从日志中查找
# Specify the log file name. Also the empty string can be used to force
# Redis Cluster Porxy to log on the standard output. Note that if you use
# standard output for logging but daemonize, logs will be sent to /dev/null
#
#logfile ""
logfile "/usr/local/redis_cluster_proxy/redis_cluster_proxy.log" # 跨slot操作,这里设置为yes,允许
# Enable cross-slot queries that can use multiple keys belonging to different
# slots or even different nodes.
# WARN: these queries will break the the atomicity deisgn of many Redis
# commands.
# NOTE: cross-slots queries are not supported by all the commands, even if
# this feature is enabled
#
# enable-cross-slot no
enable-cross-slot yes # Maximum number of clients allowed
#
# max-clients 10000 # 连接到redis cluster时候的身份认证,如果redis集群节点设置了身份认证的话,强烈建议redis集群所有节点设置一个统一的auth
# Authentication password used to authenticate on the cluster in case its nodes
# are password-protected. The password will be used both for fetching cluster's
# configuration and to automatically authenticate proxy's internal connections
# to the cluster itself (both multiplexing shared connections and clients'
# private connections. So, clients connected to the proxy won't need to issue
# the Redis AUTH command in order to be authenticated.
#
# auth mypassw
auth your_redis_cluster_password # 这个节点是redis 6.0之后的用户名,这里没有指定
# Authentication username (supported by Redis >= 6.0)
#
# auth-user myuser ################################# LOGGING #####################################
# Log level: can be debug, info, success, warning o error.
log-level error # Dump queries received from clients in the log (log-level debug required)
#
# dump-queries no # Dump buffer in the log (log-level debug required)
#
# dump-buffer no # Dump requests' queues (requests to send to cluster, request pending, ...)
# in the log (log-level debug required)
#
# dump-queues no
启动redis-cluster-proxy,./bin/redis-cluster-proxy -c ./proxy.conf
需要注意的是,首次运行时直接打印出来启动日志或者异常信息,保证可以正常启动,然后再以daemonize方式运行
因为笔者一开始遇到了一些错误,发现同样的错误,控制台直接打印出来的日志,跟daemonize方式运行打印到文件的日志不完全一致。
redis-cluster-proxy尝试
与普通的redis 集群链接方式不同,redis-cluster-proxy模式下,客户端可以连接至redis-cluster-proxy节点,而无需知道Redis集群自身的详细信息,这里尝试执行一个multpile操作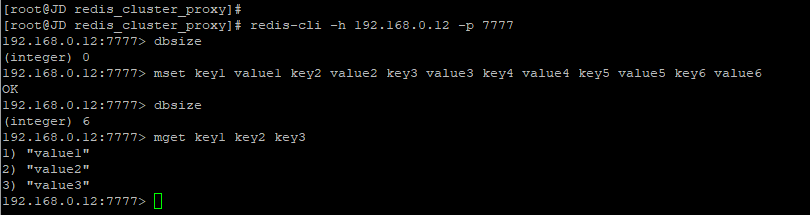
这里使用传统的集群链接方式,来查看上面multiple操作的数据,可以发现的确是写入到集群中不同的节点中了。
故障转移测试
简单粗暴地关闭一个主节点,这里直接关闭192.168.0.61节点,看看redis-cluster-proxy能否正常读写
1,首先redis cluster自身的故障转移是没有问题的,完全成功
2,192.168.0.64接替192.168.0.61成为主节点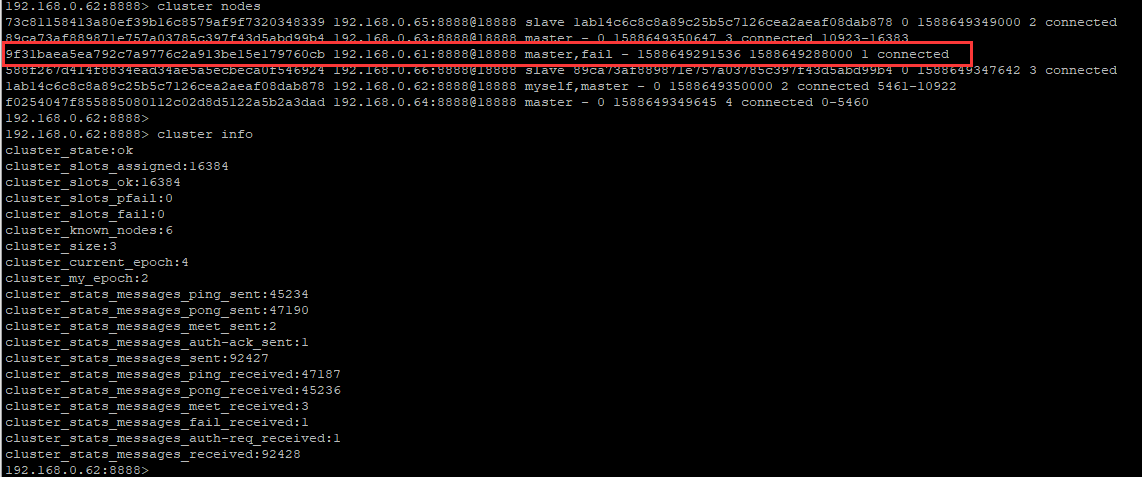
3,proxy节点操作数据卡死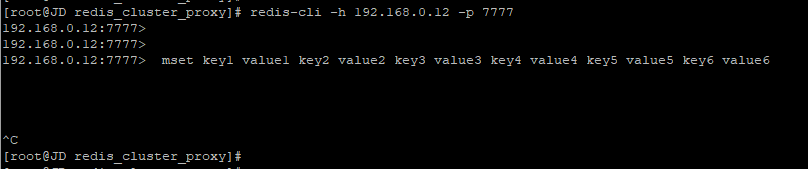
查看redis-cluster-proxy的日志,说192.168.0.61节点无法连接,proxy失败退出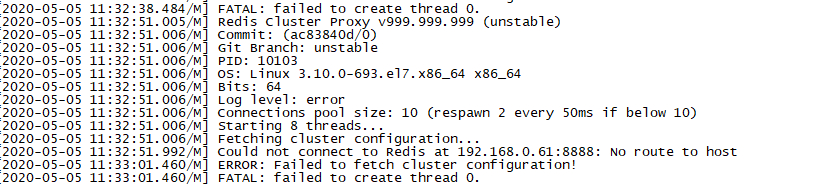
由此可见,正如日志里说明的,Redis Cluster Proxy v999.999.999 (unstable),期待有更稳定的版本推出。
类似问题作者本人也有回应,参考:https://github.com/RedisLabs/redis-cluster-proxy/issues/36
The Proxy currently requires that all nodes of the cluster must be up at startup when it fetches the cluster's internal map.
I'll probably change this in the next weeks.
redis-cluster-proxy是完美的解决方案?
因为刚推出不久,生产环境基本上不会有太多实际的应用,里面肯定有不少坑,但不妨害对其有更多的期待。
初次尝试可以感受的到,redis-cluster-proxy是一个非常轻量级,清爽简单的proxy代理层,它解决了一些redis cluster存在的一些实际问题,对应于程序来说也带来了一些方便性。
如果没有源码开发能力,相比其他第三方proxy中间件,必须要承认官方可靠性和权威性。
那么,redis-cluster-proxy是一个完美的解决方案么,留下两个问题
1,如何解决redis-cluster-proxy单点故障?
2,proxy节点的如何面对网络流量风暴?
redis 6.0下redis-cluster-proxy代理尝试的更多相关文章
- redis 5.0 CLUSTERDOWN The cluster is down
安装 redis 集群,设置值报错,错误信息:redis 5.0 CLUSTERDOWN The cluster is down. 这个是由于安装错误导致的,需要重新进行 修复一下. 命令如下: [ ...
- Redis(二)linux下redis安装
上篇讲解了redis在windows下的安装,接下来看看在linux下如何安装redis(纯菜鸟入门级别)? (1)redis的下载及编译 这里,首先进入存放文件目录(我的云服务器的是:cd /jel ...
- 【redis】 linux 下redis 集群环境搭建
Redis集群 (要让集群正常工作至少需要3个主节点,在这里我们要创建6个redis节点,其中三个为主节点,三个为从节点,对应的redis节点的ip和端口对应关系如下) 127.0.0.1:63791 ...
- 【Redis】windows下redis服务的安装
下载地址: https://github.com/MicrosoftArchive/redis/releases Redis 支持 32 位和 64 位.这个需要根据你系统平台的实际情况选择,这里我们 ...
- 【Redis】Linux下Redis安装与redis-desktop-manager使用(无法连接Redis服务器解决方法)
新手小白开始学习nosql数据库Redis,首先从安装入手. 全文分两部分:Linux下安装redis,可视化工具redis desktop manager的简单使用. 一.安装 下载,解压缩和编译R ...
- Redis之Ubuntu下Redis集群搭建
安装redis 首先下载redis $ wget http://download.redis.io/releases/redis-4.0.10.tar.gz $ .tar.gz $ cd redis- ...
- 【Redis】Linux下Redis的安装
Redis服务安装 主要有两种方式:apt安装和编译安装. 我采用的是apt安装,系统是ubuntu18.04,Redis version 5:4.0.9-1 在 Ubuntu 系统安装 Redi 可 ...
- Redis(三):windows下Redis的安装配置以及注意事项
一.下载windows版本的Redis 去官网找了很久,发现原来在官网上可以下载的windows版本的,现在官网以及没有下载地址,只能在github上下载,官网只提供linux版本的下载 官网下载地址 ...
- Redis学习---Ubuntu下Redis的安装
Ubuntu系统安装 Linux 系统安装[Ubuntu] 安装/启动Redis 要在 Ubuntu 上安装 Redis,打开终端,然后输入以下命令: 升级软件管理模块apt: sudo apt-ge ...
随机推荐
- Python爬虫系列(四):Beautiful Soup解析HTML之把HTML转成Python对象
在前几篇文章,我们学会了如何获取html文档内容,就是从url下载网页.今天开始,我们将讨论如何将html转成python对象,用python代码对文档进行分析. (牛小妹在学校折腾了好几天,也没把h ...
- 页面存在多个url,使用jmeter进行遍历操作
有一次遇见一个问题:进入网站后,有多个相同的url,但是仅url后面的路径中id有区别,如下图:这时我想要遍历点击查看url详情内容:那么就可以使用一个“逻辑控制器---foreach控制器” 如下: ...
- sigmod函数求导
sigmod函数: \[f(z)=\frac{1}{1+e^{-z}} \] 求导: \[\frac{\partial f(z)}{\partial z}=\frac{-1*-1*e^{-z}}{(1 ...
- Docker php安装扩展步骤详解
前言 此篇,主要是演示docker-php-source , docker-php-ext-install ,docker-php-enable-docker-configure 这四个命令到底是用来 ...
- AJ整理问题之:copy,对象自定义copy 什么是property
AJ分享,必须精品 copy copy的正目的 copy 目的:建立一个副本,彼此修改,各不干扰 Copy(不可变)和MutableCopy(可变)针对Foundation框架的数据类型. 对于自定义 ...
- Linux下搭建接口自动化测试平台
前言 我们今天来学习一下在Linux下如何搭建基于HttpRunner开发的接口自动化测试平台吧! 需要在Linux上提前准备的环境(下面是本人搭建时的环境): 1,Python 3.6.8 (可参考 ...
- 【LeetCode】23.合并K个排序链表
题目描述 23.合并K个排序链表 合并k个排序链表,返回合并后的排序链表.请分析和描述算法的复杂度. 示例: 输入: [ 1->4->5, 1->3->4, 2->6 ] ...
- Salesforce 学习 | 官方总结最实用的Spring '20新功能
在Spring '20正式发布之前,Trailblazers 社区举行了一个名为Treasure Hunt的在线活动,通过预览沙盒,分享他们认为Spring ‘20中最重要的功能.这篇文章就来盘点一下 ...
- windows下常用快捷指令记忆
快速打开环境变量窗口 sysdm.cpl --系统设置 快速打开远程桌面程序 mstsc ---Microsoft terminal services client 快速打开事件查看器 eventvw ...
- AOP-SheepAspect
转载https://www.cnblogs.com/InCsharp/p/5902133.html SheepAspect 简介以及代码示列: SheepAspect是一个AOP框架为.NET平台,深 ...