
ubuntu OPENCV移植
Installing
OpenCV 2.4.1 in Ubuntu 12.04 LTS
The latest Long Term Support version of Ubuntu(12.04 LTS) is out and a new version of OpenCV was released as well. This means that now is a great opportunity to update my OpenCV installation guide to the latest versions, Ubuntu 12.04 LTS and OpenCV 2.4.1.
We are going to setup OpenCV to use the new Qt highgui interface, which is much better than the simple highgui interface. Also, we will install OpenCV with support for OpenGL, as well as reading and writing videos, access to a webcam, Python, C and C++ interfaces,
and Intel Threading Building Blocks (TBB).
OK, so the first step is to make sure that everything in the system is updated and upgraded:
1 |
sudo apt-get |
2 |
sudo apt-get |
apt-get install quota
Now, you need to install many dependencies, such as support for reading and writing image files, drawing on the screen, some needed tools, etc… This step is very easy, you only need to write the following command in the Terminal:
1 |
sudo apt-get install build-essential |
Time to get the OpenCV 2.4.1 source code:
1 |
cd ~ |
3 |
tar -xvftar.bz2 |
4 |
cd OpenCV-2.4.1 |
Now we have to generate the Makefile by using cmake. In here we can define which parts of OpenCV we want to compile. Since we want to use Python, TBB, OpenGL, Qt, work with videos, etc, here is where we need to set that. Just execute the following line at the
terminal to create the appropriate Makefile. Note that there are two dots at the end of the line, it is an argument for the cmake program and it means the parent directory (because we are inside the build directory, and we want to refer to the OpenCV directory,
which is its parent).
1 |
mkdir build |
2 |
cd build |
3 |
cmake |
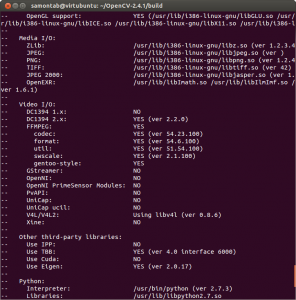
Check that the above command produces no error and that in particular it reports FFMPEG as YES. If this is not the case you will not be able to read or write videos. Also, check that Python, TBB, OpenGL, V4L, OpenGL and Qt are detected.
If anything is wrong, go back, correct the errors by maybe installing extra packages and then run cmake again. You should see something similar to this:
Now, you are ready to compile and install OpenCV 2.4.1:
1 |
make |
2 |
sudo make install |
Now you have to configure OpenCV. First, open the opencv.conf file with the following code:
1 |
sudo gedit |
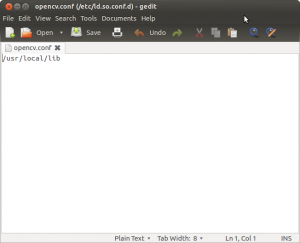
Add the following line at the end of the file(it may be an empty file, that is ok) and then save it:
1 |
/usr/local/lib |
Run the following code to configure the library:
1 |
sudo ldconfig |
Now you have to open another file:
1 |
sudo geditbash.bashrc |
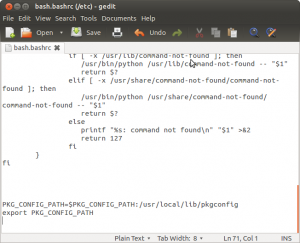
Add these two lines at the end of the file and save it:
1 |
PKG_CONFIG_PATH=$PKG_CONFIG_PATH:/usr/local/lib/pkgconfig |
2 |
export PKG_CONFIG_PATH |
Finally, close the console and open a new one, restart the computer or logout and then login again. OpenCV will not work correctly until
you do this.
Now you have OpenCV 2.4.1 installed in your computer with Python, TBB, OpenGL, video, and Qt support.
Check out the cool Qt interface which provides image viewing capabilities with zoom, as well as the ability to save the current image with just one click.
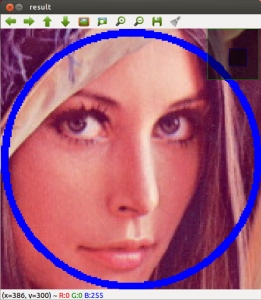
If you zoom in enough, you can see the RGB (or intensity) values for each pixel.
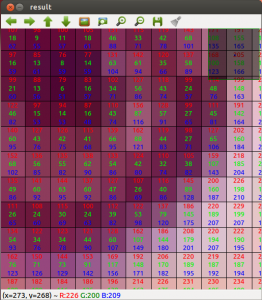
Now let’s build some samples included in OpenCV:
1 |
cd ~/OpenCV-2.4.1/samples/c |
2 |
chmod +x |
3 |
./build_all.sh |
Now we are ready to run the examples:
1 |
./facedetect"/usr/local/share/OpenCV/haarcascades/haarcascade_frontalface_alt.xml"--scale=1.5 |
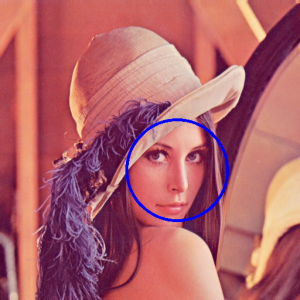
1 |
./facedetect"/usr/local/share/OpenCV/haarcascades/haarcascade_frontalface_alt.xml"--nested-cascade="/usr/local/share/OpenCV/haarcascades/haarcascade_eye.xml" --scale=1.5 |
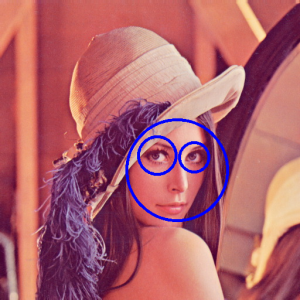
1 |
~/OpenCV-2.4.1/build/bin/grabcut |
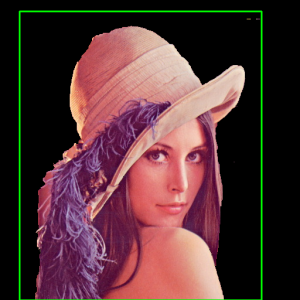
1 |
~/OpenCV-2.4.1/build/bin/calibration_artificial |

1 |
python |

-----------------------------------------------------------------------------------------------人生过隙,忽然而已!
ubuntu OPENCV移植的更多相关文章
- opencv 移植
1.ubunut系统搭建opencv+python开发环境 1.1.ubuntu系统安装pip3工具 sudo apt-get install python3-pip //安装python模块安装工具 ...
- 【opencv】ubuntu opencv imshow()报错
错误提示: ubuntu opencv imshow() 报错 windows.cpp报错 the function is not implemented If you are on Ubuntu o ...
- Ubuntu下移植OpenCv
通过近一周的时候终于成功交叉编译opencv成功了,真心不容易.有一句话乃真理也,凡事贵在坚持.过程总是痛苦的,因为不懂得很多问题但是又需要面对很多问题,最大的收获就是耐心解决所有问题后就懂得这些了. ...
- opencv移植到ubuntu
原创博文,转载请标明出处--周学伟http://www.cnblogs.com/zxouxuewei/ OpenCV 2.2以后版本需要使用Cmake生成makefile文件,因此需要先安装cmake ...
- zedboard OPENCV移植
1:系统环境搭建 要准备好交叉编译环境 见http://blog.csdn.net/xiabodan/article/details/22717175 2:下载cmake CMake是一个跨平台的安装 ...
- opencv移植(二)
原文:https://blog.csdn.net/Guet_Kite/article/details/78667175?utm_source=copy 版权声明:本文为博主原创文章,转载请附上博文链接 ...
- 【转】OpenCV 移植学习--EMCV
在Opencv论坛有好些这方面的帖子,主要看了一下几个牛人的帖子,比如论坛管理员于博士Shiqi Yu:(EMCV:可在DSP上运行的OpenCV)http://www.opencv.org.cn/f ...
- Android平台下OpenCV移植与使用---基于C/C++
在<Android Studio增加NDK代码编译支持--Mac环境>和<Mac平台下Opencv开发环境搭建>两篇文章中,介绍了如何使用NDK环境和Opencv环境搭建与测试 ...
- opencv移植(一)cmake安装
原文:https://blog.csdn.net/Guet_Kite/article/details/78667175?utm_source=copy 版权声明:本文为博主原创文章,转载请附上博文链接 ...
随机推荐
- 关于apache的重启
一:Apache重起的最好方法apachectl graceful http://blog.csdn.net/qianling3439/article/details/8622618 二:请问apac ...
- 代码片段---S3C2440按键中断驱动程序的设计
用到的知识: 中断 等待队列 睡眠 select poll misc http://pan.baidu.com/s/1bneSG5h
- Creating Your Own Server: The Socket API, Part 2
转:http://www.linuxforu.com/2011/09/creating-your-own-server-the-socket-api-part-2/ By Pankaj Tanwar ...
- Windows 7 IIS HTTP 错误 500.21 – Internal Server Error 解决方法
错误状况: 下面内容来自网络,自己也另有补充 原因:在安装Framework v4.0之后,再启用IIS,导致Framework没有完全安装 解决办法:开始->所有程序->附件->鼠 ...
- find your present (2)
Problem Description In the new year party, everybody will get a "special present".Now it's ...
- 通过pinyin4j将汉字转换为全拼 和 拼音首字母
/** * 汉字转换为拼音 包含多音字,包含生母zh,ch,sh的 */ public void toPinYinAll(){ String initials = "zh,ch,sh&quo ...
- 对C++/CLR的一些评价
我以后要是再用这东西,我自砍双手
- Android 高级UI设计笔记21:Android SegmentView(分段选择控件)
1. 分段控制(SegmentView) 首先我们先看看什么是SegmentView的效果,如下: 分段控制这个View控件是ios7的分段控制,和QQ消息页面顶部的效果一样,android没有这个控 ...
- ajax步骤和理解
步骤: 1.利用html+css来实现页面,表达信息: 2.用XMLHttpRequest和web服务器进行数据的异步交换 3.运营js操作DOM,实现动态局部刷新: XMLHttpRequest对象 ...
- ASP.NET的票据工具类FormsAuthenticationTicket
票据是asp.net登录验证的一种方式,以前研究过,现在并不使用,今天发现了,记录一下. /*###################票据工具################### * 1.设置< ...