
Shiro官方快速入门10min例子源码解析框架3-Authentication(身份认证)
在作完预备的初始化和session测试后,到了作为一个权鉴别框架的核心功能部分,确认你是谁--身份认证(Authentication)。
通过提交给shiro身份信息来验证是否与储存的安全信息数据是否相符来判断用户身份的真实性
本文涉及到token的构建,框架结构下认证行为的调用,realm中授权数据的获取、登录信息比较,login过程中对已有有subject、session的处理
同样,本篇本文使用的是shiro 1.3.2版本,配合源码最佳~
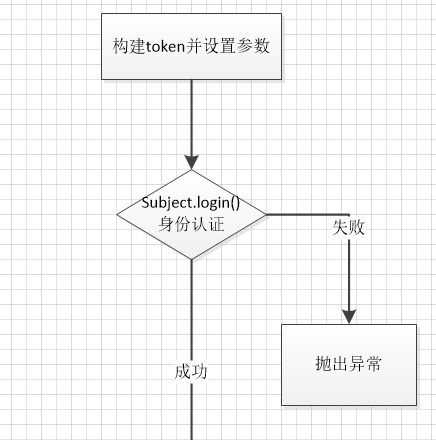
官方例子代码流程如下
if (!currentUser.isAuthenticated()) {

            UsernamePasswordToken token = new UsernamePasswordToken("lonestarr", "vespa");

            token.setRememberMe(true);

            try {

                currentUser.login(token);

            } catch (UnknownAccountException uae) {

                log.info("There is no user with username of " + token.getPrincipal());

            } catch (IncorrectCredentialsException ice) {

                log.info("Password for account " + token.getPrincipal() + " was incorrect!");

            } catch (LockedAccountException lae) {

                log.info("The account for username " + token.getPrincipal() + " is locked.  " +

                        "Please contact your administrator to unlock it.");

            }

            // ... catch more exceptions here (maybe custom ones specific to your application?

            catch (AuthenticationException ae) {

                //unexpected condition?  error?

            }

        }
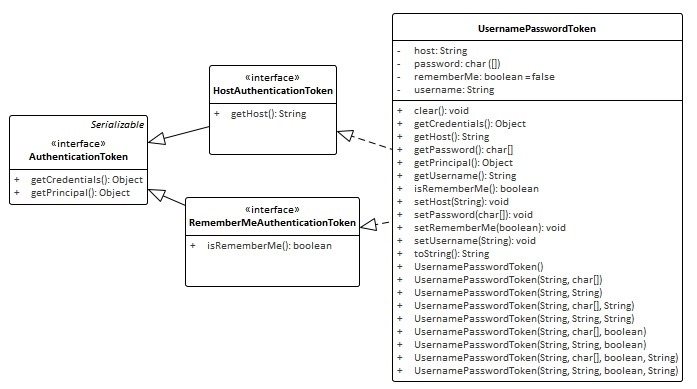
3.1首先构造token,其中 UsernamePasswordToken 实现了HostAuthenticationToken和RememberMeAuthenticationToken接口,他们都继承自AuthenticationToken接口
HostAuthenticationToken接口指定了token的域,RememberMeAuthenticationToken接口指定了token是否实现RememberMe(认证跨session)
ps:shiro 认证状态区分Authenticated和Remembered,Authenticated指当前session(或流程)下已经过认证,Remembered指曾经获得认证,如果是web状态下RememberMe相关信息保存在cookie中
二者可以调用 subject.isAuthenticated() 及subject.isRemembered()区分
其中UsernamePasswordToken 的Principal(身份)概念即Username,Credentials(凭证)概念即Password
在token 中设置用户名和密码
UsernamePasswordToken token = new UsernamePasswordToken("lonestarr", "vespa");
设置是否使用RememberMe(此案例中不具体起作用,只是作为示例在token中设置
token.setRememberMe(true);
案例中不对host进行设置
3.2完成对token的构建设置后,便进行认证(Authentication)操作
currentUser.login(token);
首先先借用官方的例图来了解一下整个的流程
1-调用subject的login入口传入token
2-subject实际调用SecurityManager的login
3-securityManager再调用authenticator实例的doAuthenticate方法,一般这个是ModularRealmAuthenticator的实例
4-判断realm的状况,如果是单realm则直接调用realm,如果是多realm则要判断认证策略(AuthenticationStrategy)
5-调用对应realm中的getAuthenticationInfo实现进行认证

DelegatingSubject.login代码如下,下面对认证流程进行详细的解读
public void login(AuthenticationToken token) throws AuthenticationException {

        clearRunAsIdentitiesInternal();

        Subject subject = securityManager.login(this, token);

        PrincipalCollection principals;

        String host = null;

        if (subject instanceof DelegatingSubject) {

            DelegatingSubject delegating = (DelegatingSubject) subject;

            //we have to do this in case there are assumed identities - we don't want to lose the 'real' principals:

            principals = delegating.principals;

            host = delegating.host;

        } else {

            principals = subject.getPrincipals();

        }

        if (principals == null || principals.isEmpty()) {

            String msg = "Principals returned from securityManager.login( token ) returned a null or " +

                    "empty value.  This value must be non null and populated with one or more elements.";

            throw new IllegalStateException(msg);

        }

        this.principals = principals;

        this.authenticated = true;

        if (token instanceof HostAuthenticationToken) {

            host = ((HostAuthenticationToken) token).getHost();

        }

        if (host != null) {

            this.host = host;

        }

        Session session = subject.getSession(false);

        if (session != null) {

            this.session = decorate(session);

        } else {

            this.session = null;

        }

    }
3.2.1首先是初始化
clearRunAsIdentitiesInternal();
如果subject已含session则获取session并清除其中参数
3.2.2调用securityManager中的()login()开始认证
Subject subject = securityManager.login(this, token);
这里调用的是DefaultSecurityManager中的login
public Subject login(Subject subject, AuthenticationToken token) throws AuthenticationException {

        AuthenticationInfo info;

        try {

            info = authenticate(token);//调用AbstractAuthenticator.authenticate,

        } catch (AuthenticationException ae) {

            try {

                onFailedLogin(token, ae, subject);//认证失败,清除remenberMe的信息使之失效

            } catch (Exception e) {

                if (log.isInfoEnabled()) {

                    log.info("onFailedLogin method threw an " +

                            "exception.  Logging and propagating original AuthenticationException.", e);

                }

            }

            throw ae; //propagate

        }

        Subject loggedIn = createSubject(token, info, subject);

        onSuccessfulLogin(token, info, loggedIn);

        return loggedIn;

    }
3.2.2.1
调用AbstractAuthenticator.authenticate(),其中调用ModularRealmAuthenticator.doAuthenticate
protected AuthenticationInfo doAuthenticate(AuthenticationToken authenticationToken) throws AuthenticationException {

        assertRealmsConfigured();

        Collection<Realm> realms = getRealms();

        if (realms.size() == 1) {

            return doSingleRealmAuthentication(realms.iterator().next(), authenticationToken);

        } else {

            return doMultiRealmAuthentication(realms, authenticationToken);

        }

    }
判断realms可用由于是配置的是单realm
则调用ModularRealmAuthenticator.doSingleRealmAuthentication(),其中调用realm实现判断token类型是否支持,然后执行realm实现中的getAuthenticationInfo方法
protected AuthenticationInfo doSingleRealmAuthentication(Realm realm, AuthenticationToken token) {

        if (!realm.supports(token)) {

            String msg = "Realm [" + realm + "] does not support authentication token [" +

                    token + "].  Please ensure that the appropriate Realm implementation is " +

                    "configured correctly or that the realm accepts AuthenticationTokens of this type.";

            throw new UnsupportedTokenException(msg);

        }

        AuthenticationInfo info = realm.getAuthenticationInfo(token);

        if (info == null) {

            String msg = "Realm [" + realm + "] was unable to find account data for the " +

                    "submitted AuthenticationToken [" + token + "].";

            throw new UnknownAccountException(msg);

        }

        return info;

    }
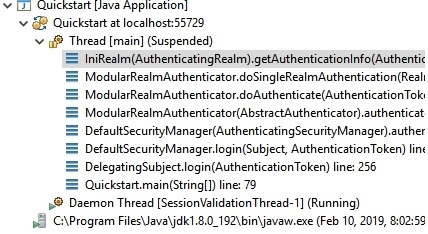
从下图中看出这里的realm是配置后的iniRealm实例,其方法在AuthenticatingRealm中实现,由于inirealm直接在初始化onInit()时就在内存加载了所有授权数据信息,例子并没有使用cache。
public final AuthenticationInfo getAuthenticationInfo(AuthenticationToken token) throws AuthenticationException {

        AuthenticationInfo info = getCachedAuthenticationInfo(token);

        if (info == null) {

            //otherwise not cached, perform the lookup:

            info = doGetAuthenticationInfo(token);

            log.debug("Looked up AuthenticationInfo [{}] from doGetAuthenticationInfo", info);

            if (token != null && info != null) {

                cacheAuthenticationInfoIfPossible(token, info);

            }

        } else {

            log.debug("Using cached authentication info [{}] to perform credentials matching.", info);

        }

        if (info != null) {

            assertCredentialsMatch(token, info);

        } else {

            log.debug("No AuthenticationInfo found for submitted AuthenticationToken [{}].  Returning null.", token);

        }

        return info;

    }
3.2.2.1.1调用SimpleAccountRealm.doGetAuthenticationInfo通过用户名从Map users 取出对应的SimpleAccount,并判断是否被锁,是否过期
protected AuthenticationInfo doGetAuthenticationInfo(AuthenticationToken token) throws AuthenticationException {

        UsernamePasswordToken upToken = (UsernamePasswordToken) token;

        SimpleAccount account = getUser(upToken.getUsername());

        if (account != null) {

            if (account.isLocked()) {

                throw new LockedAccountException("Account [" + account + "] is locked.");

            }

            if (account.isCredentialsExpired()) {

                String msg = "The credentials for account [" + account + "] are expired";

                throw new ExpiredCredentialsException(msg);

            }

        }

        return account;

    }
对应getUser方法使用了读锁保证了map读操作的原子性
protected SimpleAccount getUser(String username) {

        USERS_LOCK.readLock().lock();

        try {

            return this.users.get(username);

        } finally {

            USERS_LOCK.readLock().unlock();

        }

    }
3.2.2.1.2调用AuthenticatingRealm.assertCredentialsMatch,获取密码比较器(CredentialsMatcher),其中调用doCredentialsMatch获取对比token和info(上面从realm通过用户名获取的AuthenticationInfo实例)中的密码(核心的一步),并返回结果
public boolean doCredentialsMatch(AuthenticationToken token, AuthenticationInfo info) {

        Object tokenCredentials = getCredentials(token);

        Object accountCredentials = getCredentials(info);

        return equals(tokenCredentials, accountCredentials);

    }
3.2.2.2随后通知认证监听器AuthenticationListener(本例未设置)层层返回info至DefaultSecurityManager创建新的有登录信息的subject
Subject loggedIn = createSubject(token, info, subject);
并将现有subject中的信息赋予新的subject
protected Subject createSubject(AuthenticationToken token, AuthenticationInfo info, Subject existing) {

        SubjectContext context = createSubjectContext();

        context.setAuthenticated(true);

        context.setAuthenticationToken(token);

        context.setAuthenticationInfo(info);

        if (existing != null) {

            context.setSubject(existing);

        }

        return createSubject(context);

    }
3.2.2.3设置rememberMe(本例未实现
onSuccessfulLogin(token, info, loggedIn);
3.2.3 继续获取信息principals,host(本例无),设置session到subject,
        if (subject instanceof DelegatingSubject) {

            DelegatingSubject delegating = (DelegatingSubject) subject;

            //we have to do this in case there are assumed identities - we don't want to lose the 'real' principals:

            principals = delegating.principals;

            host = delegating.host;

        } else {

            principals = subject.getPrincipals();

        }

        if (principals == null || principals.isEmpty()) {

            String msg = "Principals returned from securityManager.login( token ) returned a null or " +

                    "empty value.  This value must be non null and populated with one or more elements.";

            throw new IllegalStateException(msg);

        }

        this.principals = principals;

        this.authenticated = true;

        if (token instanceof HostAuthenticationToken) {

            host = ((HostAuthenticationToken) token).getHost();

        }

        if (host != null) {

            this.host = host;

        }

        Session session = subject.getSession(false);

        if (session != null) {

            this.session = decorate(session);

        } else {

            this.session = null;

        }
3.3完成认证后测试一下Principal(用户名)是否正确
log.info("User [" + currentUser.getPrincipal() + "] logged in successfully.");

可见用户信息正确
至此完成了一个简单的Authentication过程
参考:
http://shiro.apache.org/10-minute-tutorial.html
http://shiro.apache.org/authentication.html
http://www.apache.org/dyn/closer.cgi/shiro/1.3.2/shiro-root-1.3.2-source-release.zip
转载请注明作者及来源:https://www.cnblogs.com/codflow/
Shiro官方快速入门10min例子源码解析框架3-Authentication(身份认证)的更多相关文章
- Shiro官方快速入门10min例子源码解析框架2-Session
Shiro自身维护了一套session管理组件,它可以独立使用,并不单纯依赖WEB/Servlet/EJB容器等环境,使得它的session可以任何应用中使用. 2-Session)主要介绍在quic ...
- Shiro官方快速入门10min例子源码解析框架1-初始化
Shiro,一个易用的Java安全框架,主要集合身份认证.授权.加密和session管理的功能. 这系文章主要简介Shiro架构,并通过官方的quickstart例程分析最简实现下Shiro的工作流程 ...
- Orleans例子源码
这是Orleans系列文章中的一篇.首篇文章在此 我共享以下我现在写教程的简单的Orleans例子源码. 这个代码已经是我为了写word改动过了的.不过大体内容是通用的. 我写博客总体想法是:去除所有 ...
- 【Activiti工作流引擎】官方快速入门demo
Activiti官方快速入门demo 地址: https://www.activiti.org/quick-start 0. 版本 activiti 5.22.0 JDK 1.8 1. 介绍 这个快速 ...
- 分布式 PostgreSQL 集群(Citus),官方快速入门教程
多租户应用程序 在本教程中,我们将使用示例广告分析数据集来演示如何使用 Citus 来支持您的多租户应用程序. 注意 本教程假设您已经安装并运行了 Citus. 如果您没有运行 Citus,则可以使用 ...
- 使用C#类向数据库添加数据的例子源码
在上一篇中,增加了sql server数据库操作类SqlOperator,用于操作sql server数据库.还有一个SqlStringHelper类,用于处理sql语句的单引号.那么这两个类怎么使用 ...
- jackson官方快速入门文档
官方地址: http://jackson.codehaus.org/ http://wiki.fasterxml.com/JacksonInFiveMinutes http://wiki.faster ...
- TodoMVC中的Backbone+MarionetteJS+RequireJS例子源码分析之一
Marionette牵线木偶,Backbone是脊骨的意思,Marionette是基于Backbone做扩展库,可以理解为把脊骨骨架绑线扯着变成牵线木偶动起来哈哈,使backbone更易使用呵呵! 构 ...
- Android例子源码非第三方实现根据字母排序的城市列表
values 下dimens.xml <resources> <!-- Default screen margins, per the Android Design guidelin ...
随机推荐
- jquery中通过添加readonly或者disabled属性实现行为禁止 / 去除某个属性的方法
<!DOCTYPE html> <html lang="en"> <head> <meta charset="UTF-8&quo ...
- 【flask macro】No caller defined
https://segmentfault.com/q/1010000005352059/a-1020000005352912 先码着 有时间了再换成caller() 先用老方法吧...
- Maven镜像更换为阿里云中央仓库(精)
前言 maven仓库默认在国外,使用难免很慢,尤其是下载依赖的时候,换为国内镜像,让你感受飞一般的感觉.国内支持maven镜像的有阿里云,开源中国等,这里换为阿里云的. 更换 修改maven配置文件s ...
- MySQL , MHA , Haproxy 配置
1. 基本架构 2. 读端口影射 3. 写端口影射 进行一个Health Check MHA Manager对Master节点MySQL 进行存活监控 读FailOver 1 读FailOver 2 ...
- C#-WebForm-★★★JQuery-动画★★★
1.show(),hide() 瞬间显示或隐藏,隐藏后不占有位置 2.slideDown(),slideUp() 向下拉伸显示,向上缩减隐藏 3.fadeIn(),fadeOut() 渐显或渐隐,隐藏 ...
- 开源系统-edusoho在线教育
#部署 ```bash [root@localhost ~]# docker run --name edusoho -tid -p 9900:80 -e DOMAIN= ...
- 并发编程>>线程池的实现(四)
线程创建倾向 如果运行的线程的小于corePoolSize,当请求来时,创建新线程. 如果运行corePoolSize或多于,当请求来时,排队. 如果请求不能进行排队,且小于maximumPoolSi ...
- 基础概念——令人迷惑的EOF
EOF概念常常使人迷惑. 首先我们要理解并没有像EOF字符这样的东西. 进一步讲EOF是由内核检测到的一种条件. 应用程序在它接收到由read函数返回的零返回码时,它就会发现EOF条件. 对于磁盘文件 ...
- Vue项目开发目录结构
最近做一些CI+Vue开发的简单项目,由于刚开始一直从事后端,对Vue了解不是很多,fork了团队的项目代码发现项目的文件夹很多,一时间有些懵,上网上参考了部分资料,博客园中的放晴的天空与狮子爱吃草两 ...
- OPENERP 中自定义模块 找不到的问题
问题的前提是你写的模块本身没有问题,我自己碰到的情况是在本机运行可以,但是上传到服务器上以后却无论怎么重启服务都找不到模块. 问题的根源在上传的文件权限设置不对: 假设自定义模块为rainsoft_p ...