
vue实现非路由跳转以及数据传递
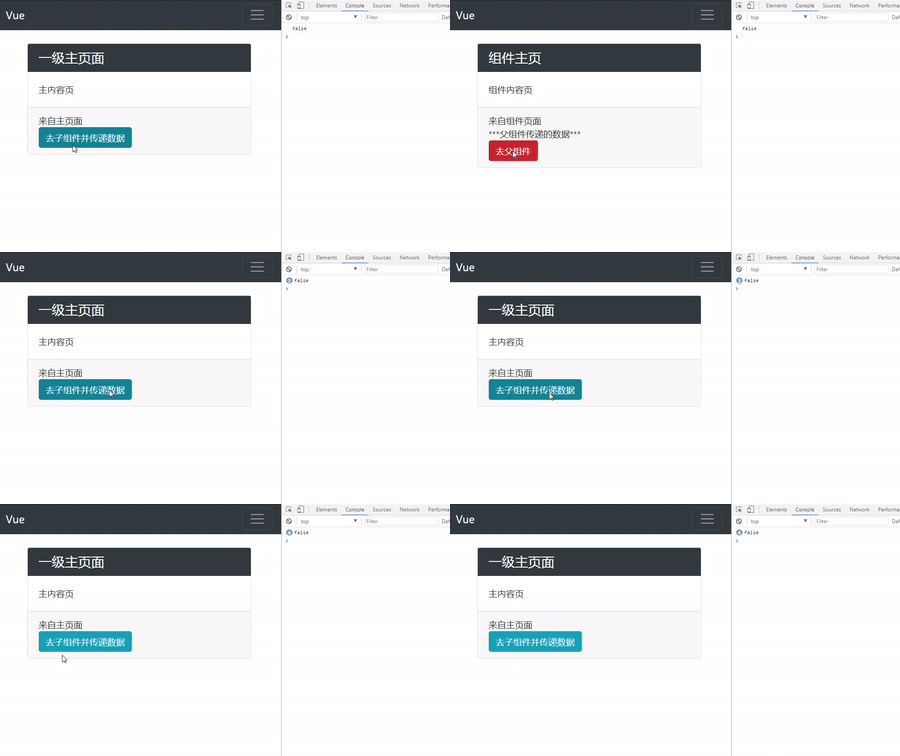
定义一个父组件
<template>

  <v-layout>

    <v-card contextual-style="dark" v-if="show">

      <span slot="header">

        一级主页面

      </span>

      <div slot="body">主内容页</div>

      <div slot="footer" :showDate="showDate">

        <div>来自主页面</div>

        <button type="button" class="btn btn-info " @click="toggle1">去子组件并传递数据</button>

      </div>

    </v-card>

    <v-card contextual-style="dark" v-else>

      <span slot="header">

        组件主页

      </span>

      <div slot="body">组件内容页</div>

      <div slot="footer">

        <div>来自组件页面</div>

        <my-button showDate="***父组件传递的数据***" @toggleEvent="toggle"></my-button>

      </div>

    </v-card>

  </v-layout>

</template>

<script>

/* ============

 * Home Index Page

 * ============

 *

 * The home index page.

 */

import VLayout from '@/layouts/Default';

import VCard from '@/components/Card';

import MyButton from '@/components/MyButton';

export default {

  /**

   * The name of the page.

   */

  name: 'home-index',

  data() {

    return {

      show: true,

      showDate: "父子间传过来的数据"

    }

  },

  methods: {

    toggle1(){

this.show =false;

    },

    toggle(data) {

      console.log(data)

      this.show = data;

    }

  },

  mounted() {

    // this.toggle();

  },

  /**

   * The components that the page can use.

   */

  components: {

    VLayout,

    VCard,

    MyButton

  },

};

</script>
再定义一个子组件
<template>

    <div>

        <div slot="body">{{showDate}}</div>

        <button type="button" class="btn btn-danger " @click="toggle1">去父组件</button>

    </div>

</template>

<script>

export default {

    props: ["showDate"],

    methods: {

        toggle1() {

            this.$emit('toggleEvent', "false")

        }

    }

}

</script>
将父组件的数据通过porps传递到子组件,子组件通过this.$emit(‘触发的事件函数’,要传输的数据)
就目前来说(组件之间传递数据共有三种方法):
1.通过父子组件之间的通信
2.通过vuex
3.通过路由传参
要说的就这么多,晚安~~~
vue实现非路由跳转以及数据传递的更多相关文章
- Vue编程式路由跳转传递参数
Vue 有时在路由跳转时需要用到一些原页面里的数据,用以下方法: 1.在跳转页的方法里写下query参数 TableChange(scope){ this.$router.push({ path:'d ...
- 解决vue单页路由跳转后scrollTop的问题
作为vue的初级使用者,在开发过程中遇到的坑太多了.在看页面的时候发现了页面滚动的问题,当一个页面滚动了,点击页面上的路由调到下一个页面时,跳转后的页面也是滚动的,滚动条并不是在页面的顶部 在我们写路 ...
- Android first --- 页面跳转及数据传递
页面跳转即数据传递 创建第二个界面Acivity *需要在清单文件中添加配置一个Actuvity标签 标签中如果带有这个子节点,则会在Android中添加一个快捷图标 <intent-filte ...
- vue中通过路由跳转的三种方式
原文:https://blog.csdn.net/qq_40072782/article/details/82533477 router-view 实现路由内容的地方,引入组件时写到需要引入的地方需要 ...
- 「实践篇」解决微前端 single-spa 项目中 Vue 和 React 路由跳转问题
前言 本文介绍的是在做微前端 single-spa 项目过程中,遇到的 Vue 子应用和 React 子应用互相跳转路由时遇到的问题. 项目情况:single-spa 项目,基座用的是 React,目 ...
- vue如何在路由跳转的时候更新组件
项目中在路由跳转的时候碰到一个问题,没有更新视图,如何解决呢: https://segmentfault.com/a/1190000008879966 http://www.tuicool.com/a ...
- vue 所有的路由跳转加一个统一参数
需求是什么 所有的路由跳转加一个统一的参数 实现方式 先深入理解一下router的全局前置守卫 router.beforeEach((to, from, next) => { const que ...
- Android应用开发基础之六:页面跳转和数据传递
创建第二个Activity 需要在清单文件中为其配置一个activity标签 标签中如果带有这个子节点,则会在系统中多创建一个快捷图标 <intent-filter> <action ...
- Android初级教程理论知识(第五章页面跳转和数据传递)
总体概述: Android四大组件 Activity BroadCastReceiver Service ContentProvider 创建第二个activity 新创建的activity,必须在清 ...
随机推荐
- C#基础入门 七
C#基础入门 七 接口 由于C#语言不支持多重继承,所以可以使用接口模拟结构的继承,通过使用interface关键字,定义一个接口. interface USB { void Read(string[ ...
- Android Camera的使用(一) 读书笔记
原文地址 https://blog.csdn.net/junzia/article/details/52301199 拍照步骤1.添加权限2.开启相机时check一下是否有摄像头3.对预览大小.照片大 ...
- .NET框架源码解读之准备CLR源码阅读环境
微软发布了CLR 2.0的源码,这个源码是可以直接在freebsd和windows环境下编译及运行的,请在微软shared source cli(http://www.microsoft.com/en ...
- 学习React前端框架,报错 'render' is not defined no-undef
报错 'render' is not defined no-undef 原因没有 写 import { render } from 'react-dom'
- UWP开发砸手机系列(二)—— “讲述人”识别自定义控件Command
上一篇我们提到如何让“讲述人”读出自定义的CanReadGrid,但“讲述人”仍然无法识别CanReadGrid上绑定的Command.XAML代码如下: <StackPanel> < ...
- C博客作业06—结构体&指针
1.本章学习总结 1.1思维导图 1.2本章学习体会 明白了结构体的定义及使用方法 学会了fopen,fclose,feof等文件操作函数,学会使用c语言进行文件操作 大作业中的部分函数出现未知错误且 ...
- B - Bridging signals (LIS)
点击打开链接 B - Bridging signals 'Oh no, they've done it again', cries the chief designer at the Waferlan ...
- 删除标注关联仿dda命令DIMDISASSOCIATE
static void sk_ARXTestXDatamydimassoc(void) { // Add your code for command sk_ARXTestXData.mydimasso ...
- [ActionScript 3.0] 幻灯片效果实例
package com.fylibs.components.effects { import com.fylibs.utils.LoaderQueues; import com.tweener.tra ...
- AngularJS源码解析1:angular自启动过程
angularJS加载进来后,会有一个立即执行函数调用,在源代码的最下面是angular初始化的地方.代码展示: bindJQuery(); publishExternalAPI(angular); ...