
django的mysql设置和mysql服务器闲置时间设置
服务器启动后,每个进程都会主动连接到mysql,要是长时间没有数据交互,mysql会自动断开连接。
show variables like '%timeout%';
闲置连接的超时时间由wait_timeout控制,默认8小时。
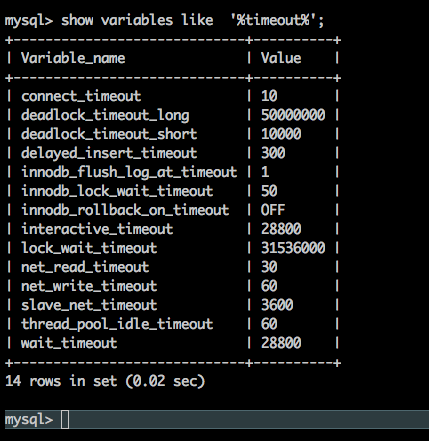
django的database设置:通过设置CONN_MAX_AGE<8小时,让客户端主动断开闲置的连接,避免客户端因闲置超时发生连接错误
DATABASES = {

    'default': {

        # 'ENGINE': 'django.db.backends.sqlite3',

        # 'NAME': os.path.join(BASE_DIR, 'db.sqlite3'),

        'ENGINE': 'django.db.backends.mysql',

        'NAME': conf.get('mysql', 'database'),

        'USER': conf.get('mysql', 'username'),

        'PASSWORD': conf.get('mysql', 'password'),  # 密码,

        'HOST': conf.get('mysql', 'host'),

        'PORT': conf.get('mysql', 'port'),

        # mysql服务器的设置是:闲置时间超过8个小时则服务端主动断开连接,因此这里设置客户端最多显示6个小时,就主动断开连接,

        # 下次连接时,重新建立新的连接,参考:https://docs.djangoproject.com/en/2.2/ref/databases/ Persistent connections

        'CONN_MAX_AGE': **,  # 数据库每个连接断开的时间设置

        'OPTIONS': {

            # "init_command": "SET sql_mode='STRICT_TRANS_TABLES'",

            # 'init_command': "SET innodb_strict_mode=1",

            # https://django-mysql.readthedocs.io/en/latest/checks.html

            'init_command': "SET sql_mode='STRICT_TRANS_TABLES', innodb_strict_mode=1",

            'charset': 'utf8mb4',

        },

        # Tell Django to build the test database with the 'utf8mb4' character set

        'TEST': {

            'CHARSET': 'utf8mb4',

            'COLLATION': 'utf8mb4_general_ci',

        },

        # 使每一个http请求都是事务性的

        # 'ATOMIC_REQUESTS': True

    }

}
原文细读:
Persistent connections

Persistent connections avoid the overhead of re-establishing a connection to the database in each request. They’re controlled by the CONN_MAX_AGE parameter which defines the maximum lifetime of a connection. It can be set independently for each database.

The default value is , preserving the historical behavior of closing the database connection at the end of each request. To enable persistent connections, set CONN_MAX_AGE to a positive number of seconds. For unlimited persistent connections, set it to None.


Connection management

Django opens a connection to the database when it first makes a database query. It keeps this connection open and reuses it in subsequent requests. Django closes the connection once it exceeds the maximum age defined by CONN_MAX_AGE or when it isn’t usable any longer.

In detail, Django automatically opens a connection to the database whenever it needs one and doesn’t have one already — either because this is the first connection, or because the previous connection was closed.

At the beginning of each request, Django closes the connection if it has reached its maximum age. If your database terminates idle connections after some time, you should set CONN_MAX_AGE to a lower value, so that Django doesn’t attempt to use a connection that has been terminated by the database server. (This problem may only affect very low traffic sites.)

At the end of each request, Django closes the connection if it has reached its maximum age or if it is in an unrecoverable error state. If any database errors have occurred while processing the requests, Django checks whether the connection still works, and closes it if it doesn’t. Thus, database errors affect at most one request; if the connection becomes unusable, the next request gets a fresh connection.

Caveats

Since each thread maintains its own connection, your database must support at least as many simultaneous connections as you have worker threads.

Sometimes a database won’t be accessed by the majority of your views, for example because it’s the database of an external system, or thanks to caching. In such cases, you should set CONN_MAX_AGE to a low value or even , because it doesn’t make sense to maintain a connection that’s unlikely to be reused. This will help keep the number of simultaneous connections to this database small.

The development server creates a new thread for each request it handles, negating the effect of persistent connections. Don’t enable them during development.

When Django establishes a connection to the database, it sets up appropriate parameters, depending on the backend being used. If you enable persistent connections, this setup is no longer repeated every request. If you modify parameters such as the connection’s isolation level or time zone, you should either restore Django’s defaults at the end of each request, force an appropriate value at the beginning of each request, or disable persistent connections.
参考:
https://www.cnblogs.com/li1234yun/p/7729800.html
https://docs.djangoproject.com/en/2.2/ref/databases/
django的mysql设置和mysql服务器闲置时间设置的更多相关文章
- django+nginx+xshell简易日志查询,接上<关于《rsyslog+mysql+loganalyzer搭建日志服务器<个人笔记>》的反思>
纠正一下之前在<关于<rsyslog+mysql+loganalyzer搭建日志服务器<个人笔记>>的反思>中说到的PHP+MySQL太慢,这里只是说我技术不好,没 ...
- Ubuntu+Django+Nginx+uWSGI+Mysql搭建Python Web服务器
Ubuntu+Django+Nginx+uWSGI+Mysql搭建Python Web服务器 闲着无聊的时候部署了一个Django项目玩,用vm虚拟机部署的. 准备工作 我使用的系统是Ubuntu16 ...
- mysql笔记05 优化服务器设置
优化服务器设置 1. MySQL有大量可以修改的参数--但不应该随便去修改.通常只需要把基本的项配置正确(大部分情况下只有很少一些参数时真正重要的),应将更多时间花在schema的优化.索引,以及查询 ...
- 解决乱码的方法是,在执行SQL语句之前,将MySQL以下三个系统参数设置为与服务器字符集character-set-server相同的字符集
character-set-server/default-character-set:服务器字符集,默认情况下所采用的. character-set-database:数据库字符集. characte ...
- 第六章 优化服务器设置--高性能MySQL 施瓦茨--读书笔记
MySql的默认配置不适用于使用大量资源,因为其通用性很高. 不要期望改变配置文件会带来巨大的性能提升.提升大小取决于工作负载,通常可以通过选择适当的配置参数得到两到三倍的性能提升.在这时候,性能提升 ...
- 如何通过命令行创建和设置一个MySQL用户
我想要在MySQL服务器上创建一个新的用户帐号,并且赋予他适当的权限和资源限制.如何通过命令行的方式来创建并且设置一个MySQL用户呢? 要访问一个MySQL服务器,你需要使用一个用户帐号登录其中方可 ...
- 关于《rsyslog+mysql+loganalyzer搭建日志服务器<个人笔记>》的反思
关于<rsyslog+mysql+loganalyzer搭建日志服务器<个人笔记>>的反思--链接--http://www.cnblogs.com/drgcaosheng/p/ ...
- 关于MYSQL数据库安装方式及相关设置简要说明
网上关于MYSQL的教程非常多,但都不是最新的,我这里只是针对最新版本的MY SQL 的安装与设置进行一个简要的说明,大部份操作都相同. 以下是按照WINDOWS 64位操作系统+MY SQL 5.6 ...
- Mysql从客户端连接服务器连不上的问题
Mysql从客户端连接服务器连不上的问题 公司要用Mysql做一个测试,开始在自己的本地建一个Mysql数据库自己本地的程序再连上去,没有遇到过连接不上的问题.这次数据库在服务器上,从本地客户端连 ...
随机推荐
- Android导入依赖appcompat-v7报错
Android导入依赖appcompat-v7报错 导入appcompat-v7时报错了 导入的是implementation 'com.android.support:appcompat-v7: ...
- python3之Django模型(一)
1.模型概述 模型是关于您的数据的唯一,明确的信息来源,它包含您正在存储的数据的重要字段和行为.通常,每个模型映射到单个数据库表. 每个模型都是一个子类的python类django.db.models ...
- JAVAEE——SpringBoot入门:简介、微服务、环境准备、helloworld与探究、快速构建项目
一.Spring Boot 入门 1.Spring Boot 简介 简化Spring应用开发的一个框架: 整个Spring技术栈的一个大整合: J2EE开发的一站式解决方案: 2.微服务 2014,m ...
- Android-Start方式和Bind方式混合开启Service
Android-Start方式和Bind方式混合开启Service 需求如下 需要开发一个音乐APP,需要满足以下的需求: 当退出所有的Activity后仍然能够播放音乐 能够控制音乐的播放比如说,暂 ...
- [ 转载 ] Tcp三次握手和四次挥手详解
#TCP的报头: 源端口号:表示发送端端口号,字段长为16位.目标端口号:表示接收端口号,字段长为16位.序列号:表示发送数据的位置,字段长为32位.每发送一次数据,就累加一次该数据字节数的大小.注意 ...
- BZOJ.4516.[SDOI2016]生成魔咒(后缀自动机 map)
题目链接 后缀数组做法见这. 直接SAM+map.对于每个节点其产生的不同子串数为len[i]-len[fa[i]]. //15932kb 676ms #include <map> #in ...
- .net 中的async,await理解
理解: 1.async修饰的方法可理解为异步方法(必须要配合await,否则和普通方法无异)2.当async方法执行遇到await,则立即将控制权转移到async方法的调用者3.由调用者决定是否需要等 ...
- JVM7、8参数详解及优化
1. JVM堆内存划分 这两天看到下面这篇文章的图不错. 一图读懂JVM架构解析 1.1 JDK7及以前的版本 其中最上一层是Nursery内存,一个对象被创建以后首先被放到Nursery中的Eden ...
- 使用 IntraWeb (7) - 主模板
TIWLayoutMgrHTML.TIWTemplateProcessorHTML 属于页面级的模板, 如果要全站统一模板, 当然要用主模板. TIWTemplateProcessorHTML 通过其 ...
- RabbitMQ简单使用
环境搭建: RabitMQ是用Elang编写的,虽然Elang本身是跨平台的,但也同时意味着搭建Rabit环境需要首先配置Elang环境.配置RabitMQ的网上教程还比较多的: windows 下 ...