C#利用Zxing.net生成条形码和二维码并实现打印的功能
开篇:zxing.net是.net平台下编解条形码和二维码的工具。
下载地址:http://pan.baidu.com/s/1kTr3Vuf
Step1:使用VS2010新建一个窗体程序项目:
Step2:添加三个类:分别是BarCodeClass.cs、DocementBase.cs、imageDocument.cs。(下一步贴出这些类的代码);;;;添加下载回来的引用zxing.dll。
》说明:
《1》 BarCodeClass.cs主要用来实现条形码和二维码的生成和解析。
《2》 DocementBase.cs、imageDocument.cs这两个类是用来实现对生成的条形码和二维码进行打印。

Step3:编写上一步的三个类的代码:
》BarCodeClass.cs
using System;
using System.Collections.Generic;
using System.Linq;
using System.Text;
using ZXing.Common;
using ZXing;
using System.Windows.Forms;
using System.Drawing;
using System.Text.RegularExpressions;
using ZXing.QrCode;
namespace BarCode
{
class BarCodeClass
{
///<summary>
///生成条形码
///</summary>
///<paramname="pictureBox1"></param>
///<paramname="Contents"></param>
public void CreateBarCode(PictureBoxpictureBox1,string Contents)
{
Regexrg = new Regex("^[0-9]{12}$");
if(!rg.IsMatch(Contents))
{
位数字");
return;
}
EncodingOptionsoptions =null;
BarcodeWriterwriter =null;
options = newEncodingOptions
{
Width = pictureBox1.Width,
Height = pictureBox1.Height
};
writer = newBarcodeWriter();
writer.Format = BarcodeFormat.ITF;
writer.Options = options;
Bitmapbitmap = writer.Write(Contents);
pictureBox1.Image = bitmap;
}
///<summary>
///生成二维码
///</summary>
///<paramname="pictureBox1"></param>
///<paramname="Contents"></param>
public void CreateQuickMark(PictureBoxpictureBox1,string Contents)
{
if(Contents == string.Empty)
{
MessageBox.Show("输入内容不能为空!");
return;
}
EncodingOptionsoptions =null;
BarcodeWriterwriter =null;
options = newQrCodeEncodingOptions
{
DisableECI = true,
CharacterSet = "UTF-8",
Width = pictureBox1.Width,
Height = pictureBox1.Height
};
writer = newBarcodeWriter();
writer.Format = BarcodeFormat.QR_CODE;
writer.Options = options;
Bitmapbitmap = writer.Write(Contents);
pictureBox1.Image = bitmap;
}
///<summary>
///解码
///</summary>
///<paramname="pictureBox1"></param>
public void Decode(PictureBoxpictureBox1)
{
BarcodeReaderreader =new BarcodeReader();
Resultresult = reader.Decode((Bitmap)pictureBox1.Image);
}
}
}
》DocementBase.cs
using System;
using System.Collections.Generic;
using System.Linq;
using System.Text;
using System.Drawing.Printing;
using System.Drawing;
using System.Windows.Forms;
namespace BarCode
{
class DocementBase : PrintDocument
{
//fields
public Font Font = new Font("Verdana",10, GraphicsUnit.Point);
//预览打印
public DialogResult showPrintPreviewDialog()
{
PrintPreviewDialogdialog =new PrintPreviewDialog();
dialog.Document = this;
returndialog.ShowDialog();
}
//先设置后打印
public DialogResult ShowPageSettingsDialog()
{
PageSetupDialogdialog =new PageSetupDialog();
dialog.Document = this;
returndialog.ShowDialog();
}
}
}
》imageDocument.cs
using System;
using System.Collections.Generic;
using System.Linq;
using System.Text;
using System.Drawing;
using System.Drawing.Printing;
namespace BarCode
{
class imageDocument : DocementBase
{
privateImage _Image;
public Image Image
{
get
{
return_Image;
}
set
{
_Image = value;
if(_Image != null)
{
if(_Image.Size.Width > _Image.Size.Height)
DefaultPageSettings.Landscape = true;
else
DefaultPageSettings.Landscape = false;
}
}
}
publicimageDocument()
{
}
publicimageDocument(Image image)
{
this.Image= image;
}
protectedoverridevoidOnPrintPage(PrintPageEventArgs e)
{
if(Image == null)
{
thrownewInvalidOperationException();
}
RectanglebestFit = GetBestFitRectangle(e.MarginBounds, Image.Size);
e.Graphics.DrawImage(Image, bestFit);
e.Graphics.DrawRectangle(Pens.Black, bestFit);
e.Graphics.DrawRectangle(Pens.Black, e.MarginBounds);
}
// 保持高度比:参数为(打印边界的Rectangularle对象,图像大小的Size对象)
protectedRectangle GetBestFitRectangle(Rectangle toContain,SizeobjectSize)
{
//检查页面是水平还是竖直的。
boolcontainerLandscape =false;
if(toContain.Width > toContain.Height)
containerLandscape = true;
//高度比=图像的高/图像的宽
floataspectRatio = (float)objectSize.Height / (float)objectSize.Width;
//得到页面左上角的坐标
intmidContainerX = toContain.Left + (toContain.Width / 2);
intmidContainerY = toContain.Top + (toContain.Height / 2);
intx1 = 0, x2 = 0, y1 = 0, y2 = 0;
if(containerLandscape ==false)
{
//竖直图像
x1 = toContain.Left;
x2 = toContain.Right;
//调整之后的height
intadjustedHeight = (int)((float)toContain.Width * aspectRatio);
y1 = midContainerY -(adjustedHeight / 2);
y2 = y1 + adjustedHeight;
}
else
{
y1 = toContain.Top;
y2 = toContain.Bottom;
//调整之后的height
intadjustedWidth = (int)((float)toContain.Height/ aspectRatio);
x1 = midContainerX -(adjustedWidth / 2);
x2 = x1 + adjustedWidth;
}
returnnewRectangle(x1,y1, x2 - x1, y2 - y1);
}
}
}
Step4:修改界面。
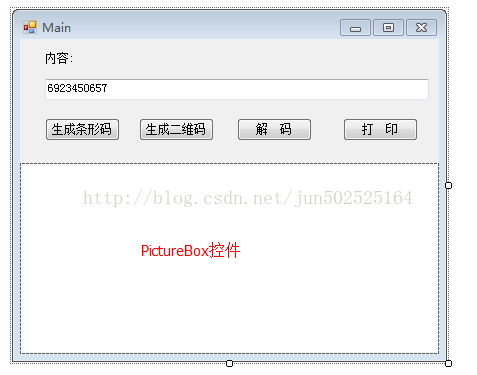
Step5:依次双击【生成条形码】、【生成二维码】、【解码】、【打印】等按钮,进入Click事件,编写后台代码。这里不再一一讲述如何实现。代码参照下一步:
Step6:贴出窗体的全部代码。
using System;
using System.Collections.Generic;
using System.ComponentModel;
using System.Data;
using System.Drawing;
using System.Linq;
using System.Text;
using System.Windows.Forms;
using System.Text.RegularExpressions;
using ZXing;
using ZXing.QrCode.Internal;
using ZXing.Common;
using System.IO;
using ZXing.QrCode;
namespace BarCode
{
public partial class Main : Form
{
publicMain()
{
InitializeComponent();
}
private BarCodeClass bcc = newBarCodeClass();
private DocementBase _docement;
//生成条形码
privatevoid button1_Click(objectsender,EventArgs e)
{
bcc.CreateBarCode(pictureBox1,txtMsg.Text);
}
//生成二维码
privatevoid button2_Click(objectsender,EventArgs e)
{
bcc.CreateQuickMark(pictureBox1, txtMsg.Text);
}
privatevoid Form1_Load(objectsender,EventArgs e)
{
txtMsg.Text = System.DateTime.Now.ToString("yyyyMMddhhmmss").Substring(0,12);
}
//解码
privatevoid button4_Click(objectsender,EventArgs e)
{
if(pictureBox1.Image ==null)
{
MessageBox.Show("请录入图像后再进行解码!");
return;
}
BarcodeReaderreader =new BarcodeReader();
Resultresult = reader.Decode((Bitmap)pictureBox1.Image);
MessageBox.Show(result.Text);
}
//打印
privatevoid button3_Click(objectsender,EventArgs e)
{
if(pictureBox1.Image ==null)
{
MessageBox.Show("You Must Load an Image first!");
return;
}
else
{
_docement=new imageDocument(pictureBox1.Image);
}
_docement.showPrintPreviewDialog();
}
}
}
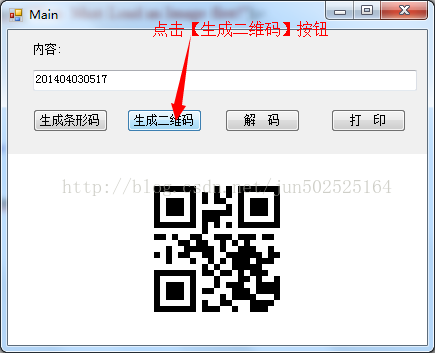
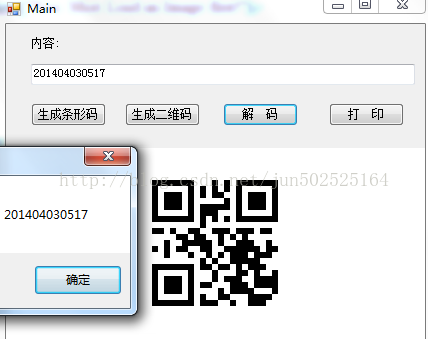
Step7:剩下的就是演示了:本机演示结果如下:
》运行程序:点击【生成条形码】,结果如下:

》点击【解码】按钮,结果如下:

》点击《打印》按钮,结果如下:

》点击【生成二维码】按钮,结果如下:
》点击【解码】按钮,结果如下:
》点击【打印】按钮,结果如下:

C#利用Zxing.net生成条形码和二维码并实现打印的功能的更多相关文章
- C#Zxing.net生成条形码和二维码
下载Zxing.net官网:https://archive.codeplex.com/?p=zxingnet 或者去VS程序包下载 封装好的代码: using System; using System ...
- 利用ZXing.Net生成和识别二维码
ZXing.Net:ZXing是一个开放源码的,用Java实现的多种格式的1D/2D条码图像处理库. github:https://github.com/micjahn/ZXing.Net 直接将字符 ...
- C# 利用ZXing.Net来生成条形码和二维码
本文是利用ZXing.Net在WinForm中生成条形码,二维码的小例子,仅供学习分享使用,如有不足之处,还请指正. 什么是ZXing.Net? ZXing是一个开放源码的,用Java实现的多种格式的 ...
- 使用谷歌Z生成条形码以及二维码
下载地址:http://zxingnet.codeplex.com/ zxing.net是.net平台下编解条形码和二维码的工具,使用非常方便. 首先下载二进制dll文件,引入工程: using Sy ...
- 使用ZXing.Net生成与识别二维码(QR Code)
Google ZXing是目前一个常用的基于Java实现的多种格式的1D/2D条码图像处理库,出于其开源的特性其现在已有多平台版本.比如今天要用到的ZXing.Net就是针对微软.Net平台的版本.使 ...
- ZXing生成条形码、二维码、带logo二维码
采用的是开源的ZXing,Maven配置如下,jar包下载地址,自己选择版本下载,顺便推荐下Maven Repository <!-- https://mvnrepository.com/art ...
- winform生成条形码和二维码(ZXing.Net)
首先在项目添加ZXing.Net. 工具-->Nuget包管理器-->Nuget程序包 在所搜栏输入 ZXing.Net 如下图: 添加完成后会看见: 效果图: 所有代码: /// &l ...
- iOS开发——生成条形码,二维码
- (void)viewDidLoad { [super viewDidLoad]; self.imageView.image = [self generateBarCode:@"15248 ...
- ZXing.net 生成和解析二维码
nuget引用zxing.net包 public partial class Form1 : Form { public Form1() { InitializeComponent(); } priv ...
随机推荐
- mfc CSpinButton
知识点: CSliderCtrl(滑块)控件 CSliderCtrl常用属性 CSliderCtrl类常用成员函数 CSliderCtrl运用示例 一.CSliderCtr常用属性 Orientati ...
- Eclipse中JBoss插件配置
JBoss 服务器集成到Eclispe(考虑Eclipse版本Version: Indigo Service Release 2) http://www.cnblogs.com/sunddenly/p ...
- 写个发邮件的功能php的(全代码)
---恢复内容开始--- 正好做了个项目,需要在线留言,一般在线留言发邮件是很常见的方式,一开始从网上搜了很久都没有很全的,也有全一点的,但是也不能用,运行不成功,下面给大家分享一下运行成功了的全部代 ...
- OpenGL学习(2)——绘制三角形(补)
对上一篇的补充,通过绘制三角形来完成矩形的绘制.此外,完成章节后练习. 绘制矩形 一个矩形由两个三角形组成,因此绘制矩形需要绘制两个三角形,一共6个顶点,其中2个顶点重复画了两次. 为了减小开销,仅储 ...
- 教你用PS制作雨天窗户上透明水滴字
雨天窗户上透明水滴字制作方法很简单,主要利用图层样式来实现.学习后可以让你对图层样式有更好的了解,认识. 先看下完成后的效果图: 步骤1: 在Photoshop中我们新建或Ctrl+N,创建1920x ...
- DRF框架获取参数的方式
DRF获取参数的方式 例如url url(r'^demo/(?P<word>.*)/$', DemoView.as_view()) 在类视图中获取参数 url:http://127.0.0 ...
- VC++ MFC程序设置以管理员权限运行
1.引入资源文件 (.manifest文件),文件中的 name 值为程序全称.exe:文件内容如下: <?xml version="1.0" encoding=" ...
- PAT甲题题解-1016. Phone Bills (25)-模拟、排序
博主欢迎转载,但请给出本文链接,我尊重你,你尊重我,谢谢~http://www.cnblogs.com/chenxiwenruo/p/6789229.html特别不喜欢那些随便转载别人的原创文章又不给 ...
- 冲刺Two之站立会议2
今天我们进行了主界面部分的设置,因为它包含的部分有很多,所以就只能它拆分进行一一突破.今天主要完成了主界面的框架搭建,以及添加了需要的按钮,包括好友管理,退出登录,开启聊天通信界面的内容等.
- SDN竞赛思考总结
SDN竞赛思考总结 2016年下半年张老师开始着手组建SDN小组,从未接触过任何网络知识的我也有幸成为小组一员.从最开始刷Openflow交换机,Get了刷交换机的新技能;到P4FPGA的无疾而终,表 ...