【Ray Tracing in One Weekend 超详解】 光线追踪1-6
新的一年,前来打卡
Preface
回顾上一篇,我们讲述了漫反射材质,也就是平时的磨砂表面。
它一种将入射光经表面随机散射形成的材质,是一种非常普遍的表面形式。
这一篇,我们将来学习镜面反射,或者说是金属材质
镜面在生活中见得也很多,它是一种将入射光经表面按照物理反射规律形成的材质。
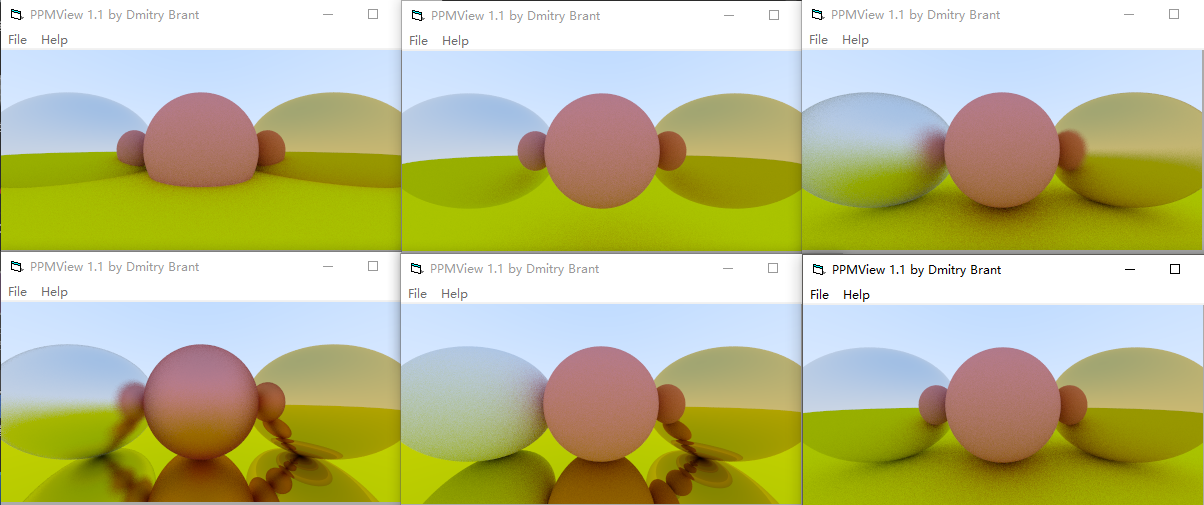
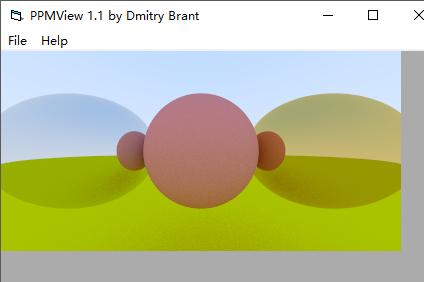
先看效果
Ready
之前我们就写好的
ray.h
intersect.h
intersection.h
sphere.h
camera.h
Chapter8: Metal
之前我们已经写过一个漫反射的材质,可以发现,材质其实就解决两个问题:
1.如何创造反射光或者散射光(吸收转化入射光)
2.如何确定光线强度的衰减量
我们采用类比法:
上一篇中
diffuse表面:1.视线与物体表面产生撞击点p,在p处相切单位圆内随机找一点s,散射光方向即p->s
2.我们上一篇采用的光线强度衰减机制是取半。
这一篇中我们将
metal表面: 1.根据物理反射定律确定入射光对应的反射光的方向
2.强度衰减改为三元组,分别对应rgb三分量的衰减度,且用参数自由确定
那么首先,它们有共同点,我们有必要将其抽象一下
/// material.h

// -----------------------------------------------------

// [author]        lv

// [begin ]        2018.1.1

// [brief ]        the material-class for the ray-tracing project

//                from the 《ray tracing in one week》

// -----------------------------------------------------

#ifndef MATERIAL_H

#define MATERIAL_H

namespace rt

{

//abstract basic class

class material

    {

public:

    /*

    @brief: produce a scattered ray

    @param: InRay -> Incident light

            info -> the information of intersect-point(hit-point)

            attenuation -> when scattered, how much the ray should be attenuated by tis reflectance R

            scattered -> as we talk, it is a new sight; or

                         it is the scattered ray with the intersect-point

    @retur: the function calculate a scattered ray or not

    */

    virtual bool scatter(const ray& InRay, const hitInfo& info, rtvec& attenuation, ray& scattered)const = ;

protected:

    /*

    @brief: find a random point in unit_sphere

    */

    const rtvec random_unit_sphere()const

        {

        rtvec p;

        do

            {

            p = 2.0*rtvec(rtrand01(), rtrand01(), rtrand01()) - rtvec(, , );

            } while (dot(p, p) >= 1.0);

        return p;

        }

    };

}

#endif
书上是这样的:

但是取单位圆随机点在两个材质中都有用到,所以,我还是选择把它放在了基类中,可能作者在后面会进行添加,这个不做讨论。
我们继续看一下,如果我们定义了材质,那么我们需要改一些其他的文件内容,将它融入进去
intersect.h中的hitInfo中需要添加

我们现在定义漫反射材质(Diffuse or Lambertian)如下:
/// diffuse.h

// -----------------------------------------------------

// [author]        lv

// [begin ]        2019.1.1

// [brief ]        one of the materials

// -----------------------------------------------------

#ifndef DIFFUSE_H

#define DIFFUSE_H

namespace rt

{

//diffuse material

class lambertian : public material

    {

public:

    lambertian(const rtvec& a) :_albedo(a) {  }

    virtual bool scatter(const ray& rIn, const hitInfo& info, rtvec& attenuation, ray& scattered)const override;

protected:

    rtvec _albedo;

    };

bool lambertian::scatter(const ray& rIn, const hitInfo& info, rtvec& attenuation, ray& scattered)const

{

    rtvec target = info._p + info._n + random_unit_sphere();

    scattered = ray{ info._p, target - info._p };

    attenuation = _albedo;

    return true;

}

}

#endif
diffuse.h
scatter函数就是上次主函数里面写的 lerp()
_albedo为衰减三元组,下同,不再赘述
接下来,我们需要了解一下,反射定律;
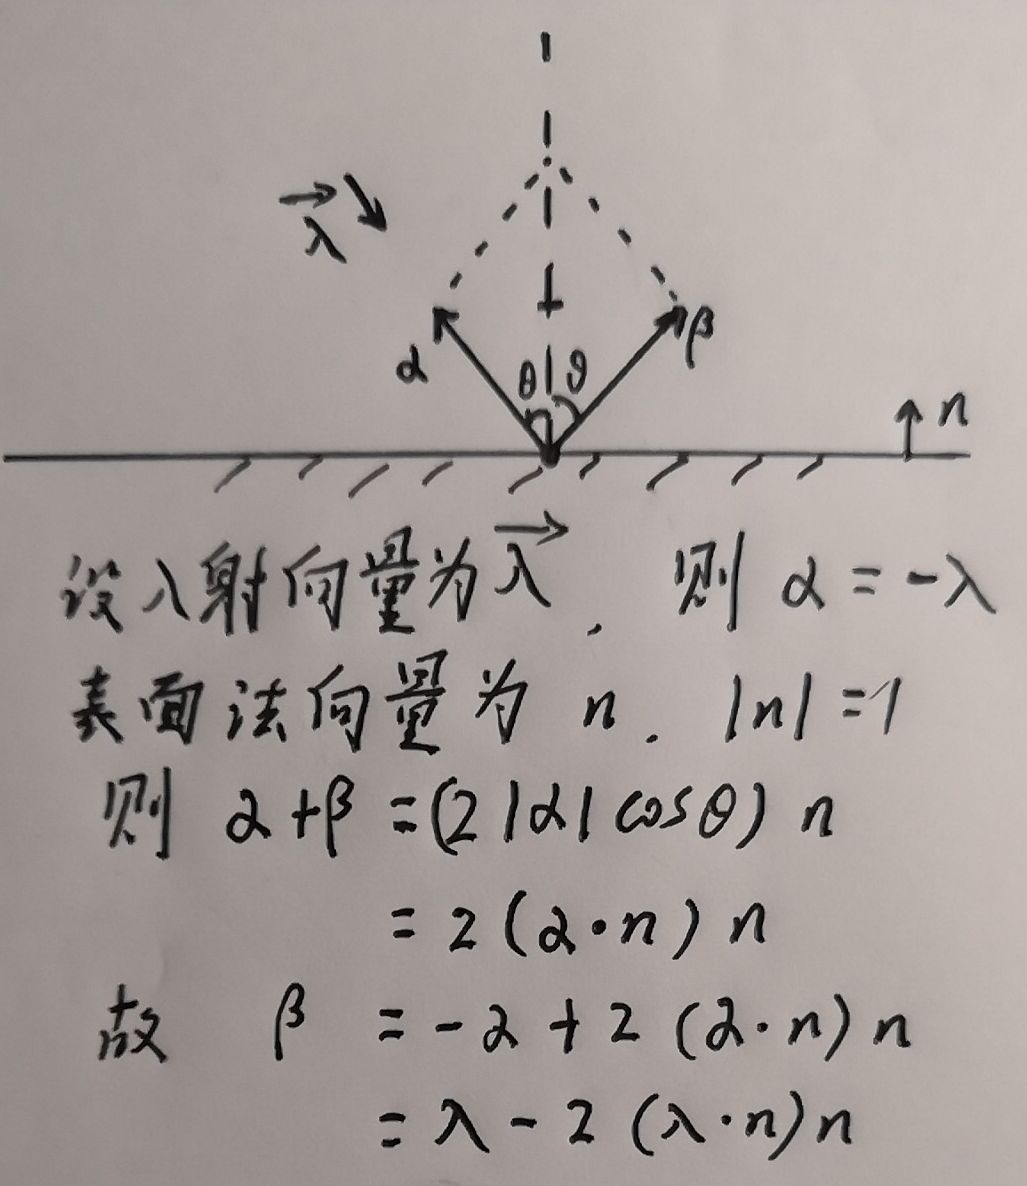
所以,我们的反射函数如下:
inline rtvec reflect(const rtvec& in, const rtvec& n)const { return in - * dot(in, n)*n; }
然后我们就可以写金属材质了
/// metal.h

// -----------------------------------------------------

// [author]        lv

// [begin ]        2018.1.1

// [brief ]        one of the materials

// -----------------------------------------------------

#ifndef MEATL_H

#define METAL_H

namespace rt

{

//metal material

class metal :public material

    {

public:

    metal(const rtvec& a) :_albedo(a) {     }

    virtual bool scatter(const ray& rIn, const hitInfo& info, rtvec& attenuation, ray& scattered)const override;

protected:

    inline rtvec reflect(const rtvec& in, const rtvec& n)const { return in -  * dot(in, n)*n; }

    rtvec _albedo;

    };

bool metal::scatter(const ray& rIn, const hitInfo& info, rtvec& attenuation, ray& scattered)const

{

    rtvec target = reflect(rIn.direction().ret_unitization(), info._n);

    scattered = ray{ info._p, target };

    attenuation = _albedo;

    return dot(scattered.direction(), info._n) != ;

}

}

#endif
metal.h
这个其实比较简单,就根据反射定律计算出反射向量然后转移视线即可
根据书上的步骤,我们可以先写一个例子了
我们首先写lerp函数
为了避免场景中物体过多,进行非常多次反射降低渲染效率,我们取合适的反射递归深度值作为界限
rtvec lerp(const ray& sight, intersect* world, int depth)

{

    hitInfo info;

    if (world->hit(sight, (rtvar)0.001, rtInf(), info))

    {

        ray scattered;

        rtvec attenuation;

        if (depth <  && info.materialp->scatter(sight, info, attenuation, scattered))

            return attenuation * lerp(scattered, world, depth + ); //递归反射,每次反射回退计算rgb的时候进行衰减

        else

            return rtvec(, , );

    }

    else

    {

        rtvec unit_dir = sight.direction().ret_unitization();

        rtvar t = 0.5*(unit_dir.y() + .);

        return (. - t)*rtvec(., ., .) + t*rtvec(0.5, 0.7, 1.0);

    }

}
我们的main函数:
inline rtvar rtrand01() //https://www.cnblogs.com/lv-anchoret/p/10190092.html

{

    static std::mt19937 mt;

    static std::uniform_real_distribution<rtvar> rtrand;

    return rtrand(mt);

}
main:
    stds ofstream file("graph8-1.ppm");

    size_t W = , H = , sample = ;

    if (file.is_open())

    {

        file << "P3\n" << W << " " << H << "\n255\n" << stds endl;

        size_t sphereCnt = ;

        intersect** list = new intersect*[sphereCnt];

        list[] = new sphere(rtvec(, , -), 0.5, new lambertian(rtvec(0.8,0.3,0.3)));

        list[] = new sphere(rtvec(, -100.5, -), , new lambertian(rtvec(0.8, 0.8, .)));

        list[] = new sphere(rtvec(-, , -), 0.5, new metal(rtvec(0.8, 0.8, 0.8)));

        list[] = new sphere(rtvec(, , -), 0.5, new metal(rtvec(0.8, 0.6, 0.2)));

        intersect* world = new intersections(list, sphereCnt);

        camera cma;

        for (int y = H - ; y >= ; --y)

            for (int x = ; x < W; ++x)

            {

                rtvec color;

                for (int cnt = ; cnt < sample; ++cnt)

                {

                    lvgm::vec2<rtvar> para{

                        (rtrand01() + x) / W,

                        (rtrand01() + y) / H };

                    color += lerp(cma.get_ray(para), world, );

                }

                color /= sample;

                color = rtvec(sqrt(color.r()), sqrt(color.g()), sqrt(color.b()));    //gamma 校正,上一篇讲过

                int r = int(255.99 * color.r());

                int g = int(255.99 * color.g());

                int b = int(255.99 * color.b());

                file << r << " " << g << " " << b << stds endl;

            }

        file.close();

        if (list[])delete list[];

        if (list[])delete list[];

        if (list[])delete list[];

        if (list[])delete list[];

        if (list)delete[] list;

        if (world)delete world;

        stds cout << "complished" << stds endl;

    }

    else

        stds cerr << "open file error" << stds endl;
上述的sphere对象增加了材质,所以我们需要为sphere-class做一些适当的补充
/// sphere.h

// -----------------------------------------------------

// [author]        lv

// [begin ]        2018.1.1

// [brief ]        the sphere-class for the ray-tracing project

//                from the 《ray tracing in one week》

// -----------------------------------------------------

#ifndef SPHERE_H

#define SPHERE_H

namespace rt

{

class sphere :public intersect

    {

public:

    sphere() {  }

        /*

        @para1: 球心坐标

        @para2: 球半径

        @para3: 材质

        */

    sphere(const rtvec& h, rtvar r, material* ma) :_heart(h), _radius(r), _materialp(ma) {  }

    ~sphere() { if (_materialp)    delete _materialp; }

    virtual bool hit(const ray& sight, rtvar t_min, rtvar t_max, hitInfo& rec)const override;

    inline const rtvar r()const { return _radius; }

    inline const rtvec& heart()const { return _heart; }

    inline rtvar& r() { return _radius; }

    inline rtvec& heart() { return _heart; }

private:

    rtvec _heart;

    rtvar _radius;

    material* _materialp;

    };

bool sphere::hit(const ray& sight, rtvar t_min, rtvar t_max, hitInfo& rec)const

{

    rtvec trace = sight.origin() - _heart;

    rtvar a = dot(sight.direction(), sight.direction());

    rtvar b = 2.0 * dot(trace, sight.direction());

    rtvar c = dot(trace, trace) - _radius * _radius;

    rtvar delt = b*b - 4.0*a*c;

    if (delt > )

    {

        rec.materialp = _materialp;

        rtvar x = (-b - sqrt(delt)) / (2.0*a);

        if (x < t_max && x > t_min)

        {

            rec._t = x;

            rec._p = sight.go(rec._t);

            rec._n = (rec._p - _heart) / _radius;

            return true;

        }

        x = (-b + sqrt(delt)) / (2.0*a);

        if (x < t_max && x > t_min)

        {

            rec._t = x;

            rec._p = sight.go(x);

            rec._n = (rec._p - _heart) / _radius;

            return true;

        }

    }

    return false;

}

}

#endif
sphere.h
我们创建了四个球
中间heart:(0,0,1) r:0.5
下面heart:(0,-100.5,-1) r:100
左边heart:(-1,0,-1) r:0.5
右边heart:(1,0,-1) r:0.5
左右为镜面,中间和下面是磨砂
回顾我们的标准屏幕坐标系:coor 1.1
中间球的球心 ,距上边界为1,距下边界为1,距左边界为2,距右边界为2
所以,绿色球(heart(0,-100.5,-1), r:100)超出屏幕底部0.5,意思是和三个球的底部是契合的,所以,它们之间有三个接触的阴影
而左右两个球中的画面均为镜面反射,并不是透明,中间球两边的小球是在旁边球面的球面镜像
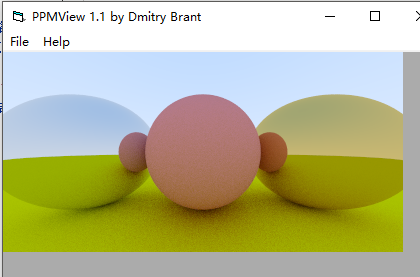
我们可以测验下,比如把绿球的半径改为100.3,即

则是这样的:
现在总该相信,绿球的上边界并不是图中的绿色横线,那些都是左右球镜面反射的镜像。
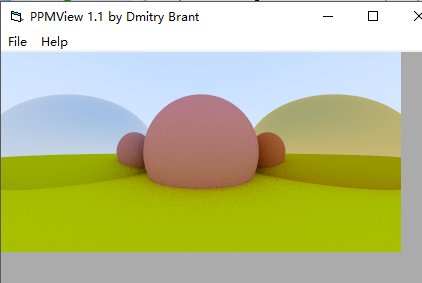
你也可以把绿球的半径改为99.7
三个球的底部和绿球并没有接触阴影,且球镜面镜像中绿色横线边界有所降低
如果没有明白,我们来屡一下流程再继续往下走:
流程
1.我们先创建几个sphere,每个都需要有球心、半径、rgb衰减三元组和材质
2.视线扫描屏幕
3.lerp计算
1)当前视线和场景中所有的物体求表面交点,求最近点,顺便把交点的信息都记录下来,包括位置,表面法线和该点所在的sphere中的材质信息
2)如果有交点:根据交点的材质,计算反射或散射向量,顺便把材质中的衰减三元组信息通过参数传出来,然后返回rgb的时候进行rgb分量衰减,根据求取的scattered-ray,进行视线转移(视点转换);如果没有交点了,那么返回该位置对应的背景插值颜色
4.采样
5.gamma校正
6.输出屏幕中该点的信息
那么,我们还是来关注下这里面的一些个有趣的事情,好像有一个叫衰减三元组的,使用计算反射后的光线的rgb乘以三元组进行分量衰减,那么,如果衰减三元组为(1,1,1),那么意思就是保持原值,未损失,那么我们把场景中所有的sphere中的衰减三元组均改为(1,1,1),会是什么样子的呢?
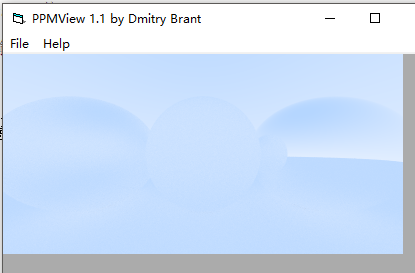
非常不明显,尤其是中间和下面,基本看不到了,右边还算有些轮廓
因为,漫反射材质散射方向随机,所以如果不把散射光进行逐步衰减的话,基本就是周围背景色,所以,漫反射材质很容易融入坏境
而镜面是严格的物理反射规律,所以上半部分会用更上面的光代替,下面的会用下面的光代替,所以还是有一些色差的
左面的部分还加了镜面模糊效果的,镜面模糊下面讲
镜面模糊其实就是 镜面 + 模糊系数*漫反射
漫反射实现原理是根据随机化s点,所以模糊镜面实现公式即为:
模糊镜面反射 = 镜面反射 + 模糊系数 * 单位球随机点漫反射
引用书中一张图:
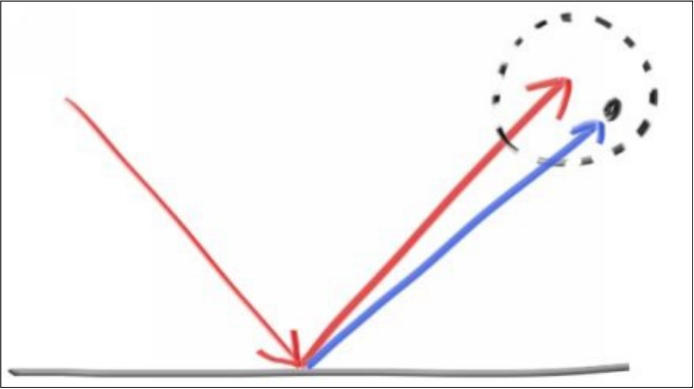
模糊原理就和漫反射原理差不多
/// metal.h

// -----------------------------------------------------

// [author]        lv

// [begin ]        2018.1.1

// [brief ]        one of the materials

// -----------------------------------------------------

#ifndef MEATL_H

#define METAL_H

namespace rt

{

//metal material

class metal :public material

    {

public:

    metal(const rtvec& a, const rtvar f = 0.) :_albedo(a)

        {

        if (f <  && f >= )_fuzz = f;

        else _fuzz = ;

        }

    virtual bool scatter(const ray& rIn, const hitInfo& info, rtvec& attenuation, ray& scattered)const override;

protected:

    inline rtvec reflect(const rtvec& in, const rtvec& n)const { return in -  * dot(in, n)*n; }

    rtvec _albedo;

    rtvar _fuzz;

    };

bool metal::scatter(const ray& rIn, const hitInfo& info, rtvec& attenuation, ray& scattered)const

{

    rtvec target = reflect(rIn.direction().ret_unitization(), info._n);

    scattered = ray{ info._p, target + _fuzz * random_unit_sphere() };

    attenuation = _albedo;

    return dot(scattered.direction(), info._n) != ;

}

}

#endif
所以我们在main中创建sphere时,还要指定模糊系数,默认为0(不模糊)
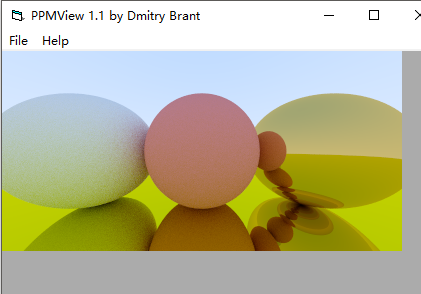
我们来测试下模糊系数,如果左右两个镜面的模糊系数分别为0.7和0.2的话,是这个样子的:

如果只把右边和下边改为镜面,那么就很有意思了:
最后一张,全镜面,左球和中球模糊
是不是感觉非常有意思
遗留工程问题
一个基类material,里面一个纯虚函数scatter
两个子类,metal和Lambertian
两个子类的类声明放在头文件中,将scatter函数实现放在源文件中
会有一个子类的scatter无法解析
感谢您的阅读,生活愉快~
【Ray Tracing in One Weekend 超详解】 光线追踪1-6的更多相关文章
- 【Ray Tracing The Next Week 超详解】 光线追踪2-9
我们来整理一下项目的代码 目录 ----include --hit --texture --material ----RTdef.hpp ----ray.hpp ----camera.hpp ---- ...
- 【Ray Tracing The Next Week 超详解】 光线追踪2-6 Cornell box
Chapter 6:Rectangles and Lights 今天,我们来学习长方形区域光照 先看效果 light 首先我们需要设计一个发光的材质 /// light.hpp // ------- ...
- 【Ray Tracing in One Weekend 超详解】 光线追踪1-4
我们上一篇写了Chapter5 的第一个部分表面法线,那么我们来学剩下的部分,以及Chapter6. Chapter5:Surface normals and multiple objects. 我们 ...
- 【Ray Tracing The Next Week 超详解】 光线追踪2-7 任意长方体 && 场景案例
上一篇比较简单,很久才发是因为做了一些好玩的场景,后来发现这一章是专门写场景例子的,所以就安排到了这一篇 Preface 这一篇要介绍的内容有: 1. 自己做的光照例子 2. Cornell box画 ...
- 【Ray Tracing The Next Week 超详解】 光线追踪2-8 Volume
Preface 今天有两个东东,一个是体积烟雾,一个是封面图 下一篇我们总结项目代码 Chapter 8:Volumes 我们需要为我们的光线追踪器添加新的物体——烟.雾,也称为participat ...
- 【Ray Tracing The Next Week 超详解】 光线追踪2-5
Chapter 5:Image Texture Mapping 先看效果: 我们之前的纹理是利用的是撞击点p处的位置信息,比如大理石纹理 而我们今天的图片映射纹理采用2D(u,v)纹理坐标来进行. 在 ...
- 【Ray Tracing in One Weekend 超详解】 光线追踪1-8 自定义相机设计
今天,我们来学习如何设计自定义位置的相机 ready 我们只需要了解我们之前的坐标体系,或者说是相机位置 先看效果 Chapter10:Positionable camera 这一章我们直接用概念 ...
- 【Ray Tracing The Next Week 超详解】 光线追踪2-4 Perlin noise
Preface 为了得到更好的纹理,很多人采用各种形式的柏林噪声(该命名来自于发明人 Ken Perlin) 柏林噪声是一种比较模糊的白噪声的东西:(引用书中一张图) 柏林噪声是用来生成一些看似杂乱 ...
- 【Ray Tracing The Next Week 超详解】 光线追踪2-3
Preface 终于到了激动人心的纹理章节了 然鹅,看了下,并不激动 因为我们之前就接触过 当初有一个 attenuation 吗? 对了,这就是我们的rgb分量过滤器,我们画出的红色.蓝色.绿色等 ...
- 【Ray Tracing The Next Week 超详解】 光线追踪2-2
Chapter 2:Bounding Volume Hierarchies 今天我们来讲层次包围盒,乍一看比较难,篇幅也多,但是咱们一步一步来,相信大家应该都能听懂 BVH 和 Perlin text ...
随机推荐
- libvirt工具实现虚拟机管理
libvirt工具实现虚拟机管理 作者:尹正杰 版权声明:原创作品,谢绝转载!否则将追究法律责任. 一.介绍virt-install命令的常用参数 virt-install是一个命令行工具,它能够为K ...
- bzoj千题计划181:bzoj1878: [SDOI2009]HH的项链
http://www.lydsy.com/JudgeOnline/problem.php?id=1878 之前用莫队做的,现在用树状数组 把每种数的第一个出现位置在树状数组中+1 nxt[i] 记录i ...
- SimpleRoundedImage-不使用mask实现圆角矩形图片
1.一张图片是如何显示在屏幕上的 一张图片渲染到unity界面中的大致流程. 2.我们要做什么 我们要做的就是在CPU中将图片的矩形顶点数据修改成圆角矩形的顶点信息,之后Unity会将修改后的顶点数据 ...
- spark RDD 常见操作
fold 操作 区别 与 co 1.mapValus 2.flatMapValues 3.comineByKey 4.foldByKey 5.reduceByKey 6.groupByKey 7.so ...
- html文件中jquery与velocity变量中的$冲突的解决方法
1.使用jQuery代替$. 如:jQuery.ajax(); 缺点:不适合扩展,一旦替换成第三方库时,那就麻烦大发 2.使用jQuery.noConflict. 如:var j = jQuery.n ...
- 浅谈区间DP的解题时常见思路
一.区间DP解题时常见思路 如果题目中答案满足: 大的区间的答案可以由小的区间答案组合或加减得到 大的范围可以由小的范围代表 数据范围较小 我们这时可以考虑采用区间DP来解决. 那么常见的解法有两种: ...
- Java内存模型-final域的内存语义
一 引言 说到final你肯定知道它是Java中的关键字,那么它所在Java中的作用你知道吗?不知道的话,请前往这篇了解下https://www.cnblogs.com/yuanfy008/p/802 ...
- Dream_Spark版本定制第一课
从今天起,我们踏上了新的Spark学习旅途.我们的目标是要像Spark官方机构那样有能力去定制Spark. 一. 我们最开始将从Spark Streaming入手. 为何从Spark Streami ...
- 查看IP以及连接数
AWK: time awk 'BEGIN{while("netstat -an"|getline){if( $5 ~ /[1-255]/){split($5,t1,":& ...
- 升级openssh到最新版本
首先,下载最新版本,传到服务器:http://mirror.aarnet.edu.au/pub/OpenBSD/OpenSSH/portable/ 安装 cd /root/ mkdir ssh_upg ...