死磕nginx系列--nginx服务器做web服务器
nginx 做静态服务器
HTML页面如下
<!DOCTYPE html>

<html lang="en">

<head>

    <meta charset="UTF-8">

    <title>Title</title>

</head>

<body>

<h1>图片展示</h1>

<div>

    <img src="/static/images/1.png">

</div>

</body>

</html>
上传相关文件,生成如下路径
tree html/

html/

├── index.html

└── static

    └── images

        └── 1.png
## 配置nginx.conf 配置文件

worker_processes  1;

events {

    worker_connections  1024;

}

http {

    include       mime.types;

    default_type  application/octet-stream;

    sendfile        on;

    keepalive_timeout  65;

    server {

        listen       80;

        server_name  localhost;

        location / {

            root   html;

            index  index.html index.htm;

        }

        error_page   500 502 503 504  /50x.html;

        location = /50x.html {

            root   html;

        }

    }

}
/data/app/nginx/sbin/nginx -t

nginx: the configuration file /data/app/nginx-1.10.3/conf/nginx.conf syntax is ok

nginx: configuration file /data/app/nginx-1.10.3/conf/nginx.conf test is successful

/data/app/nginx/sbin/nginx -s reload
浏览器访问:

这个时候我们可以把static静态页面给拆分出来
worker_processes  1;

events {

    worker_connections  1024;

}

http {

    include       mime.types;

    default_type  application/octet-stream;

    sendfile        on;

    keepalive_timeout  65;

    server {

        listen       80;

        server_name  localhost;

        location / {

            root   html;

            index  index.html index.htm;

        }

        location /static/ {

            root /data/db;

        }

        error_page   500 502 503 504  /50x.html;

        location = /50x.html {

            root   html;

        }

    }

}
将静态文件迁移到/data/db目录下,并重启nginx服务。
mv html/static/ /data/db/

/data/app/nginx/sbin/nginx -t

/data/app/nginx/sbin/nginx -s reload
测试图片是否能否获取:
curl -I http://192.168.56.12/static/images/1.png

HTTP/1.1 200 OK

Server: nginx/1.10.3

Date: Sun, 08 Apr 2018 09:31:35 GMT

Content-Type: image/png

Content-Length: 32239

Last-Modified: Sun, 08 Apr 2018 09:21:26 GMT

Connection: keep-alive

ETag: "5ac9df16-7def"

Accept-Ranges: bytes
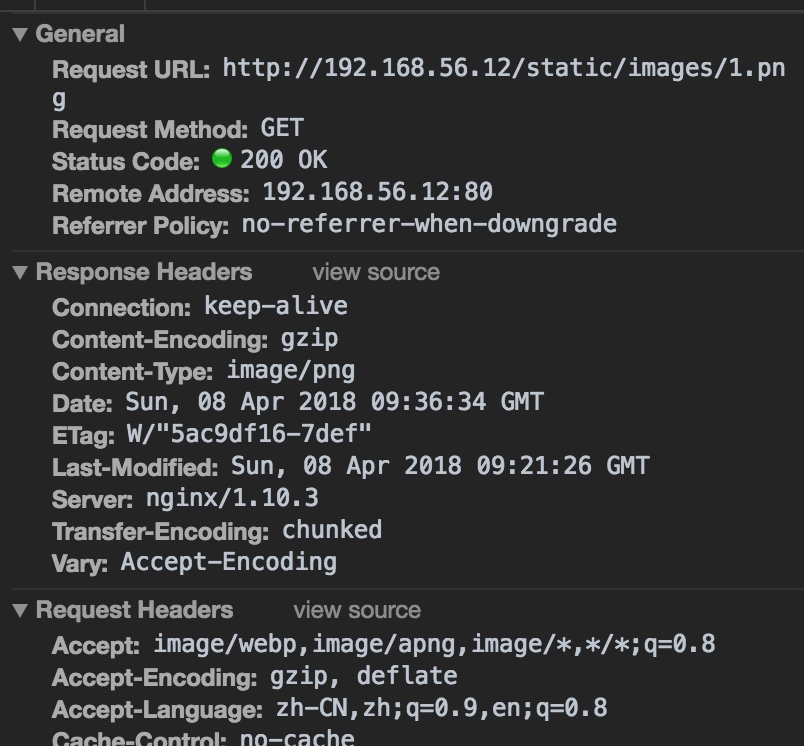
对图片开启gzip压缩
worker_processes  1;

events {

    worker_connections  1024;

}

http {

    include       mime.types;

    default_type  application/octet-stream;

    sendfile        on;

    gzip on;

    gzip_min_length 1k;

    gzip_buffers    4 16k;

    gzip_http_version 1.1;

    gzip_comp_level 6;

    gzip_types image/png;

    gzip_vary on;

    keepalive_timeout  65;

    server {

        listen       80;

        server_name  localhost;

        location / {

            root   html;

            index  index.html index.htm;

        }

        location /static/ {

            root /data/db;

        }

        error_page   500 502 503 504  /50x.html;

        location = /50x.html {

            root   html;

        }

    }

}
/data/app/nginx/sbin/nginx -t

/data/app/nginx/sbin/nginx -s reload
对比两次响应头信息,开启gzip 压缩后响应头多了Content-Encoding: gzip,开启压缩成功。

nginx 反向代理后端服务器
配置nginx环境
user  www www;

worker_processes 8;

error_log  /data/logs/nginx_error.log  crit;

pid        /usr/local/webserver/nginx/nginx.pid;

#Specifies the value for maximum file descriptors that can be opened by this process.

worker_rlimit_nofile 65535;

events

{

  use epoll;

  worker_connections 65535;

}

http

{

  include       mime.types;

  default_type  application/octet-stream;

  #charset  gb2312;

  server_names_hash_bucket_size 128;

  client_header_buffer_size 32k;

  large_client_header_buffers 4 32k;

  client_max_body_size 8m;

  sendfile on;

  tcp_nopush     on;

  keepalive_timeout 60;

  tcp_nodelay on;

include  gzip.conf;

include blog.biglittle.cn.conf;
gzip.conf文件内容
  gzip on;

  gzip_min_length  1k;

  gzip_buffers     4 16k;

  gzip_http_version 1.0;

  gzip_comp_level 2;

  gzip_types       text/plain application/x-javascript text/css application/xml;

  gzip_vary on;
blog.biglittle.cn.conf文件内容
##  server

  {

    listen 80 default;

    server_name blog.biglittleant.cn;

    index index.html index.htm index.php;

    root html;

    location ~ .*\.(php|php5)?$

    {

      fastcgi_pass  127.0.0.1:9000;

      fastcgi_index index.php;

      include fastcgi.conf;

    }

  }
fastcgi.conf文件内容
  fastcgi_connect_timeout 300;

  fastcgi_send_timeout 300;

  fastcgi_read_timeout 300;

  fastcgi_buffer_size 64k;

  fastcgi_buffers 4 64k;

  fastcgi_busy_buffers_size 128k;

  fastcgi_temp_file_write_size 128k;
安装PHP 环境
下载PHP文件,并安装基础依赖包
wget http://cn2.php.net/distributions/php-7.1.2.tar.gz

 yum -y install  libpng libpng-devel freetype freetype-devel libxml2 libxml2-devel zlib zlib-devel libcurl-devel libjpeg-turbo-devel openssl openssl-devel
编译安装
./configure --prefix=/data/app/php-7.1.2 --enable-fpm --with-fpm-user=nginx --with-fpm-group=nginx --with-mysqli --with-zlib --with-curl --with-gd --with-jpeg-dir --with-png-dir --with-freetype-dir --with-openssl --enable-mbstring --enable-xml --enable-session --enable-ftp --enable-pdo -enable-tokenizer --enable-zip --enable-bcmath --enable-sockets --with-gettext

make && make install

ln -s /data/app/php-7.1.2/ /data/app/php7

cp php.ini-development /data/app/php7/lib/php.ini

cp sapi/fpm/php-fpm.service /usr/lib/systemd/system/
修改配置文件
vim /data/app/php7/lib/php.ini

# 查找 mysqli.default_socket,修改成:

mysqli.default_socket = /data/app/mysql/mysql.sock

date.timezone = PRC
好了,PHP 7 已经安装好,下面验证一下
shell > /data/app/php7/bin/php -v

PHP 7.0.5 (cli) (built: Apr  8 2016 00:08:04) ( NTS )

Copyright (c) 1997-2016 The PHP Group

Zend Engine v3.0.0, Copyright (c) 1998-2016 Zend Technologies
再查看下已经安装的模块
/data/app/php7/bin/php -m
接着配置 php-fpm文件
# copy php-fpm 的配置文档

cp /data/app/php7/etc/php-fpm.conf.default /data/app/php7/etc/php-fpm.conf

cp /data/app/php7/etc/php-fpm.d/www.conf.default /data/app/php7/etc/php-fpm.d/www.conf
其中 www.conf 中要留意以下这个值
listen = 127.0.0.1:9000
配置 php-fpm 启动服务脚本
修改启动脚本,把里边 prefix 相关的内容用实际路径代替
vim /usr/lib/systemd/system/php-fpm.service

PIDFile=/usr/local/php7/var/run/php-fpm.pid

ExecStart=/usr/local/php7/sbin/php-fpm --nodaemonize --fpm-config /usr/local/php7/etc/php-fpm.conf

# 重新载入 systemd

systemctl daemon-reload

systemctl start php-fpm

ss -lntup |grep 9000
编写PHP测试文件
vim /data/app/nginx/html/hello.php 编写一个PHP测试文件。
<html>

 <head>

  <title>PHP 测试</title>

 </head>

 <body>

 <?php echo '<p>Hello World</p>'; ?>

 <?php phpinfo(); ?>

 </body>

</html>
测试是否可用
/data/app/nginx/sbin/nginx -t

/data/app/nginx/sbin/nginx -s reload

死磕nginx系列--nginx服务器做web服务器的更多相关文章
- 死磕nginx系列--nginx 目录
死磕nginx系列--nginx入门 死磕nginx系列--nginx配置文件 死磕nginx系统-nginx日志配置 死磕nginx系列--nginx服务器做web服务器 死磕nginx系列--使用 ...
- 树莓派做web服务器(nginx、Apache)
一想到Linux Web服务器,我们首先想到的是: Apache + MySql + Php. Apache:是世界使用排名第一的Web服务器软件. 可以运行在几乎所有广泛使用的计算机平台上,由于其跨 ...
- Nginx是什么,有什么优点?为什么选择Nginx做web服务器软件?(经典经典)
1.基础知识 代理服务器: 一般是指局域网内部的机器通过代理服务器发送请求到互联网上的服务器,代理服务器一般作用在客户端.应用比如:GoAgent,FQ神器. 一个完整的代理请求过程为:客 ...
- Ubuntu+Django+Nginx+uWSGI+Mysql搭建Python Web服务器
Ubuntu+Django+Nginx+uWSGI+Mysql搭建Python Web服务器 闲着无聊的时候部署了一个Django项目玩,用vm虚拟机部署的. 准备工作 我使用的系统是Ubuntu16 ...
- Nginx是如何配置为 Web 服务器的【转载】
详解 Nginx是如何配置为 Web 服务器的 林涛 发表于:2016-11-29 23:23 分类:WebServer 标签:Nginx,web,web服务器 521次 抽象来说,将 Nginx 配 ...
- ubuntu12.04 安装nginx+php+mysql (lnmp)的web服务器环境
1.Ubuntu12.04 安装nginx+php+mysql (lnmp)的web服务器环境 http://blog.db89.org/ubuntu12-04-install-nginx-php-m ...
- 一生挚友redo log、binlog《死磕MySQL系列 二》
系列文章 原来一条select语句在MySQL是这样执行的<死磕MySQL系列 一> 一生挚友redo log.binlog<死磕MySQL系列 二> 前言 咔咔闲谈 上期根据 ...
- 打开order by的大门,一探究竟《死磕MySQL系列 十二》
在日常开发工作中,你一定会经常遇到要根据指定字段进行排序的需求. 这时,你的SQL语句类似这样. select id,phone,code from evt_sms where phone like ...
- 重重封锁,让你一条数据都拿不到《死磕MySQL系列 十三》
在开发中有遇到很简单的SQL却执行的非常慢,甚至只查询一行数据. 咔咔遇到的只有两种情况,一种是MySQL服务器CPU占用率很高,所有的SQL都执行的很慢直到超时,程序也直接502,另一种情况是行锁造 ...
随机推荐
- Spring基础(7) : Bean的名字
1.普通bean是用id标志,context.getBean时传入名称即可获得. <bean id="p" class="com.Person"/> ...
- C++虚析构函数解析
当派生类对象从内存中撤销时一般先运行派生类的析构函数,然后再调用基类的析构函数. 如果用new运算符建立的派生类的临时对象,对指向基类的指针指向这个临时对象当用delete运算符撤销对象时,系统执行的 ...
- WinForm窗体上两个panel,怎么实现一个panel固定漂浮在另一个panel之上
问题:winform窗体,要实现一个panel漂浮在另一个panel之上,但是运行的时候移动鼠标或者其他操作,上面那个panel就会消失?即只能显示一个panel. 原因:在窗体上拖放控件肉眼观察是平 ...
- Weex 实现文件的下载
需求:在使用weex框架时,我们使用vue文件写页面,在native端加载服务器端的js页面时由于网络状态的不确定性,我们需要在第一次加载的时候对js页面进行本地存储.也就是说我们需要把js文件下载到 ...
- 关于《阿里巴巴Java开发规约》插件的安装与使用
一.安装 二.idea插件的安装与使用 https://github.com/alibaba/p3c/tree/master/idea-plugin#run-plugin Idea Plugin Pr ...
- 【14】代理模式(Proxy Pattern)
一.引言 在软件开发过程中,有些对象有时候会由于网络或其他的障碍,以至于不能够或者不能直接访问到这些对象,如果直接访问对象给系统带来不必要的复杂性.这时候可以在客户端和目标对象之间增加一层中间层,让代 ...
- PHP中NOTICE错误常见解决方法
对于初学者,肯定会遇到不同的错误提示,比如:警告,致命,等等,其中NOTICE错误等级最低,页面中,好多类似 Notice: Use of undefined constant title - ass ...
- git 常见命令,规范 整理
move commit to stage area(把本地的1个commit还原到 暂存区) git reset --soft HEAD~1 把其他的commit的合并到现在到分支:git cherr ...
- bootstrap和ajax相结合
<!DOCTYPE html PUBLIC "-//W3C//DTD XHTML 1.0 Transitional//EN" "http://www.w3.org/ ...
- Python Django框架笔记(一):安装及创建项目
#推荐一本书<Python核心编程>(适合有一定基础的),美国人Wesley Chun编写的,京东.淘宝应该都有.我是觉得写的很好,详细.简洁.满满的干货,不像有的书整本看完也没什么用. ...