
GridLayout自定义数字键盘(两个EditText)
功能说明:
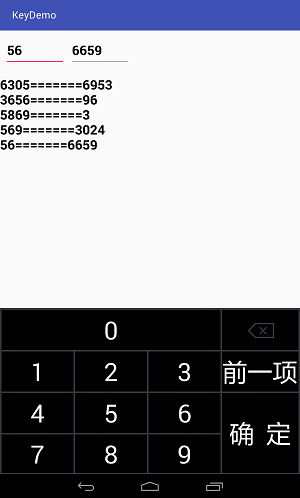
适用于两个EditText输入框,并控制输入字符的长度,点击键盘中的"确定"按钮完成输入,点击"前一项"光标跳到前一个EditText
运行效果图如下:
布局文件
 <?xml version="1.0" encoding="utf-8"?>

 <LinearLayout xmlns:android="http://schemas.android.com/apk/res/android"

     xmlns:tools="http://schemas.android.com/tools"

     android:layout_width="match_parent"

     android:layout_height="match_parent"

     android:orientation="vertical"

     android:focusable="true"

     android:focusableInTouchMode="true">

     <LinearLayout

         android:layout_marginTop="10dp"

         android:layout_width="match_parent"

         android:layout_height="60dp">

         <EditText

             android:id="@+id/edt1"

             android:maxLength="4"

             android:textSize="20sp"

             android:textColor="#000000"

             android:textStyle="bold"

             android:layout_marginLeft="10dp"

             android:selectAllOnFocus="true"

             android:focusableInTouchMode="true"

             android:layout_width="120dp"

             android:layout_height="match_parent" />

         <EditText

             android:textSize="20sp"

             android:textColor="#000000"

             android:textStyle="bold"

             android:id="@+id/edt2"

             android:maxLength="4"

             android:selectAllOnFocus="true"

             android:layout_marginLeft="10dp"

             android:layout_width="120dp"

             android:layout_height="match_parent" />

     </LinearLayout>

     <TextView

         android:textSize="20sp"

         android:textColor="#000000"

         android:textStyle="bold"

         android:layout_marginTop="20dp"

         android:id="@+id/tv"

         android:layout_width="match_parent"

         android:layout_height="400dp" />

     <include

         android:layout_marginTop="65dp"

         android:layout_width="match_parent"

         android:layout_height="wrap_content"

         android:layout_alignParentBottom="true"

         layout="@layout/gridlayout"/>

 </LinearLayout>
<?xml version="1.0" encoding="utf-8"?>

<GridLayout xmlns:android="http://schemas.android.com/apk/res/android"

    android:layout_width="match_parent"

    android:layout_height="match_parent"

    android:background="#34373e">

    <Button

        android:layout_marginTop="4dp"

        android:layout_marginLeft="3dp"

        android:id="@+id/txt0"

        android:layout_width="350dp"

        android:layout_height="80dp"

        android:layout_column="0"

        android:layout_columnSpan="3"

        android:layout_gravity="fill_horizontal"

        android:layout_row="1"

        android:background="#000000"

        android:textColor="#FFFFFF"

        android:textSize="50dp"

        android:text="0" />

    <ImageButton

        android:layout_marginTop="4dp"

        android:layout_marginLeft="3dp"

        android:layout_marginRight="5dp"

        android:id="@+id/delete"

        android:layout_width="153dp"

        android:layout_height="80dp"

        android:background="#000000"

        android:textColor="#FFFFFF"

        android:layout_column="3"

        android:layout_gravity="fill_horizontal"

        android:layout_row="1"

        android:src="@drawable/delete" />

    <Button

        android:layout_marginTop="3dp"

        android:layout_marginLeft="3dp"

        android:id="@+id/txt1"

        android:layout_width="144dp"

        android:layout_height="80dp"

        android:layout_column="0"

        android:layout_row="2"

        android:background="#000000"

        android:textColor="#FFFFFF"

        android:textSize="50dp"

        android:text="1" />

    <Button

        android:layout_marginTop="3dp"

        android:layout_marginLeft="3dp"

        android:id="@+id/txt2"

        android:layout_width="144dp"

        android:layout_height="80dp"

        android:layout_column="1"

        android:layout_row="2"

        android:background="#000000"

        android:textColor="#FFFFFF"

        android:textSize="50dp"

        android:text="2" />

    <Button

        android:layout_marginTop="3dp"

        android:layout_marginLeft="3dp"

        android:id="@+id/txt3"

        android:layout_width="144dp"

        android:layout_height="80dp"

        android:layout_column="2"

        android:layout_row="2"

        android:background="#000000"

        android:textColor="#FFFFFF"

        android:textSize="50dp"

        android:text="3" />

    <Button

        android:layout_marginTop="3dp"

        android:layout_marginLeft="3dp"

        android:layout_marginRight="5dp"

        android:id="@+id/next"

        android:layout_width="123dp"

        android:layout_height="80dp"

        android:layout_column="3"

        android:layout_gravity="fill_horizontal"

        android:layout_row="2"

        android:textSize="50dp"

        android:text="前一项"

        android:background="#000000"

        android:textColor="#FFFFFF" />

    <Button

        android:layout_marginTop="3dp"

        android:layout_marginLeft="3dp"

        android:id="@+id/txt4"

        android:layout_width="144dp"

        android:layout_height="80dp"

        android:layout_column="0"

        android:layout_row="3"

        android:background="#000000"

        android:textColor="#FFFFFF"

        android:textSize="50dp"

        android:text="4" />

    <Button

        android:layout_marginTop="3dp"

        android:layout_marginLeft="3dp"

        android:id="@+id/txt5"

        android:layout_width="144dp"

        android:layout_height="80dp"

        android:layout_column="1"

        android:layout_row="3"

        android:background="#000000"

        android:textColor="#FFFFFF"

        android:textSize="50dp"

        android:text="5" />

    <Button

        android:layout_marginTop="3dp"

        android:layout_marginLeft="3dp"

        android:id="@+id/txt6"

        android:layout_width="144dp"

        android:layout_height="80dp"

        android:layout_column="2"

        android:layout_row="3"

        android:background="#000000"

        android:textColor="#FFFFFF"

        android:textSize="50dp"

        android:text="6" />

    <Button

        android:layout_marginLeft="3dp"

        android:layout_marginTop="3dp"

        android:layout_marginRight="5dp"

        android:layout_marginBottom="3dp"

        android:id="@+id/sure"

        android:layout_width="153dp"

        android:layout_height="160dp"

        android:layout_columnSpan="2"

        android:layout_rowSpan="2"

        android:background="#000000"

        android:textColor="#FFFFFF"

        android:textSize="50dp"

        android:text="确  定" />

    <Button

        android:layout_marginTop="3dp"

        android:layout_marginLeft="3dp"

        android:layout_marginBottom="3dp"

        android:id="@+id/txt7"

        android:layout_width="144dp"

        android:layout_height="77dp"

        android:layout_column="0"

        android:layout_row="4"

        android:background="#000000"

        android:textColor="#FFFFFF"

        android:textSize="50dp"

        android:text="7" />

    <Button

        android:layout_marginTop="3dp"

        android:layout_marginLeft="3dp"

        android:layout_marginBottom="3dp"

        android:id="@+id/txt8"

        android:layout_width="144dp"

        android:layout_height="77dp"

        android:layout_column="1"

        android:layout_row="4"

        android:background="#000000"

        android:textColor="#FFFFFF"

        android:textSize="50dp"

        android:text="8" />

    <Button

        android:layout_marginTop="3dp"

        android:layout_marginLeft="3dp"

        android:id="@+id/txt9"

        android:layout_width="144dp"

        android:layout_height="77dp"

        android:layout_column="2"

        android:layout_row="4"

        android:background="#000000"

        android:textColor="#FFFFFF"

        android:textSize="50dp"

        android:layout_marginBottom="3dp"

        android:text="9" />

</GridLayout>
Java代码:
public class MainActivity extends AppCompatActivity {

    private EditText edt1,edt2;

    private String str1="",str2="",string="";

    private TextView textView;

    private int[] btidNum = { R.id.txt0, R.id.txt1, R.id.txt2, R.id.txt3,

            R.id.txt4, R.id.txt5, R.id.txt6, R.id.txt7, R.id.txt8, R.id.txt9};

    private Button[] buttons = new Button[btidNum.length];

    boolean flag=true;

    //控制第一个EditText中输入数据的长度

    TextWatcher tw = new TextWatcher() {

        //@Override

        public void beforeTextChanged(CharSequence s, int start, int count, int after) {

        }

        //@Override

        public void onTextChanged(CharSequence s, int start, int before, int count) {

        }

        //@Override

        public void afterTextChanged(Editable s) {

            if (s.toString().length() == 4) {

                if (edt1.isFocused()) {

                    edt1.clearFocus();

                    edt2.requestFocus();

//                    edt2.setText("1");

//                    edt2.setSelection(1);    //   设置光标的位置

                    string="";

                    flag=false; //第二个

                }

                else if(edt2.isFocusable()){

                    edt2.clearFocus();

                    edt1.requestFocus();

                    string="";

                    flag=true;//第一个

                }

            }

        }

    };

    @Override

    protected void onCreate(Bundle savedInstanceState) {

        super.onCreate(savedInstanceState);

        setContentView(R.layout.activity_main);

        edt1=(EditText)findViewById(R.id.edt1);

        edt1.addTextChangedListener(tw);

        edt2=(EditText)findViewById(R.id.edt2);

        edt2.addTextChangedListener(tw);

        textView=(TextView)findViewById(R.id.tv);

        edt1.requestFocus();

        GetNumber get = new GetNumber();

        for (int i = 0; i < btidNum.length; i++) {

            buttons[i] = (Button) findViewById(btidNum[i]);

            buttons[i].setOnClickListener(get);

        }

        ImageButton delete=(ImageButton)findViewById(R.id.delete);

        Button next=(Button)findViewById(R.id.next);

        Button sure=(Button)findViewById(R.id.sure);

        delete.setOnClickListener(new View.OnClickListener() {

            @Override

            public void onClick(View view) {

                if(str1.length()>0&&flag==true){

                    str1=str1.substring(0,str1.length()-1);

                    edt1.setText(str1);

                    edt1.setSelection(str1.length());

                    string=edt1.getText().toString();

                }else if(str2.length()>0&&flag==false){

                    str2=str2.substring(0,str2.length()-1);

                    edt2.setText(str2);

                    edt2.setSelection(str2.length());

                    string=edt2.getText().toString();

                }

            }

        });

        next.setOnClickListener(new View.OnClickListener() {

            @Override

            public void onClick(View view) {

                if(edt2.isFocusable()){

                    edt2.clearFocus();

                    edt1.requestFocus();

                    string="";

                    flag=true;

                }

            }

        });

        sure.setOnClickListener(new View.OnClickListener() {

            @Override

            public void onClick(View view) {

                str1=edt1.getText().toString().trim();

                str2=edt2.getText().toString().trim();

                textView.append(str1+"======="+str2+"\n");

            }

        });

    }

    // 给 EditText赋值

    class GetNumber implements View.OnClickListener {

        @Override

        public void onClick(View v) {

            String txt = ((Button) v).getText().toString();

            string=string+txt;

            if(flag==true){

                str1=string;

                edt1.setText(str1);

                edt1.setSelection(str1.length());

            }else if(flag==false){

                str2=string;

                edt2.setText(str2);

                edt2.setSelection(str2.length());

            }

        }

    }

}
如需屏蔽系统键盘,请借鉴上一篇
GridLayout自定义数字键盘(两个EditText)的更多相关文章
- ios自定义数字键盘
因为项目又一个提现的功能,textfiled文本框输入需要弹出数字键盘,首先想到的就是设置textfiled的keyboardType为numberPad,此时你会看到如下的效果: 但是很遗憾这样 ...
- html5自定义数字键盘
原理:使用div模拟输入框,避免手机原生键盘弹出,键盘使用div模拟,点击事件使用js控制,光标闪烁使用css模拟,具体代码如下: <!doctype html> <html lan ...
- h5仿微信、支付宝数字键盘|微信支付键盘|支付宝付款键盘
html5仿微信支付数字键盘|仿支付宝键盘|h5仿微信密码输入键盘|自定义数字键盘 很早之前由于项目需求,就有开发过一个h5仿微信支付键盘,这几天就把之前的数字键盘模块独立出来,重新整理开发成demo ...
- iOS数字键盘自定义按键
UIKeyboardTypeNumberPad 数字键盘自定义按键 最近做一个搜索用户的功能,这里使用了UISearchBar.由于搜索的方式只有手机号码,所以这里的键盘要限制为数字输入,可以这么做: ...
- 前端angularJS利用directive实现移动端自定义软键盘的方法
最近公司项目的需求上要求我们iPad项目上一些需要输入数字的地方用我们自定义的软键盘而不是移动端设备自带的键盘,刚接到需求有点懵,因为之前没有做过,后来理了一下思路发现这东西也就那样.先看一下实现之后 ...
- Android自定义安全键盘
在银行APP里经常要自定义键盘,例如实现下面这样的效果 首先在xml文件里定义键盘 <Keyboard xmlns:android="http://schemas.andr ...
- android开发(45) 自定义软键盘(输入法)
概述 在项目开发中遇到一个需求,”只要数字键盘的输入,仅仅有大写字母的输入,某些输入法总是会提示更新,弹出广告等“,使得我们需要自定义输入. 关联到的知识 KeyboardView 一个视图 ...
- 一个数字键盘引发的血案——移动端H5输入框、光标、数字键盘全假套件实现
https://juejin.im/post/5a44c5eef265da432d2868f6 为啥要写假键盘? 还是输入框.光标全假的假键盘? 手机自带的不用非得写个假的,吃饱没事干吧? 装逼?炫技 ...
- Excel 2007中自定义数字格式前要了解的准则
要在Excel 2007中创建自定义数字格式,首先应了解自定义数字格式的准则,并从选择某一内置数字格式开始.然后,可以更改该格式的任意代码部分,从而创建自己的自定义数字格式. 数字格式最多可包含四个代 ...
随机推荐
- window.returnValue跨域传值问题[转]
主页面用window.showModalDialog的时候,如果直接打开其它系统的页面,这时候别人的页面在window.returnValue=1;这样返回值的时候,主页面是取不到返回值的,原因就是因 ...
- Nopcommerce 二次开发2 WEB
using System; using System.Collections.Generic; using System.Linq; using System.ServiceModel.Syndica ...
- js解决IE不支持数组的indexOf()方法
if (!Array.indexOf) { Array.indexOf = function (obj) { ...
- 向架构师进军--->系统架构设计基础知识
如果你对项目管理.系统架构有兴趣,请加微信订阅号"softjg",加入这个PM.架构师的大家庭 在讲解系统架构设计之前,有必要补充一下架构相关的概念,因此本博文主要讲述架构.架构师 ...
- 庆祝下:iOS 开发者企业级计划(299美元/年帐户+邓白氏码免费) 和 Windows Phone公司应用(公司帐户99美元+Symantec企业证书299美元/年))顺利发布成功
时间:2013-11-15,地址:http://192.168.0.8 网站可下载三个终端应用直接安装IOS,Windows Phone,Android iOS: 企业版IDP通过 iTunes.使 ...
- JAVA Socket 编程学习笔记(一)
1. Socket 通信简介及模型 Java Socket 可实现客户端--服务器间的双向实时通信.java.net包中定义的两个类socket和ServerSocket,分别用来实现双向连接的cli ...
- oracle-关于dual
来源:百度知道1. dual 是一张表.是一张只有一个字段,一行记录的表. 2.习惯上,我们称之为'伪表'.因为他不存储主题数据.3. 他的存在,是为了操作上的方便.因为select 都是要有特定对象 ...
- js 中数字问题
在js中请注意数字是没有长度的, 不能使用for循环遍历数字的长度 操作时通过.toString()把数字转换成字符串后通过字符串的.length 属性得到长度
- Verilog $random用法
“$random函数调用时返回一个32位的随机数,它是一个带符号的整形数...”,并给出了一个例子: _________________________________________________ ...
- [转]CSS 表单元素对齐详解
来源:http://blog.sina.com.cn/s/blog_655388ed0100lzyk.html 简单的设置input{vertical-align:middle}即可,完美的: lab ...