
linux-ELK安装配置
前言:
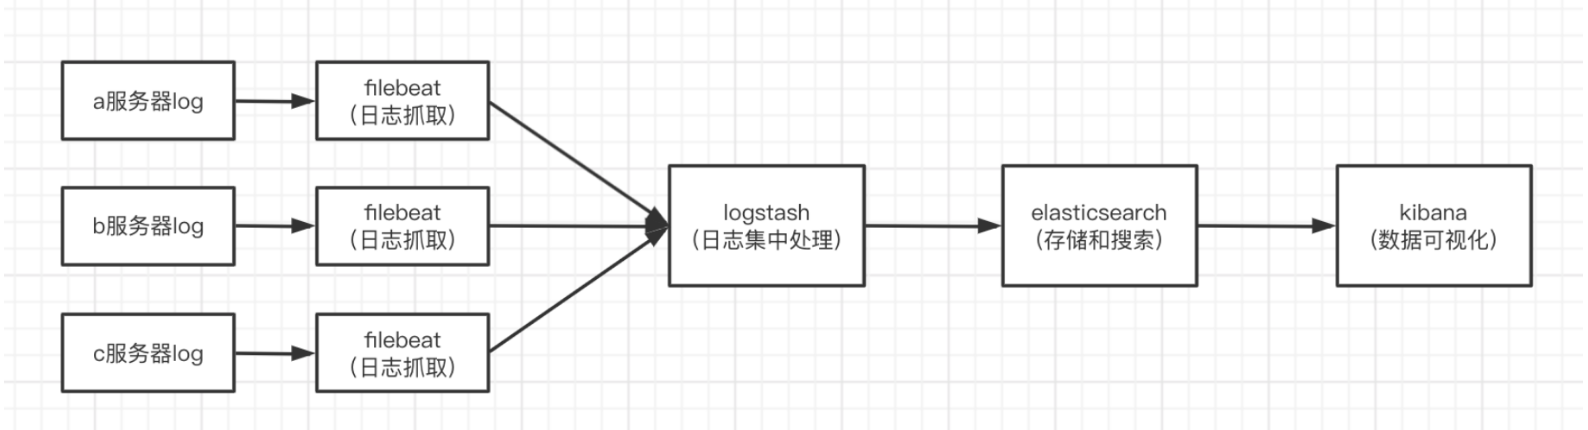
ELK 是三个开源项目的首字母缩写,这三个项目分别是:Elasticsearch、Logstash 和 Kibana。
• Elasticsearch 是一个搜索和分析引擎。
• Logstash 是服务器端数据处理管道,能够同时从多个来源采集数据,转换数据,然后将数据发送到诸如 Elasticsearch 等存储库中。
• Kibana 则可以让用户在 Elasticsearch 中使用图形和图表对数据进行可视化。
filbeat是安装到web端的服务器进行日志采集
正式安装:
!!!!!!!!!!!注意好对应的版本!!!!!!!!! (该教程使用的是7.13.2版本)
一.安装配置es(Elasticsearch)
由于一开始装的是7.10.2的所以截图中是7.10.2,版本不对应的话会出现版本冲突问题,后续统一调整为了7.13.2版本
创建es用户组:groupadd es

在es用户组下创建es用户:useradd es -g es -p es

进入es用户

[root@iZj6c49h0dw85252u6oxu0Z ~]# su es

下载安装包或者上传安装包

[es@iZj6c49h0dw85252u6oxu0Z data]$ wget https://artifacts.elastic.co/downloads/elasticsearch/eelasticsearch-7.13.2-linux-x86_64.tar.gz

解压

[es@iZj6c49h0dw85252u6oxu0Z data]$ tar -zxvf elasticsearch-7.13.2-linux-x86_64.tar.gz

赋予用户权限:chown -R es:es /data/elasticsearch-7.13.2

启动es

[es@iZj6c49h0dw85252u6oxu0Z es]$ cd elasticsearch-7.13.2/

[es@iZj6c49h0dw85252u6oxu0Z elasticsearch-6.5.0]$ bin/elasticsearch -d
修改三个配置文件,文件中添加
export JAVA_HOME=/data/elasticsearch-7.13.2/jdk
export PATH=$JAVA_HOME/bin:$PATH
在/data/elasticsearch-7.13.2/config 中修改配置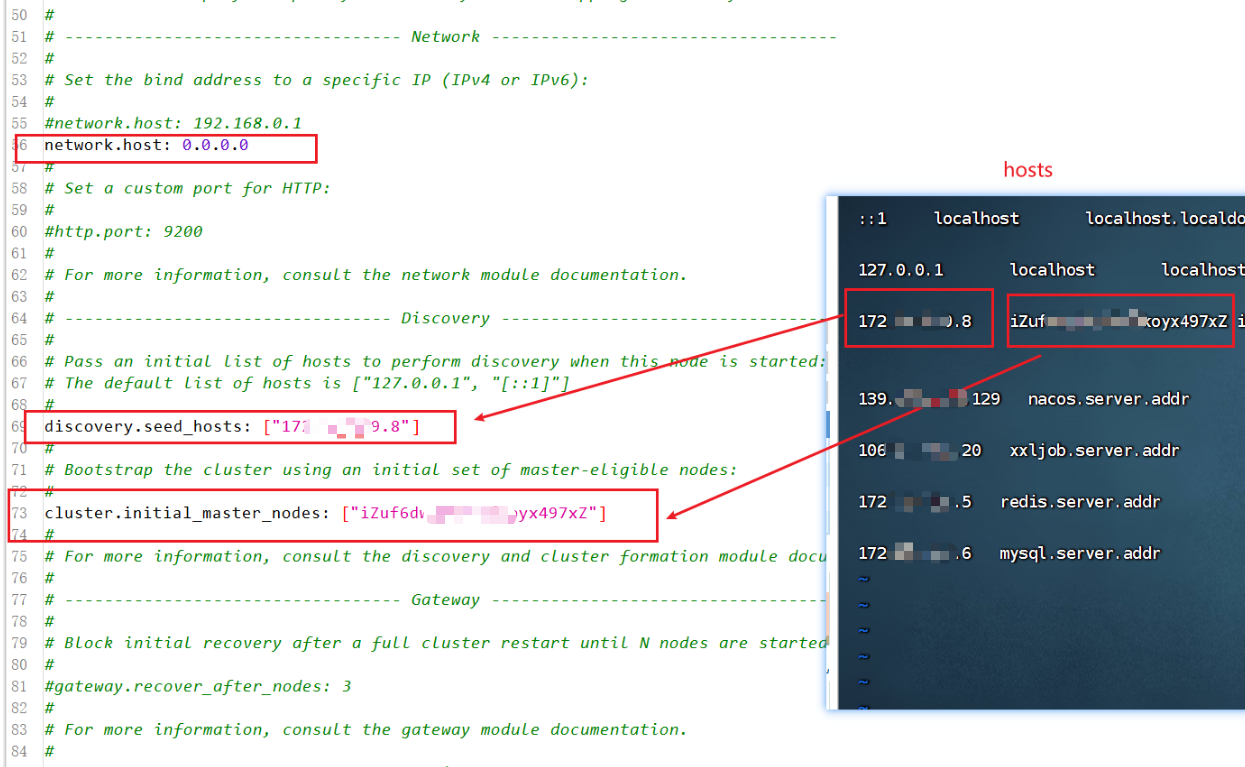
服务器中验证 curl http://内网ip:9200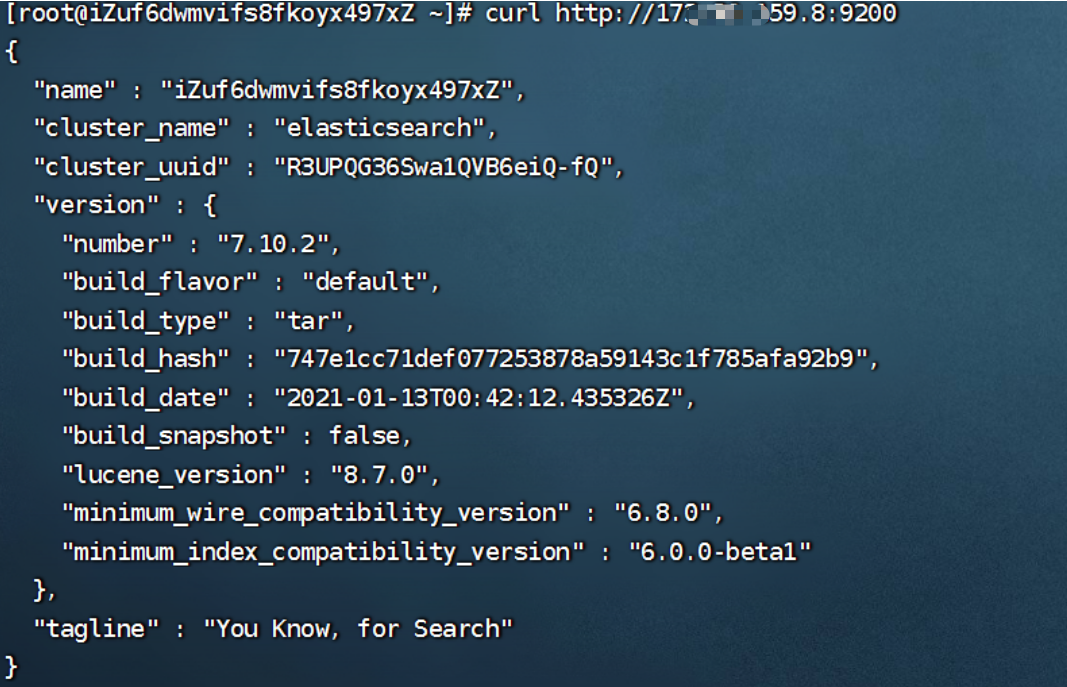
出现该画面就是按照配置成功启动了!
可以修改 /elasticsearch-7.13.2/config/jvm.options 文件

分配运行内存

-Xms4g

-Xmx4g
安装时遇到的问题:
错误问题

一

[root@izuf672oio5mc4fbyj0s0jz ~]# curl http://47.244.38.173:9200/

curl: (7) Failed connect to 47.244.38.173:9200; Connection refused

修改elasticsearch.yml文件,去掉注释并修改IP:network.host: 0.0.0.0,并开通入方向的阿里云访问规则,再次启动ES就可以了

[es@izuf672oio5mc4fbyj0s0jz elasticsearch-6.5.0]$ vi config/elasticsearch.yml

二

[1] bootstrap checks failed

[1]: max file descriptors [65535] for elasticsearch process is too low, increase to at least [65536]

root用户下修改/etc/security/limits.conf

:su root

vim /etc/security/limits.conf

1.修改内容:

root soft nofile 65535

root hard nofile 65535

* soft nofile 65536

* hard nofile 65536

2.修改/etc/sysctl.conf

最后新增vm.max_map_count=655360

修改完成后,执行 sysctl -p 命令,使配置生效
二.安装配置Logstash
上传并解压

tar -zxvf logstash-7.13.2-linux-x86_64.tar.gz
解压完之后进入/config,拷贝一份logstash-sample.conf到bin目录下,方便后面启动:
cp /data/logstash-7.13.2/config/logstash-sample.conf /data/logstash-7.13.2/config/logstash.conf编辑以下内容拷贝到bin的logstash.conf
# Sample Logstash configuration for creating a simple
# Beats -> Logstash -> Elasticsearch pipeline.
input {
beats {
port => 5044
}
}
# log.file.path=/data/jars/logs/charge-server/charge-server-2023-08-29.5.log
# index => "%{[@metadata][beat]}}-%{+YYYY.MM.dd}"
# index => "%{[fields][log_type]}-%{+YYYY.MM.dd}"
output {
elasticsearch {
hosts => ["http://localhost:9200"]
index => "%{[fields][log_type]}-%{+YYYY.MM.dd}"
#user => "elastic"
#password => "changeme"
}
}服务器后台启动
nohup bin/logstash -f config/logstash.conf > /dev/null 2>&1 &
应用命令启动(可实时看到启动日志)
bin/logstash -f config/logstash.conf三.kibana安装与配置
上传并解压

tar -zxvf kibana-7.13.2-linux-x86_64.tar.gz
编辑/config/kibana.yml
这里用的是默认端口5601,这里serverhost不能用localhost,不然外网访问不到,在配置文件的最后一行,还可以将系统设置为中文。
kibana也不能使用root用户启动
# Kibana is served by a back end server. This setting specifies the port to use.
#server.port: 5601
# Specifies the address to which the Kibana server will bind. IP addresses and host names are both valid values.
# The default is 'localhost', which usually means remote machines will not be able to connect.
# To allow connections from remote users, set this parameter to a non-loopback address.
server.host: "0.0.0.0"
# Specifies locale to be used for all localizable strings, dates and number formats.
# Supported languages are the following: English - en , by default , Chinese - zh-CN .
i18n.locale: "zh-CN"
#es的hosts
elasticsearch.hosts: ["http://192.xxx.x.211:9200"]cd kibana-7.13.2-linux-x86_64/bin/
启动
./kibana --allow-root &
nohup ./kibana --allow-root &
日志路径
/data/ELK/kibana-7.13.2-linux-x86_64/config/node.options四.filbeat安装与配置
上传并解压

tar -zxvf filebeat-7.13.2-linux-x86_64.tar.gz
编辑/filebeat-7.13.2-linux-x86_64/filebeat.yml
filebeat.inputs:
- type: log
enabled: true
paths:
# 地址是服务的日志地址
- /data/jars/logs/base-server/*.log
#- c:\programdata\elasticsearch\logs\*
fields:
log_type: "base-server"
#多个服务就在后面追加
- type: log
enabled: true
paths:
- /data/jars/logs/finance-server/*.log
#- c:\programdata\elasticsearch\logs\*
fields:
log_type: "finance-server"
- type: filestream
# Change to true to enable this input configuration.
enabled: false
# Paths that should be crawled and fetched. Glob based paths.
paths:
- /var/log/*.log
#- c:\programdata\elasticsearch\logs\*
# ============================== Filebeat modules ==============================
filebeat.config.modules:
# Glob pattern for configuration loading
path: ${path.config}/modules.d/*.yml
# Set to true to enable config reloading
reload.enabled: false
# Period on which files under path should be checked for changes
#reload.period: 10s
# ======================= Elasticsearch template setting =======================
setup.template.settings:
index.number_of_shards: 1
#index.codec: best_compression
#_source.enabled: false
# =================================== Kibana ===================================
# Starting with Beats version 6.0.0, the dashboards are loaded via the Kibana API.
# This requires a Kibana endpoint configuration.
setup.kibana:
# Kibana Host
# Scheme and port can be left out and will be set to the default (http and 5601)
# In case you specify and additional path, the scheme is required: http://localhost:5601/path
# IPv6 addresses should always be defined as: https://[2001:db8::1]:5601
#host: "localhost:5601"
# Kibana Space ID
# ID of the Kibana Space into which the dashboards should be loaded. By default,
# the Default Space will be used.
#space.id:
#日志是推送到Logstash,
# ------------------------------ Logstash Output -------------------------------
output.logstash:
#The Logstash hosts
#配置安装Logstash所在的服务器ip
hosts: ["127.0.0.1:5044"]
# Optional SSL. By default is off.
# List of root certificates for HTTPS server verifications
#ssl.certificate_authorities: ["/etc/pki/root/ca.pem"]
# Certificate for SSL client authentication
#ssl.certificate: "/etc/pki/client/cert.pem"
# Client Certificate Key
#ssl.key: "/etc/pki/client/cert.key"
# ================================= Processors =================================
processors:
- add_host_metadata:
when.not.contains.tags: forwarded
- add_cloud_metadata: ~
- add_docker_metadata: ~
- add_kubernetes_metadata: ~启动运行
nohup ./filebeat -e -c filebeat.yml > /dev/null 2>&1 &
./filebeat -e -c filebeat.yml遇到的问题:
不定时间,filebeat就会自动退出或者ssh连接断开filebeat自动退出

1后台启动

`nohup ./filebeat -e -c filebeat.yml > /dev/null 2>&1 &`

2不要直接关闭终端,而是先执行命令exit后

3关闭shh连接终端
最后 ip:5601访问kibana 至此安装完毕!
linux-ELK安装配置的更多相关文章
- 阿里云服务器Linux CentOS安装配置(零)目录
阿里云服务器Linux CentOS安装配置(零)目录 阿里云服务器Linux CentOS安装配置(一)购买阿里云服务器 阿里云服务器Linux CentOS安装配置(二)yum安装svn 阿里云服 ...
- 阿里云服务器Linux CentOS安装配置(九)shell编译、打包、部署
阿里云服务器Linux CentOS安装配置(九)shell编译.打包.部署 1.查询当前目录以及子目录下所有的java文件,并显示查询结果 find . -name *.java -type f - ...
- 阿里云服务器Linux CentOS安装配置(八)nginx安装、配置、域名绑定
阿里云服务器Linux CentOS安装配置(八)nginx安装.配置.域名绑定 1.安装nginx yum -y install nginx 2.启动nginx service nginx star ...
- 阿里云服务器Linux CentOS安装配置(七)域名解析
阿里云服务器Linux CentOS安装配置(七)域名解析 1.购买域名 登录阿里云,左侧菜单点击[域名],然后[域名注册],完成域名购买.(一般首年45元) 2.添加域名解析 在域名列表里点击你的域 ...
- 阿里云服务器Linux CentOS安装配置(六)resin多端口配置、安装、部署
阿里云服务器Linux CentOS安装配置(六)resin多端口配置.安装.部署 1.下载resin包 http://125.39.66.162/files/2183000003E08525/cau ...
- 阿里云服务器Linux CentOS安装配置(五)jetty配置、部署
阿里云服务器Linux CentOS安装配置(五)jetty配置.部署 1.官网下载jetty:wget http://repo1.maven.org/maven2/org/eclipse/jetty ...
- 阿里云服务器Linux CentOS安装配置(四)yum安装tomcat
阿里云服务器Linux CentOS安装配置(四)yum安装tomcat 1.yum -y install tomcat 执行命令后,会帮你把jdk也安装好 2.tomcat安装目录:/var/li ...
- 阿里云服务器Linux CentOS安装配置(三)yum安装mysql
阿里云服务器Linux CentOS安装配置(三)yum安装mysql 1.执行yum安装mysql命令:yum -y install mysql-server mysql-devel 2.启动mys ...
- 阿里云服务器Linux CentOS安装配置(二)yum安装svn
阿里云服务器Linux CentOS安装配置(二)yum安装svn 1.secureCRT连接服务器 2.先创建一个文件夹,用来按自己的习惯来,用来存放数据 mkdir /data 3.yum安装sv ...
- 阿里云服务器Linux CentOS安装配置(一)购买阿里云服务器
阿里云服务器Linux CentOS安装配置(一)购买阿里云服务器 我在阿里云购买的服务器配置 CPU:1核 内存:2G 系统盘:40G 公共镜像:CentOS 6.5 64位 公网带宽:1Mbps ...
随机推荐
- auto-GPT部署
Auto-GPT 是一个实验性开源应用程序,其作者在3月31日将其发布在Github上.它以GPT-4 作为驱动,可以自主做出决定以实现目标,无需用户干预.AutoGPT的地址:https://git ...
- 2023-08-20:用go语言写算法。给定一个由'W'、'A'、'S'、'D'四种字符组成的字符串,长度一定是4的倍数, 你可以把任意连续的一段子串,变成'W'、'A'、'S'、'D'组成的随意状
2023-08-20:用go语言写算法.给定一个由'W'.'A'.'S'.'D'四种字符组成的字符串,长度一定是4的倍数, 你可以把任意连续的一段子串,变成'W'.'A'.'S'.'D'组成的随意状态 ...
- 如何调用api接口获取到商品数据
要调用API接口获取商品数据,需要进行以下步骤: 确定API接口 首先需要确定要使用的API接口,可以通过搜索引擎或者相关文档来查找适合的API接口.以淘宝开放平台为例,可以使用淘宝的商品信息查询AP ...
- 手把手教你使用Vite构建第一个Vue3项目
写在前面 在之前的文章中写过"如何创建第一个vue项目",但那篇文章写的是创建vue2的 项目. 传送门如何创建第一个vue项目 打开Vue.js官网:https://cn.vue ...
- Paddle图神经网络训练-PGLBox代码阅读笔记
图存储部分 paddle/fluid/framework/fleet/heter_ps graph_gpu_wrapper.h GPU图主入口 graph_gpu_ps_table.h GPU图的主要 ...
- 《Python魔法大冒险》002 编程是什么?
魔法师:在这个充满魔法和奇迹的数字时代,你是否好奇过计算机是如何运作的?当你用手机玩游戏.在电脑上浏览网页.看动画电影,你是否想过这背后的秘密是什么?别担心,今天我们将揭开这神秘的面纱,一起来探索编程 ...
- Github、Gitee优秀的开源项目
收集 Github.Gitee优秀的开源项目,并进行归类整理.项目地址 目录 编程语言项目 SprinBoot 项目 源码分析项目 前后端分离项目 Vue2 项目 Vue3 项目 微服务项目 Api ...
- 【网络爬虫笔记】爬虫Robots协议语法详解
Robots协议是指一个被称为Robots Exclusion Protocol的协议.该协议的主要功能是向网络蜘蛛.机器人等搜索引擎爬虫提供一个标准的访问控制机制,告诉它们哪些页面可以被抓取,哪些页 ...
- Vue3搭建后台管理系统模板
搭建后台管理系统模板 2.1项目初始化 今天来带大家从0开始搭建一个vue3版本的后台管理系统.一个项目要有统一的规范,需要使用eslint+stylelint+prettier来对我们的代码质量做检 ...
- 历时一个月,《穿透Laravel》全书完成!
近几年来Laravel在PHP领域大放异彩,逐渐成为PHP开发框架中的中流砥柱. 这个系列的文章, 会带你一起探知Laravel框架底层的实现细节.与其他框架相比,Laravel的设计理念确实更为先进 ...