【Vue】Re15 Router 第二部分(缺省路由、动态路由)
一、设置首页重定向:
import Vue from 'vue';

import Router from 'vue-router';

import Home from "../components/Home";

import About from "../components/About";

Vue.use(Router);

const routerList = [

  /* 重定向首页路由配置 */

  {

    path : '', /* 缺省值默认指向 '/' */

    redirect : '/home',

  },

  {

    path : '/home', /* 为什么这里是path不是url? 因为完整的url还包括 项目根url(协议头 + 域名(或者IP地址) + 端口号 + 项目根名称路径(可选))  */

    name : 'home', /* 名字可以不加 */

    component : Home

  },

  {

    path : '/about',

    name : 'about',

    component : About

  },

]

const router = new Router({

  routes : routerList

});

export default router;
在访问首页时自动重定向跳转到首页组件
二、路由模式更改:
我们可以更改路由模式,默认使用的是hash,可以更改为history
import Vue from 'vue';

import Router from 'vue-router';

import Home from "../components/Home";

import About from "../components/About";

Vue.use(Router);

const routerList = [

  /* 重定向首页路由配置 */

  {

    path : '', /* 缺省值默认指向 '/' */

    redirect : '/home',

  },

  {

    path : '/home', /* 为什么这里是path不是url? 因为完整的url还包括 项目根url(协议头 + 域名(或者IP地址) + 端口号 + 项目根名称路径(可选))  */

    name : 'home', /* 名字可以不加 */

    component : Home

  },

  {

    path : '/about',

    name : 'about',

    component : About

  },

]

const router = new Router({

  routes : routerList,

  mode : 'history'

});

export default router;
更改history之后,url将不再有#标识
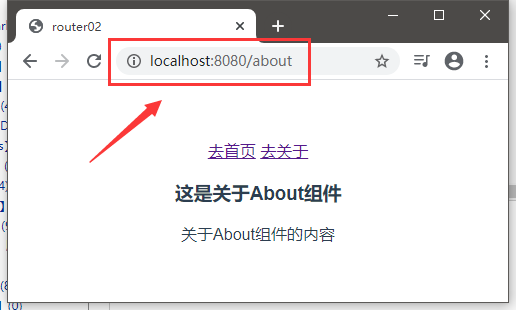
三、Link元素补充
之前的案例只是使用了to一个属性
<template>

  <div id="app">

    <router-link to="/home">去首页</router-link>

    <router-link to="/about">去关于</router-link>

    <router-view></router-view>

  </div>

</template>
其他属性
tag属性
用来指定渲染之后的元素,默认是使用a元素
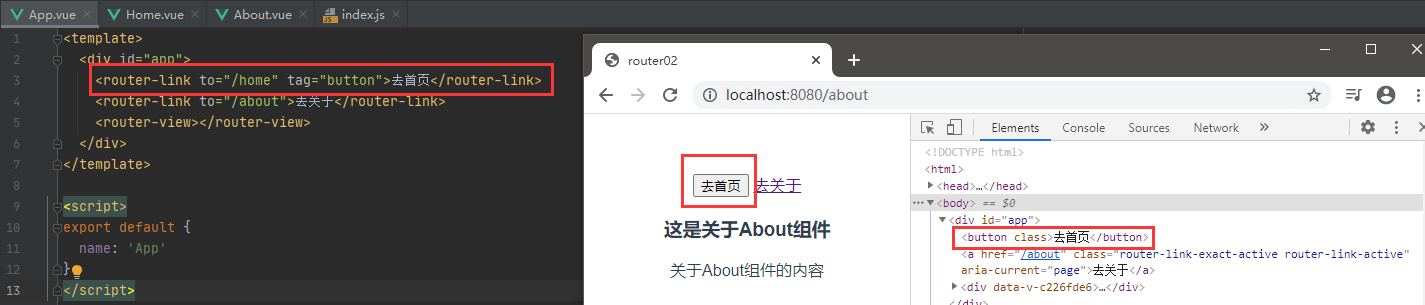
replace属性
history记录不再保存,浏览器不可操作回退
但是实际设置之后并没有起效。。。
<template>

  <div id="app">

    <router-link to="/home" tag="button" replace>去首页</router-link>

    <router-link to="/about" tag="button" replace>去关于</router-link>

    <router-view></router-view>

  </div>

</template>
active-class属性
link元素在路由匹配成功后自动设置一个router-link-active的class

可以设置改属性,修改默认的值名称:
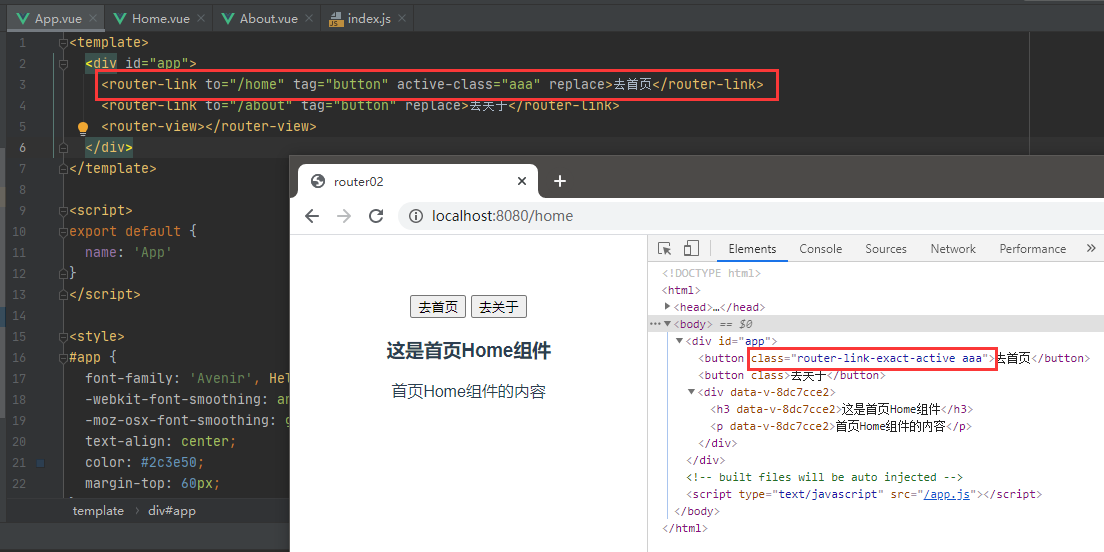
这样可以轻松的控制路由元素的样式
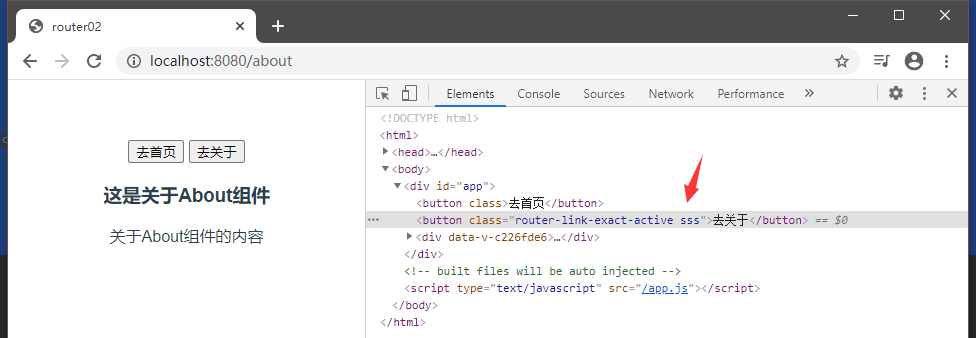
或者在路由实例中配置修改【router/index.js】:
import Vue from 'vue';

import Router from 'vue-router';

import Home from "../components/Home";

import About from "../components/About";

Vue.use(Router);

const routerList = [

  /* 重定向首页路由配置 */

  {

    path : '', /* 缺省值默认指向 '/' */

    redirect : '/home',

  },

  {

    path : '/home', /* 为什么这里是path不是url? 因为完整的url还包括 项目根url(协议头 + 域名(或者IP地址) + 端口号 + 项目根名称路径(可选))  */

    name : 'home', /* 名字可以不加 */

    component : Home

  },

  {

    path : '/about',

    name : 'about',

    component : About

  },

]

const router = new Router({

  routes : routerList,

  mode : 'history',

  linkActiveClass : 'sss'

});

export default router;
这样就是改变默认设置的了
四、使用JS代码方式实现路由
<template>

  <div id="app">

<!--    <router-link to="/home" tag="button" active-class="aaa" replace>去首页</router-link>-->

<!--    <router-link to="/about" tag="button" replace>去关于</router-link>-->

    <button @click="toHome">首页</button>

    <button @click="toAbout">关于</button>

    <router-view></router-view>

  </div>

</template>

<script>

export default {

  name: 'App',

  methods : {

    toHome () {

      this.$router.push('/home');

    },

    toAbout () {

      this.$router.push('/about');

    }

  }

}

</script>

<style>

#app {

  font-family: 'Avenir', Helvetica, Arial, sans-serif;

  -webkit-font-smoothing: antialiased;

  -moz-osx-font-smoothing: grayscale;

  text-align: center;

  color: #2c3e50;

  margin-top: 60px;

}

</style>
push可更换replace方法,就是不能操作回退
五、动态路由跳转
增加一个用户组件:
<template>

  <div>

    <h3>用户管理组件</h3>

    <p>用户管理内容</p>

  </div>

</template>

<script>

export default {

  name: "User"

}

</script>

<style scoped>

</style>
配置路由:
import Vue from 'vue';

import Router from 'vue-router';

import Home from "../components/Home";

import About from "../components/About";

import User from "../components/User";

Vue.use(Router);

const routerList = [

  /* 重定向首页路由配置 */

  {

    path : '', /* 缺省值默认指向 '/' */

    redirect : '/home',

  },

  {

    path : '/home', /* 为什么这里是path不是url? 因为完整的url还包括 项目根url(协议头 + 域名(或者IP地址) + 端口号 + 项目根名称路径(可选))  */

    name : 'home', /* 名字可以不加 */

    component : Home

  },

  {

    path : '/about',

    name : 'about',

    component : About

  },

  {

    path : '/user',

    name : 'user',

    component : User

  }

]

const router = new Router({

  routes : routerList,

  mode : 'history',

});

export default router;
首页配置链接:
<template>

  <div id="app">

    <router-link to="/home" tag="button" >去首页</router-link>

    <router-link to="/about" tag="button" >去关于</router-link>

    <router-link to="/user" tag="button" >用户管理</router-link>

<!--    <button @click="toHome">首页</button>-->

<!--    <button @click="toAbout">关于</button>-->

    <router-view></router-view>

  </div>

</template>

<script>

export default {

  name: 'App',

  // methods : {

  //   toHome () {

  //     this.$router.push('/home');

  //   },

  //   toAbout () {

  //     this.$router.push('/about');

  //   }

  // }

}

</script>

<style>

#app {

  font-family: 'Avenir', Helvetica, Arial, sans-serif;

  -webkit-font-smoothing: antialiased;

  -moz-osx-font-smoothing: grayscale;

  text-align: center;

  color: #2c3e50;

  margin-top: 60px;

}

</style>
确保动态路由之前的静态路由是正常的:

配置动态路由

现在预览肯定点击看不到用户管理,因为没有给动态路径,路径就无法匹配:
给App.vue组件的user的link上补上这个动态路径就可以访问
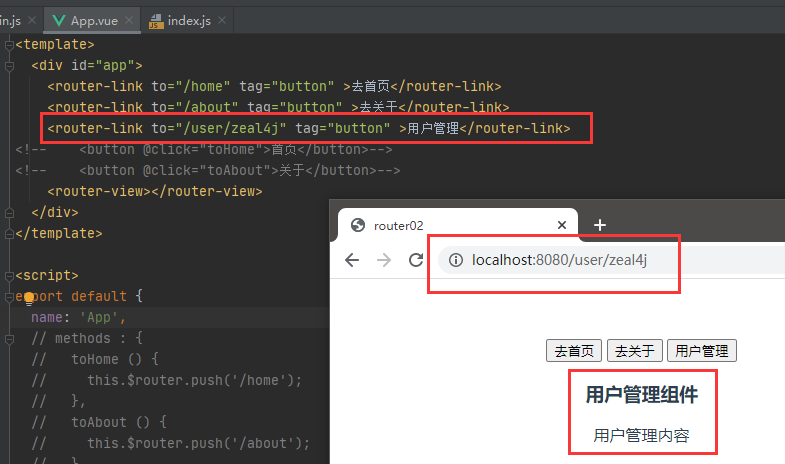
但是动态路由不可能这样直接写死的,所以需要结合Vue实例的data属性配合

除此之外我们还需要获取用户的信息显示在用户管理的界面中
以张三用户登录,就肯定在用户组件页面中显示张三的信息出来
$route对象
该对象表示当前活跃的路由对象,也就是routes中的一个元素
配置user组件:
<template>

  <div>

    <h3>用户管理组件</h3>

    <p>用户管理内容 用户名:{{username}}</p>

  </div>

</template>

<script>

export default {

  name: "User",

  computed : {

    username () {

      return this.$route.params.username

    }

  }

}

</script>

<style scoped>

</style>
可以从$route对象获取参数对象中的具体参数变量
我们在设置动态路由时使用的是username,所以这里引用的变量也就是username
上面的mustache对应computed属性的方法名username,更下面的$route的username没一点关系
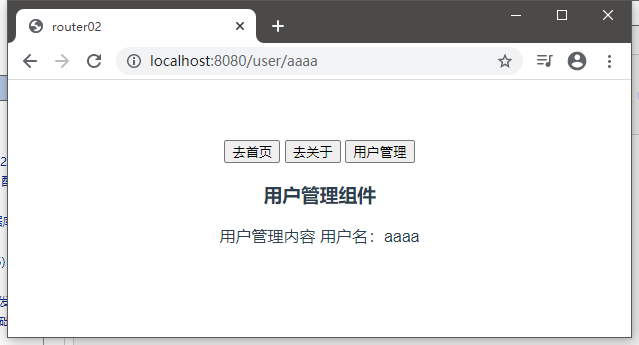
也可以直接在mustache语法中调用:
<p>用户管理内容 用户名:{{$route.params.username}}</p>
【Vue】Re15 Router 第二部分(缺省路由、动态路由)的更多相关文章
- 使用VUE开发用户后台时的动态路由问题、按钮权限问题以及其他页面处理问题
如今前后端分离是大势所趋,笔者虽然是做后台的,但也不得不学学前端的流行框架VUE -_-||| . 为了学习VUE,笔者搭建了一个简单的用户后台,以此来了解VUE的开发思路(注:本项目不用于实际开发, ...
- vue-router动态路由控制
一.注册使用vue-router import Vue from 'vue' import Router from 'vue-router' Vue.use(Router); 二.编写动态路由注册函数 ...
- VueRouter爬坑第二篇-动态路由
VueRouter系列的文章示例编写时,项目是使用vue-cli脚手架搭建. 项目搭建的步骤和项目目录专门写了一篇文章:点击这里进行传送 后续VueRouter系列的文章的示例编写均基于该项目环境. ...
- 06 Vue路由简介,原理,实现及嵌套路由,动态路由
路由概念 路由的本质就是一种对应关系,比如说我们在url地址中输入我们要访问的url地址之后,浏览器要去请求这个url地址对应的资源. 那么url地址和真实的资源之间就有一种对应的关系,就是路由. 路 ...
- Cisco动态路由(rip)
接Cisco静态路由,讨论一下Cisco动态路由. 实验环境布置 命令布置动态路由 Router0: Router>enable Router#configure terminal Router ...
- vue+iview实现动态路由和权限验证
github上关于vue动态添加路由的例子很多,本项目参考了部分项目后,在iview框架基础上完成了动态路由的动态添加和菜单刷新.为了帮助其他需要的朋友,现分享出实现逻辑,欢迎一起交流学习. Gith ...
- 从壹开始前后端分离 [ vue + .netcore 补充教程 ] 三十║ Nuxt实战:动态路由+同构
上期回顾 说接上文<二九║ Nuxt实战:异步实现数据双端渲染>,昨天咱们通过项目二的首页数据处理,简单了解到了 nuxt 异步数据获取的作用,以及亲身体验了几个重要文件夹的意义,整篇文章 ...
- vue动态添加路由addRoutes之不能将动态路由存入缓存
在我不知道vue的路由还可以通过addRoutes动态添加时,我只知道vue的路由都是写死在路由表中的,每当跳转时再去加载相应的路由.直到在一个新公司接到需要根据用户的权限显示不同的菜单的需求时才知道 ...
- 【原创】一篇学会vue路由配置 、 动态路由 、多层路由(实例)
先来看看效果图: 为了方便讲解,我没有使用vue脚手架,如果需要的,可以留言跟我要.不多说开工: 首先,html先组上 <div id="app"> <div&g ...
- vue动态路由
我们经常需要把某种模式匹配到的所有路由,全都映射到同个组件.例如,我们有一个 User 组件,对于所有 ID 各不相同的用户,都要使用这个组件来渲染.能够提供参数的路由即为动态路由第一步:定义组件 c ...
随机推荐
- vs 启动时报错:未能加载文件或程序集 SharpGit
错误完整内容: ---------------------------Microsoft Visual Studio---------------------------System.Reflecti ...
- Vue学习:7.计算属性2
上一节了解的是计算属性的默认简写,只能读取,不能修改. 什么意思呢?很简单,我们知道计算属性是依赖数据动态计算一个值,那我可不可以直接this.计算属性 = xxx 来修改计算属性的结果呢?这其实是不 ...
- 使用Blazor WebAssembly整合PocketBase的基础项目模板
使用Blazor WebAssembly整合PocketBase的基础项目模板 在这篇博客文章中,我们将探讨如何创建一个集成PocketBase的基础Blazor WebAssembly项目.我们将涵 ...
- http请求方式GET,POST工具类RestTemplate
http请求方式GET,POST工具类RestTemplate import com.alibaba.fastjson.JSON; import com.alibaba.fastjson.serial ...
- es语法 rest api 模拟根据歌手,歌名,歌词来搜索demo
#创建索引songs_v1 PUT { - "acknowledged": true, "shards_acknowledged": true, "i ...
- python批量读取excel csv文件插入mysql数据库
#python批量读取excel csv文件插入mysql数据库 import os import csv import argparse import pymysql import sys clas ...
- VMware 虚拟机下载
VMware破解版下载地址: https://www.aliyundrive.com/s/CUr4eaMgxGa 提取码:e0c8 激活码: ZF3R0-FHED2-M80TY-8QYGC-NPKYF ...
- python重拾第十一天-REDIS缓存数据库
缓存数据库介绍 NoSQL(NoSQL = Not Only SQL ),意即"不仅仅是SQL",泛指非关系型的数据库,随着互联网web2.0网站的兴起,传统的关系数据库在应付we ...
- python重拾第十一天-RABBITMQ队列
安装python rabbitMQ module pip install pika 官网 https://pypi.python.org/pypi/pika 安装rabbit-server服务,cen ...
- .Net Framework使用Autofac实现依赖注入
.Net Framework使用Autofac实现依赖注入 前言 最近也是找了快2周的工作了,收到的面试邀请也就几个,然后有个面试题目是用asp.net mvc + Entityframework 做 ...