Spring框架之IoC( Inversion of Control )基础知识入门
1、IoC创建对象的方式
使用无参构造创建对象
假如要使用有参构造创建:
下标赋值constructor-arg
<!--有参-->

<bean id="User" class="com.reliable.pojo.User" >

    <constructor-arg index="0" value="靠谱杨"></constructor-arg>

</bean>
public User(String name){

		System.out.println("User的有参构造!");

		this.name=name;

	}
通过类型type="java.lang.String"
    <bean id="User" class="com.reliable.pojo.User" >

        <constructor-arg type="java.lang.String" value="靠谱杨"></constructor-arg>

    </bean>
- 通过参数名name="name" value="reliable"
    <bean id="User" class="com.reliable.pojo.User" >

        <constructor-arg name="name" value="reliable"></constructor-arg>

    </bean>
总结:在配置文件加载的时候,Spring容器中管理的对象就已经初始化成功了!
2、Spring的配置
2.1、别名
    <!--别名-->

    <alias name="User" alias="new_user"></alias>
2.2、Bean的配置
<?xml version="1.0" encoding="UTF-8"?>
<beans xmlns="http://www.springframework.org/schema/beans"
xmlns:xsi="http://www.w3.org/2001/XMLSchema-instance"
xsi:schemaLocation="http://www.springframework.org/schema/beans
http://www.springframework.org/schema/beans/spring-beans.xsd">
<!--
类型 变量名 = new 类型();
Hello hello = new Hello();
bean就是java对象 , 由Spring创建和管理
bean = 一个对象
其中
id = 变量名
class = new的对象类型
property相当于给对象里的属性设置一个值
-->
<bean id="Hello" class="com.reliable.pojo.Hello">
<property name="name" value="Spring"/>
</bean>
<!-- 无参 -->
<!--<bean id="User" class="com.reliable.pojo.User">-->
<!--<property name="name" value="靠谱"></property>-->
<!--</bean>-->
<!--有参第一种,index-->
<!--<bean id="User" class="com.reliable.pojo.User" >
<constructor-arg index="0" value="靠谱杨"></constructor-arg>
</bean>-->
<!-- 2 类型-->
<!-- <bean id="User" class="com.reliable.pojo.User" >
<constructor-arg type="java.lang.String" value="靠谱杨"></constructor-arg>
</bean>-->
<!-- 3 参数名字 -->
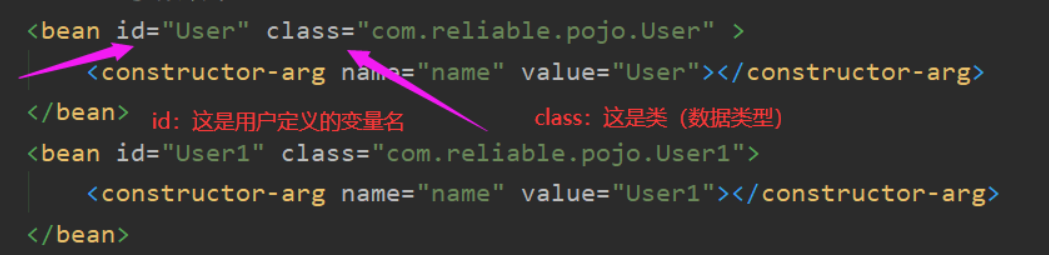
<bean id="User" class="com.reliable.pojo.User" >
<constructor-arg name="name" value="User"></constructor-arg>
</bean>
<bean id="User1" class="com.reliable.pojo.User1">
<constructor-arg name="name" value="User1"></constructor-arg>
</bean>
<!--别名 如果添加的别名 都可以使用-->
<alias name="User" alias="new_user"></alias>
</beans>

2.3、import
一般用于团队开发使用,可以将多个配置文件导入合并为一个
    <!--import -->

    <import resource="beans1.xml"></import>
3、依赖注入(DI)
3.1 构造器注入
- 依赖注入:Set注入
- 依赖:bean对象的创建依赖于容器
- 注入:bean对象中的所有属性,由容器来注入!
3.2、Set方式注入【重点】
- 复杂类型
public class Address {

	private String address;

	public String getAddress() {

		return address;

	}

	public void setAddress(String address) {

		this.address = address;

	}

}
- 实体对象
import java.util.*;

public class Student {

	public String getName() {

		return name;

	}

	public Address getAddress() {

		return address;

	}

	public String[] getBooks() {

		return books;

	}

	public List<String> getHobbies() {

		return hobbies;

	}

	public Map<String, String> getCard() {

		return card;

	}

	public Set<String> getGames() {

		return games;

	}

	public String getWife() {

		return wife;

	}

	public Properties getInfo() {

		return info;

	}

	private String name;

	private Address address;

	private String[] books;

	private List<String> hobbies;

	private Map<String,String> card;

	private Set<String> games;

	private String wife;

	private Properties info;

	public void setName(String name) {

		this.name = name;

	}

	public void setAddress(Address address) {

		this.address = address;

	}

	public void setBooks(String[] books) {

		this.books = books;

	}

	public void setHobbies(List<String> hobbies) {

		this.hobbies = hobbies;

	}

	public void setCard(Map<String, String> card) {

		this.card = card;

	}

	public void setGames(Set<String> games) {

		this.games = games;

	}

	public void setWife(String wife) {

		this.wife = wife;

	}

	public void setInfo(Properties info) {

		this.info = info;

	}

	@Override

	public String toString() {

		return "Student{" +

				"name='" + name + '\'' +

				", address=" + address +

				", books=" + Arrays.toString(books) +

				", hobbies=" + hobbies +

				", card=" + card +

				", games=" + games +

				", wife='" + wife + '\'' +

				", info=" + info +

				'}';

	}

	//show方法

	public void show(){

		System.out.println("name="+ name

				+ ",address="+ address.getAddress()

				+ ",books="

		);

		for (String book:books){

			System.out.print("<<"+book+">>\t");

		}

		System.out.println("\n爱好:"+ hobbies);

		System.out.println("card:"+card);

		System.out.println("games:"+games);

		System.out.println("wife:"+wife);

		System.out.println("info:"+info);

	}

}
xml配置文件

<?xml version="1.0" encoding="UTF-8"?>

<beans xmlns="http://www.springframework.org/schema/beans"

       xmlns:xsi="http://www.w3.org/2001/XMLSchema-instance"

       xsi:schemaLocation="http://www.springframework.org/schema/beans

        http://www.springframework.org/schema/beans/spring-beans.xsd">

    <bean id="Address" class="com.kuang.pojo.Address">

        <property name="address" value="石家庄"></property>

    </bean>

    <bean id="Student" class="com.kuang.pojo.Student">

        <!-- 第一种:普通值注入 -->

        <property name="name" value="杨传伟"></property>

        <!-- 第二种:ref注入 -->

        <property name="address" ref="Address"></property>

        <!-- 第三种:数组注入 -->

        <property name="books">

            <array>

                <value>《红楼梦》</value>

                <value>《西游记》</value>

                <value>《水浒传》</value>

                <value>《三国演义》</value>

            </array>

        </property>

        <!-- 第四种:List注入 -->

        <property name="hobbies">

            <list>

                <value>听音乐</value>

                <value>看电影</value>

                <value>敲代码</value>

                <value>摄影</value>

            </list>

        </property>

        <!-- 第五种:Map注入 -->

        <property name="card">

            <map>

                <entry key="IDcard" value="1234567"></entry>

                <entry key="STcard" value="7654321"></entry>

            </map>

        </property>

        <!-- 第六种:Set注入 -->

        <property name="games">

            <set>

                <value>跑跑卡丁车官方竞速版</value>

                <value>王者荣耀</value>

            </set>

        </property>

        <!-- 第七种:设置空值 -->

        <property name="wife">

            <null></null>

        </property>

        <!--properties-->

        <property name="info">

            <props>

                <prop key="学号">20194074</prop>

                <prop key="性别">男</prop>

                <prop key="姓名">杨传伟</prop>

                <prop key="username">reliable</prop>

                <prop key="userpass">resetpass01</prop>

            </props>

        </property>

    </bean>

</beans>
3.3、拓展方式注入
使用p命名空间和c命名空间
使用:
package com.kuang.pojo;

public class User {

	private String name;

	private int age;

	public User(String name,int age) {

		this.name = name;

		this.age=age;

	}

	public User(){};

	public String getName() {

		return name;

	}

	public void setName(String name) {

		this.name = name;

	}

	public int getAge() {

		return age;

	}

	public void setAge(int age) {

		this.age = age;

	}

	@Override

	public String toString() {

		return "User{" +

				"name='" + name + '\'' +

				", age=" + age +

				'}';

	}

}
配置文件:
<?xml version="1.0" encoding="UTF-8"?>

<beans xmlns="http://www.springframework.org/schema/beans"

       xmlns:xsi="http://www.w3.org/2001/XMLSchema-instance"

       xmlns:p="http://www.springframework.org/schema/p"

       xmlns:c="http://www.springframework.org/schema/c"

       xsi:schemaLocation="http://www.springframework.org/schema/beans

        http://www.springframework.org/schema/beans/spring-beans.xsd">

    <!--P(属性: properties)命名空间 , 属性依然要设置set方法-->

    <bean id="user" class="com.kuang.pojo.User" p:name="靠谱" p:age="21"/>

    <!--C(构造: Constructor)命名空间 , 属性依然要设置set方法-->

    <bean id="user2" class="com.kuang.pojo.User" c:name="狂神" c:age="18"/>

</beans>
测试:
	public void test2(){

		ApplicationContext context=new ClassPathXmlApplicationContext("beans03.xml");

		User user = context.getBean("user", User.class);

		System.out.println(user);

		User user2 = context.getBean("user2", User.class);

		System.out.println(user2);

	}

注意
要引入c和p命名空间:
xmlns:p="http://www.springframework.org/schema/p"
xmlns:c="http://www.springframework.org/schema/c"
Spring框架之IoC( Inversion of Control )基础知识入门的更多相关文章
- Spring框架的IOC之注解方式的快速入门
1. 步骤一:导入注解开发所有需要的jar包 * 引入IOC容器必须的6个jar包 * 多引入一个:Spring框架的AOP的jar包,spring-aop的jar包 2. 步骤二:创建对应的包结构, ...
- Spring (一) IOC ( Inversion Of Control )
前序 现在小米手机很火就还拿小米手机来举例子,上一篇写的关于SSH框架搭建是从小米手机公司内个整个流程方面来考虑,如何提高效率生产效率,这篇博客主要从公司外部环境说明如何提高生产效率,那么怎么才能提高 ...
- Spring框架中IoC(控制反转)的原理(转)
原文链接:Spring框架中IoC(控制反转)的原理 一.IoC的基础知识以及原理: 1.IoC理论的背景:在采用面向对象方法设计的软件系统中,底层实现都是由N个对象组成的,所有的对象通过彼此的合作, ...
- 初识Spring框架实现IOC和DI(依赖注入)
学习过Spring框架的人一定都会听过Spring的IoC(控制反转) .DI(依赖注入)这两个概念,对于初学Spring的人来说,总觉得IoC .DI这两个概念是模糊不清的,是很难理解的, IoC是 ...
- 【Java_Spring】控制反转IOC(Inversion of Control)
1. IOC的概念 控制反转IoC(Inversion of Control)是一种设计思想,而DI(依赖注入)是实现IoC的一种方法.在没有使用IOC的程序中,对象间的依赖关系是靠硬编码的方式实现的 ...
- Spring框架的IOC(控制反转)
1.1.IoC是什么 Ioc-Inversion of Control,即"控制反转",不是什么技术,而是一种设计思想.在Java开发中,Ioc意味着将你设计好的对象交给容器控制, ...
- Spring框架(3)---IOC装配Bean(注解方式)
IOC装配Bean(注解方式) 上面一遍文章讲了通过xml来装配Bean,那么这篇来讲注解方式来讲装配Bean对象 注解方式需要在原先的基础上重新配置环境: (1)Component标签举例 1:导入 ...
- (精简)Spring框架的IoC(替代工厂类实现方法)和AOP(定义规则,约定大于配置)
Spring的核心框架主要包含两个技术,分别用来处理工厂类,以及事务处理和连接管理的. 两大核心概念 1) IoC:控制反转,在现在的开发中,如果想建立对象并设置属性,是需要先new对象,再通过se ...
- Spring框架之IOC(控制反转)
[TOC] 第一章Spring框架简介 IOC(控制反转)和AOP(面向方面编程)作为Spring框架的两个核心,很好地实现了解耦合.所以,简单来说,Spring是一个轻量级的控制反转(IoC)和面向 ...
- Spring框架的IOC核心功能快速入门
2. 步骤一:下载Spring框架的开发包 * 官网:http://spring.io/ * 下载地址:http://repo.springsource.org/libs-release-local/ ...
随机推荐
- Java 使用SimpleDateFormat格式化日期
Java 使用SimpleDateFormat格式化日期,这里只涉及最实用的方面. 用途 用于格式化日期和解析日期类型字符串. formatting (date -> text), parsin ...
- 新零售SaaS架构:什么是订单履约系统?
什么是订单履约系统? 订单履约系统用来管理从接到销售订单,到把货品送到客户手中的整个业务过程.它是上游交易(如销售和客户下单环节)和下游仓储配送(如库存管理.物流)之间的桥梁,确保信息流的顺畅和操作的 ...
- Nacos2作为Dubbo3的配置中心踩坑总结
本文阐述问题所使用的组件版本分别是,Dubbo:3.2.4,Nacos服务端:2.2.3,Nacos客户端:2.2.4. 在Dubbo3的官方文档中,关于如何使用Nacos作为配置中心的详细介绍参考: ...
- Kotlin 基础入门
目录 一.基础语法 1.1 常见数据类型 1.2 变量 1.2.1 变量声明 1.2.2 类型推断 1.2.3 Null 安全 1.2.4 面向对象语言 1.3 流程控制 1.3.1 if 表达式 1 ...
- 【Azure 应用服务】Azure Function HTTP Trigger 遇见奇妙的500 Internal Server Error: Failed to forward request to http://169.254.130.x
问题描述 使用 Azure Funciton App,在本地运行完全成功的Python代码,发布到Azure Function就出现了500 Internal Server Error. 而且错误消 ...
- 【Azure 应用服务】azure function powershell 调用 New-AzADServicePrincipal -DisplayName $sp -PasswordCredential $spCred
问题描述 powershell 调用New-AzADServicePrincipal -DisplayName $sp -PasswordCredential $spCred,出现如下错误: Reso ...
- 隐藏在 Nebula Graph 背后的星辰大海
本文首发于 Nebula Graph Community 公众号 作者介绍 大家好,我是 Anyzm,graph-ocean(GitHub:https://github.com/nebula-cont ...
- 在vmware里安装ubuntu的简单过程(具体的见网址)
在官网选择vmware版本为16,安装后,在vmware里升级到最新版.(这个可以解决蓝屏) 在下面的这个文章里下载ubuntu的镜像文件iso,我下载的是16年的,内存为1.6GB,下载的时间用的少 ...
- C++11的类型转换
//C类型转换 /* C语言:显式和隐式类型转换 隐式类型转化:编译器在编译阶段自动进行,能转就转,不能转就编译失败 显式类型转化:需要用户自己处理. 隐式类型:界定:相关类型,相近类型,意义相似的类 ...
- [C++] does not name a type
从网上找到了以下几点 https://blog.csdn.net/fly20180712/article/details/88306008 1.没有加调用函数的头文件 2.不存在xxx命名空间 3.包 ...