
Ubuntu下搭建yocto
参考自:
https://www.jianshu.com/p/f6e0debb5e1f
https://blog.csdn.net/qq_31041847/article/details/90211464
原文设置repo使用镜像需要翻墙才能下载使用,基于原文修改镜像源为清华镜像,另修改build-dir/conf/local.conf配置文件加快yocto编译速度,亲测可用。
目标:搭建支持设备树的yocto环境,yocto的内核版本更高4.1.5
安装软件包
$ sudo apt-get install gawk wget git-core diffstat unzip texinfo gcc-multilib build-essential chrpath socat libsdl1.2-dev
$ sudo apt-get install libsdl1.2-dev xterm sed cvs subversion coreutils texi2html docbook-utils python-pysqlite2 help2man make gcc g++ desktop-file-utils libgl1-mesa-dev libglu1-mesa-dev mercurial autoconf automake groff curl lzop asciidoc
安装u-boot-tools
$ sudo apt-get install u-boot-tools
设置repo()
$ mkdir /work/tools/yocto/bin
$ cd /work/tools/yocto/bin
$ curl https://mirrors.tuna.tsinghua.edu.cn/git/git-repo -o repo
$ chmod a+x repo
$ export REPO_URL='https://mirrors.tuna.tsinghua.edu.cn/git/git-repo/'
$ export PATH=/work/tools/yocto/bin:$PATH
设置git环境
$ git config --global user.name "Your Name"
$ git config --global user.email "Your Email"
$ git config --list
repo同步
$ mkdir /work/tools/yocto/fsl-release-bsp
$ cd /work/tools/yocto/fsl-release-bsp
$ repo init -u git://git.freescale.com/imx/fsl-arm-yocto-bsp.git -b imx-4.1-krogoth
$ repo sync
然后等待同步完成,如果同步过程出错,可以用ctrl+c中断执行,并重新执行repo sync直到同步成功。
编译yocto工程
$ DISTRO= MACHINE= source fsl- setup-release.sh -b
DISTRO有如下四种设置:
fsl-imx-x11
fsl-imx-wayland
fsl-imx-xwayland
fsl-imx-fb
我选择fsl-imx-x11
MACHINE同样有多种配置:
imx6qpsabreauto
imx6qpsabresd
imx6ulevk
imx6ull14x14evk
imx6ull9x9evk
imx6dlsabreauto
imx6dlsabresd
imx6qsabreauto
imx6qsabresd
imx6slevk
imx6solosabreauto
imx6solosabresd
imx6sxsabresd
imx6sxsabreauto
imx7dsabresd
我选择imx6qsabresd。因此我执行的最终命令如下:
$ DISTRO=fsl-imx-x11 MACHINE=imx6qsabresd source fsl-setup-release.sh -b build
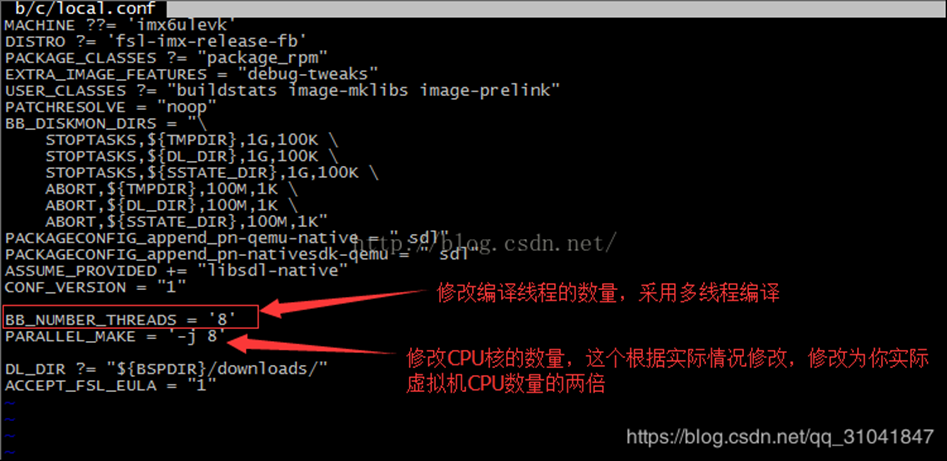
修改配置文件加快yocto编译速度,具体修改如下图:
编译镜像文件
$ bitbake fsl-image-qt5
同样的bitbake可以编译以下多种镜像:
core-image-minimal
core-image-base
core-image-sato
fsl-image-machine-test
fsl-image-gui
fsl-image-qt5,
如未修改build-dir/conf/local.conf配置文件编译fsl-image-qt5的时间非常长,在网速飞快的情况下也需两天,如果编译中途出错,可以ctrl+c中断后重新执行命令:
$ bitbake fsl-image-qt5
如果编译过程中无意关掉了终端,那么重新打开终端进入fsl-release-bsp目录后只需要执行以下命令就可以重新进入编译环境:
$ source setup-environment build
编译结束后会占用80G左右空间,虚拟机默认配置空间会不足
编译qt5的交叉编译工具链
$ bitbake meta-toolchain-qt5
编译完成后会在/opt/yocto/fsl-release-bsp/build/tmp/deploy/sdk目录下
生成文件fsl-imx-fb-glibc-i686-meta-toolchain-qt5-cortexa9hf-neon-toolchain-4.1.15-2.0.0.sh。
执行如下命令安装qt5的交叉编译工具链:
$ cd ~/fsl-release-bsp/build/tmp/deploy/sdk
$ ./fsl-imx-x11-glibc-x86_64-meta-toolchain-qt5-cortexa9hf-neon-toolchain-4.1.15-2.1.0.sh
…
SDK has been successfully set up and is ready to be used.
Each time you wish to use the SDK in a new shell session, you need to source the environment setup script e.g.
$ . /opt/fsl-imx-x11/4.1.15-2.1.0/environment-setup-cortexa9hf-neon-poky-linux-gnueabi
执行如下命令安装GCC的交叉编译工具链:
$ source setup-environment build
$ bitbake meta-toolchain
$ cd ~/fsl-release-bsp/build/tmp/deploy/sdk
$ ./fsl-imx-x11-glibc-x86_64-meta-toolchain-cortexa9hf-neon-toolchain-4.1.15-2.1.0.sh
一路选择默认设置,最终将在/opt/fsl-imx-x11/4.1.15-2.1.0/目录下生成我们所需要的工具链。
SDK has been successfully set up and is ready to be used.
Each time you wish to use the SDK in a new shell session, you need to source the environment setup script e.g.
$ . /opt/fsl-imx-x11/4.1.15-2.1.0/environment-setup-cortexa9hf-neon-poky-linux-gnueabi
至此,我们所需要的所有文件均已生成,包含了uboot,kernel,rootfs以及交叉编译qt应用程序的交叉编译工具。相对应的软件版本如下:
uboot:v2016.03
kernel:v4.1.15
qt版本:qt5.6.2
当然最重要的是yocto编译生成的rootfs中包括了imx6所需要的各种库,特别是有我们所需要的能完整的支持imx6的gpu性能的qt5.6.
设置开机自动运行脚本
cd /opt/fsl-imx-x11/4.1.15-2.1.0
chmod a+x environment-setup-cortexa9hf-neon-poky-linux-gnueabi
vim ~/.bashrc
在最后一行添加
source /opt/fsl-imx-x11/4.1.15-2.1.0/environment-setup-cortexa9hf-neon-poky-linux-gnueabi
Ubuntu下搭建yocto的更多相关文章
- 在Ubuntu下搭建ASP.NET 5开发环境
在Ubuntu下搭建ASP.NET 5开发环境 0x00 写在前面的废话 年底这段时间实在太忙了,各种事情都凑在这个时候,没时间去学习自己感兴趣的东西,所以博客也好就没写了.最近工作上有个小功能要做成 ...
- 在Linux(Ubuntu)下搭建ASP.NET Core环境并运行 继续跨平台
最新教程:http://www.cnblogs.com/linezero/p/aspnetcoreubuntu.html 无需安装mono,在Linux(Ubuntu)下搭建ASP.NET Core环 ...
- Ubuntu下搭建NodeJS+Express WEB开发框架
Ubuntu下搭建NodeJS+Express WEB开发框架 2012-12-27 15:06 作者: NodeJSNet 来源: 本站 浏览: 2,966 次阅读 我要评论暂无评论 字号: 大 中 ...
- 如何在Ubuntu下搭建Android NDK开发环境
1 搭建Android SDK开发环境 参考在在Ubuntu下搭建Android SDK开发环境(图文)首先在Ubuntu下搭建Android SDK开发环境. 2 下载NDK开发包 打开官网: ht ...
- Ubuntu下搭建ASP.NET 5
在Ubuntu下搭建ASP.NET 5开发环境 0x00 写在前面的废话 年底这段时间实在太忙了,各种事情都凑在这个时候,没时间去学习自己感兴趣的东西,所以博客也好就没写了.最近工作上有个小功能要 ...
- 在Ubuntu下搭建FTP服务器的方法
由于整个学校相当于一个大型局域网,相互之间传送数据非常快,比如要共享个电影,传点资料什么的. 所以我们可以选择搭建一个FTP服务器来共享文件. 那么问题来了,有的同学会问,我们既然在一个局域网内,直接 ...
- Ubuntu下搭建FTP服务器
Ubuntu下搭建FTP服务器 我装的服务器系统是Ubuntu 12.04 LTS,FTP软件当然是选择大名鼎鼎的vsftpd(very secure FTP daemon), 用系统自带的FTP还好 ...
- deepin/ubuntu下搭建Jekyll环境
title: deepin/ubuntu下搭建Jekyll环境 最近用github搭建了个博客,正好也学习一下markdown语法,由于markdown写完后不是立即可见,所以每次写完文章都要经过在线 ...
- Linux之旅-ubuntu下搭建nodejs环境
.NET Core也开源了,并且可移植到Linux下,而ubuntu作为linux发行版的翘楚,极大的方便了初学者的入门,搭建完ASP.NET Core运行环境后,作为半前半后的开发人员,就继续着搭建 ...
随机推荐
- react - get或set 取值函数
取值函数(getter)和存值函数(setter) 您可以添加以get或set为前缀的方法来创建getter和setter,它们是根据您正在执行的操作执行的两个不同的代码:访问变量或修改其值.对某个属 ...
- 114、Java中String类之字符串文本复杂二次拆分
01.代码如下: package TIANPAN; /** * 此处为文档注释 * * @author 田攀 微信382477247 */ public class TestDemo { public ...
- ISAP 算法
Dinic 算法其实已经足够处理大多数的网络流了,但还不够快.接下来介绍的是最优秀的增广路最大流算法:ISAP(Improve Shortest Argumenting Path).它的时间复杂度上界 ...
- js去后台传递的值
function test(){ var param = [[${list}]];//以集合为例 } 如果list里面是实体类那么就需要重写toString,或者转为json
- Python学习笔记之基础篇(五)字典
#数据类型划分:可变数据类型 不可变数据类型 #不可变数据类型 : 元组 bool int str --> 可哈希 #可变数据类型 list ,dict set --->不可哈希 ''' ...
- No qualifying bean of type 'org.springframework.ui.Model' available
原因:@Autowired 下面没有注入类
- 微信二次分享的JSSDK的调用
网页端微信的二次分享如果不调用分享的SDK,分享之后就不会带有标题.描述 .缩略图 微信分享SDK调用 引入 <script src="//res.wx.qq.com/open/js/ ...
- Redis详解(一)——RDB
Redis详解(一)--RDB 前言 由于 Redis 是一个内存数据库,所谓内存数据库,就是将数据库中的内容保存在内存中,这与传统的MySQL,Oracle等关系型数据库直接将内容保存到硬盘中相比, ...
- java 之word转html
jar包 链接: https://pan.baidu.com/s/13o2CZTwM-Igx6wcoyEu_ug 密码: n95q package com.bistu.service; import ...
- qrcode在手机上不显示的问题
可以试试以下解决方案: 1.修改qrcode.min.js:里的function n()红线区域替换成这个 , 原因是这样子才能支持安卓机显示.