
Vue+Axios+Nigix+SpringCloud前端和后端搭建及其碰到的问题
一、Axios、Router的安装和使用
1、如何安装Axios和Router
1)、进入到工程所在的文件夹,通过cmd指令,进入到window的dos界面
2)、输入:npm install axios --save-dev;来安装Axios
3)、router在项目创建阶段会直接询问是否安装,选择yes即可。
2、如何使用Axios
1)、专门写一个index接口js文件,例如:
import Axios from 'axios'

import qs from 'qs'

export const User = {

  login(username, password) {

    return Axios.post('/login/',{

      username: username,

      password: password

    })

  },

  addSignUpUser(userInfo) {

    console.log(userInfo)

    return Axios.post('/addUser',userInfo);

  }

}
2)、在其他vue控件中引入
import { User } from '../../api/index'

methods: {

    ...mapMutations(['SET_SIGN_UP_SETP']),

    ...mapActions(['addSignUpUser']),

    handleSubmit (name) {

      const father = this;

      this.$refs[name].validate((valid) => {

        if (valid) {

          const userinfo = {

            username: this.formValidate.name,

            password: this.formValidate.password,

            mail: this.formValidate.mail,

            phone: this.$route.query.phone

          };

          //this.addSignUpUser(userinfo);

          User.addSignUpUser(userinfo)

            .then(result =>{

              if (result.status) {

                this.$Message.success('注册成功');

                father.SET_SIGN_UP_SETP(2);

                this.$router.push({ path: '/SignUp/signUpDone' });

              } else {

                this.$Message.error('注册失败');

              }

            });

        } else {

          this.$Message.error('注册失败');

        }

      });

    }

  },
3、Axios跨域问题如何解决?
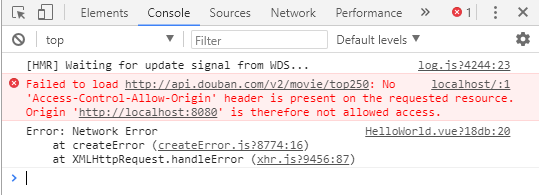
1)、这里以访问api/addUser为例,直接访问如下:
Axios.post("http://www.happymall.com/api/addUser")

.then(res=>{

    console.log(res)

})

.catch(err=>{

    console.log(err)

})
Step1:配置BaseUrl
在main.js中,配置下我们访问的Url前缀:
import Vue from 'vue'

import App from './App'

import Axios from 'axios'

Vue.prototype.$axios = Axios

Axios.defaults.baseURL = '/api'

Axios.defaults.headers.post['Content-Type'] = 'application/json';

Vue.config.productionTip = false

new Vue({

  el: '#app',

  components: { App },

  template: '<App/>'

})
关键代码是:Axios.defaults.baseURL = '/api',这样每次发送请求都会带一个/api的前缀。
Step2:配置代理
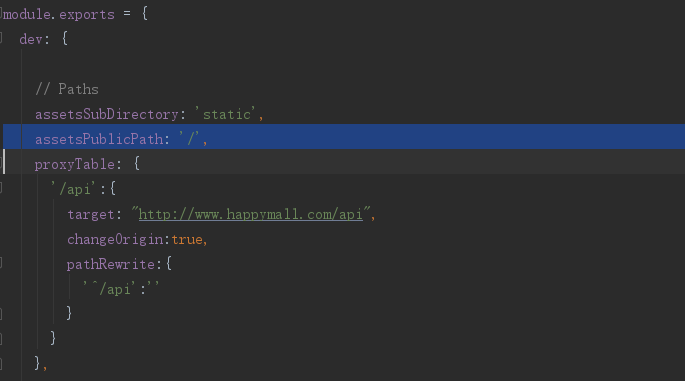
修改config文件夹下的index.js文件,在proxyTable中加上如下代码;示意图如下:
'/api':{

    target: "http://www.happymall.com",

    changeOrigin:true,

    pathRewrite:{

        '^/api':''

    }

}
Step3:修改请求Url
修改刚刚的axios请求,把url修改如下:
this.$axios.get("/addUser")

.then(res=>{

    console.log(res)

})

.catch(err=>{

    console.log(err)

})
Step4:重启服务
重启服务后,此时已经能够访问了。
原理:
因为我们给url加上了前缀/api,我们访问/api/addUser就当于访问了:localhost:8080/api/addUser(其中localhost:8080是默认的IP和端口)。
在index.js中的proxyTable中拦截了/api,并把/api及其前面的所有替换成了target中的内容,因此实际访问Url是http://www.happymall/api/addUser。
4、路由如何使用
1)、全局引入路由
/* eslint-disable no-new */

new Vue({

  el: '#app',

  router,

  store,

  components: { App },

  template: '<App/>'

});
2)、配置路由规则
import Vue from 'vue';

import Router from 'vue-router';

import Index from '@/components/Index';

const Login = resolve => require(['@/components/Login'], resolve);

const SignUp = resolve => require(['@/components/SignUp'], resolve);

Vue.use(Router);

export default new Router({

  routes: [

    {

      path: '/', // 首页

      name: 'Index',

      component: Index

    },

    {

      path: '/Login', // 登录

      name: 'Login',

      component: Login

    },

    {

      path: '/SignUp', // 注册

      /*name: 'SignUp',*/

      component: SignUp,

      children: [

        {

          path: '/',

          name: 'index',

          component: CheckPhone

        },

        {

          path: 'checkPhone',

          name: 'CheckPhone',

          component: CheckPhone

        },

        {

          path: 'inputInfo',

          name: 'InputInfo',

          component: InputInfo

        },

        {

          path: 'signUpDone',

          name: 'SignUpDone',

          component: SignUpDone

        }

      ]

    },

 ]

});
3)、使用路由
 User.addSignUpUser(userinfo)

            .then(result =>{

              if (result.status) {

                this.$Message.success('注册成功');

                father.SET_SIGN_UP_SETP(2);

                this.$router.push({ path: '/SignUp/signUpDone' });

              } else {

                this.$Message.error('注册失败');

              }

            });
二、Nigix路由地址问题
在Nigix通过配置服务器,将前端请求通过路由机制并结合SpringCloud实现负载均衡;服务器配置如下:
server {

        listen ;

        server_name www.happymall.com;

        location /{

            root happymall;

            index index.html;

        }

        location /api {

            proxy_pass http://127.0.0.1:9005/zuul-user/user/manage;

            add_header 'Access-Control-Allow-Credentials' 'true';

            add_header 'Access-Control-Allow-Origin' '*';

        }

    }
http://api.douban.com/api/addUser发送的请求,通过路由机制可以将该请求发送到Zull客户端;实现负载均衡。
http://127.0.0.1:9005/zuul-user/user/manage;
三、Zull客户端和Euraka服务器的配置
1、建立Euraka服务器
配置文件如下:
server.port=8761

#eureka config

spring.application.name=eureka-server

eureka.instance.hostname=localhost

eureka.client.registerWithEureka=true

eureka.client.fetchRegistry=true

eureka.instance.preferIpAddress=true

eureka.server.enable-self-preservation=false
2、建立Zull客户端
配置文件如下:
eureka.client.serviceUrl.defaultZone=http://localhost:8761/eureka/

server.port=9005

spring.application.name=serviceZuul

zuul.routes.zuul-user.path=/zuul-user/**

zuul.routes.zuul-user.serviceId=userservice

zuul.sensitive-headers=
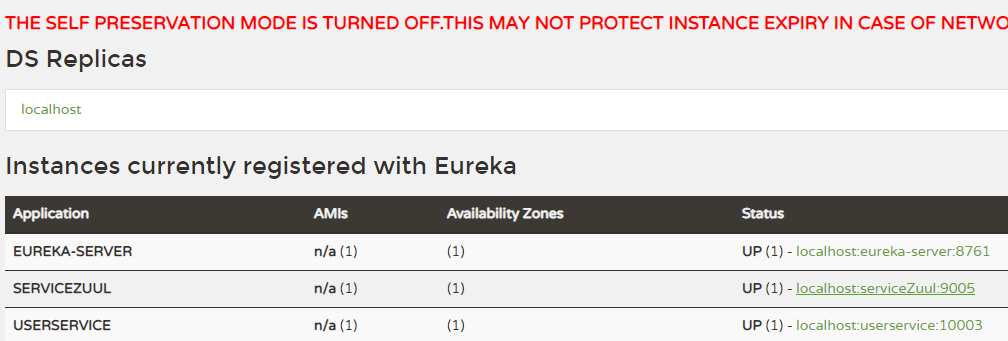
3、访问Euraka服务器查看微服务
四、springcloud微服务搭建
1、先建立一个父工程
先建立一个父工程,里面只保留一个pom.xml文件,用来提供继承服务,使其他微服务都继承该父工程;统一spring包的版本。
2、建立一个公共资源工程
继承父工程,并用于提供公用的pojo,vo和utils工具类;
3、建立一个respositry公共工程
该工程用来提供数据库连接池
4、将项目进行纵向切分,分成不同的微服务,并分别建立Maven工程
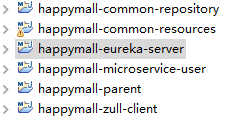
以用户管理模块为例,将该模块建立一个微服务;总体项目架构如下所示:
5、编写user微服务的代码
根据MVC模型,编写Controller、Modle和View层代码,其中controller层的代码示例如下
package cn.tedu.user.controller;

import org.springframework.beans.factory.annotation.Autowired;

import org.springframework.web.bind.annotation.RequestBody;

import org.springframework.web.bind.annotation.RequestMapping;

import org.springframework.web.bind.annotation.RestController;

import cn.tedu.common.pojo.User;

import cn.tedu.common.vo.SysResult;

import cn.tedu.user.service.UserService;

@RestController

@RequestMapping("/user/manage")

public class UserController {

@Autowired

private UserService userService;

    @RequestMapping("/checkUserName")

    public SysResult checkUserName(String userName) {

        Integer exist = userService.checkUsername(userName);

        //根据exist判断返回结果

        if(exist == 0) {

            return SysResult.ok();

        } else {

            return SysResult.build(201, "已存在", null);

        }

    }

    @RequestMapping("/addUser")

    public SysResult userSave(@RequestBody User user) {

        try {

            userService.userSave(user);

            return SysResult.ok();

        } catch (Exception e) {

            e.printStackTrace();

            return SysResult.build(201, e.getMessage(), null);

        }

    }

}
因为前端传递的格式是Json字符串格式,因此在后端中接受对象时,要加上@RequestBody;表示该请求参数是一个对象。
五、postman测试效果如下图所示:
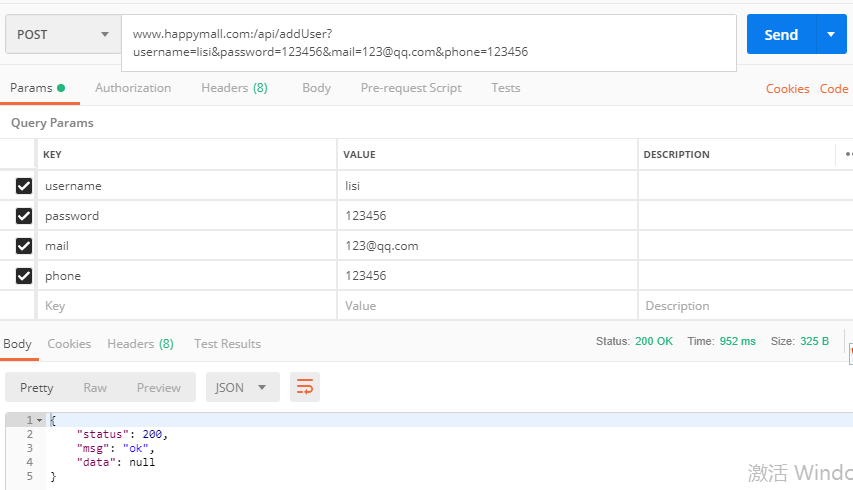
Vue+Axios+Nigix+SpringCloud前端和后端搭建及其碰到的问题的更多相关文章
- vue axios 发送post请求,后端接收参数为null
1首先检查自己的传参方式是否正确,我是传一个对象,没有问题,接口也触发了 2查了下资料说是 Content-Type的问题,设置为 'application/x-www-form-urlencod ...
- vue axios的跨域前后端解决方案
原因出于安全考虑,浏览器有一个同源策略.浏览器中,异步请求的地址与目标地址的协议.域名和端口号三者与当前有不同,就属于跨域请求. 限制跨域访问是浏览器的一个安全策略,因为如果没有这个策略,那么就有被跨 ...
- vue+axios完美实现前端路由拦截
一.路由拦截 1.首先在router的index.js里配置一个自定义字段requireAuth,用该字段来判断进入该路由是否需要登录.如果已经登陆则进入该路由,反之则进入登录页面. 如图是路由配置: ...
- [Vue 牛刀小试]:第十六章 - 针对传统后端开发人员的前端项目框架搭建
一.前言 在之前学习 Vue 基础知识点的文章中,我们还是采用传统的方式,通过在 html 页面上引用 vue.js 这个文件,从而将 Vue 引入到我们的项目开发中.伴随着 Node.js 的出现, ...
- vue前端+java后端 vue + vuex + koa2开发环境搭建及示例开发
vue + vuex + koa2开发环境搭建及示例开发 https://segmentfault.com/a/1190000012918518 vue前端+java后端 https://blog.c ...
- vue 解决axios请求出现前端跨域问题
vue 解决axios请求出现前端跨域问题 最近在写纯前端的vue项目的时候,碰到了axios请求本机的资源的时候,出现了访问报404的问题.这就让我很难受.查询了资料原来是跨域的问题. 在正常开发中 ...
- SpringCloud微服务实战——搭建企业级开发框架(四十七):【移动开发】整合uni-app搭建移动端快速开发框架-添加Axios并实现登录功能
uni-app自带uni.request用于网络请求,因为我们需要自定义拦截器等功能,也是为了和我们后台管理保持统一,这里我们使用比较流行且功能更强大的axios来实现网络请求. Axios ...
- @vue/cli 4.0+express 前后端分离实践
之前总结过一篇vue-cli 2.x+express+json-server实现前后端分离的帖子,@vue/cli3.0及4.0搭建的项目与vue-cli2.x的项目结构有很大的不同.这里对@vue/ ...
- SpringBoot + Vue + ElementUI 实现后台管理系统模板 -- 后端篇(五): 数据表设计、使用 jwt、redis、sms 工具类完善注册登录逻辑
(1) 相关博文地址: SpringBoot + Vue + ElementUI 实现后台管理系统模板 -- 前端篇(一):搭建基本环境:https://www.cnblogs.com/l-y-h/p ...
随机推荐
- 820算法复试 Eratasthene 质数筛选
Eratasthene 学问之道无他,求其放心而巳矣 https://blog.csdn.net/qq_37653144/article/details/80470029 class Solution ...
- 02-03Android学习进度报告三
今天主要学习了线性布局和相对布局的概念和区别,以及线性布局和相对布局的优缺点. 经过搜素发现,我们屏幕适配的使用用的比较多的就是LinearLayout的权重属性weight,我 学习了一些 Line ...
- 用C/C++创建windows服务程序
转载:https://blog.csdn.net/chenyujing1234/article/details/8023816 一.演示过程下方代码演示了如何使用vs(C/C++)创建windows服 ...
- Excel使用小技巧
1.Excel随机设置单元格的内容为整数0或1: 在单元格中写公式: =ROUND(RAND(),0) 2.设置某个单元格的值为1或0,根据其他3个单元格的值为0或1来确定: 在该单元格中写公式: ...
- C++11类内static成员变量声明与定义
众所周知,将一个类内的某个成员变量声明为static型,可以使得该类实例化得到的对象实现对象间数据共享. 在C++中,通常将一个类的声明写在头文件中,将这个类的具体定义(实现)写在cpp源文件中. 因 ...
- error C4996: 'fopen': This function or variable may be unsafe. Consider using fopen_s instead. To disable deprecation
遇到这个问题,请打开项目的Properties(属性)------->Configuration Properties(配置属性)------>C/C++ ------>Prepro ...
- FMDB数据迁移
https://www.jianshu.com/p/736b00b3a1e1 2017.08.25 15:44* 字数 500 阅读 1474评论 0喜欢 4 公司项目中,一般都需要做数据持久化,我们 ...
- VNC怎么和宿主机共享粘贴板
VNC怎么和宿主机共享粘贴板 假设目标主机是linux,终端主机是windows(就是在windows上使用VNC登陆linux) 在linux中执行vncconfig -nowin& 在li ...
- BUU re xor
从13行和18行的0x21(c规定十六进制必须用0x**表示)可以知道这个字符串就是33个字符 shift+e来提取出数组中的字符: 设这个数组是global数组 global[] = { 102, ...
- primecoin服务常用命令和参数说明
Primecoin命令: 启动服务:./primecoind -daemon -rpcuser=user -rpcpassword=password -txindex=1 -addrindex=1 - ...