反应式编程是使你的应用程序更高效的一种越来越流行的方式。响应式应用程序异步调用响应,而不是调用资源并等待响应。这使他们可以释放处理能力,仅在必要时执行处理,并且比其他系统更有效地扩展。

Java生态系统在反应框架中占有相当大的份额,其中包括Play框架,Ratpack,Vert.x和Spring WebFlux。像反应式编程一样,微服务架构可以帮助大型团队快速扩展,并且可以使用上述任何出色的框架进行构建。

今天,我想向你展示如何使用Spring Cloud Gateway,Spring Boot和Spring WebFlux构建反应性微服务架构。我们将利用Spring Cloud Gateway,因为API网关通常是云原生微服务架构中的重要组件,可为你所有的后端微服务提供聚合层。

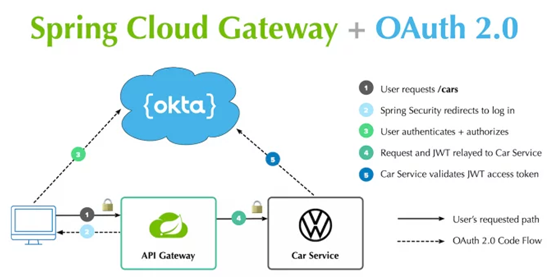
本教程将向你展示如何使用REST API构建微服务,该API返回新车列表。你将使用Eureka进行服务发现,并使用Spring Cloud Gateway将请求路由到微服务。然后,你将集成Spring Security,以便只有经过身份验证的用户才能访问你的API网关和微服务。
PrerequisitesHTTPie (or cURL), Java 11+, and an internet connection.

Spring Cloud Gateway vs. Zuul

Zuul是Netflix的API网关。Zuul最初于2013年发布,最初并不具有反应性,但Zuul 2是彻底的重写,使其具有反应性。不幸的是,Spring Cloud不支持Zuul 2,并且可能永远不会支持。

现在,Spring Cloud Gateway是Spring Cloud Team首选的API网关实现。它基于Spring 5,Reactor和Spring WebFlux。不仅如此,它还包括断路器集成,使用Eureka进行服务发现,并且与OAuth 2.0集成起来要容易得多!

接下来让我们深入了解。

创建一个Spring Cloud Eureka Server项目

首先创建一个目录来保存你的所有项目,例如spring-cloud-gateway。在终端窗口中导航至它,并创建一个包括Spring Cloud Eureka Server作为依赖项的discovery-service项目。


http https://start.spring.io/starter.zip javaVersion==11 artifactId==discovery-service \

  name==eureka-service baseDir==discovery-service \

  dependencies==cloud-eureka-server | tar -xzvf -


上面的命令使用HTTPie。我强烈建议安装它。你也可以使用卷曲。运行curlhttps//start.spring.io以查看语法。

在其主类上添加@EnableEurekaServer,以将其用作Eureka server。


import org.springframework.cloud.netflix.eureka.server.EnableEurekaServer;

@EnableEurekaServer

@SpringBootApplication

public class EurekaServiceApplication {...}

将以下属性添加到项目的src / main / resources / application.properties文件中,以配置其端口并关闭Eureka注册。


server.port=8761

eureka.client.register-with-eureka=false

要使发现服务在Java 11+上运行,请添加对JAXB的依赖关系。


<dependency>

    <groupId>org.glassfish.jaxb</groupId>

    <artifactId>jaxb-runtime</artifactId>

</dependency>

使用./mvnw spring-boot:run或通过在IDE中运行它来启动项目。

创建一个Spring Cloud Gateway项目

接下来,创建一个包含一些Spring Cloud依赖项的api-gateway项目。

http https://start.spring.io/starter.zip javaVersion==11 artifactId==api-gateway \

  name==api-gateway baseDir==api-gateway \

  dependencies==actuator,cloud-eureka,cloud-feign,cloud-gateway,cloud-hystrix,webflux,lombok | tar -xzvf -

一分钟后,我们将重新配置该项目。

使用Spring WebFlux创建反应式微服务

Car微服务将包含此示例代码的很大一部分,因为它包含支持CRUD的功能齐全的REST API。

使用start.spring.io创建car-service项目:

http https://start.spring.io/starter.zip javaVersion==11 artifactId==car-service \

  name==car-service baseDir==car-service \

  dependencies==actuator,cloud-eureka,webflux,data-mongodb-reactive,flapdoodle-mongo,lombok | tar -xzvf -

这个命令中的dependencies参数很有趣。你可以看到其中包括Spring WebFlux,以及MongoDB。Spring Data还为Redis和Cassandra提供了响应式驱动程序。

你可能还对R2DBC(反应性关系数据库连接)感兴趣,R2DBC是一种将反应性编程API引入SQL数据库的工作。在本示例中,我没有使用它,因为在start.spring.io上尚不可用。

使用Spring WebFlux构建REST API

我是大众的忠实拥护者,尤其是公交车和臭虫等经典车。你是否知道大众在未来几年内将推出大量电动汽车? 我对ID Buzz感到非常兴奋,它具有经典曲线,全电动而且拥有350匹以上的马力!

如果你不熟悉ID Buzz,请看这张来自大众汽车的照片。

让我们从这个API示例中获得乐趣,并使用电动VW作为我们的数据集。该API将跟踪各种汽车名称和发布日期。

在src / main / java /…/ CarServiceApplication.java中添加Eureka注册,示例数据初始化和反应性REST API:

package com.example.carservice;

import lombok.AllArgsConstructor;

import lombok.Data;

import lombok.NoArgsConstructor;

import lombok.extern.slf4j.Slf4j;

import org.springframework.boot.ApplicationRunner;

import org.springframework.boot.SpringApplication;

import org.springframework.boot.autoconfigure.SpringBootApplication;

import org.springframework.cloud.netflix.eureka.EnableEurekaClient;

import org.springframework.context.annotation.Bean;

import org.springframework.data.annotation.Id;

import org.springframework.data.mongodb.core.mapping.Document;

import org.springframework.data.mongodb.repository.ReactiveMongoRepository;

import org.springframework.http.HttpStatus;

import org.springframework.http.ResponseEntity;

import org.springframework.web.bind.annotation.*;

import reactor.core.publisher.Flux;

import reactor.core.publisher.Mono;

import java.time.LocalDate;

import java.time.Month;

import java.util.Set;

import java.util.UUID;

@EnableEurekaClient (1)

@SpringBootApplication

@Slf4j (2)

public class CarServiceApplication {

    public static void main(String[] args) {

        SpringApplication.run(CarServiceApplication.class, args);

    }

    @Bean (3)

    ApplicationRunner init(CarRepository repository) {

        // Electric VWs from https://www.vw.com/electric-concepts/

        // Release dates from https://www.motor1.com/features/346407/volkswagen-id-price-on-sale/

        Car ID = new Car(UUID.randomUUID(), "ID.", LocalDate.of(2019, Month.DECEMBER, 1));

        Car ID_CROZZ = new Car(UUID.randomUUID(), "ID. CROZZ", LocalDate.of(2021, Month.MAY, 1));

        Car ID_VIZZION = new Car(UUID.randomUUID(), "ID. VIZZION", LocalDate.of(2021, Month.DECEMBER, 1));

        Car ID_BUZZ = new Car(UUID.randomUUID(), "ID. BUZZ", LocalDate.of(2021, Month.DECEMBER, 1));

        Set<Car> vwConcepts = Set.of(ID, ID_BUZZ, ID_CROZZ, ID_VIZZION);

        return args -> {

            repository

                    .deleteAll() (4)

                    .thenMany(

                            Flux

                                    .just(vwConcepts)

                                    .flatMap(repository::saveAll)

                    )

                    .thenMany(repository.findAll())

                    .subscribe(car -> log.info("saving " + car.toString())); (5)

        };

    }

}

@Document

@Data

@NoArgsConstructor

@AllArgsConstructor

class Car { (6)

    @Id

    private UUID id;

    private String name;

    private LocalDate releaseDate;

}

interface CarRepository extends ReactiveMongoRepository<Car, UUID> {

} (7)

@RestController

class CarController { (8)

    private CarRepository carRepository;

    public CarController(CarRepository carRepository) {

        this.carRepository = carRepository;

    }

    @PostMapping("/cars")

    @ResponseStatus(HttpStatus.CREATED)

    public Mono<Car> addCar(@RequestBody Car car) { (9)

        return carRepository.save(car);

    }

    @GetMapping("/cars")

    public Flux<Car> getCars() { (10)

        return carRepository.findAll();

    }

    @DeleteMapping("/cars/{id}")

    public Mono<ResponseEntity<Void>> deleteCar(@PathVariable("id") UUID id) {

        return carRepository.findById(id)

                .flatMap(car -> carRepository.delete(car)

                        .then(Mono.just(new ResponseEntity<Void>(HttpStatus.OK)))

                )

                .defaultIfEmpty(new ResponseEntity<>(HttpStatus.NOT_FOUND));

    }

}

  1. 添加@EnableEurekaClient批注以进行服务发现
  2. @ Slf4j是Lombok的一个方便注释,可用于登录类
  3. ApplicationRunner bean用默认数据填充MongoDB
  4. 删除MongoDB中的所有现有数据,以免添加新数据
  5. 订阅结果,以便同时调用deleteAll()和saveAll()
  6. 带有Spring Data NoSQL和Lombok注释的汽车类,以减少样板
  7. CarRepository接口扩展了ReactiveMongoRepository,几乎没有任何代码即可提供CRUD功能!
  8. 使用CarRepository执行CRUD操作的CarController类
  9. Spring WebFlux返回单个对象的Mono发布者

10. 为多个对象返回一个Flex发布者

如果你使用IDE来构建项目,则需要为IDE设置Lombok

你还需要修改car-service项目的application.properties以设置其名称和端口

spring.application.name=car-service

server.port=8081

运行MongoDB

运行MongoDB的最简单方法是从car-service / pom.xml中的flappoodle依赖项中删除测试范围。这将导致你的应用程序启动嵌入式MongoDB依赖关系。

<dependency>

    <groupId>de.flapdoodle.embed</groupId>

    <artifactId>de.flapdoodle.embed.mongo</artifactId>

    <!--<scope>test</scope>-->

</dependency>

你还可以使用Homebrew安装和运行MongoDB


brew tap mongodb/brew

brew install mongodb-community@4.2

mongod

或者,使用Docker:

docker run -d -it -p 27017:27017 mongo

使用WebFlux传输数据

这就完成了使用Spring WebFlux构建REST API所需完成的所有工作。

“但是等等!”你可能会说。 “我以为WebFlux就是关于流数据的?”

在此特定示例中,你仍然可以从/cars端点流式传输数据,但不能在浏览器中。

除了使用服务器发送事件或WebSocket之外,浏览器无法使用流。但是,非浏览器客户端可以通过发送具有application/stream+json值的Accept header来获取JSON流(感谢Rajeev Singh的技巧)。

你可以通过启动浏览器并使用HTTPie发出请求来测试此时一切正常。但是,编写自动化测试会更好!

使用WebTestClient测试你的WebFlux API

WebClient是Spring WebFlux的一部分,可用于发出响应请求,接收响应以及使用有效负载填充对象。 伴随类WebTestClient可用于测试WebFlux API。 它包含与WebClient相似的请求方法,以及检查响应正文,状态和标头的方法。

修改car-service项目中的src/test/java/…/CarServiceApplicationTests.java类以包含以下代码。

package com.example.carservice;

import org.junit.Test;

import org.junit.runner.RunWith;

import org.springframework.beans.factory.annotation.Autowired;

import org.springframework.boot.test.context.SpringBootTest;

import org.springframework.http.MediaType;

import org.springframework.test.context.junit4.SpringRunner;

import org.springframework.test.web.reactive.server.WebTestClient;

import reactor.core.publisher.Mono;

import java.time.LocalDate;

import java.time.Month;

import java.util.Collections;

import java.util.UUID;

@RunWith(SpringRunner.class)

@SpringBootTest(webEnvironment = SpringBootTest.WebEnvironment.RANDOM_PORT,

        properties = {"spring.cloud.discovery.enabled = false"})

public class CarServiceApplicationTests {

    @Autowired

    CarRepository carRepository;

    @Autowired

    WebTestClient webTestClient;

    @Test

    public void testAddCar() {

        Car buggy = new Car(UUID.randomUUID(), "ID. BUGGY", LocalDate.of(2022, Month.DECEMBER, 1));

        webTestClient.post().uri("/cars")

                .contentType(MediaType.APPLICATION_JSON_UTF8)

                .accept(MediaType.APPLICATION_JSON_UTF8)

                .body(Mono.just(buggy), Car.class)

                .exchange()

                .expectStatus().isCreated()

                .expectHeader().contentType(MediaType.APPLICATION_JSON_UTF8)

                .expectBody()

                .jsonPath("$.id").isNotEmpty()

                .jsonPath("$.name").isEqualTo("ID. BUGGY");

    }

    @Test

    public void testGetAllCars() {

        webTestClient.get().uri("/cars")

                .accept(MediaType.APPLICATION_JSON_UTF8)

                .exchange()

                .expectStatus().isOk()

                .expectHeader().contentType(MediaType.APPLICATION_JSON_UTF8)

                .expectBodyList(Car.class);

    }

    @Test

    public void testDeleteCar() {

        Car buzzCargo = carRepository.save(new Car(UUID.randomUUID(), "ID. BUZZ CARGO",

                LocalDate.of(2022, Month.DECEMBER, 2))).block();

        webTestClient.delete()

                .uri("/cars/{id}", Collections.singletonMap("id", buzzCargo.getId()))

                .exchange()

                .expectStatus().isOk();

    }

}

为了证明它有效,请运行./mvnw test。测试通过后,请拍一下自己的背!

如果你使用的是Windows,请使用 mvnw test.

这篇先讲到这,下篇继续:使用Spring Cloud Gateway保护反应式微服务(二)

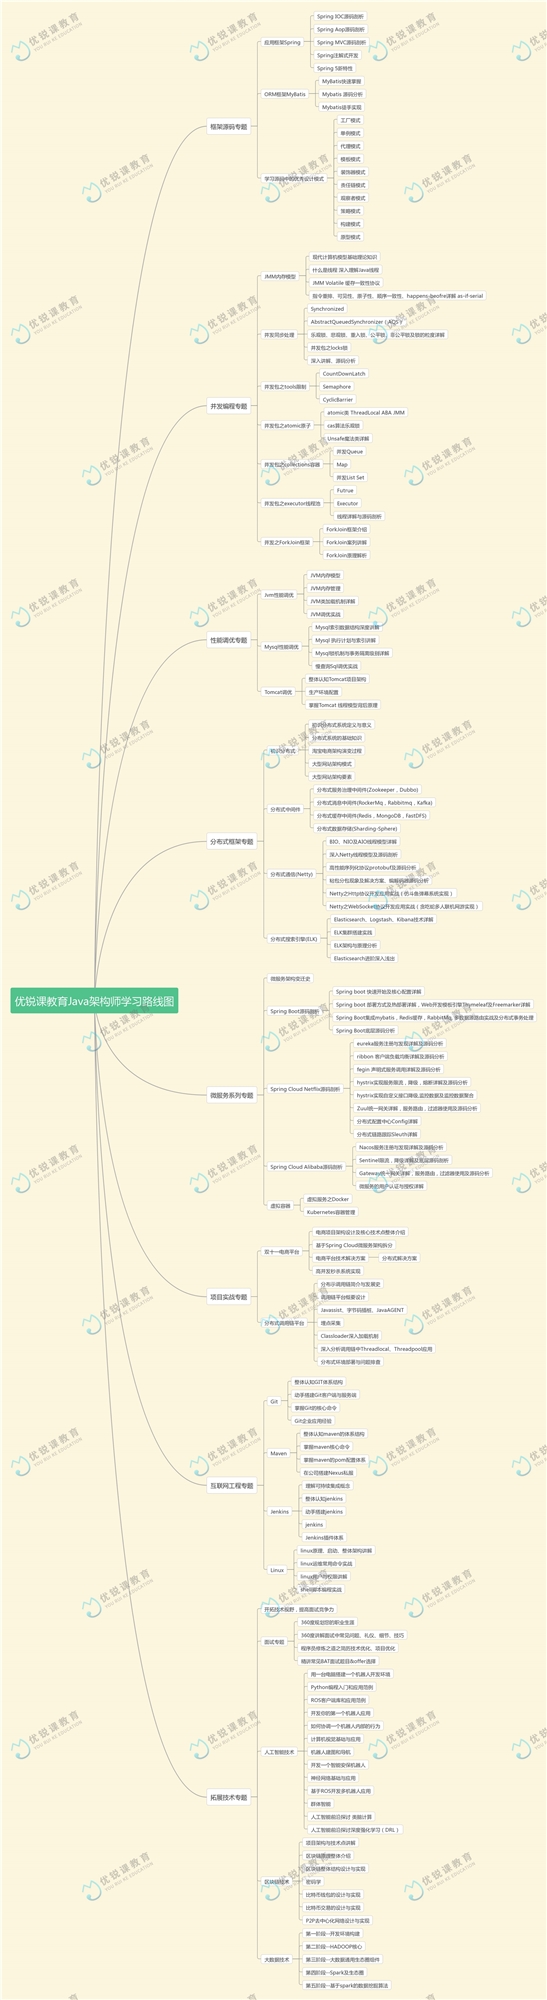
另外近期整理了一套完整的java架构思维导图,分享给同样正在认真学习的每位朋友~
使用Spring Cloud Gateway保护反应式微服务(一)的更多相关文章

  1. 使用Spring Cloud Gateway保护反应式微服务(二)

    抽丝剥茧,细说架构那些事——[优锐课] 接着上篇文章:使用Spring Cloud Gateway保护反应式微服务(一) 我们继续~ 将Spring Cloud Gateway与反应式微服务一起使用 ...

  2. 微服务网关实战——Spring Cloud Gateway

    导读 作为Netflix Zuul的替代者,Spring Cloud Gateway是一款非常实用的微服务网关,在Spring Cloud微服务架构体系中发挥非常大的作用.本文对Spring Clou ...

  3. Spring Cloud Gateway简单入门,强大的微服务网关

    我最新最全的文章都在南瓜慢说 www.pkslow.com,欢迎大家来喝茶! 1 简介 见名知义,Spring Cloud Gateway是用于微服务场景的网关组件,它是基于Spring WebFlu ...

  4. Spring Cloud Gateway入门

    1.什么是Spring Cloud GatewaySpring Cloud Gateway是Spring官方基于Spring 5.0,Spring Boot 2.0和Project Reactor等技 ...

  5. API网关spring cloud gateway和负载均衡框架ribbon实战

    通常我们如果有一个服务,会部署到多台服务器上,这些微服务如果都暴露给客户,是非常难以管理的,我们系统需要有一个唯一的出口,API网关是一个服务,是系统的唯一出口.API网关封装了系统内部的微服务,为客 ...

  6. 快速突击 Spring Cloud Gateway

    认识 Spring Cloud Gateway Spring Cloud Gateway 是一款基于 Spring 5,Project Reactor 以及 Spring Boot 2 构建的 API ...

  7. 熬夜肝了这篇Spring Cloud Gateway的功能及综合使用

    前言 SpringCloud 是微服务中的翘楚,最佳的落地方案. Spring Cloud Gateway 是 Spring Cloud 新推出的网关框架,之前是 Netflix Zuul.网关通常在 ...

  8. 微服务网关 Spring Cloud Gateway

    1.  为什么是Spring Cloud Gateway 一句话,Spring Cloud已经放弃Netflix Zuul了.现在Spring Cloud中引用的还是Zuul 1.x版本,而这个版本是 ...

  9. Spring Cloud gateway 网关服务二 断言、过滤器

    微服务当前这么火爆的程度,如果不能学会一种微服务框架技术.怎么能升职加薪,增加简历的筹码?spring cloud 和 Dubbo 需要单独学习.说没有时间?没有精力?要学俩个框架?而Spring C ...

随机推荐

  1. WordPress 网站迁移

    最近想把本地的WordPress迁移到我的Linux虚拟机里面,是不是很无聊,哈哈哈,接下来就是一过程了,其实这个和迁移到线上是一样的, 1.首先将本地的文件WordPress通过FTP传到虚拟机上: ...

  2. python3.8+PySimpleGUI+进度条代码大全

    1.python3.8+PySimpleGUI+进度条大全 2.效果图: 3.代码: #导出模块 import PySimpleGUI as sg import time import inspect ...

  3. !important面试汇总啊

    https://www.jianshu.com/p/feab89b88d6b https://juejin.im/post/5c64d15d6fb9a049d37f9c20#heading-57

  4. ANSYS热分析简介1

    目录 1. ANSYS热分析简介 1.1 传导 1.2 热载荷分类 1.2.1 载荷施加 1.3 热分析分类 1.3.1 稳态热分析 1.3.2 瞬态热分析 1.3.3 非线性分析综述 2. 热分析单 ...

  5. 2016-2017学年第三次测试赛 习题E 林喵喵算术

    时间限制: 1 Sec  内存限制: 128 MB 提交: 70  解决: 25 提交统计讨论版 题目描述 给你两个八进制数,你需要在八进制计数法的情况下计算a-b. 如果结果为负数,你应该使用负号代 ...

  6. 【原】centos安装django

    一.更新系统软件包yum update -y 二.安装软件管理包和可能使用的依赖 yum -y groupinstall "Development tools" yum insta ...

  7. 温湿度传感器AM2302(DH22)

    AM2302   3.3V - 5.5V,建议供电电压为 5V单总线通信模式时,SDA 上拉(开漏)后与微处理器的 I/O 端口相连.单总线通信特殊说明: 0.功耗待机40~50uA;测量1~1.5m ...

  8. Esp32的一些资料链接

    http://wiki.ai-thinker.com/doku.php/utils/esp32_idf_menuconfig   http://wiki.ai-thinker.com/doku.php ...

  9. 解决RStudio(非conda安装)在使用Anaconda中的R环境时,缺失“ libbz2-1.dll ”而不能正常启动问题

    1.问题描述 当非conda安装的RStudio,在调用Anaconda中的R环境时,报如下错误: 2.解决办法 下载同版本的R,对Anaconda中R相应的文件进行替换(图标中标注的部分) R3.5 ...

  10. CSS各种小技巧

    /* *背景的透明度设置 */ -moz-opacity: 0.8; opacity:.80; filter: alpha(opacity=80); 待续...