PO设计模式-实现移动端自动化测试
开发环境:python 3.6.5 + selenium 2.48.0 + pytest框架 + Android 5.1
工具:pycharm + Appium + Genymotion
测试机型:Samsung Galaxy S6
#需求:设计3个测试用例

#1.实现点击设置->显示->放大镜(查找)->输入内容->点击返回按钮

#2.实现点击设置->更多->移动网络->首选网络类型->2G

#3.实现点击设置->更多->移动网络->首选网络类型->3G
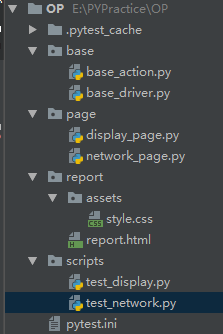
以下是PO模式设计文件目录
实现设计模式前:
import time

from appium import webdriver

class TestSetting:

    def setup(self):

        # server 启动参数

        desired_caps = {}

        # 设备信息

        desired_caps['platformName'] = 'Android'

        desired_caps['platformVersion'] = '5.1'

        desired_caps['deviceName'] = '192.168.56.101:5555'

        # app的信息

        desired_caps['appPackage'] = 'com.android.settings'

        desired_caps['appActivity'] = '.Settings'

        # 解决输入中文

        desired_caps['unicodeKeyboard'] = True

        desired_caps['resetKeyboard'] = True

        # 声明我们的driver对象

        self.driver = webdriver.Remote('http://127.0.0.1:4723/wd/hub', desired_caps)

    def test_mobile_network_2g(self):

        self.driver.find_element_by_xpath("//*[contains(@text,'更多')]").click()

        self.driver.find_element_by_xpath("//*[contains(@text,'移动网络')]").click()

        self.driver.find_element_by_xpath("//*[contains(@text,'首选网络类型')]").click()

        self.driver.find_element_by_xpath("//*[contains(@text,'2G')]").click()

    def test_mobile_network_3g(self):

        self.driver.find_element_by_xpath("//*[contains(@text,'更多')]").click()

        self.driver.find_element_by_xpath("//*[contains(@text,'移动网络')]").click()

        self.driver.find_element_by_xpath("//*[contains(@text,'首选网络类型')]").click()

        self.driver.find_element_by_xpath("//*[contains(@text,'3G')]").click()

    def test_mobile_display_input(self):

        self.driver.find_element_by_xpath("//*[contains(@text,'显示')]").click()

        self.driver.find_element_by_id("com.android.settings:id/search").click()

        self.driver.find_element_by_id("android:id/search_src_text").send_keys("hello")

        self.driver.find_element_by_class_name("android.widget.ImageButton").click()

    def teardown(self):

        self.driver.quit()
实现设计模式后:
公共部分抽取在base文件夹
抽取前置配置:
base_driver.py
from appium import webdriver

def Testbase():

    # server 启动参数

    desired_caps = {}

    desired_caps['platformName'] = 'Android'

    desired_caps['platformVersion'] = '5.1'

    desired_caps['deviceName'] = '192.168.56.101:5555'

    desired_caps['appPackage'] = 'com.android.settings'

    desired_caps['appActivity'] = '.Settings'

    desired_caps['unicodeKeyboard'] = True

    desired_caps['resetKeyboard'] = True

    # 解决输入中文问题

    desired_caps['unicodeKeyboard'] = True

    desired_caps['resetKeyboard'] = True

    # 声明driver对象

    driver = webdriver.Remote('http://127.0.0.1:4723/wd/hub', desired_caps)

    return driver
抽取公共方法:
base_action.py
from selenium.webdriver.support.wait import WebDriverWait

class BaseAction:

    def __init__(self, driver):

        self.driver = driver

    # 显示等待

    def find_elements(self, loc, time=10, poll=1):

        return WebDriverWait(self.driver, time, poll).until(lambda x: x.find_element(loc[0], loc[1]))

    # 定义一个函数,取按钮的元素

    def act_click(self,loc):

        return self.act_title(loc).click()

    # 定义一个函数,取输入框的元素

    def act_text(self,loc,text):

        return self.act_title(loc).send_keys(text)

    def act_title(self, loc):

        by = loc[0]

        value = loc[1]

        return self.driver.find_element(by, value)
页面主体部分:
page
测试用例1:
display_page.py
from base.base_action import BaseAction

from selenium.webdriver.common.by import By

class DisplayPage(BaseAction):

    # 初始化方法

    # 显示按钮

    see_button = By.XPATH, "//*[contains(@text,'显示')]"

    # 放大镜按钮

    search_button = By.ID, "com.android.settings:id/search"

    # 放大镜旁边的输入文本

    search_edit_text = By.ID, "android:id/search_src_text"

    # 返回按钮

    back_button = By.CLASS_NAME, "android.widget.ImageButton"

    #

    # # 定义一个函数,取按钮的元素

    # def act_click(self,loc):

    #     return self.driver.find_element(loc[0],loc[1]).click()

    # # 定义一个函数,取输入框的元素

    # def act_text(self,loc,text):

    #     return self.driver.find_element(loc[0],loc[1]).send_keys(text)

    # def __init__(self, driver):

    #     self.driver = driver

    # 点击显示

    def click_see(self):

        # self.driver.find_element_by_xpath("//*[contains(@text,'显示')]").click()

        # self.driver.find_element(self.see_button).click()

        self.act_click(self.see_button)

    # 点击放大镜

    def click_search(self):

        # self.driver.find_element_by_id("com.android.settings:id/search").click()

        # self.driver.find_element(self.search_button).click()

        self.act_click(self.search_button)

    # 输入文本

    def input_text(self, text):

        # self.driver.find_element_by_id("android:id/search_src_text").send_keys(text)

        # self.driver.find_element(self.search_edit_text).send_keys(text)

        self.act_text(self.search_edit_text,text)

    # 点击返回

    def click_back(self):

        # self.driver.find_element_by_class_name("android.widget.ImageButton").click()

        # self.driver.find_element(self.back_button).click()

        self.act_click(self.back_button)
测试用例2/3:
network_page.py
from selenium.webdriver.common.by import By

from base.base_action import BaseAction

class NetworkPage(BaseAction):

# 抽离元素

    # 更多按钮

    more_button = By.XPATH, "//*[contains(@text,'更多')]"

    # 网络移动按钮

    network_button = By.XPATH, "//*[contains(@text,'移动网络')]"

    #首选网络类型按钮

    first_network_button = By.XPATH, "//*[contains(@text,'首选网络类型')]"

    # 2G选择按钮

    button_2g = By.XPATH, "//*[contains(@text,'2G')]"

    # 3G选择按钮

    button_3g = By.XPATH, "//*[contains(@text,'3G')]"

# 代码精简方式,提取公共元素

    def click_more(self):

        # self.driver.find_element_by_xpath("//*[contains(@text,'更多')]").click()

        # self.driver.find_element(By.XPATH, "//*[contains(@text,'更多')]").click()

        self.act_click(self.more_button)

    def click_network(self):

        # self.driver.find_element_by_xpath("//*[contains(@text,'移动网络')]").click()

        # self.driver.find_element(By.XPATH, "//*[contains(@text,'移动网络')]").click()

        self.act_click(self.network_button)

    def click_first_network(self):

        # self.driver.find_element_by_xpath("//*[contains(@text,'首选网络类型')]").click()

        # self.driver.find_element(By.XPATH, "//*[contains(@text,'首选网络类型')]").click()

        self.act_click(self.first_network_button)

    def mobile_network_2g(self):

        # self.driver.find_element_by_xpath("//*[contains(@text,'2G')]").click()

        # self.driver.find_element(By.XPATH, "//*[contains(@text,'2G')]").click()

        self.act_click(self.button_2g)

    def mobile_network_3g(self):

        # self.driver.find_element_by_xpath("//*[contains(@text,'3G')]").click()

        # self.driver.find_element(By.XPATH, "//*[contains(@text,'2G')]").click()

        self.act_click(self.button_3g)
测试用例1的脚本:
test_display.py
# 获取本地地址

import sys, os

sys.path.append(os.getcwd())

from base.base_driver import Testbase

from page.display_page import DisplayPage

class TestDisplay:

    def setup(self):

        self.driver = Testbase()

        self.display_page = DisplayPage(self.driver)

    def test_mobile_display_input(self):

        # 点击显示

        self.display_page.click_see()

        # 点击放大镜

        self.display_page.click_search()

        # 文本输入

        self.display_page.input_text("hello")

        # 点击返回

        self.display_page.click_back()

    def teardown(self):

        self.driver.quit()
测试用例2/3的脚本:
test_network.py
import os, sys

sys.path.append(os.getcwd())

from page.network_page import NetworkPage

from base.base_driver import Testbase

class TestNetwork:

    def setup(self):

        self.driver = Testbase()

        self.network_page = NetworkPage(self.driver)

        self.network_page.click_more()

        self.network_page.click_network()

        self.network_page.click_first_network()

    def test_mobile_network_2g(self):

        self.network_page.mobile_network_2g()

    def test_mobile_network_3g(self):

        # self.network_page.click_more()

        # self.network_page.click_network()

        # self.network_page.click_first_network()

        self.network_page.mobile_network_3g()

    def teardown(self):

        self.driver.quit()
pytest框架的执行文件:
pytest.ini
注意:因为文件为ini格式,#不被识别为注释标识,请删掉注释部分
[pytest]

#文件路径,和生成报告

addopts = -s --html=./report/report.html

testpaths = ./scripts

#执行的文件名

python_files = test_*.py

#执行文件里面的类

python_classes = Test*

#执行类中的那些方法

python_functions = test_*
PO设计模式-实现移动端自动化测试的更多相关文章
- selenium自动化测试框架之PO设计模式
面向对象的特性:封装.继承.多态.在自动化中一样适用,Selenium自动化测试中有一个名字常常被提及PageObject(思想与面向对象的特性相同),通过PO模式可以大大提高测试用例的维护效率. 传 ...
- Web自动化测试—PO设计模式(二)
PO设计模式要点一:页面类都继承于BasePage 目录结构 ui_auto_test --src --pages --__init__.py --base_page.py --login_page. ...
- 移动端自动化测试-WTF Appium?
手机App分为两大类,原生App(Native App)和混合APP(Hybrid App) 原生App(Native App) 原生App实际就是我们所常见的传统App开发模式,云端数据存储+App ...
- 基于Python Selenium Unittest PO设计模式详解
本文章会讲述以下几个内容: 1.什么是PO设计模式(Page Object Model) 2.为什么要使用PO设计模式 3.使用PO设计模式要点 4.PO设计模式实例 1.什么是PO设计模式 (Pag ...
- Python Selenium设计模式 - PO设计模式
整理一下python selenium自动化测试实践中使用较多的po设计模式. 为什么要用PO 基于python selenium2开始开始ui自动化测试脚本的编写不是多么艰巨的任务.只需要定位到元素 ...
- 移动端自动化测试-WTF Appium
手机App分为两大类,原生App(Native App)和混合APP(Hybrid App) 原生App(Native App) 原生App实际就是我们所常见的传统App开发模式,云端数据存储+App ...
- 移动端自动化测试Appium 从入门到项目实战Python版☝☝☝
移动端自动化测试Appium 从入门到项目实战Python版 (一个人学习或许会很枯燥,但是寻找更多志同道合的朋友一起,学习将会变得更加有意义✌✌) 说到APP自动化测试,Appium可是说是非常流 ...
- appium 移动端自动化测试工具
appium 移动端自动化测试工具 appium 移动端自动化测试工具 appium 是哟个自动化测试开源工具 支持ios和安卓平台的应用 以及web应用和混合应用 appium 是一个跨平台的工具: ...
- appium+python做移动端自动化测试
1 导言 1.1 编制目的 该文档为选用Appium作为移动设备原生(Native).混合(Hybrid).移动Web(Mobile Web)应用UI自动化测试的相关自动化测试人员.开发人员等提供 ...
随机推荐
- php 随机useragent
<?php /** * 获取随机useragent */ private function get_rand_useragent($param) { $arr = array( 'Mozilla ...
- python数据预处理for knn
机器学习实战 一书中第20页数据预处理,从文本中解析数据的程序. import numpy as np def dataPreProcessing(fileName): with open(fileN ...
- 寒假day03-python
今天完成了毕设登录注册.填报等功能的界面优化,同时总结了python网络课程的部分知识点 1.修改jupyter notebook默认路径:进入cmd:(1)cd /d F:\(2)jupyter n ...
- JavaEE--分布式与集群
参考:https://www.zhihu.com/question/20004877 集群是个物理形态,分布式是个工作方式. 只要是一堆机器,就可以叫集群,他们是不是一起协作着干活,这个谁也不知道:一 ...
- v-charts使用总结(随时补充)
柱状图.折线图.环图的常用配置(配置连接地址https://v-charts.js.org/#/line) :data 绑定基本数据 { // 第一个参数为维度(就是横轴,例如时间),剩余为指标(就是 ...
- 小白学习之pytorch框架(4)-softmax回归(torch.gather()、torch.argmax()、torch.nn.CrossEntropyLoss())
学习pytorch路程之动手学深度学习-3.4-3.7 置信度.置信区间参考:https://cloud.tencent.com/developer/news/452418 本人感觉还是挺好理解的 交 ...
- 爬虫笔记(二)——浏览器的模拟(Headers属性)
有的时候,我们无法爬取一些网页,会出现403错误,因为这些网页为了防止别人恶意采集其信息所以进行了一些反爬虫的设置.那么如果我们向爬取这些网页的信息,应该怎么办呢? 可以设置一些Headers信息,模 ...
- linux下U盘变成只读文件系统的修复
问题描述: U盘插入linux下后变成了只读文件系统,不能再往u盘里拷贝文件. 总结:产生这个问题的原因可能是u盘文件系统损坏,操作系统为了防止它损坏系统,将它设置成了只读 修复方法: 在window ...
- MySQL_语句
一.基础 1.说明:创建数据库CREATE DATABASE database-name 2.说明:删除数据库drop database dbname 3.说明:备份sql server--- 创建 ...
- RedBlack-Tree(红黑树)原理及C++代码实现
众所周知,红黑树是用途很广的平衡二叉搜索树,用过的都说好.所以我们来看看红黑树的是怎么实现的吧. 红黑树顾名思义,通过红与黑两种颜色来给每个节点上色.其中根结点和叶子结点一定是黑色的,并且红色结点的两 ...