spring boot 使用swagger
在pom.xml中添加maven依赖
<dependency>

    <groupId>io.springfox</groupId>

    <artifactId>springfox-swagger2</artifactId>

    <version>2.7.0</version>

</dependency>

<dependency>

    <groupId>io.springfox</groupId>

    <artifactId>springfox-swagger-ui</artifactId>

    <version>2.7.0</version>
刚开始我用的2.8.0版本,后来折腾了好久,swagger页面就是不出来。换成2.7.0就好了。也许你折腾半天,换个版本就好了。
添加Swagger配置类:
package com.test.configuration;

import org.springframework.context.annotation.Bean;

import org.springframework.context.annotation.Configuration;

import io.swagger.annotations.ApiOperation;

import springfox.documentation.builders.ApiInfoBuilder;

import springfox.documentation.builders.PathSelectors;

import springfox.documentation.builders.RequestHandlerSelectors;

import springfox.documentation.service.ApiInfo;

import springfox.documentation.spi.DocumentationType;

import springfox.documentation.spring.web.plugins.Docket;

import springfox.documentation.swagger2.annotations.EnableSwagger2;

/**

*Swagger2配置类

*/

@Configuration

@EnableSwagger2//启用Swagger2

public class Swaggers {

    @Bean

    public Docket createRestApi(){

        return new Docket(DocumentationType.SWAGGER_2)

        .apiInfo(apiInfo())

        .select()

        .apis(RequestHandlerSelectors.withMethodAnnotation(ApiOperation.class))//扫描所有有注解的api

        .paths(PathSelectors.any())

        .build();

    }

    /**

     * 首页描述

     * @return

    */

    private ApiInfo apiInfo(){

        return new ApiInfoBuilder()

        .title("电话外呼api文档")

        .description("rest接口")

        .build();

    }

}
添加controller类
package com.text.crm.callout.controller;

import io.swagger.annotations.Api;

import io.swagger.annotations.ApiOperation;

import org.springframework.web.bind.annotation.RequestMapping;

import org.springframework.web.bind.annotation.RequestMethod;

import org.springframework.web.bind.annotation.RestController;

import org.springframework.beans.factory.annotation.Autowired;

import com.text.callout.model.WarnCallOut;

import com.text.callout.service.WarnCallOutService;

@RestController

@RequestMapping("/warn")

@Api(tags="电话外呼信息保存接口")

public class WarnCallOutController{

    @Autowired

    private WarnCallOutService warnCallOutService;

    /**

    *@param WarnCallOut电话外呼对象

    *@return

    */

    @ApiOperation("保存电话外呼信息")

    @RequestMapping(value = "/add",method=RequestMethod.POST)

    public String addWarnCallOut(WarnCallOut warnCallOut){

        return warnCallOutService.addWarnCallOut(warnCallOut);

    }

}
添加POJO类
package com.test.entity;

import io.swagger.annotations.ApiModel;

import io.swagger.annotations.ApiModelProperty;

@ApiModel("电话外呼对象")

public class WarnCallOut {

    @ApiModelProperty(value="序号,从1开始",hidden=true)

    private Long id;

    @ApiModelProperty(value="姓名",required=true)

    private String name;

    @ApiModelProperty(value="需要外乎的号码,本地号码加9,外地号码加90,多个号码用|隔开,如913800000000|9013900000000",required=true)

    private String phonenum;

    @ApiModelProperty(value="操作时间,如2018-12-06 22:00:00",required=true)

    private String requesttime;

    public Long getId() {

        return id;

    }

    public void setId(Long id) {

        this.id = id;

    }

    public String getName() {

        return name;

    }

    public void setName(String name) {

        this.name = name;

    }

    public String getPhonenum() {

        return phonenum;

    }

    public void setPhonenum(String phonenum) {

        this.phonenum = phonenum;

    }

    public String getRequesttime() {

        return requesttime;

    }

    public void setRequesttime(String requesttime) {

        this.requesttime = requesttime;

    }

}
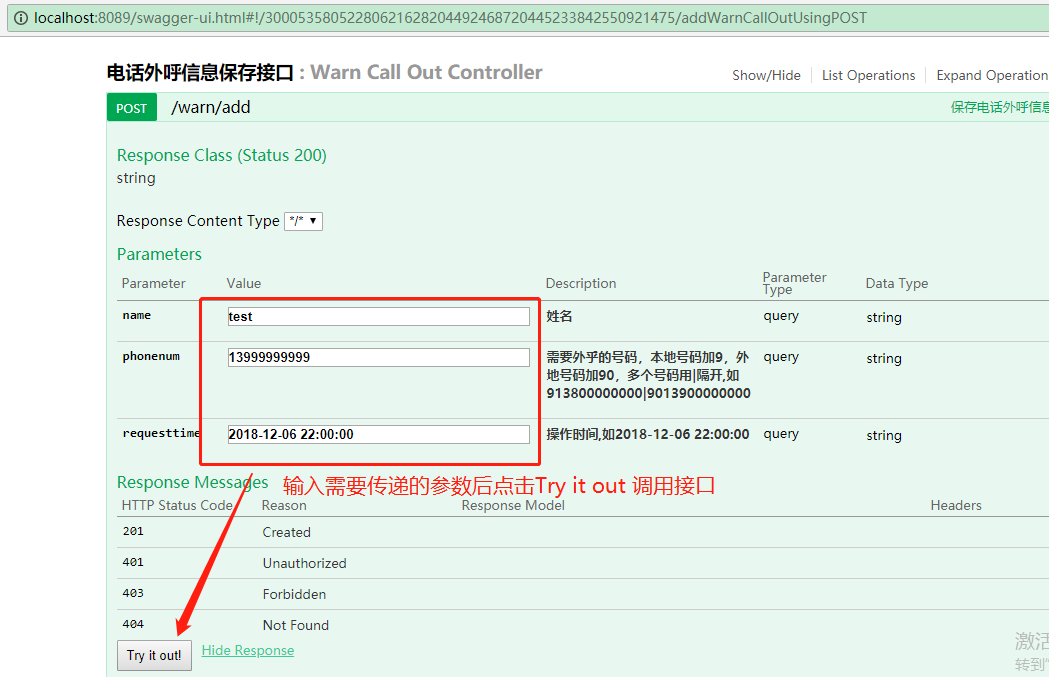
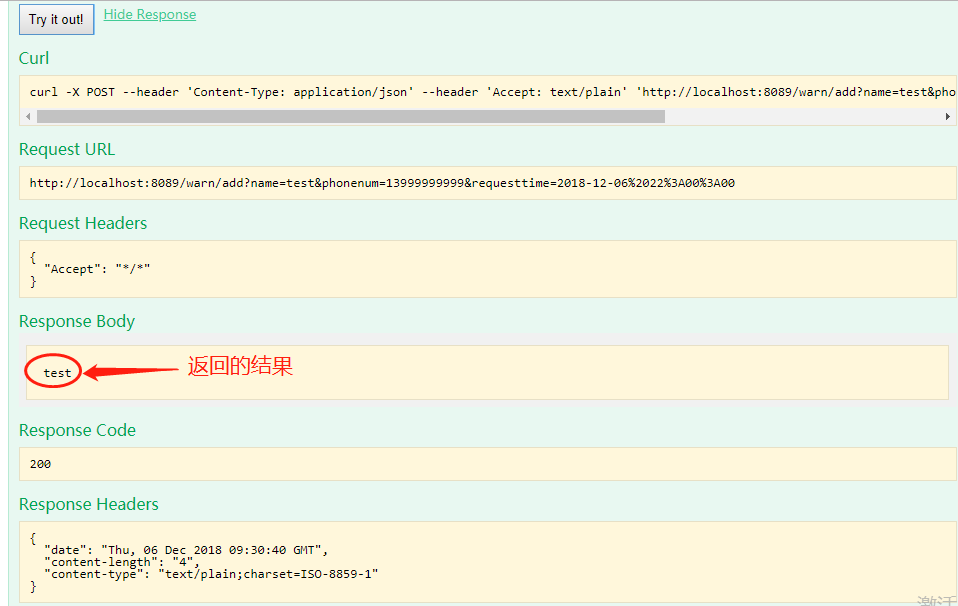
运行启动类,启动Spring Boot程序,访问:http://localhost:8080/swagger-ui.html
如果你的没有成功。可以试试把配置类改成如下:
package com.test.configuration;

import io.swagger.annotations.ApiOperation;

import org.springframework.context.annotation.Bean;

import org.springframework.context.annotation.Configuration;

import org.springframework.web.util.UriComponentsBuilder;

import springfox.documentation.builders.ApiInfoBuilder;

import springfox.documentation.builders.PathSelectors;

import springfox.documentation.builders.RequestHandlerSelectors;

import springfox.documentation.service.ApiInfo;

import springfox.documentation.spi.DocumentationType;

import springfox.documentation.spring.web.plugins.Docket;

import springfox.documentation.spring.web.paths.Paths;

import springfox.documentation.spring.web.paths.AbstractPathProvider;

import springfox.documentation.swagger2.annotations.EnableSwagger2;

import java.util.List;

import org.springframework.web.servlet.config.annotation.*;

import org.springframework.format.FormatterRegistry;

import org.springframework.http.converter.HttpMessageConverter;

import org.springframework.validation.MessageCodesResolver;

import org.springframework.validation.Validator;

import org.springframework.web.method.support.HandlerMethodArgumentResolver;

import org.springframework.web.method.support.HandlerMethodReturnValueHandler;

import org.springframework.web.servlet.HandlerExceptionResolver;

import org.springframework.web.context.request.async.DeferredResult;

/**

*Swagger2配置类

*/

@Configuration

@EnableSwagger2//启用Swagger2,生产环境记得注释掉

public class Swaggers implements WebMvcConfigurer{

    @Bean

    public Docket createRestApi(){

        return new Docket(DocumentationType.SWAGGER_2)

        .apiInfo(apiInfo())

        .select()

        .apis(RequestHandlerSelectors.withMethodAnnotation(ApiOperation.class))//扫描所有有注解的api

        .paths(PathSelectors.any())

        .build();

    }

    /**

     * 首页描述

     * @return

    */

    private ApiInfo apiInfo(){

        return new ApiInfoBuilder()

        .title("电话外呼api文档")

        .description("rest接口")

        .build();

    }

    /**

     *重写BASE URL

    */

    class BasePathAwareRalativePathProvider extends AbstractPathProvider{

        private String basePath;

        public BasePathAwareRalativePathProvider(String basePath){

            this.basePath=basePath;

        }

        @Override

        protected String applicationPath(){

            return basePath;

        }

        @Override

        protected String getDocumentationPath(){

            return "/";

        }

        @Override

        public String getOperationPath(String OperationPath){

            UriComponentsBuilder uriComponentsBuilder=UriComponentsBuilder.fromPath("/");

            return Paths.removeAdjacentForwardSlashes(uriComponentsBuilder.path("").build().toString());

        }

    }

    @Override

    public void addResourceHandlers(ResourceHandlerRegistry registry){

        registry.addResourceHandler("swagger-ui.html")

                .addResourceLocations("classpath:/META-INF/resources/");

        registry.addResourceHandler("/webjars/**")

                .addResourceLocations("classpath:/META-INF/resources/webjars/");

    };

    /**

     * 跨域支持

     * @param corsRegistry

    */

    @Override

    public void addCorsMappings(CorsRegistry corsRegistry){

                corsRegistry.addMapping("/**")

                .allowedOrigins("*")

                .allowCredentials(true)

                .allowedMethods("GET","POST","PUT","DELETE")

                .allowedHeaders("*");

    }

    @Override

    public void configurePathMatch(PathMatchConfigurer pathMatchConfigurer){}

    @Override

    public void configureContentNegotiation(ContentNegotiationConfigurer contentNegotiationConfigurer){}

    @Override

    public void configureAsyncSupport(AsyncSupportConfigurer asyncSupportConfigurer){};

    @Override

    public void configureDefaultServletHandling(DefaultServletHandlerConfigurer defaultServletHandlerConfigurer){};

    @Override

    public void addFormatters(FormatterRegistry formatterRegistry){};

    @Override

    public void addInterceptors(InterceptorRegistry interceptorRegistry){};

    @Override

    public void addViewControllers(ViewControllerRegistry viewControllerRegistry){};

    @Override

    public void configureViewResolvers(ViewResolverRegistry viewResolverRegistry){};

    @Override

    public void addArgumentResolvers(List<HandlerMethodArgumentResolver> argumentResolvers){};

    @Override

    public void addReturnValueHandlers(List<HandlerMethodReturnValueHandler> returnValueHandlers){};

    @Override

    public void configureMessageConverters(List<HttpMessageConverter<?>> converters){};

    @Override

    public void extendMessageConverters(List<HttpMessageConverter<?>> converters){};

    @Override

    public void configureHandlerExceptionResolvers(List<HandlerExceptionResolver> exceptionResolvers){};

    @Override

    public void extendHandlerExceptionResolvers(List<HandlerExceptionResolver> exceptionResolvers){};

    @Override

    public Validator getValidator(){

        return null;

    }

    @Override

    public MessageCodesResolver getMessageCodesResolver(){

        return null;

    }

}
还是不行的话,
请下载这个demo : springboot-swagger2-demo 下载好解压然后eclipse导入MAVEN项目 直接就能运行。
spring boot 启动jar包时可指定Xmx(jvm运行过程中分配的最大内存),Xms(jvm启动时分配的内存) :
java -jar -Xmx 2048m -Xms 2048m 项目名.jar
-----------------------------------------------------------------------------
spring boot 使用swagger的更多相关文章
- Spring Boot 集成 Swagger,生成接口文档就这么简单!
之前的文章介绍了<推荐一款接口 API 设计神器!>,今天栈长给大家介绍下如何与优秀的 Spring Boot 框架进行集成,简直不能太简单. 你所需具备的基础 告诉你,Spring Bo ...
- Spring Boot 集成Swagger
Spring Boot 集成Swagger - 小单的博客专栏 - CSDN博客https://blog.csdn.net/catoop/article/details/50668896 Spring ...
- spring boot集成swagger,自定义注解,拦截器,xss过滤,异步调用,guava限流,定时任务案例, 发邮件
本文介绍spring boot集成swagger,自定义注解,拦截器,xss过滤,异步调用,定时任务案例 集成swagger--对于做前后端分离的项目,后端只需要提供接口访问,swagger提供了接口 ...
- Spring Boot初识(3)- Spring Boot整合Swagger
一.本文介绍 如果Web项目是完全前后端分离的话(我认为现在完全前后端分离已经是趋势了)一般前端和后端交互都是通过接口的,对接口入参和出参描述的文档就是Mock文档.随着接口数量的增多和参数的个数增加 ...
- spring boot+mybatis+swagger搭建
环境概述 使用的开发工具:idea 2018 3.4 环境:jdk1.8 数据库:MariaDB (10.2.21) 包管理:Maven 3.5 Web容器:Tomcat 8.0 开发机系统:Wind ...
- 【Swagger】可能是目前最好的 Spring Boot 集成 swagger 的方案
[Swagger]可能是目前最好的Spring Boot集成 swagger 的方案  的时间与阿里云的服务器时间 相差15分钟了. 解决方法 : 把自己的电脑时间 (或者服务器)的时间 改成标准的北京时间就行了.
- Django 学习之Xadmin
一.xadmin的特点 1.基于Bootstrap3:Xadmin使用Bootstrap3.0框架精心打造.基于Bootstrap3,Xadmin天生就支持在多种屏幕上无缝浏览,并完全支持Bootst ...
- 说说maven依赖冲突,依赖调解,依赖传递和依赖范围
说maven依赖冲突之前需要先说说maven的 依赖传递. 依赖传递 当前项目引入了一个依赖,该依赖的依赖也会被引入项目.更加准确的说法是,maven会解析直接依赖的POM,将那些必要的间接依赖,以传 ...
- MacBook OSX VMWare Fusion 11安装 Tools For Windows
需要加载对应客户机系统的安装文件,可以在/Applications/VMware\ Fusion.app/Contents/Library/isoimages文件夹下找到: 设置虚拟机的光驱: 在虚拟 ...
- OOP的四大特征
抽象 abstract 最近对抽象有些不熟悉,那么先谈谈抽象. 抽象在java中常常表现为抽象类和抽象方法,即被abstract关键字修饰的类和方法. 抽象类:被abstract修饰的类 1 和接口不 ...
- Angular4之时间管道
{{时间戳 |date:“yyyy/MM/dd HH:mm:ss”}} “YYYY/MM/DD”不可
- jQuery Validation Engine
<!DOCTYPE HTML> <html> <head> <meta charset="utf-8"> <title> ...
- osg 线框模式,点模式切换
需要加 viewer.addEventHandler(new osgGA::StateSetManipulator(viewer.getCamera()->getOrCreateStateSet ...
- asp.net+bootstrap上传图片+FileUpload控件文件上传下载
ps:我数据库使用的pgsql,看个人修改. 代码asp.net 的,使用了mootools框架,里面包含了bootstrap上传图片,查看预览,还加了个上传任意文件的FileUpload.(界面随便 ...