Springboot与Maven多环境配置文件夹解决方案
原文地址为https://www.cnblogs.com/haixiang/p/12451703.html,转载请注明出处!
Profile用法
我们在application.yml中为jdbc.username赋予一个值,这个值为一个变量
jdbc:

  username: ${jdbc.username}
Maven中的profiles可以设置多个环境,当我们选择a环境后, <jdbc.username>内的值将替换上述配置文件中的变量
 </profiles>

        <profile>

            <id>a</id>

            <properties>

                <jdbc.username>root</jdbc.username>

            </properties>

            <!-- 默认使用此环境 -->

            <activation>

                <activeByDefault>true</activeByDefault>

            </activation>

        </profile>

    </profiles>
我们查看编译后的application.yml文件,果然变量已经被赋值。我们猜想是否可以利用Profile的这一特性设置开发、测试、生产环境,选择不同环境时使用不同变量,配合Resources和Filter来指定打包内容以及替换变量。
jdbc:

  username: root
resources
用来操作编译文件
filters
过滤器,设置过滤器的资源将会对同名变量进行赋值(被赋值的资源文件需要设置filtering为true)
多环境配置解决方案
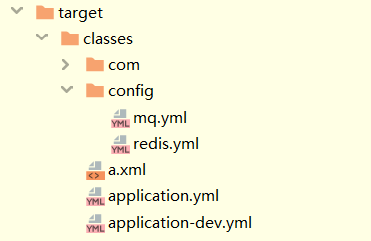
网上大多数都是分为application-dev.xml、application-test.xml、application-prod.xml三个文件,可是我们在真实项目开发中,将会用到很多各式各样的文件(例如log4j的配置文件),它们在不同环境中应该也是不同的配置,不能在测试和生产环境使用同一个配置文件。所以我们将分为三个文件夹分别代表开发环境、测试环境、生产环境,他们里面的配置文件种类一致但是内容不一样。选择完当前环境后,打的jar包只包含当前环境文件夹下的配置文件。
├─main

│  ├─java

│  │  └─......

│  └─resources

│      ├─dev

│      │   └─config

│      │   │   └─mq.yml

│      │   │   └─redis.yml

│      │   └─application-dev.yml

│      ├─prod

│      │  └─config

│      │  │    └─mq.yml

│      │  │    └─redis.yml

│      │  └─application-prod.yml

│      └─test

│      │  └─config

│      │  │    └─mq.yml

│      │  │    └─redis.yml

│      │  └─application-test.yml

│      └─application.yml

│      └─a.xml

└─test

    └─java

        └─......
dev下的config下的mq.yml
mq: mq-dev
dev下的config下的redis.yml
redis: redis-dev
dev下的application-dev.yml
profiles.active:

  dev

port: dev-port
application.yml
spring:

  profiles:

    active: ${profiles.active}

port: ${port}
查看编译后的结果
其中application.yml中变量已经被替换为
spring:

  profiles:

    active: dev

port: dev-port
完整的pom.xml
    <build>

        <plugins>

            <plugin>

                <groupId>org.springframework.boot</groupId>

                <artifactId>spring-boot-maven-plugin</artifactId>

            </plugin>

            <plugin>

                <groupId>org.apache.maven.plugins</groupId>

                <artifactId>maven-resources-plugin</artifactId>

                <version>3.1.0</version>

                <!--使用默认的变量分割符即${}-->

                <configuration>

                    <useDefaultDelimiters>true</useDefaultDelimiters>

                </configuration>

            </plugin>

        </plugins>

        <!-- 测试文件的编译路径设置 -->

        <testResources>

            <testResource>

                <!--这里是关键! 根据不同的环境,把对应文件夹里的配置文件打包-->

                <directory>src/main/resources</directory>

                <includes>

                    <include>application.yml</include>

                </includes>

                <filtering>true</filtering>

            </testResource>

            <testResource>

                <!--这里是关键! 根据不同的环境,把对应文件夹里的配置文件打包-->

                <directory>src/main/resources/${profiles.active}</directory>

                <includes>

                    <include>**/*.yml</include>

                </includes>

                <filtering>false</filtering>

            </testResource>

        </testResources>

        <resources>

            <resource>

                <!--打包该目录下的 application.yml -->

                <directory>src/main/resources</directory>

                <includes>

                    <include>application.yml</include>

                </includes>

                <!-- 启用过滤 即该资源中的变量将会被过滤器中的值替换 -->

                <filtering>true</filtering>

            </resource>

            <resource>

                <directory>src/main/resources</directory>

                <includes>

                    <include>**/*.properties</include>

                    <include>**/*.xml</include>

                </includes>

                <filtering>false</filtering>

            </resource>

            <resource>

                <!-- ${profiles.active}由profile提供 -->

                <directory>src/main/resources/${profiles.active}</directory>

                <includes>

                    <include>**/*.yml</include>

                </includes>

                <filtering>false</filtering>

            </resource>

        </resources>

        <!-- 定义 filter,即该资源中的值将会用来替换同名属性(设置 filtering 为 true 的资源中的属性)-->

        <filters>

          <filter>

              src/main/resources/${profiles.active}/application-${profiles.active}.yml

          </filter>

        </filters>

    </build>

    <profiles>

        <profile>

            <!-- 本地开发环境 -->

            <id>dev</id>

            <properties>

                <profiles.active>dev</profiles.active>

            </properties>

            <activation>

                <activeByDefault>true</activeByDefault>

            </activation>

        </profile>

        <profile>

            <!-- 测试环境 -->

            <id>test</id>

            <properties>

                <profiles.active>test</profiles.active>

            </properties>

        </profile>

        <profile>

            <!-- 生产环境 -->

            <id>prod</id>

            <properties>

                <profiles.active>prod</profiles.active>

            </properties>

        </profile>

    </profiles>
Springboot与Maven多环境配置文件夹解决方案的更多相关文章
- 通过Maven更换环境配置文件
大致思路:配置文件有三套:main/resources.devmain/resources.prodmain/resources.test公共部分放到main/resource下使用mvn clean ...
- 使用IDEA开发SpringBoot不加载application.yml配置文件的解决方案
1.如果启动项目不加载application.yml配置文件,那么请确认下是否应用了Resources为项目资源文件夹 2.如果项目起初是可以正常使用的,突然不知道改了什么,然后进行启动项目的时候不加 ...
- 用maven按环境打包SpringBoot的不同配置文件
利用maven按环境打包SpringBoot的不同配置文件 application-dev.properties对应开发环境 application-test.properties对应测试环境 app ...
- springboot多环境配置文件
一.关于springboot的配置文件 springboot的配置文件主要有两种:properties文件和yml文件,我们只要选择一种使用就可以了.我们通过properties文件介绍一下配置的方式 ...
- 使用maven profile指定配置文件打包适用多环境
新建maven项目, 在pom.xml中添加 profile节点信息如下: <profiles> <profile> <!-- 开发环境 --> <id& ...
- spring-boot多环境配置文件
spring-boot多环境配置文件 目录 配置 多环境配置文件名称要遵循格式 application-{profile}.yml application.yml spring: profiles: ...
- SpringBoot(二): SpringBoot属性配置文件 SpringBoot多环境配置文件 SpringBoot自定义配置文件
1.属性配置文件 一共分为两种,一种是键值对的properties属性配置文件,一种是yaml格式的配置文件 properties配置: 2.多环境配置文件 当我们的项目中有多套配置文件 比如开发的配 ...
- springboot结合maven打包发布
本篇分享如何使用maven便利我们打springboot的发布包:我这里使用的是idea开发工具,首先创建了多个module的项目结构,如图: 要对多个module的项目做打包,一般情况都是在父级po ...
- Maven的环境搭建及新建web项目
第一次接触maven,做一个简单的记录 一.下载maven及环境变量的配置 下载地址 http://maven.apache.org/download.cgi 配置其环境变量 MAVEN_HOME= ...
随机推荐
- Windows电脑忘记密码
1.重启电脑,开机后按F8进入高级选项,选择<命令提示符的安全模式>并回车 2.出现administrator的登录画面后直接回车,此时便进入了命令行窗口 3.下面就是简单粗暴的一行命令搞 ...
- HashMap相关知识
HashMap的工作原理是近年来常见的Java面试题.几乎每个Java程序员都知道HashMap,都知道哪里要用HashMap,知道Hashtable和HashMap之间的区别,那么为何这道面试题如此 ...
- python--mysql的CURD操作
from pymysql import * def main(): # 创建Connextion连接 conn = connect(host='localhost', port=3306, user= ...
- miracle|
N-COUNT 奇迹;出人意料的事If you say that a good event is a miracle, you mean that it is very surprising and ...
- 《内蒙古自治区第十二届大学生程序设计竞赛试题_D: 正品的概率》
问题 D: 正品的概率 内存限制:128 MB时间限制:1 S标准输入输出 题目类型:传统评测方式:文本比较上传者:外部导入 提交:36通过:7 返回比赛提交提交记录 题目描述 袋中有m枚正品硬币,n ...
- 基于Jquery的textarea滚动条插件(原创)
之前项目中自己写的滚动条插件.先前太忙没有好好整理.现在项目间歇期拿出来整理后贴出来 Demo Here css 我是把mCustomScrollbar 的UI 扣下来的. 这里我要介绍下这个插件不错 ...
- Selenium的Web自动化测试(送源码)
8.1 Selenium自动化测试准备 1.Selenium介绍 Selenium是一个Web开源自动化测试框架,页面级操作,模拟用户真实操作,API从系统层面触发事件. Selenium 1.0 ...
- 算法设计与分析-Week12
题目描述 You are given coins of different denominations and a total amount of money amount. Write a func ...
- 阿里云vpc网络SNAT实现内网实例通外网
需求场景: 因费用和安全考虑,内网部分机器没有分配公网IP,没绑定弹性公网IP,没有购买NAT服务,但是内网机器需要访问外网部分资源,如发送邮件. 操作步骤如下: 1.查看外网上的转发功能的开启没开启 ...
- 使用 KM 处理 HHKB 方向键
对于上了 HHKB 这条贼船的人来说,刚开始使用起来最大的别扭可能就是没有方向键的问题了. 最早的我使用 Karabiner 来解决,里边有一些内置的组合可以替代方向键,我用 control + hj ...