Spring Data MongoDB example with Spring MVC 3.2
Spring Data MongoDB example with Spring MVC 3.2
Here is another example web application built with Spring MVC 3.2 and Spring Data 1.2, integrating with the MongoDB document database.
STEP 1: Create new webapp project, I will use maven for this. (Note: I am on my macbook with Maven 3 and Java 6 installed.)
mvn archetype:generate
-DgroupId=com.manishchhabra.blog
-DartifactId=HelloSpringWithMongoDB
-DarchetypeArtifactId=maven-archetype-webapp
-DinteractiveMode=false
You could create the maven project directly in your IDE as well. But I usually create it on the terminal and import it in eclipse by using the following command (Note: The following command is run within your newly created project directory, i.e. run -> cd HelloSpringWithMongoDB)
mvn eclipse:eclipse -Dwtpversion=2.0
STEP 2: Add Spring Framework 3.2 and Spring Data 1.2 dependencies to your pom.xml
|
1
2
3
4
5
6
7
8
9
10
11
12
13
14
15
16
17
|
<dependency> <groupId>org.springframework</groupId> <artifactId>spring-orm</artifactId> <version>3.2.0.RELEASE</version></dependency><dependency> <groupId>org.springframework</groupId> <artifactId>spring-webmvc</artifactId> <version>3.2.0.RELEASE</version></dependency><dependency> <groupId>org.springframework.data</groupId> <artifactId>spring-data-mongodb</artifactId> <version>1.2.0.RELEASE</version></dependency> |
STEP 3: Update your web.xml (src/main/webapp/WEB-INF/web.xml) to use Spring’s DispatcherServlet
|
1
2
3
4
5
6
7
8
9
10
11
12
13
14
15
16
17
18
19
20
21
22
23
24
25
26
27
28
|
<web-app xmlns="http://java.sun.com/xml/ns/javaee" xmlns:xsi="http://www.w3.org/2001/XMLSchema-instance" xsi:schemaLocation="http://java.sun.com/xml/ns/javaee http://java.sun.com/xml/ns/javaee/web-app_2_5.xsd" version="2.5"> <display-name>Spring With MongoDB Web Application</display-name> <servlet> <servlet-name>dispatcher</servlet-name> <servlet-class>org.springframework.web.servlet.DispatcherServlet</servlet-class> <load-on-startup>1</load-on-startup> </servlet> <servlet-mapping> <servlet-name>dispatcher</servlet-name> <url-pattern>/</url-pattern> </servlet-mapping> <context-param> <param-name>contextConfigLocation</param-name> <param-value>/WEB-INF/dispatcher-servlet.xml</param-value> </context-param> <listener> <listener-class>org.springframework.web.context.ContextLoaderListener</listener-class> </listener></web-app> |
STEP 4: Add your spring configuration to the dispatcher-servlet.xml
- Use MongoFactoryBean to connect to the MongoDB instance.
- Use MongoTemplate to connect and make queries to the database.
|
1
2
3
4
5
6
7
8
9
10
11
12
13
14
15
16
17
18
19
20
21
22
23
24
25
26
27
28
29
30
|
<?xml version="1.0" encoding="UTF-8"?><beans xmlns="http://www.springframework.org/schema/beans" xmlns:xsi="http://www.w3.org/2001/XMLSchema-instance" xmlns:context="http://www.springframework.org/schema/context" xmlns:p="http://www.springframework.org/schema/p" xsi:schemaLocation="http://www.springframework.org/schema/beans http://www.springframework.org/schema/beans/spring-beans-3.2.xsd http://www.springframework.org/schema/context http://www.springframework.org/schema/context/spring-context-3.2.xsd"> <context:component-scan base-package="com.manishchhabra.blog" /> <!-- Factory bean that creates the Mongo instance --> <bean id="mongo" class="org.springframework.data.mongodb.core.MongoFactoryBean"> <property name="host" value="localhost" /> </bean> <!-- MongoTemplate for connecting and quering the documents in the database --> <bean id="mongoTemplate" class="org.springframework.data.mongodb.core.MongoTemplate"> <constructor-arg name="mongo" ref="mongo" /> <constructor-arg name="databaseName" value="test" /> </bean> <!-- Use this post processor to translate any MongoExceptions thrown in @Repository annotated classes --> <bean class="org.springframework.dao.annotation.PersistenceExceptionTranslationPostProcessor" /> <bean id="jspViewResolver" class="org.springframework.web.servlet.view.InternalResourceViewResolver" p:prefix="/WEB-INF/jsp/" p:suffix=".jsp" /> </beans> |
STEP 5: Create a model (using Person as an example), service and controller in the new source directory src/main/java
Model
|
1
2
3
4
5
6
7
8
9
10
11
12
13
14
15
16
17
18
19
20
21
22
23
24
25
|
package com.manishchhabra.blog.model;import org.springframework.data.annotation.Id;import org.springframework.data.mongodb.core.mapping.Document;@Documentpublic class Person { @Id private String id; private String name; public String getId() { return id; } public void setId(String id) { this.id = id; } public String getName() { return name; } public void setName(String name) { this.name = name; }} |
Service
|
1
2
3
4
5
6
7
8
9
10
11
12
13
14
15
16
17
18
19
20
21
22
23
24
25
26
27
28
29
30
31
32
33
34
35
36
37
38
39
|
package com.manishchhabra.blog.service;import java.util.List;import java.util.UUID;import org.springframework.beans.factory.annotation.Autowired;import org.springframework.data.mongodb.core.MongoTemplate;import org.springframework.stereotype.Repository;import com.manishchhabra.blog.model.Person;@Repositorypublic class PersonService { @Autowired private MongoTemplate mongoTemplate; public static final String COLLECTION_NAME = "person"; public void addPerson(Person person) { if (!mongoTemplate.collectionExists(Person.class)) { mongoTemplate.createCollection(Person.class); } person.setId(UUID.randomUUID().toString()); mongoTemplate.insert(person, COLLECTION_NAME); } public List<Person> listPerson() { return mongoTemplate.findAll(Person.class, COLLECTION_NAME); } public void deletePerson(Person person) { mongoTemplate.remove(person, COLLECTION_NAME); } public void updatePerson(Person person) { mongoTemplate.insert(person, COLLECTION_NAME); }} |
Controller for the CRUD operations
|
1
2
3
4
5
6
7
8
9
10
11
12
13
14
15
16
17
18
19
20
21
22
23
24
25
26
27
28
29
30
31
32
33
34
35
36
37
38
39
40
41
42
43
|
package com.manishchhabra.blog.controller;import org.springframework.beans.factory.annotation.Autowired;import org.springframework.stereotype.Controller;import org.springframework.ui.ModelMap;import org.springframework.util.StringUtils;import org.springframework.web.bind.annotation.ModelAttribute;import org.springframework.web.bind.annotation.RequestMapping;import org.springframework.web.bind.annotation.RequestMethod;import org.springframework.web.servlet.View;import org.springframework.web.servlet.view.RedirectView;import com.manishchhabra.blog.model.Person;import com.manishchhabra.blog.service.PersonService; @Controller public class PersonController { @Autowired private PersonService personService; @RequestMapping(value = "/person", method = RequestMethod.GET) public String getPersonList(ModelMap model) { model.addAttribute("personList", personService.listPerson()); return "output"; } @RequestMapping(value = "/person/save", method = RequestMethod.POST) public View createPerson(@ModelAttribute Person person, ModelMap model) { if(StringUtils.hasText(person.getId())) { personService.updatePerson(person); } else { personService.addPerson(person); } return new RedirectView("/HelloSpringWithMongoDB/person"); } @RequestMapping(value = "/person/delete", method = RequestMethod.GET) public View deletePerson(@ModelAttribute Person person, ModelMap model) { personService.deletePerson(person); return new RedirectView("/HelloSpringWithMongoDB/person"); } } |
STEP 5: Create a JSP Page in the folder WEB-INF/jsp called output.jsp (This will currently invoke create and delete).
|
1
2
3
4
5
6
7
8
9
10
11
12
13
14
15
16
17
18
19
20
21
|
<%@ taglib prefix="c" uri="http://java.sun.com/jsp/jstl/core" %><html><body> <h2>Here is a simple CRUD using Spring MVC and MongoDB.</h2> <form action="person/save" method="post"> <input type="hidden" name="id"> <label for="name">Person Name</label> <input type="text" id="name" name="name"/> <input type="submit" value="Submit"/> </form> <table border="1"> <c:forEach var="person" items="${personList}"> <tr> <td>${person.name}</td><td><input type="button" value="delete" onclick="window.location='person/delete?id=${person.id}'"/></td> </tr> </c:forEach> </table> </body></html> |
STEP 6: That’s it! Its time to run your project. You could either run directly from eclipse or you could run “mvn package” to build a war file and deploy it to your application server. I tested this on tomcat running on port 8080 (http://localhost:8080/HelloSpringWithMongoDB/person) and I could store and delete person with provided names. Working! yeah.. Here is a picture of me playing with the app ![]()
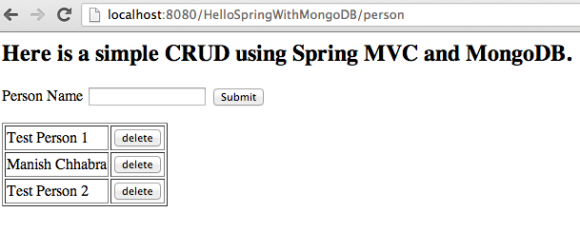
Spring Data MongoDB Spring MVC 3.2 Example App
You can view or download the full project code athttps://github.com/manishchhabra/HelloSpringWithMongoDB
Spring Data MongoDB example with Spring MVC 3.2的更多相关文章
- spring data mongodb 配置遇到的几个问题
一. mongodb 2.2版本以上的配置 spring.data.mongodb.uri = mongodb://newlook:newlook@192.168.0.109:27017/admin ...
- spring data mongodb中,如果对象中的属性不想加入到数据库字段中
spring data mongodb中,如果对象中的属性不想加入到数据库字段中,可加@Transient注解,声明为透明属性 spring data mongodb 官网帮助文档 http://ww ...
- 使用Spring访问Mongodb的方法大全——Spring Data MongoDB查询指南
1.概述 Spring Data MongoDB 是Spring框架访问mongodb的神器,借助它可以非常方便的读写mongo库.本文介绍使用Spring Data MongoDB来访问mongod ...
- Spring data mongodb 聚合,投射,内嵌数组文档分页.
尽量别直接用 DBObject ,Spring data mongodb 的api 本来就没什么多大用处,如果还直接用 DBObject 那么还需要自己去解析结果,说动做个对象映射,累不累 Spri ...
- JAVA 处理 Spring data mongodb 时区问题
Spring data mongodb 查询出结果的时候会自动 + 8小时,所以我们看起来结果是对的 但是我们查询的时候,并不会自动 + 8小时,需要自己处理 解决方法 1 @JsonFormat ...
- Spring data mongodb ObjectId ,根据id日期条件查询,省略@CreatedDate注解
先看看ObjectId 的json 结构,非常丰富,这里有唯一机器码,日期,时间戳等等,所以强烈建议ID 使用 ObjectId 类型,并且自带索引 Spring data mongodb 注解 @C ...
- Spring data mongodb @CreatedBy@LastModifiedBy@CreatedBy@LastModifiedBy SpringSecurityAuditorAware,只记录用户名
要在Spring data mongodb 中使用@CreatedBy@LastModifiedBy@CreatedBy@LastModifiedBy 这四个注解 必须实现 SpringSecuri ...
- Spring Data MongoDB 三:基本文档查询(Query、BasicQuery)(一)
一.简单介绍 Spring Data MongoDB提供了org.springframework.data.mongodb.core.MongoTemplate对MongoDB的CRUD的操作,上一 ...
- Introduction to Spring Data MongoDB
Introduction to Spring Data MongoDB I just announced the new Spring 5 modules in REST With Spring: & ...
随机推荐
- [CSS]cursor鼠标样式
用css控制鼠标样式的语法如下: <span style="cursor:*">文本或其它页面元素</span> 把 * 换成如下15个效果的一种: ...
- 利用def生成dll文件
DLL中导出函数的声明有两种方式:一种为在函数声明中加上__declspec(dllexport),这里不再举例说明:另外一种方式是采用模块定义(.def) 文件声明,.def文件为链接器提供了有关被 ...
- 2016022611 - redis订阅发布命令集合
redis消息订阅发布命令 参考地址:http://www.yiibai.com/redis/redis_pub_sub.html 消息发送者发送消息,通过redis的channal,消息接收者获取消 ...
- 浅析Linux操作系统工作的基础
环境:lubuntu 13.04 kernel 3.9.7 作者:SA12226265 katao 简介: 本文根据 Linux™ 系统工作基础的分析,对存储程序计算机.堆栈(函数调用堆栈)机制和 ...
- Nginx配置免费SSL证书StartSSL,解决Firefox不信任问题
先在StartSSL上申请免费一年的SSL证书,具体过程网上很多教程.然后把申请到的key和crt文件上传到服务器,比如/usr/local/nginx/certs/. Nginx配置SSL证书 直接 ...
- [BZOJ 3669] [Noi2014] 魔法森林 【LCT】
题目链接:BZOJ - 3669 题目分析 如果确定了带 x 只精灵A,那么我们就是要找一条 1 到 n 的路径,满足只经过 Ai <= x 的边,而且要使经过的边中最大的 Bi 尽量小. 其实 ...
- iPhone手机VPN设置
如果iPhone,iPad游戏或软件服务器在国外不能用,就需要设置VPN了. 如果是为了解除公司上网策略限制,或者为了上Google,Facebook,都可以通过设置VPN实现. 要使用VPN需要到V ...
- 如何与 DevOps 为伍?
DevOps 是一个席卷 IT 界的新术语.但它究竟是什么,南非的公司们如何利用它来加快高品质应用程序的开发速度?国外知名博客作者凯西·吉布森找到了一些答案. 其实 DevOps 这个词已经火了一段时 ...
- 如何用python语句获得Python的安装目录
官方文档上有写的,sys.executable是当前Python解释器(或者其他Python实现)的路径去掉后面一个路径分隔符(Windows下是'\')后的部分即可 >>>impo ...
- Scarborough Fair 绝美天籁
很少见的男声唱法,而且还古色古香: https://www.youtube.com/watch?v=sgbo2QWLBzI https://www.youtube.com/watch?v=-BakWV ...