Spring Data MongoDB example with Spring MVC 3.2
Spring Data MongoDB example with Spring MVC 3.2
Here is another example web application built with Spring MVC 3.2 and Spring Data 1.2, integrating with the MongoDB document database.
STEP 1: Create new webapp project, I will use maven for this. (Note: I am on my macbook with Maven 3 and Java 6 installed.)
mvn archetype:generate
-DgroupId=com.manishchhabra.blog
-DartifactId=HelloSpringWithMongoDB
-DarchetypeArtifactId=maven-archetype-webapp
-DinteractiveMode=false
You could create the maven project directly in your IDE as well. But I usually create it on the terminal and import it in eclipse by using the following command (Note: The following command is run within your newly created project directory, i.e. run -> cd HelloSpringWithMongoDB)
mvn eclipse:eclipse -Dwtpversion=2.0
STEP 2: Add Spring Framework 3.2 and Spring Data 1.2 dependencies to your pom.xml
|
1
2
3
4
5
6
7
8
9
10
11
12
13
14
15
16
17
|
<dependency> <groupId>org.springframework</groupId> <artifactId>spring-orm</artifactId> <version>3.2.0.RELEASE</version></dependency><dependency> <groupId>org.springframework</groupId> <artifactId>spring-webmvc</artifactId> <version>3.2.0.RELEASE</version></dependency><dependency> <groupId>org.springframework.data</groupId> <artifactId>spring-data-mongodb</artifactId> <version>1.2.0.RELEASE</version></dependency> |
STEP 3: Update your web.xml (src/main/webapp/WEB-INF/web.xml) to use Spring’s DispatcherServlet
|
1
2
3
4
5
6
7
8
9
10
11
12
13
14
15
16
17
18
19
20
21
22
23
24
25
26
27
28
|
<web-app xmlns="http://java.sun.com/xml/ns/javaee" xmlns:xsi="http://www.w3.org/2001/XMLSchema-instance" xsi:schemaLocation="http://java.sun.com/xml/ns/javaee http://java.sun.com/xml/ns/javaee/web-app_2_5.xsd" version="2.5"> <display-name>Spring With MongoDB Web Application</display-name> <servlet> <servlet-name>dispatcher</servlet-name> <servlet-class>org.springframework.web.servlet.DispatcherServlet</servlet-class> <load-on-startup>1</load-on-startup> </servlet> <servlet-mapping> <servlet-name>dispatcher</servlet-name> <url-pattern>/</url-pattern> </servlet-mapping> <context-param> <param-name>contextConfigLocation</param-name> <param-value>/WEB-INF/dispatcher-servlet.xml</param-value> </context-param> <listener> <listener-class>org.springframework.web.context.ContextLoaderListener</listener-class> </listener></web-app> |
STEP 4: Add your spring configuration to the dispatcher-servlet.xml
- Use MongoFactoryBean to connect to the MongoDB instance.
- Use MongoTemplate to connect and make queries to the database.
|
1
2
3
4
5
6
7
8
9
10
11
12
13
14
15
16
17
18
19
20
21
22
23
24
25
26
27
28
29
30
|
<?xml version="1.0" encoding="UTF-8"?><beans xmlns="http://www.springframework.org/schema/beans" xmlns:xsi="http://www.w3.org/2001/XMLSchema-instance" xmlns:context="http://www.springframework.org/schema/context" xmlns:p="http://www.springframework.org/schema/p" xsi:schemaLocation="http://www.springframework.org/schema/beans http://www.springframework.org/schema/beans/spring-beans-3.2.xsd http://www.springframework.org/schema/context http://www.springframework.org/schema/context/spring-context-3.2.xsd"> <context:component-scan base-package="com.manishchhabra.blog" /> <!-- Factory bean that creates the Mongo instance --> <bean id="mongo" class="org.springframework.data.mongodb.core.MongoFactoryBean"> <property name="host" value="localhost" /> </bean> <!-- MongoTemplate for connecting and quering the documents in the database --> <bean id="mongoTemplate" class="org.springframework.data.mongodb.core.MongoTemplate"> <constructor-arg name="mongo" ref="mongo" /> <constructor-arg name="databaseName" value="test" /> </bean> <!-- Use this post processor to translate any MongoExceptions thrown in @Repository annotated classes --> <bean class="org.springframework.dao.annotation.PersistenceExceptionTranslationPostProcessor" /> <bean id="jspViewResolver" class="org.springframework.web.servlet.view.InternalResourceViewResolver" p:prefix="/WEB-INF/jsp/" p:suffix=".jsp" /> </beans> |
STEP 5: Create a model (using Person as an example), service and controller in the new source directory src/main/java
Model
|
1
2
3
4
5
6
7
8
9
10
11
12
13
14
15
16
17
18
19
20
21
22
23
24
25
|
package com.manishchhabra.blog.model;import org.springframework.data.annotation.Id;import org.springframework.data.mongodb.core.mapping.Document;@Documentpublic class Person { @Id private String id; private String name; public String getId() { return id; } public void setId(String id) { this.id = id; } public String getName() { return name; } public void setName(String name) { this.name = name; }} |
Service
|
1
2
3
4
5
6
7
8
9
10
11
12
13
14
15
16
17
18
19
20
21
22
23
24
25
26
27
28
29
30
31
32
33
34
35
36
37
38
39
|
package com.manishchhabra.blog.service;import java.util.List;import java.util.UUID;import org.springframework.beans.factory.annotation.Autowired;import org.springframework.data.mongodb.core.MongoTemplate;import org.springframework.stereotype.Repository;import com.manishchhabra.blog.model.Person;@Repositorypublic class PersonService { @Autowired private MongoTemplate mongoTemplate; public static final String COLLECTION_NAME = "person"; public void addPerson(Person person) { if (!mongoTemplate.collectionExists(Person.class)) { mongoTemplate.createCollection(Person.class); } person.setId(UUID.randomUUID().toString()); mongoTemplate.insert(person, COLLECTION_NAME); } public List<Person> listPerson() { return mongoTemplate.findAll(Person.class, COLLECTION_NAME); } public void deletePerson(Person person) { mongoTemplate.remove(person, COLLECTION_NAME); } public void updatePerson(Person person) { mongoTemplate.insert(person, COLLECTION_NAME); }} |
Controller for the CRUD operations
|
1
2
3
4
5
6
7
8
9
10
11
12
13
14
15
16
17
18
19
20
21
22
23
24
25
26
27
28
29
30
31
32
33
34
35
36
37
38
39
40
41
42
43
|
package com.manishchhabra.blog.controller;import org.springframework.beans.factory.annotation.Autowired;import org.springframework.stereotype.Controller;import org.springframework.ui.ModelMap;import org.springframework.util.StringUtils;import org.springframework.web.bind.annotation.ModelAttribute;import org.springframework.web.bind.annotation.RequestMapping;import org.springframework.web.bind.annotation.RequestMethod;import org.springframework.web.servlet.View;import org.springframework.web.servlet.view.RedirectView;import com.manishchhabra.blog.model.Person;import com.manishchhabra.blog.service.PersonService; @Controller public class PersonController { @Autowired private PersonService personService; @RequestMapping(value = "/person", method = RequestMethod.GET) public String getPersonList(ModelMap model) { model.addAttribute("personList", personService.listPerson()); return "output"; } @RequestMapping(value = "/person/save", method = RequestMethod.POST) public View createPerson(@ModelAttribute Person person, ModelMap model) { if(StringUtils.hasText(person.getId())) { personService.updatePerson(person); } else { personService.addPerson(person); } return new RedirectView("/HelloSpringWithMongoDB/person"); } @RequestMapping(value = "/person/delete", method = RequestMethod.GET) public View deletePerson(@ModelAttribute Person person, ModelMap model) { personService.deletePerson(person); return new RedirectView("/HelloSpringWithMongoDB/person"); } } |
STEP 5: Create a JSP Page in the folder WEB-INF/jsp called output.jsp (This will currently invoke create and delete).
|
1
2
3
4
5
6
7
8
9
10
11
12
13
14
15
16
17
18
19
20
21
|
<%@ taglib prefix="c" uri="http://java.sun.com/jsp/jstl/core" %><html><body> <h2>Here is a simple CRUD using Spring MVC and MongoDB.</h2> <form action="person/save" method="post"> <input type="hidden" name="id"> <label for="name">Person Name</label> <input type="text" id="name" name="name"/> <input type="submit" value="Submit"/> </form> <table border="1"> <c:forEach var="person" items="${personList}"> <tr> <td>${person.name}</td><td><input type="button" value="delete" onclick="window.location='person/delete?id=${person.id}'"/></td> </tr> </c:forEach> </table> </body></html> |
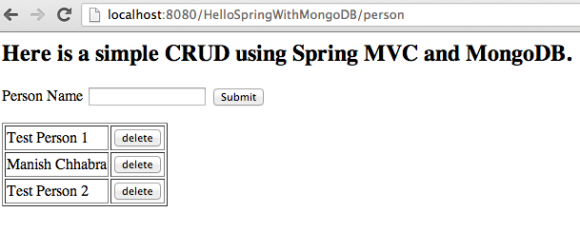
STEP 6: That’s it! Its time to run your project. You could either run directly from eclipse or you could run “mvn package” to build a war file and deploy it to your application server. I tested this on tomcat running on port 8080 (http://localhost:8080/HelloSpringWithMongoDB/person) and I could store and delete person with provided names. Working! yeah.. Here is a picture of me playing with the app ![]()
Spring Data MongoDB Spring MVC 3.2 Example App
You can view or download the full project code athttps://github.com/manishchhabra/HelloSpringWithMongoDB
Spring Data MongoDB example with Spring MVC 3.2的更多相关文章
- spring data mongodb 配置遇到的几个问题
一. mongodb 2.2版本以上的配置 spring.data.mongodb.uri = mongodb://newlook:newlook@192.168.0.109:27017/admin ...
- spring data mongodb中,如果对象中的属性不想加入到数据库字段中
spring data mongodb中,如果对象中的属性不想加入到数据库字段中,可加@Transient注解,声明为透明属性 spring data mongodb 官网帮助文档 http://ww ...
- 使用Spring访问Mongodb的方法大全——Spring Data MongoDB查询指南
1.概述 Spring Data MongoDB 是Spring框架访问mongodb的神器,借助它可以非常方便的读写mongo库.本文介绍使用Spring Data MongoDB来访问mongod ...
- Spring data mongodb 聚合,投射,内嵌数组文档分页.
尽量别直接用 DBObject ,Spring data mongodb 的api 本来就没什么多大用处,如果还直接用 DBObject 那么还需要自己去解析结果,说动做个对象映射,累不累 Spri ...
- JAVA 处理 Spring data mongodb 时区问题
Spring data mongodb 查询出结果的时候会自动 + 8小时,所以我们看起来结果是对的 但是我们查询的时候,并不会自动 + 8小时,需要自己处理 解决方法 1 @JsonFormat ...
- Spring data mongodb ObjectId ,根据id日期条件查询,省略@CreatedDate注解
先看看ObjectId 的json 结构,非常丰富,这里有唯一机器码,日期,时间戳等等,所以强烈建议ID 使用 ObjectId 类型,并且自带索引 Spring data mongodb 注解 @C ...
- Spring data mongodb @CreatedBy@LastModifiedBy@CreatedBy@LastModifiedBy SpringSecurityAuditorAware,只记录用户名
要在Spring data mongodb 中使用@CreatedBy@LastModifiedBy@CreatedBy@LastModifiedBy 这四个注解 必须实现 SpringSecuri ...
- Spring Data MongoDB 三:基本文档查询(Query、BasicQuery)(一)
一.简单介绍 Spring Data MongoDB提供了org.springframework.data.mongodb.core.MongoTemplate对MongoDB的CRUD的操作,上一 ...
- Introduction to Spring Data MongoDB
Introduction to Spring Data MongoDB I just announced the new Spring 5 modules in REST With Spring: & ...
随机推荐
- angular 实例笔记之嵌套指令间的传参
最近在项目中遇到了需要嵌套指令的情况,指令在嵌套后子指令必须获得父指令中的数据来进行判断,但是在写传参的时候遇到了坑,因此记录下来,防止以后遗忘,个人的肤浅理解,欢迎大家留言讨论 首先,关于direc ...
- TensorFlow和最近发布的slim
笔者将和大家分享一个结合了TensorFlow和最近发布的slim库的小应用,来实现图像分类.图像标注以及图像分割的任务,围绕着slim展开,包括其理论知识和应用场景. 之前自己尝试过许多其它的库,比 ...
- 2016030205 - ubuntu安装mysql
ubuntu上安装mysql 1.检查ubuntu上是否已经安装mysql sudo netstat -tap | grep mysql 本机上没有安装mysql 2.安装mysql服务器端和客户端 ...
- C语言学习总结(四) 剩余内容
第六章.剩余内容 (预处理指令,宏定义,条件编译,文件操作) 预处理指令 简单的来说就是在程序编译之前需要做的事情 1.宏定义 概念: 是一个替换代码的预处理指令,可以在编译之前进行代码替换(宏展开, ...
- Colletion View 简单的备忘
UIColletionView 这篇只是做UIColletionView的常用属性.代理方法和数据源方法的备忘,之后做一些自定义布局,增加删除动画等. UIColletionViewFlowLayou ...
- ibatis错误
java.lang.IllegalArgumentException: Mapped Statement collection already contains value for com.regin ...
- mp4下载完后才能播放的问题
下载完后才能播放的问题.mp4视频有metadata,通常在文件尾部,而flash读到这个metadata才开始播放,解决办法是用工具处理一下mp4,把它的metadata移至文件头部. 推荐工具:m ...
- AvalonDock结合MVVM模式的应用
原始代码及文章参考:http://www.codeproject.com/Articles/239342/AvalonDock-and-MVVM 环境:VS2010 源码:http://files.c ...
- 严重推荐一个免费开源数据库建模工具软件 --OpenSystemArchitect 4.0
嘿嘿,对于我这样的新手,这个工具还是很令人兴奋的. 真的是术业有专攻啊.关键还是免费开源 EXCEL,VISO,PPT,PS,CD,FREEHAND不是不可以,只是.人家还是专业点,方便点.. Ope ...
- Android 使用HttpClient方式提交POST请求
final String username = usernameEditText.getText().toString().trim(); final String password = passwr ...