OpenGL(十六) 鼠标、键盘交互响应事件
OpenGL中通过鼠标和键盘跟程序交互的实现需要实现注册鼠标和键盘响应事件,在一定条件下,该事件被触发,事件里的程序被执行,达到交互的目的。
通过glutMouseFunc(&OnMouse)注册鼠标事件,OnMouse是鼠标事件的响应,函数格式是void OnMouse(int button,int state,int x,int y);
通过glutKeyboardFunc(&KeyBoards)注册键盘事件,KeyBoards是键盘事件的响应,函数格式是
void KeyBoards(unsigned char key,int x,int y);
一、通过鼠标左键、滚轮键、右键在窗口上单击画点
#include <glut.h>
void InitEnvironment()
{
glClearColor(0.6,0.6,0.6,0);
glClear(GL_COLOR_BUFFER_BIT);
glPointSize(6);
glMatrixMode(GL_MODELVIEW);
glLoadIdentity();
gluOrtho2D(0,400,0,400);
}
void myDisplay(void)
{
glClear(GL_COLOR_BUFFER_BIT);
glFlush();
}
void OnMouse(int button,int state,int x,int y)
{
if(button==GLUT_LEFT_BUTTON&&state==GLUT_DOWN)
{
glColor3f(1,0,0);
glBegin(GL_POINTS);
glVertex2f(x,400-y);
glEnd();
glFlush();
}
if(button==GLUT_MIDDLE_BUTTON&&state==GLUT_DOWN)
{
glColor3f(0,1,0);
glBegin(GL_POINTS);
glVertex2f(x,400-y);
glEnd();
glFlush();
}
if(button==GLUT_RIGHT_BUTTON&&state==GLUT_DOWN)
{
glColor3f(0,0,1);
glBegin(GL_POINTS);
glVertex2f(x,400-y);
glEnd();
glFlush();
}
}
int main(int argc, char *argv[])
{
glutInit(&argc, argv); //初始化GLUT
glutInitDisplayMode(GLUT_RGB | GLUT_SINGLE);
glutInitWindowPosition(500, 200);
glutInitWindowSize(400, 400);
glutCreateWindow("OpenGL");
InitEnvironment(); //初始化
glutMouseFunc(&OnMouse); //注册鼠标事件
glutDisplayFunc(&myDisplay); //回调函数
glutMainLoop(); //持续显示,当窗口改变会重新绘制图形
return 0;
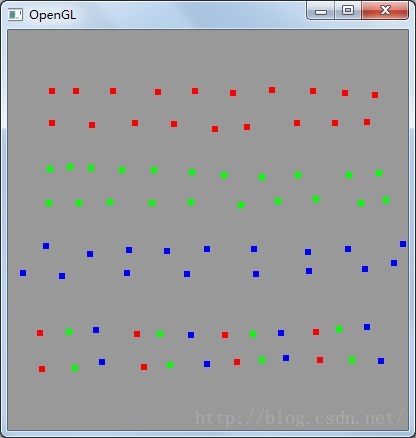
} 在窗口上单击鼠标左键、滚轮键和右键分别绘制红色、绿色和蓝色的点:
二、通过鼠标左键单击控制模型旋转、右键单击暂停旋转
#include <glut.h>
#include <Windows.h>
GLfloat angle=0.0f;
void InitEnvironment()
{
glEnable(GL_DEPTH);
glClear(GL_COLOR_BUFFER_BIT|GL_DEPTH_BUFFER_BIT);
glMatrixMode(GL_PROJECTION);
glLoadIdentity();
gluPerspective(65,1,1,50);
glMatrixMode(GL_MODELVIEW);
glLoadIdentity();
gluLookAt(12,12,20,0,0,0,0,1,0);
}
void myDisplay(void)
{
glClear(GL_COLOR_BUFFER_BIT|GL_DEPTH_BUFFER_BIT);
glPushMatrix();
glRotatef(angle,0,1,0);
//以下绘制一个立方体
glBegin(GL_QUADS);
//底面
glColor4f(1,0,0,1);
glVertex3f(-5,-5,-5);
glVertex3f(5,-5,-5);
glColor4f(0,0,1,1);
glVertex3f(5,5,-5);
glVertex3f(-5,5,-5);
//侧面A
glColor4f(0,0,1,1);
glVertex3f(-5,-5,-5);
glVertex3f(5,-5,-5);
glColor4f(0,1,0,1);
glVertex3f(5,-5,5);
glVertex3f(-5,-5,5);
//侧面B
glColor4f(0,1,0,1);
glVertex3f(5,-5,-5);
glVertex3f(5,5,-5);
glColor4f(0,1,1,1);
glVertex3f(5,5,5);
glVertex3f(5,-5,5);
//侧面C
glColor4f(1,1,0,1);
glVertex3f(5,5,-5);
glVertex3f(-5,5,-5);
glColor4f(1,0,1,1);
glVertex3f(-5,5,5);
glVertex3f(5,5,5);
//侧面D
glColor4f(1,0,1,1);
glVertex3f(-5,5,-5);
glVertex3f(-5,-5,-5);
glColor4f(0,1,0,1);
glVertex3f(-5,-5,5);
glVertex3f(-5,5,5);
//顶面
glColor4f(1,1,0,1);
glVertex3f(-5,-5,5);
glVertex3f(5,-5,5);
glColor4f(0,0,1,1);
glVertex3f(5,5,5);
glVertex3f(-5,5,5);
glEnd();
glutSwapBuffers();
glPopMatrix();
}
void RotateRect()
{
angle+=0.5;
if(angle>=360)
{
angle=0.0f;
}
Sleep(30);
myDisplay();
}
void OnMouse(int button,int state,int x,int y)
{
if(button==GLUT_LEFT_BUTTON&&state==GLUT_DOWN)
{
glutIdleFunc(RotateRect);
}
if(button==GLUT_RIGHT_BUTTON&&state==GLUT_DOWN)
{
glutIdleFunc(NULL);
}
}
int main(int argc, char *argv[])
{
glutInit(&argc, argv); //初始化GLUT
glutInitDisplayMode(GLUT_RGB | GLUT_DOUBLE);
glutInitWindowPosition(500, 200);
glutInitWindowSize(400, 400);
glutCreateWindow("OpenGL");
InitEnvironment(); //初始化显示环境
glutMouseFunc(&OnMouse); //注册鼠标事件
glutDisplayFunc(&myDisplay); //回调函数
glutMainLoop(); //持续显示,当窗口改变会重新绘制图形
return 0;
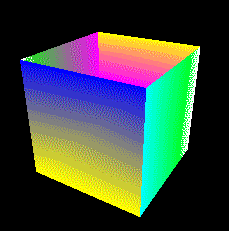
} 绘制了一个立方体模型,单击左键开始旋转,右键暂停:
三、 通过键盘控制模型各个方向旋转和视角变化
#include <glut.h>
#include <Windows.h>
GLfloat angle=10.0f;
GLfloat xDirection=0.0f;
GLfloat yDirection=0.0f;
GLfloat zDirection=10.0f;
void InitEnvironment()
{
glEnable(GL_DEPTH);
glClearColor(1,1,1,0);
glClear(GL_COLOR_BUFFER_BIT|GL_DEPTH_BUFFER_BIT);
glColor4f(0,0,1,1);
glMatrixMode(GL_PROJECTION);
glLoadIdentity();
gluPerspective(65,1,1,50);
glMatrixMode(GL_MODELVIEW);
glLoadIdentity();
gluLookAt(xDirection,yDirection,zDirection,0,0,0,0,1,0);
}
void KeyBoards(unsigned char key,int x,int y)
{
switch (key)
{
case 'w':
glMatrixMode(GL_MODELVIEW);
glRotatef(angle,-1,0,0);
glutPostRedisplay();
break;
case 'a':
glMatrixMode(GL_MODELVIEW);
glRotatef(angle,0,0,-1);
glutPostRedisplay();
break;
case 's':
glMatrixMode(GL_MODELVIEW);
glRotatef(angle,1,0,0);
glutPostRedisplay();
break;
case 'd':
glMatrixMode(GL_MODELVIEW);
glRotatef(angle,0,0,1);
glutPostRedisplay();
break;
case '4':
xDirection+=0.5;
glMatrixMode(GL_MODELVIEW);
glLoadIdentity();
gluPerspective(65,1,1,50);
glMatrixMode(GL_MODELVIEW);
glLoadIdentity();
gluLookAt(xDirection,yDirection,zDirection,0,0,0,0,1,0);
glutPostRedisplay();
break;
case '5':
yDirection+=0.5;
glMatrixMode(GL_MODELVIEW);
glLoadIdentity();
gluPerspective(65,1,1,50);
glMatrixMode(GL_MODELVIEW);
glLoadIdentity();
gluLookAt(xDirection,yDirection,zDirection,0,0,0,0,1,0);
glutPostRedisplay();
break;
case '6':
zDirection+=0.5;
glMatrixMode(GL_MODELVIEW);
glLoadIdentity();
gluPerspective(65,1,1,50);
glMatrixMode(GL_MODELVIEW);
glLoadIdentity();
gluLookAt(xDirection,yDirection,zDirection,0,0,0,0,1,0);
glutPostRedisplay();
break;
case '1':
xDirection-=0.5;
glMatrixMode(GL_MODELVIEW);
glLoadIdentity();
gluPerspective(65,1,1,50);
glMatrixMode(GL_MODELVIEW);
glLoadIdentity();
gluLookAt(xDirection,yDirection,zDirection,0,0,0,0,1,0);
glutPostRedisplay();
break;
case '2':
xDirection-=0.5;
glMatrixMode(GL_MODELVIEW);
glLoadIdentity();
gluPerspective(65,1,1,50);
glMatrixMode(GL_MODELVIEW);
glLoadIdentity();
gluLookAt(xDirection,yDirection,zDirection,0,0,0,0,1,0);
glutPostRedisplay();
break;
case '3':
xDirection-=0.5;
glMatrixMode(GL_MODELVIEW);
glLoadIdentity();
gluPerspective(65,1,1,50);
glMatrixMode(GL_MODELVIEW);
glLoadIdentity();
gluLookAt(xDirection,yDirection,zDirection,0,0,0,0,1,0);
glutPostRedisplay();
break;
case 27:
exit(0);
break;
}
}
void myDisplay(void)
{
glClear(GL_COLOR_BUFFER_BIT|GL_DEPTH_BUFFER_BIT);
glutWireTeapot(4);
glutSwapBuffers();
}
void RotateRect()
{
angle+=0.5;
if(angle>=360)
{
angle=0.0f;
}
Sleep(30);
myDisplay();
}
void OnMouse(int button,int state,int x,int y)
{
if(button==GLUT_LEFT_BUTTON&&state==GLUT_DOWN)
{
glutIdleFunc(RotateRect);
}
if(button==GLUT_RIGHT_BUTTON&&state==GLUT_DOWN)
{
glutIdleFunc(NULL);
}
}
int main(int argc, char *argv[])
{
glutInit(&argc, argv); //初始化GLUT
glutInitDisplayMode(GLUT_RGB | GLUT_DOUBLE);
glutInitWindowPosition(500, 200);
glutInitWindowSize(500, 500);
glutCreateWindow("OpenGL");
InitEnvironment(); //初始化显示环境
glutKeyboardFunc(&KeyBoards); //注册键盘事件
glutDisplayFunc(&myDisplay); //回调函数
glutMainLoop(); //持续显示,当窗口改变会重新绘制图形
return 0;
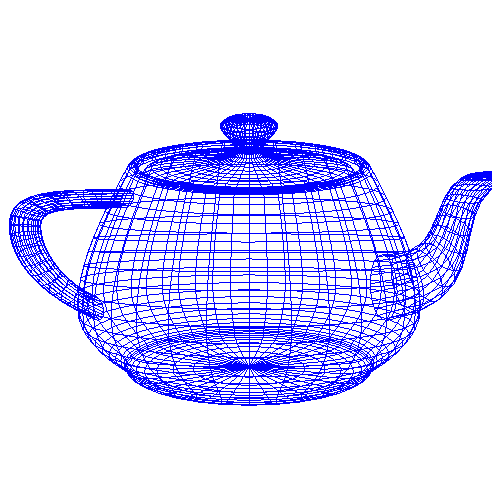
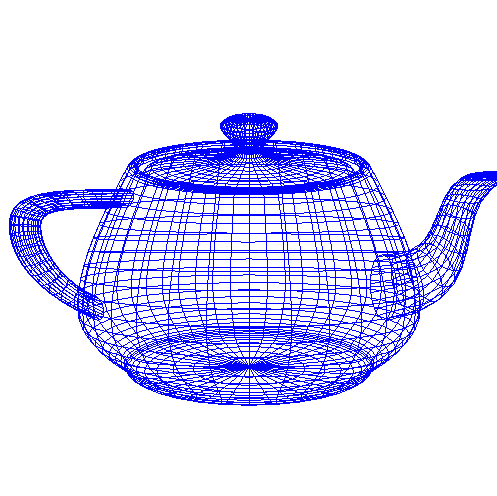
} 通过键盘上W、A、S、D键控制模型向上、向左、向下、向右旋转:
W、S键控制:
A、D键控制:

数字键4、5、6控制视角向X、Y、Z正方向移动,1、2、3控制视角向X、Y、Z负方向移动:
OpenGL(十六) 鼠标、键盘交互响应事件的更多相关文章
- OpenGL键盘交互响应事件
GLUT允许我们编写程序,在里面加入键盘输入控制,包括了普通键,和其他特殊键(如F1,UP).在这一章里我们将学习如何去检测哪个键被按下,可以从GLUT里得到些什么信息,和如何处理键盘输入. 处理 ...
- OpenGL 鼠标交互响应事件
OpenGL 鼠标.键盘交互响应事件 先来一个样例: uses gl,glu,glut; procedure InitEnvironment;cdecl; begin glClearColor();/ ...
- 关于c# winform 键盘响应右边键盘消息响应事件的上下左右方向键没有反应
原文作者:aircraft 原文链接:https://www.cnblogs.com/DOMLX/p/11835642.html 记录一下这个小坑,c# winform 键盘响应右边键盘的上下左右方向 ...
- Unity3D笔记十六 输入输出-键盘事件、鼠标事件
输入与控制操作Unity为开发者提供了Input类库,其中包括键盘事件.鼠标事件和触摸事件等一切跨平台所需要的控制事件. 一.键盘事件 1.按下事件 Input.GetKeyDown():如果按键被按 ...
- 第二十六课:jQuery对事件对象的修复
因为原生的event对象,在不同浏览器下,有不同的属性和方法,因此需要用jQuery进行兼容. jQuery在这里分两步走,首先创建一个伪事件类jQuery.Event(jQuery里面自定义的事件类 ...
- Mac OS使用技巧之十六:系统失去响应怎么办?
再好的系统,再快的本本,也会在执行时由于种种原因出现卡顿或者死机等失去响应的情况.Mac用户也会时不时碰到这样的情况,最常见的表现为鼠标变为七彩圆圈.通常等上一会儿系统会自己恢复.假设迟迟没有响应的话 ...
- js获取键盘按键响应事件(兼容各浏览器)
<script type="text/javascript" language="JavaScript" charset="UTF-8" ...
- Android开发(十六)——Android listview onItemClick事件失效的原因
参考: Android listview onItemClick事件失效的原因.http://blog.csdn.net/wangchun8926/article/details/8793178
- mfc 鼠标、键盘响应事件
一.基本目标 1.有一个基本的MFC程序,点击“关闭”则“关闭”这个程序,这点没什么好讲的,把自带的“取消”按钮,右键->属性的Caption改成“关闭”二字就可以了 2.鼠标在对话框中移动,则 ...
随机推荐
- [Immutable.js] Updating nested values with ImmutableJS
The key to being productive with Immutable JS is understanding how to update values that are nested. ...
- Swift之动画总结
UIView动画个人笔记,代码简单,不过多赘述.1.定义三个View @IBOutlet weak var mFirstView: UIView! @IBOutlet weak var mSecond ...
- js进阶课程ajax简介(ajax是浏览器来实现的)
js进阶课程ajax简介(ajax是浏览器来实现的) 一.总结 1.ajax使用需要服务器支持,比如phpstudy 2.ajax是浏览器支持的功能:ajax有个核心对象XMLHttpRequest, ...
- C++学习笔记8-操作符&指针
1. 重载操作符 赋值操作符的返回类型应该与内置类型赋值运算返回的类型同样.内置类型的赋值运算返回对右操作数的引用,因此,赋值操作符也返回对同一类类型的引用.比如.Sales_item的赋值操作符能 ...
- 多线程之线程通信条件Condition二
接上一篇,实现Condition三个条件,有这样一个应用: 1. 有三个进程,第一个进程运行1次,第二个进程运行2次,第三个进程运行3次: 2. 先运行第二个进程,然后第一个,然后第三个: 3. 依 ...
- [tmux] Automate your workflow using tmux scripts
Do you have a standard workflow that involves setting up a specific tmux layout, or running certain ...
- vue相关网站资源收集
因为接了一个使用VUE + ES6 + Webpack的项目,所以在工作之余,也加紧了对这些知识的学习,这里放上遇到的觉得不错的网站链接: 1 vue官网 https://cn.vuejs.org 2 ...
- 基于 Android NDK 的学习之旅-----环境搭建
工欲善其事 必先利其器 , 下面介绍下 Eclipse SDK NDK Cygwin CDT 集成开发环境的搭建. 1.Android 开发环境搭建 Android开发环境搭建不是重点,相信看此文章的 ...
- js进阶 11-7 jquery如何获取和改变元素的位置
js进阶 11-7 jquery如何获取和改变元素的位置 一.总结 一句话总结:jquery中匿名函数中的index参数是什么意思.jquery对象多集合,故index为所选元素的下标. 1.jqu ...
- 【u026】房间最短路问题
描述 在一个长宽均为10,入口出口分别为(0,5).(10,5)的房间里,有几堵墙,每堵墙上有两个缺口,求入口到出口的最短路经. 格式 输入格式 第一排为n(n<=20),墙的数目. 接下来n排 ...