
Solr学习笔记(3) —— SolrJ管理索引库&集群
一、什么是SolrJ
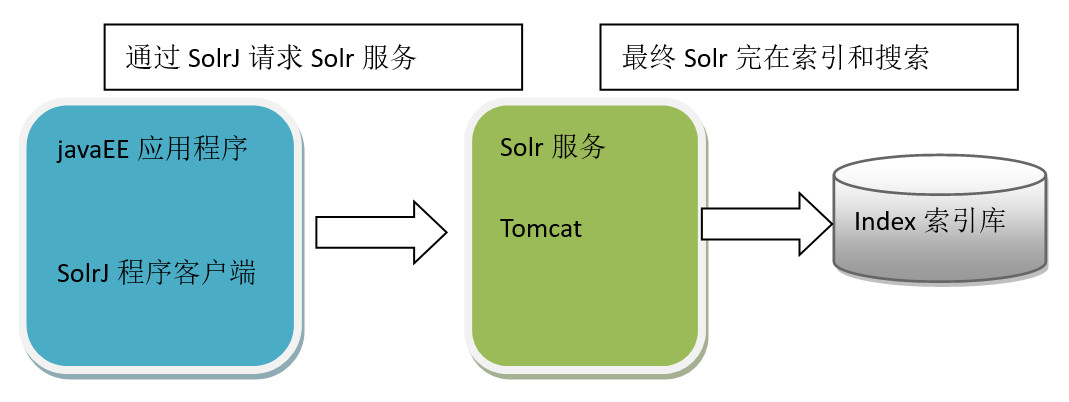
solrj是访问Solr服务的java客户端,提供索引和搜索的请求方法,SolrJ通常嵌入在业务系统中,通过SolrJ的API接口操作Solr服务,如下图:
二、SolrJ的基本操作
2.1 添加文档
- 实现步骤:
第一步:创建一个java工程
第二步:导入相关jar包
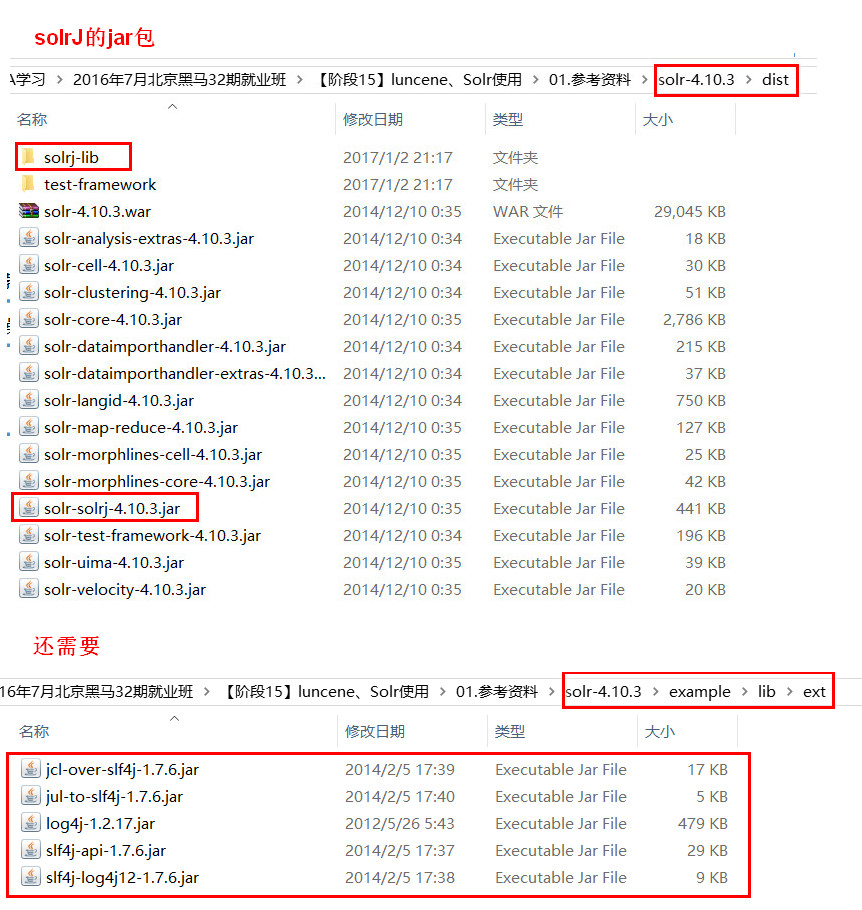
第三步:和Solr服务器建立连接。HttpSolrServer对象建立连接
第四步:创建一个SolrInputDocument对象,然后添加域
第五步:将SolrInputDocument添加到索引库
第六步:提交
- 代码实现
//向索引库中添加索引

    @Test

    public void addDocument() throws Exception {

        //和solr服务器创建连接

        //参数:solr服务器的地址

        SolrServer solrServer = new HttpSolrServer("http://localhost:8080/solr");

        //创建一个文档对象

        SolrInputDocument document = new SolrInputDocument();

        //向文档中添加域

        //第一个参数:域的名称,域的名称必须是在schema.xml中定义的

        //第二个参数:域的值

        document.addField("id", "c0001");

        document.addField("title_ik", "使用solrJ添加的文档");

        document.addField("content_ik", "文档的内容");

        document.addField("product_name", "商品名称");

        //把document对象添加到索引库中

        solrServer.add(document);

        //提交修改

        solrServer.commit();

    }
2.2 删除文档
根据id删除
//删除文档,根据id删除

    @Test

    public void deleteDocumentByid() throws Exception {

        //创建连接

        SolrServer solrServer = new HttpSolrServer("http://localhost:8080/solr");

        //根据id删除文档

        solrServer.deleteById("c0001");

        //提交修改

        solrServer.commit();

    }
根据查询删除
//根据查询条件删除文档

    @Test

    public void deleteDocumentByQuery() throws Exception {

        //创建连接

        SolrServer solrServer = new HttpSolrServer("http://localhost:8080/solr");

        //根据查询条件删除文档

        solrServer.deleteByQuery("*:*");

        //提交修改

        solrServer.commit();

    }
2.3 修改文档
在solrJ中修改没有对应的update方法,只有add方法,只需要添加一条新的文档,和被修改的文档id一致就,可以修改了。本质上就是先删除后添加。
2.4 查询文档
- 简单查询
//查询索引

    @Test

    public void queryIndex() throws Exception {

        //创建连接

        SolrServer solrServer = new HttpSolrServer("http://localhost:8080/solr");

        //创建一个query对象

        SolrQuery query = new SolrQuery();

        //设置查询条件

        query.setQuery("*:*");

        //执行查询

        QueryResponse queryResponse = solrServer.query(query);

        //取查询结果

        SolrDocumentList solrDocumentList = queryResponse.getResults();

        //共查询到商品数量

        System.out.println("共查询到商品数量:" + solrDocumentList.getNumFound());

        //遍历查询的结果

        for (SolrDocument solrDocument : solrDocumentList) {

            System.out.println(solrDocument.get("id"));

            System.out.println(solrDocument.get("product_name"));

            System.out.println(solrDocument.get("product_price"));

            System.out.println(solrDocument.get("product_catalog_name"));

            System.out.println(solrDocument.get("product_picture"));

        }

} - 复杂查询(其中包含查询、过滤、分页、排序、高亮显示等处理)
//复杂查询索引

    @Test

    public void queryIndex2() throws Exception {

        //创建连接

        SolrServer solrServer = new HttpSolrServer("http://localhost:8080/solr");

        //创建一个query对象

        SolrQuery query = new SolrQuery();

        //设置查询条件

        query.setQuery("钻石");

        //过滤条件

        query.setFilterQueries("product_catalog_name:幽默杂货");

        //排序条件

        query.setSort("product_price", ORDER.asc);

        //分页处理

        query.setStart(0);

        query.setRows(10);

        //结果中域的列表

        query.setFields("id","product_name","product_price","product_catalog_name","product_picture");

        //设置默认搜索域

        query.set("df", "product_keywords");

        //高亮显示

        query.setHighlight(true);

        //高亮显示的域

        query.addHighlightField("product_name");

        //高亮显示的前缀

        query.setHighlightSimplePre("<em>");

        //高亮显示的后缀

        query.setHighlightSimplePost("</em>");

        //执行查询

        QueryResponse queryResponse = solrServer.query(query);

        //取查询结果

        SolrDocumentList solrDocumentList = queryResponse.getResults();

        //共查询到商品数量

        System.out.println("共查询到商品数量:" + solrDocumentList.getNumFound());

        //遍历查询的结果

        for (SolrDocument solrDocument : solrDocumentList) {

            System.out.println(solrDocument.get("id"));

            //取高亮显示

            String productName = "";

            Map<String, Map<String, List<String>>> highlighting = queryResponse.getHighlighting();

            List<String> list = highlighting.get(solrDocument.get("id")).get("product_name");

            //判断是否有高亮内容

            if (null != list) {

                productName = list.get(0);

            } else {

                productName = (String) solrDocument.get("product_name");

            }

            System.out.println(productName);

            System.out.println(solrDocument.get("product_price"));

            System.out.println(solrDocument.get("product_catalog_name"));

            System.out.println(solrDocument.get("product_picture"));

        }

    }
三、使用SolrJ管理集群
3.1 添加文档
使用步骤:
第一步:把solrJ相关的jar包添加到工程中。
第二步:创建一个SolrServer对象,需要使用CloudSolrServer子类。构造方法的参数是zookeeper的地址列表。
第三步:需要设置DefaultCollection属性。
第四步:创建一SolrInputDocument对象。
第五步:向文档对象中添加域
第六步:把文档对象写入索引库。
第七步:提交。
  @Test

    public void testSolrCloudAddDocument() throws Exception {

        // 第一步:把solrJ相关的jar包添加到工程中。

        // 第二步:创建一个SolrServer对象,需要使用CloudSolrServer子类。构造方法的参数是zookeeper的地址列表。

        // 参数是zookeeper的地址列表,使用逗号分隔

        CloudSolrServer solrServer = new CloudSolrServer("192.168.25.135:2181,192.168.25.135:2182,192.168.25.135:2183");

        // 第三步:需要设置DefaultCollection属性。

        solrServer.setDefaultCollection("collection2");

        // 第四步:创建一SolrInputDocument对象。

        SolrInputDocument document = new SolrInputDocument();

        // 第五步:向文档对象中添加域

        document.addField("id", "test01");

        document.addField("item_title", "测试商品");

        document.addField("item_price", "100");

        // 第六步:把文档对象写入索引库。

        solrServer.add(document);

        // 第七步:提交。

        solrServer.commit();

    }
3.2 查询文档
创建一个CloudSolrServer对象,其他处理和单机版一致。
@Test

      public void testSolrCloudQueryDocument() throws Exception {

        CloudSolrServer cloudSolrServer = new CloudSolrServer("192.168.25.135:2181,192.168.25.135:2182,192.168.25.135:2183");

        cloudSolrServer.setDefaultCollection("collection2");

        // 创建一个query对象

        SolrQuery query = new SolrQuery();

        // 设置查询条件

        query.setQuery("*:*");

        // 执行查询

        QueryResponse queryResponse = cloudSolrServer.query(query);

        // 取查询结果

        SolrDocumentList solrDocumentList = queryResponse.getResults();

        // 共查询到商品数量

        System.out.println("共查询到商品数量:"+solrDocumentList.getNumFound());

        // 遍历查询结果

        for (SolrDocument solrDocument : solrDocumentList) {

            System.out.println(solrDocument.get("id"));

            System.out.println(solrDocument.get("item_title"));

            System.out.println(solrDocument.get("item_price"));

        }

    }
四、把搜索功能切换到集群版
<?xml version="1.0" encoding="UTF-8"?>

<beans xmlns="http://www.springframework.org/schema/beans"

    xmlns:context="http://www.springframework.org/schema/context" xmlns:p="http://www.springframework.org/schema/p"

    xmlns:aop="http://www.springframework.org/schema/aop" xmlns:tx="http://www.springframework.org/schema/tx"

    xmlns:xsi="http://www.w3.org/2001/XMLSchema-instance"

    xsi:schemaLocation="http://www.springframework.org/schema/beans http://www.springframework.org/schema/beans/spring-beans4.2.xsd

    http://www.springframework.org/schema/context http://www.springframework.org/schema/context/spring-context4.2.xsd

    http://www.springframework.org/schema/aop http://www.springframework.org/schema/aop/spring-aop4.2.xsd http://www.springframework.org/schema/tx http://www.springframework.org/schema/tx/spring-tx4.2.xsd

    http://www.springframework.org/schema/util http://www.springframework.org/schema/util/spring-util4.2.xsd">

    <!-- 单机版solr服务配置 -->

    <!-- <bean id="httpSolrServer" class="org.apache.solr.client.solrj.impl.HttpSolrServer">

        <constructor-arg name="baseURL" value="http://192.168.25.135:8080/solr"></constructor-arg>

    </bean> -->

    <!-- 集群版solr服务 -->

    <bean id="cloudSolrServer" class="org.apache.solr.client.solrj.impl.CloudSolrServer">

        <constructor-arg name="zkHost" value="192.168.25.135:2181,192.168.25.135:2182,192.168.25.135:2183"></constructor-arg>

        <property name="defaultCollection" value="collection2"></property>

    </bean>

</beans>
Solr学习笔记(3) —— SolrJ管理索引库&集群的更多相关文章
- JAVAEE——Solr:安装及配置、后台管理索引库、 使用SolrJ管理索引库、仿京东的电商搜索案例实现
1 学习回顾 1. Lucene 是Apache开源的全文检索的工具包 创建索引 查询索引 2. 遇到问题? 文件名 及文件内容 顺序扫描法 全文检索 3. 什么是全文检索? 这种先创建索引 再 ...
- solrj管理索引库
solrj管理索引库 1.1. 什么是solrJ solrj是访问Solr服务的java客户端,提供索引和搜索的请求方法,SolrJ通常在嵌入在业务系统中,通过SolrJ的API接口操作Solr服务, ...
- Dubbo入门到精通学习笔记(十七):FastDFS集群的安装、FastDFS集群的配置
文章目录 FastDFS集群的安装 FastDFS 介绍(参考:http://www.oschina.net/p/fastdfs) FastDFS 上传文件交互过程: FastDFS 下载文件交互过程 ...
- Docker 与 K8S学习笔记(二十三)—— Kubernetes集群搭建
小伙伴们,好久不见,这几个月实在太忙,所以一直没有更新,今天刚好有空,咱们继续k8s的学习,由于我们后面需要深入学习Pod的调度,所以我们原先使用MiniKube搭建的实验环境就不能满足我们的需求了, ...
- ELK学习笔记之简单适用的ES集群监控工具cerebro安装使用
安装指导及使用简介 1. 下载安装包: https://github.com/lmenezes/cerebro/releases/download/v0.7.3/cerebro-0.7.3. ...
- Nginx网络架构实战学习笔记(六):服务器集群搭建、集群性能测试
文章目录 服务器集群搭建 Nginx---->php-fpm之间的优化 302机器 202机器 压力测试 搭建memcached.mysql(数据准备) 今晚就动手-.- 集群性能测试 服务器集 ...
- Dubbo入门到精通学习笔记(十三):ZooKeeper集群的安装、配置、高可用测试、升级、迁移
文章目录 ZooKeeper集群的安装.配置.高可用测试 ZooKeeper 与 Dubbo 服务集群架构图 1. 修改操作系统的/etc/hosts 文件,添加 IP 与主机名映射: 2. 下载或上 ...
- 【Kubernetes学习笔记】-kubeadm 手动搭建kubernetes 集群
目录 K8S 组件构成 环境准备 (以ubuntu系统为例) 1. kubernetes集群机器 2. 安装 docker. kubeadm.kubelet.kubectl 2.1 在每台机器上安装 ...
- Windows系统环境下Solr之Java实战(三)使用solrJ管理索引库
https://www.cnblogs.com/zhuxiaojie/p/5764680.html https://www.cnblogs.com/xieyupeng/p/9317158.html
随机推荐
- sql基本查询语句练习
student(S#,Sname,Sage,Ssex) 学生表 S#:学号: Sname:学生姓名:Sage:学生年龄:Ssex:学生性别 Course(C#,Cname,T#) 课程表 ...
- js面试题知识点全解(一原型和原型链)
1.如何准确判断一个变量是数组类型2.写一个原型链继承的例子3.描述new一个对象的过程4.zepto(或其他框架)源码中如何使用原型链知识点:1.构造函数2.构造函数-扩展3.原型规则和示例4.原型 ...
- ES6中变量的解析赋值的用途
变量的解构赋值用途很多. (1)交换变量的值 let x = 1; let y = 2; [x, y] = [y, x]; 上面代码交换变量x和y的值,这样的写法不仅简洁,而且易读,语义非常清晰. ( ...
- idea 修改Recent projects
idea用了一段时间了,打开的项目多了,导致Open Recent列表中的项目也非常多,在找一个项目时很不方便. 后来查询,在~/Library/Preferences/IntelliJIdea目录/ ...
- VMware Workstation 软件 创建 Ubuntu 14.04虚拟机
VMware Workstation 软件 创建 Ubuntu 14.04虚拟机 1. 安装VMare Workstation 软件 下载VMware 11 软件 http://www.dntk.or ...
- Blender 工具使用—–准星
Blender 工具使用-–准星 移动准星 直接按鼠标左键 将准星放置在坐标原点 快捷键Shift + C 将准星放置到指定位置 比如下面这个位置: 按Shift + S快捷键组合,弹出一个工具栏,选 ...
- c++ 切勿重新定义继承来的带缺省参数的函数
切勿重新定义继承来的带缺省参数的函数.我们知道,继承来的函数是virtual 的,至于原因在上一节中已经说明了,即“切勿重新定义父类non-virtual函数”.所以确切的描述应该是“切勿重新定义继承 ...
- 关于Spring注解配置的步骤
今天分享一下 关于Spring注解配置的流程 1 导包:如下图所示 2 书写User和Car类 代码如下 package cn.lijun.bean; public class Car { priv ...
- 《Effective Java》第5章 泛型
第23条:请不要在新代码中使用原生态类型 声明中具有一个或者多个类型参数( type parameter)的类或者接口,就是泛型(generic)类或者接口. 每种泛型定义一组参数化的类型(param ...
- execve(".. ",[".. ",".. "],[/* ..*/])第二个 参数 数组硬传
strace.第一次跟踪点东西的启动. 第一次看见..execve(".. ",[".. ",".. "],[/* ..*/]) 第二个 参 ...