[深度学习] 各种下载深度学习数据集方法(In python)
一、使用urllib下载cifar-10数据集,并读取再存为图片(TensorFlow v1.14.0)
 # -*- coding:utf-8 -*-

 __author__ = 'Leo.Z'

 import sys

 import os

 # 给定url下载文件

 def download_from_url(url, dir=''):

     _file_name = url.split('/')[-1]

     _file_path = os.path.join(dir, _file_name)

     # 打印下载进度

     def _progress(count, block_size, total_size):

         sys.stdout.write('\r>> Downloading %s %.1f%%' %

                          (_file_name, float(count * block_size) / float(total_size) * 100.0))

         sys.stdout.flush()

     # 如果不存在dir,则创建文件夹

     if not os.path.exists(dir):

         print("Dir is not exsit,Create it..")

         os.makedirs(dir)

     if not os.path.exists(_file_path):

         print("Start downloading..")

         # 开始下载文件

         import urllib

         urllib.request.urlretrieve(url, _file_path, _progress)

     else:

         print("File already exists..")

     return _file_path

 # 使用tarfile解压缩

 def extract(filepath, dest_dir):

     if os.path.exists(filepath) and not os.path.exists(dest_dir):

         import tarfile

         tarfile.open(filepath, 'r:gz').extractall(dest_dir)

 if __name__ == '__main__':

     FILE_URL = 'http://www.cs.toronto.edu/~kriz/cifar-10-binary.tar.gz'

     FILE_DIR = 'cifar10_dir/'

     loaded_file_path = download_from_url(FILE_URL, FILE_DIR)

     extract(loaded_file_path)
按BATCH_SIZE读取二进制文件中的图片数据,并存放为jpg:
# -*- coding:utf-8 -*-

__author__ = 'Leo.Z'

# Tensorflow Version:1.14.0

import os

import tensorflow as tf

from PIL import Image

BATCH_SIZE = 128

def read_cifar10(filenames):

    label_bytes = 1

    height = 32

    width = 32

    depth = 3

    image_bytes = height * width * depth

    record_bytes = label_bytes + image_bytes

    # lamda函数体

    # def load_transform(x):

    #     # Convert these examples to dense labels and processed images.

    #     per_record = tf.reshape(tf.decode_raw(x, tf.uint8), [record_bytes])

    #     return per_record

    # tf v1.14.0版本的FixedLengthRecordDataset(filename_list,bin_data_len)

    datasets = tf.data.FixedLengthRecordDataset(filenames=filenames, record_bytes=record_bytes)

    # 是否打乱数据

    # datasets.shuffle()

    # 重复几轮epoches

    datasets = datasets.shuffle(buffer_size=BATCH_SIZE).repeat(2).batch(BATCH_SIZE)

    # 使用map,也可使用lamda(注意,后面使用迭代器的时候这里转换为uint8没用,后面还得转一次,否则会报错)

    # datasets.map(load_transform)

    # datasets.map(lamda x : tf.reshape(tf.decode_raw(x, tf.uint8), [record_bytes]))

    # 创建一起迭代器tf v1.14.0

    iter = tf.compat.v1.data.make_one_shot_iterator(datasets)

    # 获取下一条数据(label+image的二进制数据1+32*32*3长度的bytes)

    rec = iter.get_next()

    # 这里转uint8才生效,在map中转貌似有问题?

    rec = tf.decode_raw(rec, tf.uint8)

    label = tf.cast(tf.slice(rec, [0, 0], [BATCH_SIZE, label_bytes]), tf.int32)

    # 从第二个字节开始获取图片二进制数据大小为32*32*3

    depth_major = tf.reshape(

        tf.slice(rec, [0, label_bytes], [BATCH_SIZE, image_bytes]),

        [BATCH_SIZE, depth, height, width])

    # 将维度变换顺序,变为[H,W,C]

    image = tf.transpose(depth_major, [0, 2, 3, 1])

    # 返回获取到的label和image组成的元组

    return (label, image)

def get_data_from_files(data_dir):

    # filenames一共5个,从data_batch_1.bin到data_batch_5.bin

    # 读入的都是训练图像

    filenames = [os.path.join(data_dir, 'data_batch_%d.bin' % i)

                 for i in range(1, 6)]

    # 判断文件是否存在

    for f in filenames:

        if not tf.io.gfile.exists(f):

            raise ValueError('Failed to find file: ' + f)

    # 获取一张图片数据的数据,格式为(label,image)

    data_tuple = read_cifar10(filenames)

    return data_tuple

if __name__ == "__main__":

    # 获取label和type的对应关系

    label_list = [0, 1, 2, 3, 4, 5, 6, 7, 8, 9]

    name_list = ['airplane', 'automobile', 'bird', 'cat', 'deer', 'dog', 'frog', 'horse', 'ship', 'truck']

    label_map = dict(zip(label_list, name_list))

    with tf.compat.v1.Session() as sess:

        batch_data = get_data_from_files('cifar10_dir/cifar-10-batches-bin')

        # 在之前的旧版本中,因为使用了filename_queue,所以要使用start_queue_runners进行数据填充

        # 1.14.0由于没有使用filename_queue所以不需要

        # threads = tf.train.start_queue_runners(sess=sess)

        sess.run(tf.compat.v1.global_variables_initializer())

        # 创建一个文件夹用于存放图片

        if not os.path.exists('cifar10_dir/raw'):

            os.mkdir('cifar10_dir/raw')

        # 存放30张,以index-typename.jpg命名,例如1-frog.jpg

        for i in range(30):

            # 获取一个batch的数据,BATCH_SIZE

            # batch_data中包含一个batch的image和label

            batch_data_tuple = sess.run(batch_data)

            # 打印(128, 1)

            print(batch_data_tuple[0].shape)

            # 打印(128, 32, 32, 3)

            print(batch_data_tuple[1].shape)

            # 每个batch存放第一张图片作为实验

            Image.fromarray(batch_data_tuple[1][0]).save("cifar10_dir/raw/{index}-{type}.jpg".format(

                index=i, type=label_map[batch_data_tuple[0][0][0]]))
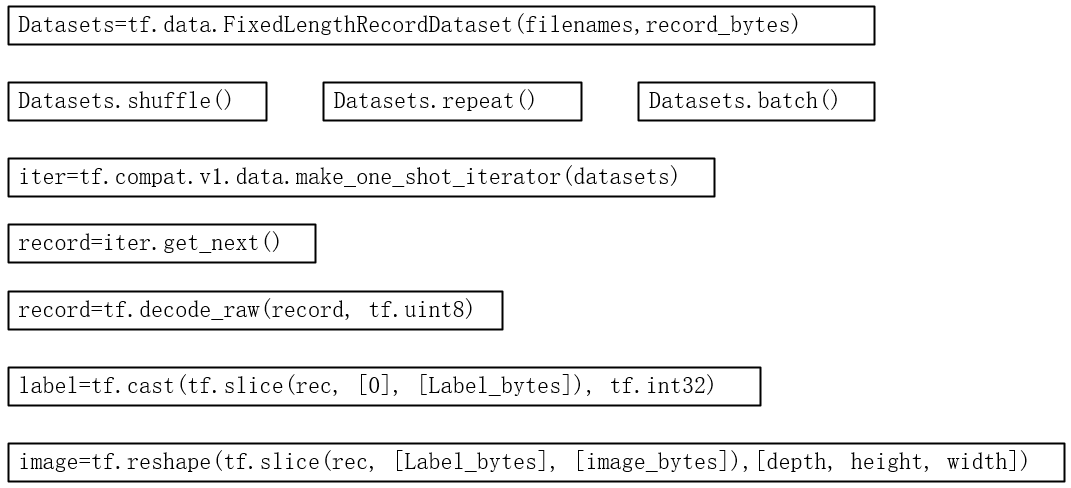
简要代码流程图:
[深度学习] 各种下载深度学习数据集方法(In python)的更多相关文章
- ReLeQ:一种自动强化学习的神经网络深度量化方法
ReLeQ:一种自动强化学习的神经网络深度量化方法 ReLeQ:一种自动强化学习的神经网络深度量化方法ReLeQ: An Automatic Reinforcement Learning Ap ...
- 腾讯优图&港科大提出一种基于深度学习的非光流 HDR 成像方法
目前最好的高动态范围(HDR)成像方法通常是先利用光流将输入图像对齐,随后再合成 HDR 图像.然而由于输入图像存在遮挡和较大运动,这种方法生成的图像仍然有很多缺陷.最近,腾讯优图和香港科技大学的研究 ...
- 【深度学习系列】迁移学习Transfer Learning
在前面的文章中,我们通常是拿到一个任务,譬如图像分类.识别等,搜集好数据后就开始直接用模型进行训练,但是现实情况中,由于设备的局限性.时间的紧迫性等导致我们无法从头开始训练,迭代一两百万次来收敛模型, ...
- OpenGL学习脚印:深度測试(depth testing)
写在前面 上一节我们使用AssImp载入了3d模型,效果已经令人激动了.可是绘制效率和场景真实感还存在不足,接下来我们还是要保持耐心,继续学习一些高级主题,等学完后面的高级主题,我们再次来改进我们载入 ...
- OpenCV 学习笔记 04 深度估计与分割——GrabCut算法与分水岭算法
1 使用普通摄像头进行深度估计 1.1 深度估计原理 这里会用到几何学中的极几何(Epipolar Geometry),它属于立体视觉(stereo vision)几何学,立体视觉是计算机视觉的一个分 ...
- (zhuan) 深度学习全网最全学习资料汇总之模型介绍篇
This blog from : http://weibo.com/ttarticle/p/show?id=2309351000224077630868614681&u=5070353058& ...
- 深度强化学习day01初探强化学习
深度强化学习 基本概念 强化学习 强化学习(Reinforcement Learning)是机器学习的一个重要的分支,主要用来解决连续决策的问题.强化学习可以在复杂的.不确定的环境中学习如何实现我们设 ...
- 小菜学习设计模式(三)—工厂方法(Factory Method)模式
前言 设计模式目录: 小菜学习设计模式(一)—模板方法(Template)模式 小菜学习设计模式(二)—单例(Singleton)模式 小菜学习设计模式(三)—工厂方法(Factory Method) ...
- VC++/MFC(VC6)开发技术精品学习资料下载汇总
工欲善其事,必先利其器,VC开发MFC Windows程序,Visual C++或Visual Studio是必须的,恩,这里都给你总结好了,拿去吧:VC/MFC开发必备Visual C++.Visu ...
随机推荐
- aws和ufile挂载数据盘EBS
aws的话挂载的ebs需要格式化,参考:https://docs.aws.amazon.com/zh_cn/AWSEC2/latest/UserGuide/ebs-using-volumes.html ...
- [c++] 幂法求特征向量
幂法的原理可参考此篇论文:http://d.wanfangdata.com.cn/Periodical/hnnydxxb2001Z1023 本文求解的是 3 阶矩阵最大特征值及其特征向量 下面是其 C ...
- 利用commons-pool2自定义对象池
一.为什么使用对象池 恰当地使用对象池化技术,可以有效地减少对象生成和初始化时的消耗,提高系统的运行效率.commons-pool2是Apache下一个开源的公共资源池.我们可以根据它来快速的建立 ...
- python 学习笔记三 (函数)
1.把函数视为对象 def factorial(n): '''return n!''' return 1 if n < 2 else n*factorial(n-1) print(factori ...
- RuntimeError: Model class user.models.User doesn't declare an explicit app_label and isn't in an application in INSTALLED_APPS.
Django 2.x版本迁移数据库报这个错误,user表使用的Django的验证系统 本来就想改一下用户表的表名,莫名的报了个这个错误,在网上找到了解决办法 打开user应用模块下的apps.py文件 ...
- (模拟)关于进制的瞎搞---You Are Given a Decimal String...(Educational Codeforces Round 70 (Rated for Div. 2))
题目链接:https://codeforc.es/contest/1202/problem/B 题意: 给你一串数,问你插入最少多少数可以使x-y型机器(每次+x或+y的机器,机器每次只取最低位--% ...
- table表格的无缝循环
<!DOCTYPE html> <html lang="en"> <head> <meta charset="UTF-8&quo ...
- Jmeter的操作流程
1.1 什么是 JMeter Apache JMeter 是 Apache 组织开发的基于 Java 的压力测试工具.用于对软件做压力测试,它最初被设计用于 Web 应用测试,但后来扩展到其他测试领域 ...
- python-day37(正式学习)
前景回顾 抢票系统的代码优化,使用了Lock类 from multiprocessing import Process,Lock import os,time,json with open('user ...
- 学习django: 庄园漫步
最近在阅读django的资料. 发现一个系列写得很好. <被解放的姜戈> 作者:Vamei 出处:http://www.cnblogs.com/vame 感谢大神指路呀~