eclipse创建springmvc项目
一、在eclipse中创建maven-archetype-webapp项目:
1.新建项目选择maven项目
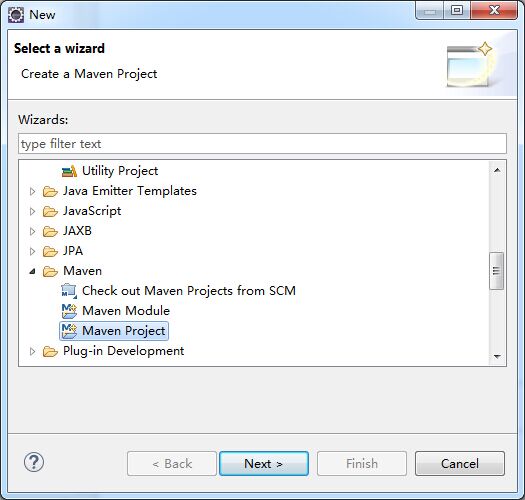
2.默认,下一步

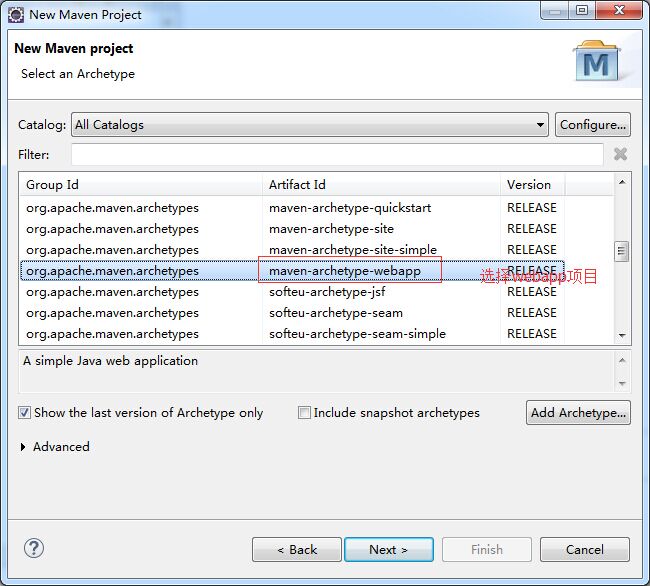
3.选择maven-archetype-webapp,其他保持默认即可
4.如下填写完成后,点击完成即可

5.创建完成后的maven项目结构如下

其中index.jsp报错,错误信息:Multiple annotations found at this line: - The superclass "javax.servlet.http.HttpServlet" was not found on the Java
意思是缺少servlet包,我们可以导入javax.servlet-api-3.1.0.jar包,我们可以用两种方式来处理:
1> 在pom.xml中的dependencies中加入依赖包
<dependency>

    <groupId>javax.servlet</groupId>

    <artifactId>javax.servlet-api</artifactId>

    <version>3.1.0</version>

</dependency>
2> 可以在build path中添加tomcat 库,如下
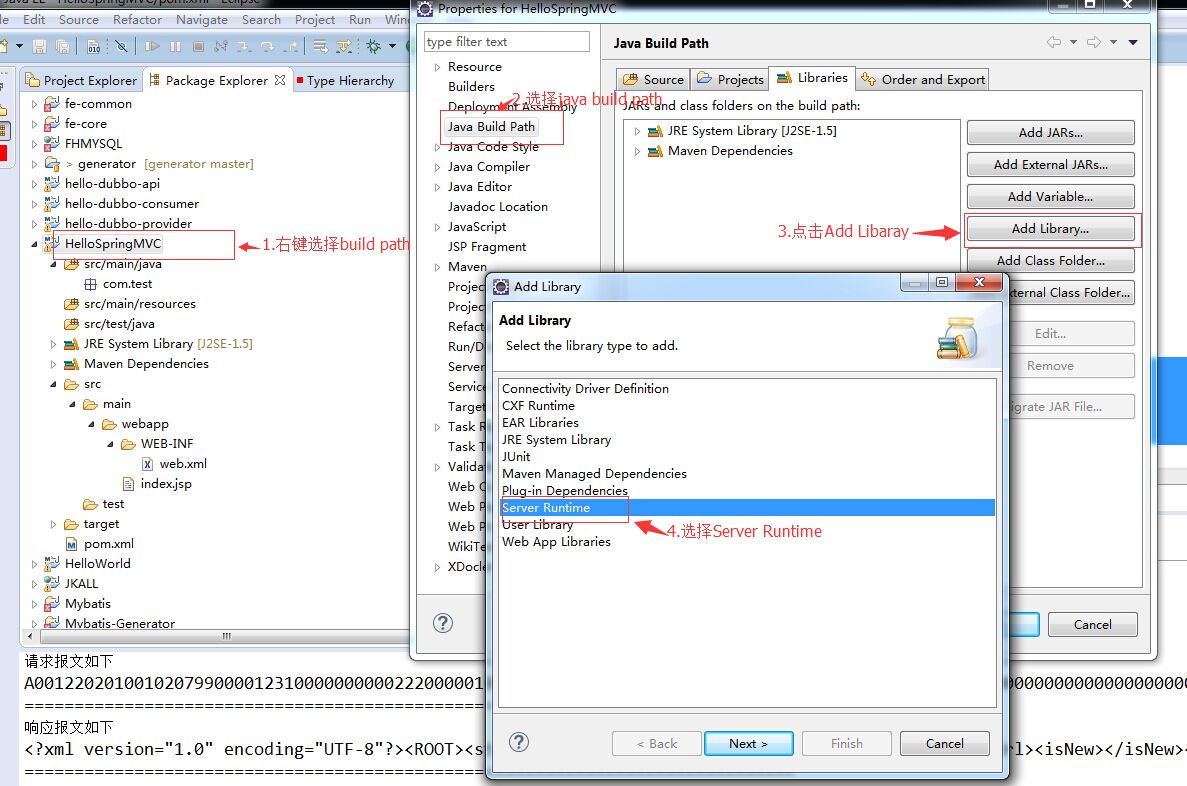
点击next出现下面界面,如下操作

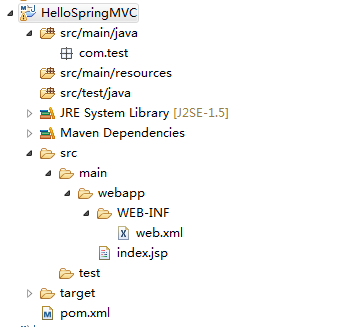
至此,一个正常的maven web项目已经建好,如下:
二、配置springMVC
1.在pom.xml中添加对spring的依赖
pom.xml

<project xmlns="http://maven.apache.org/POM/4.0.0" xmlns:xsi="http://www.w3.org/2001/XMLSchema-instance"

  xsi:schemaLocation="http://maven.apache.org/POM/4.0.0 http://maven.apache.org/maven-v4_0_0.xsd">

  <modelVersion>4.0.0</modelVersion>

  <groupId>com.test</groupId>

  <artifactId>HelloSpringMVC</artifactId>

  <packaging>war</packaging>

  <version>0.0.1-SNAPSHOT</version>

  <name>HelloSpringMVC Maven Webapp</name>

  <url>http://maven.apache.org</url>

  <properties>

      <spring.version>4.1.1.RELEASE</spring.version>

  </properties>

  <dependencies>

    <dependency>

      <groupId>junit</groupId>

      <artifactId>junit</artifactId>

      <version>3.8.1</version>

      <scope>test</scope>

    </dependency>

    <dependency>

        <groupId>org.springframework</groupId>

        <artifactId>spring-core</artifactId>

        <version>${spring.version}</version>

    </dependency>

    <dependency>

        <groupId>org.springframework</groupId>

        <artifactId>spring-web</artifactId>

        <version>${spring.version}</version>

    </dependency>

    <dependency>

        <groupId>org.springframework</groupId>

        <artifactId>spring-webmvc</artifactId>

        <version>${spring.version}</version>

    </dependency>

    <dependency>

        <groupId>javax.servlet</groupId>

        <artifactId>javax.servlet-api</artifactId>

        <version>3.1.0</version>

    </dependency>

  </dependencies>

  <build>

    <finalName>HelloSpringMVC</finalName>

  </build>

</project>
保存后会下载对应的jar文件
2.编辑web.xml文件
web.xml内容
<web-app version="3.0" xmlns="http://java.sun.com/xml/ns/javaee"

    xmlns:xsi="http://www.w3.org/2001/XMLSchema-instance"

    xsi:schemaLocation="http://java.sun.com/xml/ns/javaee

    http://java.sun.com/xml/ns/javaee/web-app_3_0.xsd">

  <display-name>Archetype Created Web Application</display-name>

  <servlet>

      <servlet-name>dispatcher</servlet-name>

      <servlet-class>org.springframework.web.servlet.DispatcherServlet</servlet-class>

          <init-param>

             <param-name>contextConfigLocation</param-name>

          <param-value>classpath:springContext.xml</param-value>

      </init-param>

      <load-on-startup>1</load-on-startup>

  </servlet>

  <servlet-mapping>

      <servlet-name>dispatcher</servlet-name>

      <url-pattern>/</url-pattern>

  </servlet-mapping>

  <context-param>

      <param-name>contextConfigLocation</param-name>

      <param-value>classpath:springContext.xml</param-value>

  </context-param>

  <listener>

      <listener-class>org.springframework.web.context.ContextLoaderListener</listener-class>

  </listener>

</web-app>
3.创建springContext.xml文件,在src/main/resources包中创建springContext.xml文件,如图:

springContxt.xml内容
<?xml version="1.0" encoding="UTF-8"?>

<beans xmlns="http://www.springframework.org/schema/beans"

    xmlns:context="http://www.springframework.org/schema/context"

    xmlns:xsi="http://www.w3.org/2001/XMLSchema-instance"

    xsi:schemaLocation="

http://www.springframework.org/schema/beans

http://www.springframework.org/schema/beans/spring-beans-3.0.xsd

http://www.springframework.org/schema/context

http://www.springframework.org/schema/context/spring-context-3.0.xsd">

    <!-- 搜索spring控件 -->

    <context:component-scan base-package="com.test"></context:component-scan>

    <!-- 视图页面配置 -->

    <bean class="org.springframework.web.servlet.view.InternalResourceViewResolver">

        <property name="prefix">

            <value>/WEB-INF/views/</value>

        </property>

        <property name="suffix">

            <value>.jsp</value>

        </property>

    </bean>

</beans>
在springContext.xml中,base-package是指定spring控制器控件的包,前缀指定的是视图目录,被设置为/WEB-INF/views,即视图目录被放到WEB-INF下。后缀指定的是视图的扩展名。例如,"hellospring"视图,将被放到/WEB-INF/views/hellospring.jsp。
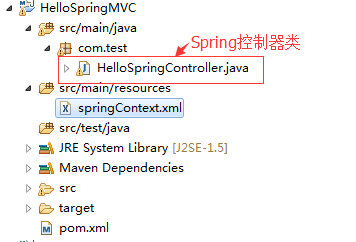
4. 创建Spring控制器和视图
创建HelloSpringController.java类,在src/main/java包中,如下图:
HelloSpringController.java
package com.test;

import org.springframework.stereotype.Controller;

import org.springframework.web.bind.annotation.RequestMapping;

import org.springframework.web.bind.annotation.RequestParam;

import org.springframework.web.servlet.ModelAndView;

@Controller

public class HelloSpringController {

    String message = "Welcome to Spring MVC!";

    @RequestMapping("/hello")

    public ModelAndView showMessage(@RequestParam(value = "name", required = false, defaultValue = "Spring") String name) {

        ModelAndView mv = new ModelAndView("hellospring");//指定视图
     //向视图中添加所要展示或使用的内容,将在页面中使用

        mv.addObject("message", message);

        mv.addObject("name", name);

        return mv;

    }

}
在上面的代码中,@Controller注解为Spring标注前置控制器的方式,@RequestMapping注解映射web请求到具体要操作的类或者方法上面,@RequestMapping注解既可以用到类上,也可以用到方法上,在此不再详述,如有疑问,可以百度。@RequestParam注解为请求指定参数。这种方式提供了一个一致 的编程风格。
另外上述代码中ModelAndView类指定具体的视图,这里是"hellospring",由于我们在springContext.xml配置了视图的前后缀,所以在这里只需要写出视图的具体名称即可,其具体指定的就是:前缀+视图名称+后缀,即完整的视图路径/WEB-INF/views/hellospring.jsp,也就是所要展示的视图的位置。
项目首页index.jsp内容
<%@ page language="java" contentType="text/html; charset=UTF-8"

pageEncoding="UTF-8"%>

<!DOCTYPE html PUBLIC "-//W3C//DTD HTML 4.01 Transitional//EN" "http://www.w3.org/TR/html4/loose.dtd">

<html>

<head>

<meta http-equiv="Content-Type" content="text/html; charset=UTF-8">

<title>Spring 4 MVC - HelloWorld Index Page</title>

</head>

<body>

    <center>

        <h2>Hello World</h2>

        <h3>

            <a href="hello?name=zhangsan">点击跳转</a>

        </h3>

    </center>

</body>

</html>
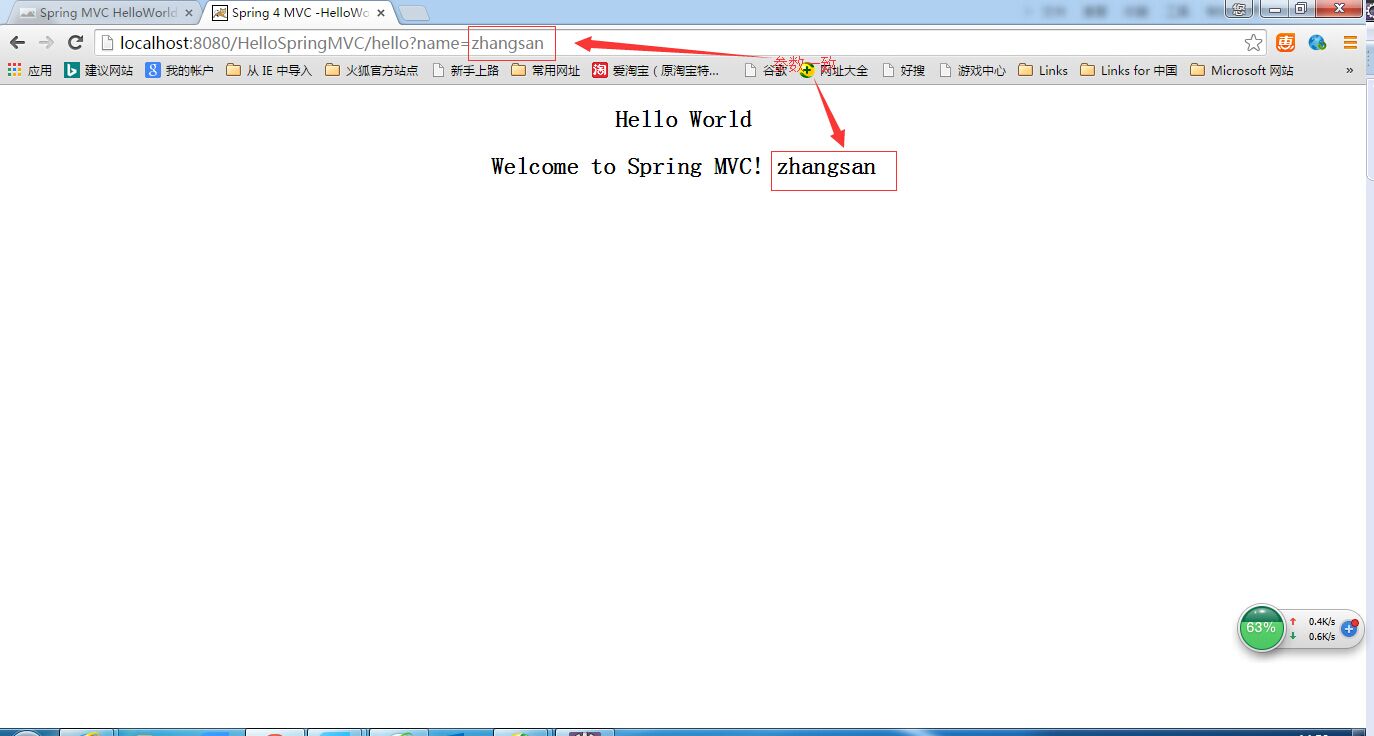
上述代码中,点击跳转 的链接其实就是我们HelloSpringController.java中定义的控制器的一个@RequestMapping注解方法,name=zhangsan为showMessage接受的参数。
在/WEB-INF/views/下创建hellospring.jsp视图,如图:

hellospring.jsp
<%@ page language="java" contentType="text/html; charset=UTF-8" pageEncoding="UTF-8"%>

<!DOCTYPE html PUBLIC "-//W3C//DTD HTML 4.01 Transitional//EN" "http://www.w3.org/TR/html4/loose.dtd">

<html>

<head>

<meta http-equiv="Content-Type" content="text/html; charset=UTF-8">

<title>Spring 4 MVC -HelloWorld</title>

</head>

<body>

    <center>

        <h2>Hello World</h2>

        <h2>

            ${message} ${name}     </h2>

    </center>

</body>

</html>
上述代码中显示我们在HelloSpringController.java的showMessage方法中添加的两个参数message和name,如图:
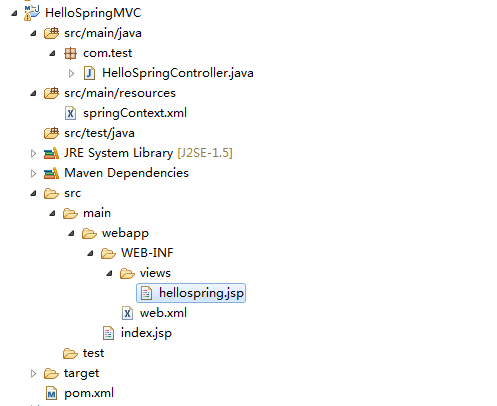
好,至此我们使用maven搭建springMVC的操作已经全部完成,完成后整个项目的结构如下图:
三、将项目部署到tomcat服务器运行
首页 http://localhost:8080/HelloSpringMVC/ ,其中也可以使用 http://localhost:8080/HelloSpringMVC/index.jsp 两个效果是一样的

点击跳转 页
注意:若是跳转后页面直接显示${message} ${name}说明jstl表达式不起作用,我们可以在pom.xml中添加如下依赖:
     <dependency>

           <groupId>javax.servlet</groupId>

            <artifactId>jstl</artifactId>

            <version>1.2</version>

            <scope>runtime</scope>

        </dependency>

        <dependency>

            <groupId>taglibs</groupId>

            <artifactId>standard</artifactId>

            <version>1.1.2</version>

        </dependency>
eclipse创建springmvc项目的更多相关文章
- eclipse 创建maven 项目 动态web工程完整示例 maven 整合springmvc整合mybatis
接上一篇: eclipse 创建maven 项目 动态web工程完整示例 eclipse maven工程自动添加依赖设置 maven工程可以在线搜索依赖的jar包,还是非常方便的 但是有的时候可能还需 ...
- springmvc学习笔记---idea创建springmvc项目
前言: 真的是很久没搞java的web服务开发了, 最近一次搞还是读研的时候, 想来感慨万千. 英雄没落, Eclipse的盟主地位隐隐然有被IntelliJ IDEA超越的趋势. Spring从2. ...
- 【SpringMVC】使用Myeclipse创建SpringMVC项目【超详细教程】
之前一直是使用Eclipse创建Web项目,用IDEA和MyEclipse的创建SpringMVC项目的时候时不时会遇到一些问题,这里把这个过程记录一下,希望能帮助到那些有需要的朋友.我是用的是MyE ...
- eclipse 创建maven 项目 动态web工程完整示例
需求表均同springmvc案例 此处只是使用maven 注意,以下所有需要建立在你的eclipse等已经集成配置好了maven了,说白了就是新建项目的时候已经可以找到maven了 没有的话需要安装m ...
- (八)Eclipse创建Maven项目运行mvn命令
1.Eclipse创建Maven项目 使用Eclipse创建一个Maven项目非常的简单,选择菜单项File>New>Other(也可以在项目结构空白处右击鼠标键),在弹出的对话框中选择M ...
- eclipse 创建maven 项目 动态web工程报错
Eclipse 创建maven 项目 动态web工程 注:Eclipse版本为(Version: Mars.1 Release (4.5.1))maven版本为(apache-maven-3.3.9) ...
- Eclipse 创建 Maven 项目、Maven JavaWeb 项目
Eclipse 创建 Maven 项目 新建一个maven项目 (默认)(如果不行第一个Create a simple ... 也选中) 默认 Jav ...
- eclipse 创建springboot项目
eclipse创建springboot项目的三种方法: 引自:https://blog.csdn.net/mousede/article/details/81285693
- Android开发中遇到的问题(三)——eclipse创建android项目无法正常预览布局文件
一.问题描述 今天使用SDK Manager将Android SDK的版本更新到了Android 5.1的版本,eclipse创建android项目时,预览activity_main.xml文件时提示 ...
随机推荐
- no newline at the end of file
[no newline at the end of file] 修复这个警告,在文件结尾回车一下就行了. 这么规定的初衷是,为了每一行都要以换行结束. 因为行尾的/表示连接下一行,如果一个文件最后一 ...
- SpringMVC总结二:Controller的请求映射方式(RequestMapping)简单介绍
在SpringMVC总结一:快速入门的基础上简单介绍一下请求映射的方式: 1,标准映射规则 1. @RequestMapping可以设置在类上,也可以设置在方法上 2. 请求的映射规则是:类上的Req ...
- linux常用命令大全(转)好东西要分享
1.ls命令 就是list的缩写,通过ls 命令不仅可以查看linux文件夹包含的文件,而且可以查看文件权限(包括目录.文件夹.文件权限)查看目录信息等等 常用参数搭配: ls -a 列出目录所有文 ...
- Oracle设置主键自增长
第一步:为表设置主键 第二步:新建序列 CREATE SEQUENCE SQ.SEQ_INCREASE START WITH 12 MAXVALUE 999 MINVALUE 0 INCREME ...
- memcache 加载(对象)所遇到的问题。资源
<?php $mem =new memcache(); if($mem->connect('127.0.0.1','11211')){ echo '连接OK'.'<br>'; ...
- CF547D Mike and Fish
欧拉回路,巧妙的解法. 发现每一个点$(x, y)$实际上是把横坐标和$x$和纵坐标$y$连一条线,然后代进去跑欧拉回路,这样里一条边对应了一个点,我们只要按照欧拉回路间隔染色即可. 注意到原图可能并 ...
- laravel的orm增删改查
增: //通过模型新增 //使用模型的create方法新增数据 删: //通过模型删除 //通过主键删除 改: //通过模型更新数据库 //结合查询语句批量更新 查:
- HTML中meta标签的作用与使用
META标签用来描述一个HTML网页文档的属性 META标签可分为两大部分:HTTP-EQUIV和NAME变量. HTTP实例 HTML代码实例中有一项内容是 <meta http-equiv= ...
- [存储过程]中的事务(rollback)回滚
在编写SQL Server 事务相关的存储过程代码时,经常看到下面这样的写法: begin tran update statement 1 ... update statement 2 ... del ...
- CentOS6.5 Eclipse C++ 版本 OpenCV
最近在搞Linux上用Eclipse(C++版本)开发 OpenCV,配环境配的那真是配到天昏地暗,不知所措,好在配成功了,期间参考了大量的帖子,所以,特立此贴,希望能给后来人一些小建议! 1.Cen ...